My Cam Research for the Experts Eye

Electric fans are all done. I ran the engine again today and had the following observations .....

I don't want to jinx it, but even taking into account the engine is in a non-load situation (no transmission), it runs perfectly. I've tweaked it a bit more and it's sensitive to carb/ignition changes as it should be. The initial slightly louder lifter noise is virtually gone. No smoke at all. Throttle response is very snappy and it just sounds great.

Oil pressure at idle.
20230830_110947_HDR.jpg

No issues with electrical, wiring, etc. Alternator is fully charging the battery at over 14v. New PMGR starter with 1/0 cable cranks the engine over great.

Cooling - the electric fans function well, no electrical or overload glitches. Lots of airflow (puller fans). Each fan is on its own circuit for redundancy. Battery power is run thru a circuit breaker to relay term 30, fan load to relay term 87, fused ignition power to relay term 86, ground from manifold water temp sensor to relay term 85. I used ignition feed to the relay so that the fans would not run with the engine off. The water temp sensor is set for 210d/on, 180d/off - when the temp sensor sees 210d, it closes to ground and activates the relay (fan).

This is the battery power fuse/relay block I put together (passenger side). There's an ignition power unit on the driver side. Those are the relays for each fan circuit. Disregard the red wires at the bottom - just temporary power I'm pulling.
20230830_115050_HDR.jpg

Fan wiring harness routes from the fans through the firewall panel and attaches directly to the relay terminal block. I do this for higher draw circuits just to minimize connectors. Other stuff plugs into that panel. Have I mentioned that I love using nutserts lol - they make it so easy to attach loom clamps, the fuel system stuff, etc.
20230830_114714_HDR.jpg

Fan wire loom goes right through the panel, other engine wiring is simply plugged in. The other exception is the HEI power feed that goes all the way to the ignition switch, no intermediate connector. Just want to ensure the HEI is getting a full 12v, using 12ga wire.
20230830_114957_HDR.jpg

Now, here's what else I observed. I had commented earlier that the engine always seemed to run on the hot side before the rebuild - really had to be careful in hot weather or traffic. Initial startup and running had a house fan on a chair, which really wasn't optimum, water temp still crept up due to not great airflow.

So today, with the electric fans installed, water temp remained in control, which was great. But here's an anomaly that I need to check out.
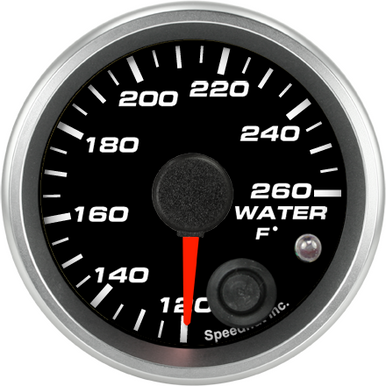
Note the gauge reading below - that reading of 195-200ish is where the electric fans cut off. According to the water temp sensor for the fans, this would be about 180, but as you can see there's about a 15 degree discrepancy between the water temp (fan) sensor and the gauge sensor. Both are in the same general location on the intake - one on each side of the thermostat housing.

20230830_112329_HDR.jpg

I need to verify which sensor is telling the truth. Using a laser temp gun it appears that the temp gauge is reading high, as the fitting boss on the intake reads about 185. I think that over the years I replaced the gauge sender, so there may be a slight mis-match between sender and gauge. I think I may have kept the old (maybe original sender) so if I did, I'll install that. Or I may just get another gauge. As you can see both the oil pressure and the water temp gauges are SunTune which I don't think are even made anymore. They are probably at least 20 years old, so new gauges may be reasonable. My gut feeling is that the engine coolant temperature isn't out of line and I just need to iron out these details.
 
thank you!
I really do appreciate the info and pictures of the project a great deal
I wish I was 1/2 as skilled at posting photos
 
thank you!
I really do appreciate the info and pictures of the project a great deal
I wish I was 1/2 as skilled at posting photos
Thanks!
Any recommendations on reasonably priced analog electric gauges? Black face/white lettering.
 
I really wish I could recommend specific gauges, the issue is simply the vendors change the part numbers , quality, accuracy,size and connection types and the gage manufacturers and specifications almost every few months.
if you've ever tried to replace the gages you installed in your car from 10-15 years back with the identical product I'm sure your aware that even if you bought the exact same brand and part number its a total crap shoot if you get a direct replacement gage

AUTOMETER and speedway are better known brands


Thanks, yes I see gauge cost all over the place. I was leaning towards the autometer as they seem to be consistent quality. The other factor is that I'll be installing oil and water gauges into the 57 dash cluster that's right over the steering wheel. They will go where the factory had originally put water and fuel gauges.

In my case I want updated oil and water gauges right in front of me, and I'll be installing fuel and volt gauges in a different location. Because that cluster isn't easy to pop in and out, I want gauges that are decent qualify and dependable.

A note - engine start and run has been a big milestone in this build. Going forward, I'll probably stick to other mini-milestones, like showing the gauge cluster when done, trans rebuild/install, driveshaft done, first drive, questions, etc.
I'm also about to get some procedures done on my lower back next week so we can take our fall RV trip for a few weeks. You won't see regular progress info, but I won't be dropping out here either. Still a lot to do, but a break coming up.
 
again, thanks for the constant updates and pictures
 
again, thanks for the constant updates and pictures
Absolutely! We sort of built this engine together - greatly appreciate the tech advice/info/data in the process.

I forgot to mention something related to fan circuits, might be of help to someone setting up electric fans.

What I posted above:

Cooling - the electric fans function well, no electrical or overload glitches. Lots of airflow (puller fans). Each fan is on its own circuit for redundancy. Battery power is run thru a circuit breaker to relay term 30, fan load to relay term 87, fused ignition power to relay term 86, ground from manifold water temp sensor to relay term 85. I used ignition feed to the relay so that the fans would not run with the engine off. The water temp sensor is set for 210d/on, 180d/off - when the temp sensor sees 210d, it closes to ground and activates the relay (fan).

Looking at the harness pic below, I also wanted to mention the red wires. There are 2 of them, one for each fan. They are soldered to the fan load wires at relay terminal 87.

They are 16ga and will each attach to a small LED light in the future console. Their purpose are as indicator lights for Fan On. An easy way to know when and if each fan is turning on or off. Of course a fan motor could die but this way I can tell if both or just one fan has activated. If it's just one light it's telling me something isn't right without having to get out and raise the hood.
20230829_101454_HDR.jpg
 
Last edited:
In my case I want updated oil and water gauges right in front of me, and I'll be installing fuel and volt gauges in a different location. Because that cluster isn't easy to pop in and out, I want gauges that are decent qualify and dependable.

Speedhut gauges are made in Utah and can be configured to your exact liking. I'm using them in my TBucket for speed and rpm.
They are having a Labor Day Sale with 15% off, September 1st thru 8th.

Below is a sample of the things you can pick to get the look you want.


1693597964809.png
 
I decided to go with Autometer Designer Black gauges. Speedhut is super quality but I went with a more moderate cost.

Finished making my transmission holding fixture. Its all heavy wall tubing and weighs a ton lol.

20230905_173834_HDR.jpg

The only other thing I'll do before we head out next week is run the engine and drain break-oil/filter. I'll put in fresh oil/filter, run it again and then it's going to sit till we're back. I'll look at the drained oil for any glitter etc and will keep the oil filter to check the media later.
 
that custom made transmission holding bracket looks great
I hope you did not modify the original engine stand tool head,
so that it can't be used for engine work
mods like this are once again just one more of an endless list of reasons ,
anyone serious about this hobby can use a decent ,
MIG or TIG welder

51-jn0Pw6GL._AC_SL1500_.jpg


71oST+j5iuL._AC_SL1500_.jpg


Last edited:
that custom made transmission holding bracket looks great
I hope you did not modify the original engine stand tool head,
so that it can't be used for engine work
mods like this are once again just one more of an endless list of reasons ,
anyone serious about this hobby can use a decent ,
MIG or TIG, etc

No engine stand mod needed, just unbolt the swing arms and bolt this to the rotating plate. I have MIG/gas but used my Lincoln stick welder with 6013 rods. My usual welds aren't perfect coins but they are structurally sound.
Even if I just use it once, it makes working on and rotating the transmission so much easier, safer too.
Just like an engine, this will attach to the trans, bolt the rotating head plate to it, then hoist the whole thing into the stand.
 
could you post the measurements/ materials and info used on the custom made, trans hold bracket so others could fabricate a duplicate?
 
could you post the measurements/ materials and info used on the custom made, trans hold bracket so others could fabricate a duplicate?
Absolutely! Here you go...
20230906_204423_HDR.jpg
20230906_204520_HDR.jpg
I didn't tack weld the nuts to each side of the tubing, but I suppose you could. The 2.5in distance from tube to plate could also be increased - I kept it as short as possible since the weight is hanging out there. But reality is the transmission isn't really that heavy. This is overbuilt because that's what I had on hand.

I ran the engine again today, fans functioning and temperature in control. The temp gauge seems to read slightly high as compared to a laser temp gun reading top and bottom radiator hoses. Ambient air temp was 101 and the car didn't overheat sitting in the garage. That was with a high velocity fan blowing on the radiator and the 2 electric fans working (210 on/180 off). This was with the Suntune temp gauge that's been in the car. I'll repeat later with new Autometer gauge. Based on my interpretation of laser temp readings and temp gauge readings along with fan cycle settings I think that the average engine temp was 190 in this environment.

I then changed oil/filter. This was first oil change - about 2 hours run time - so seeing some assembly lube swirl and mild discoloration wasn't unexpected. I know it's not a great picture but there was zero glitter in the oil, no fuel smell either. Looked completely normal to me. I saved a sample and the filter - when we're back home I'll cut it open to inspect the media. I replaced with same oil (VR1 10w-30) and Wix filter.
20230906_142559_HDR.jpg
20230906_142604_HDR.jpg
 
thank you! I'm sure some of us will use this info on their projects

and yes
inspecting your oil filter at each oil change is a very good idea
Proper magnets trap metallic debris
SmCo Samarium Cobalt Disc Magnets
http://www.magnet4less.com/
enginemagn.jpg

233.jpg


Ive generally used hardware stainless screen epoxied over oil drain holes, and ceramic magnets to limit broken valve train debris reaching the lower crank case
Samarium Cobalt MAGNETS HELP
http://www.magnet4sale.com/smco-disk-magnet-dia-1x1-4-samarium-cobalt-magnets-608-f-temperature/
magnets are ceramic and glass hard, don,t try to drill or grind them, as they can shatter
fillcut5.jpg

fillcut4.jpg

fillcut1.jpg

filtercutter2.jpg

fillcut2.jpg
 
Last edited:
With a pull force of 33 lbs, not much ferrous metal is going to get by this thing. A lot more oil is going to circulate
much closer to this magnet then the drain plug with that itty-bitty magnet.

I have this magnet on three cars and none of them have come off.

K&J Magnetics: RX864
$11.88

1694097079689.jpeg
1694097233121.png 1694097250186.png
.
 
RICK,your totally correct that adding a large magnet to the base of the oil filter helps a great deal in collecting fine metallic crap,
like the finer ,worn cam lobe , lifter debris, and dust from the ring bore seating process from continuing to circulate in the engine,
trapping it in the filter with the added security of the large magnet makes a great deal of sense


yet, the use of the high heat resistance magnets, is a very useful added precaution, thus,
I also try to prevent larger debris from ever reaching the oil pump,where it can severely damage the oil pump
or the potential resulting trash from being pumped into the oil passages,
keep in mind the oil pump and filter will in some cases BYPASS the filter if its clogged with crap.
I place several of these Samarium Cobalt Disc Magnets in the engine, generally one each in the rear drain area of both heads
a couple in the lifter gallery near each drain hole, especially near the rear distributor area,
and 4 in the corners of the oil pan sump, and use of shrapnel screens is also useful.
you'll be rather amazed at the collected metallic crap the combo of shrapnel screens and magnets collect,
and prevent from reaching the oil pump. especially if you
lose a valve keeper or break a valve spring or push rod, etc.
yeah that stuff does
occasionally happen :facepalm:
011.jpg

these are placed there in the engine to prevent bits of broken/worn lifters, valve springs, push rods

ever entering the oil pump or collecting around the oil pump pick-up
sbcoilh5a.jpg

Proper magnets trap metallic debris
SmCo Samarium Cobalt Disc Magnets
http://www.magnet4less.com/
enginemagn.jpg


Samarium Cobalt MAGNETS HELP
http://www.magnet4sale.com/smco-disk-magnet-dia-1x1-4-samarium-cobalt-magnets-608-f-temperature/

related links with good related info you should find rather helpful


Last edited:
Rick that's perfect. I'll be doing that on our vehicles.
Of course, dummy here didn't do that on this first engine start, but sure won't hurt to have it going forward.
 
Rick that's perfect. I'll be doing that on our vehicles.
Of course, dummy here didn't do that on this first engine start, but sure won't hurt to have it going forward.
I found that particular magnet to be a good compromise between cost and magnetic strength. But if you want, there are stronger magnets. Since most filters are NOT flat on the bottom, I would hesitate to go bigger than 1-1/2" for the OD.

.
One could go with maybe 6-8 small (5/16"-3/8" OD) disk magnet on the side of the filter as another option. They run around $1 - $1.50 each.

 
Last edited:
Back
Top