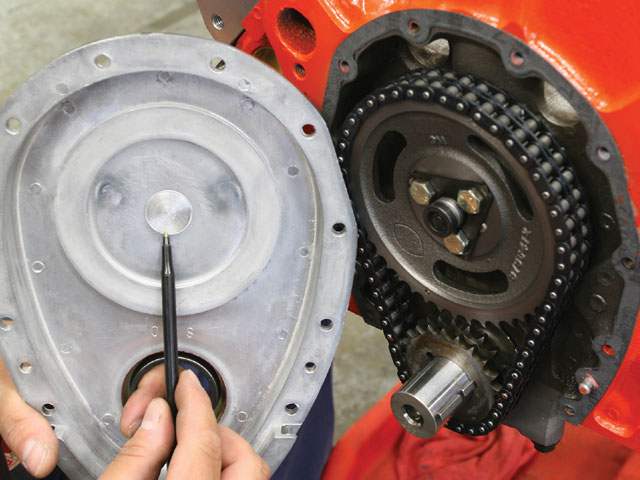
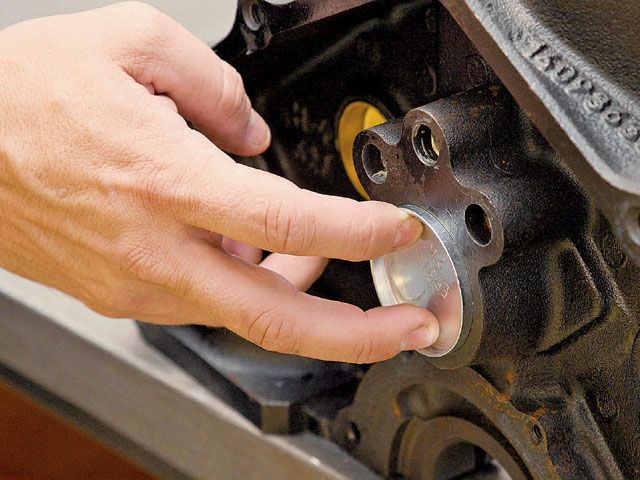
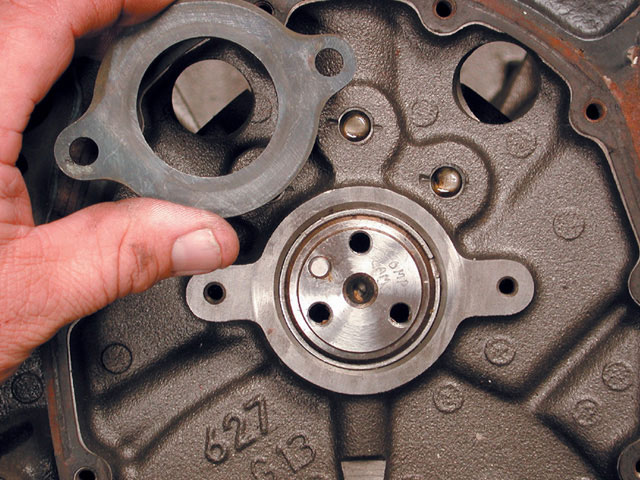
cam buttons are used to help maintain , and stabilize the cams location in the block,too maintain its forward and back ward movement to a minimum.
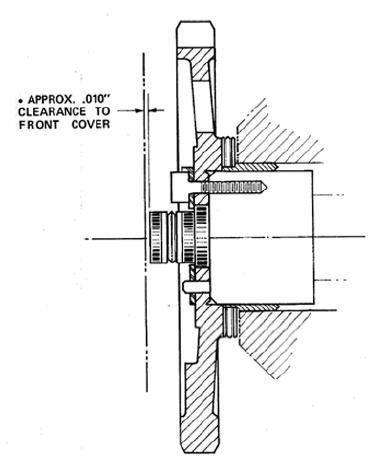
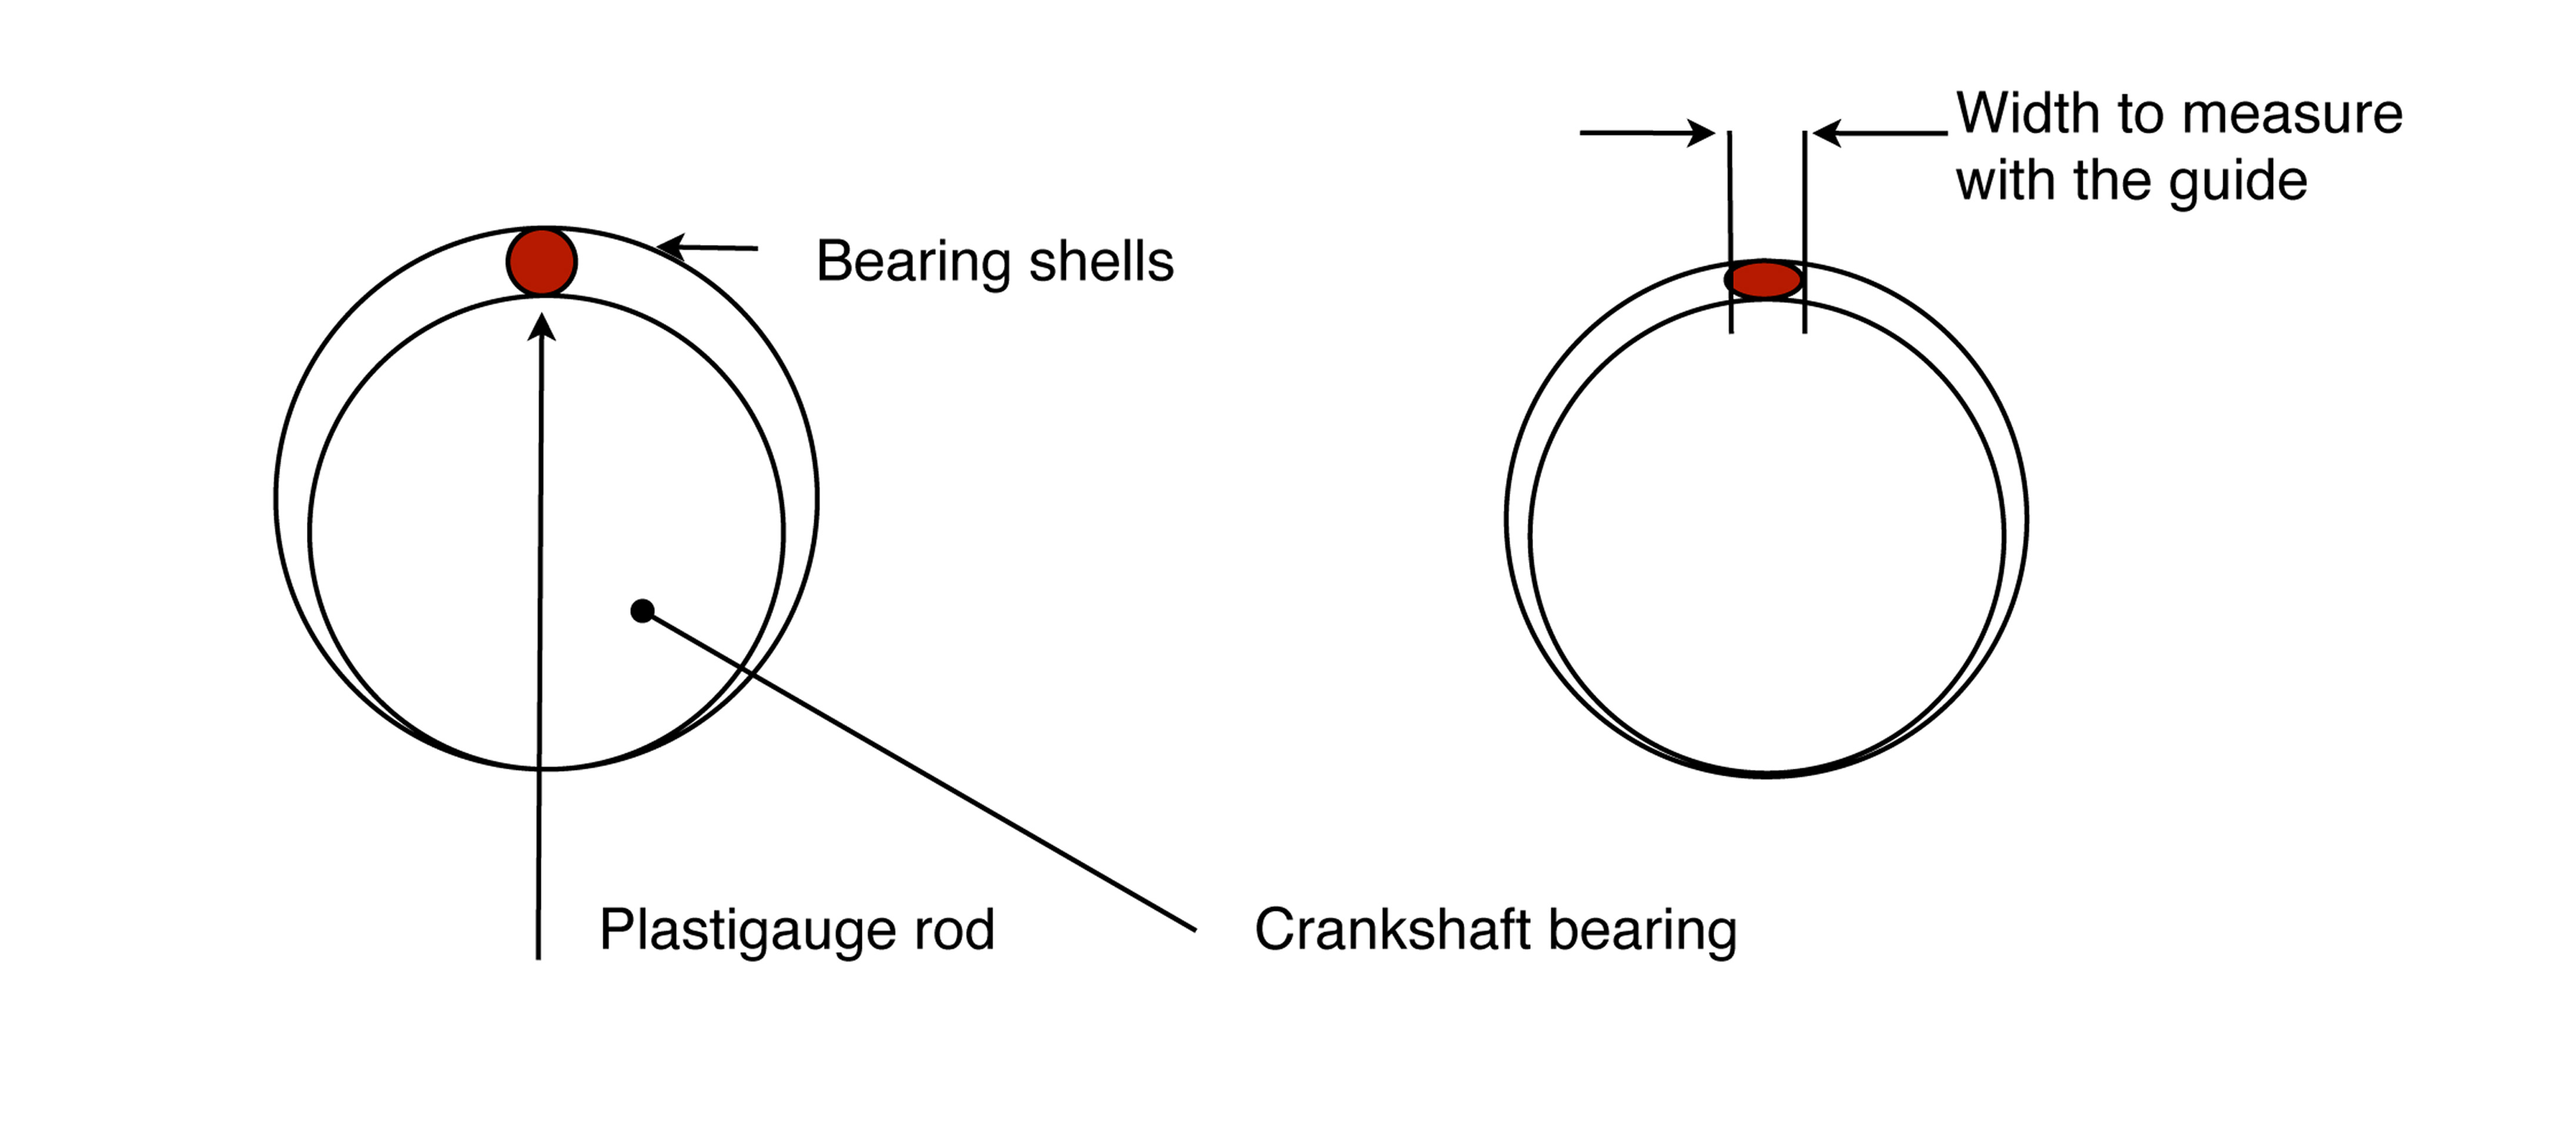
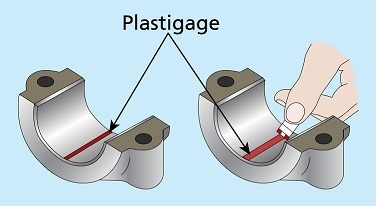
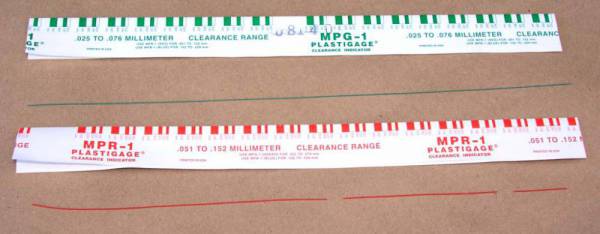
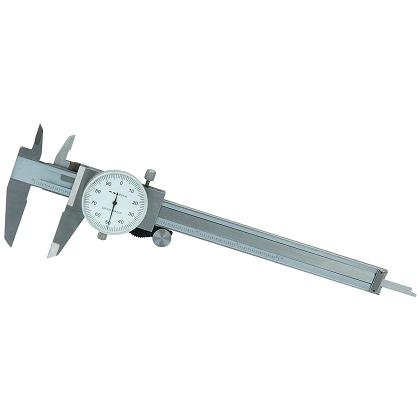
the cam button should not be binding or compressed against the front timing chain cover , when the cams installed, there should be about .010 clearance between the cam button and the front cover as installed. this can easily be measured with plasti-gauge.
step one
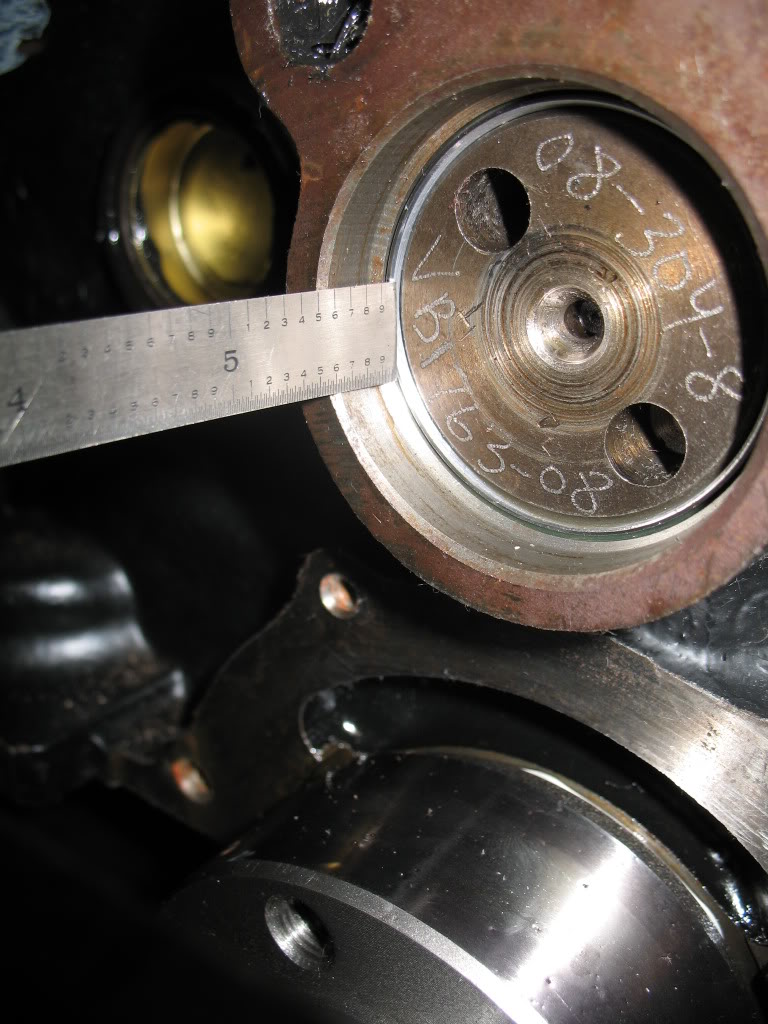
measure end clearance, with the cam and timing cover installed ...accurately, in most cases no trimming will be required,
if any trimming is required a figure 8 rocking motion over a sheet of 400 grit sand paper,on a hard flat surface, on the button nose, will slowly reduce the nylon button length


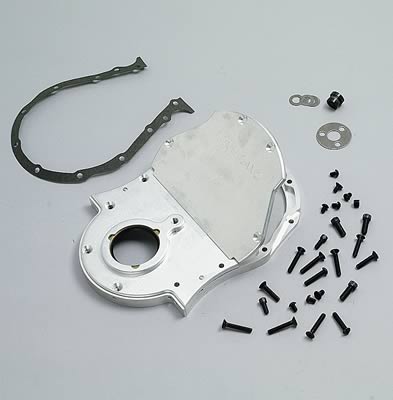
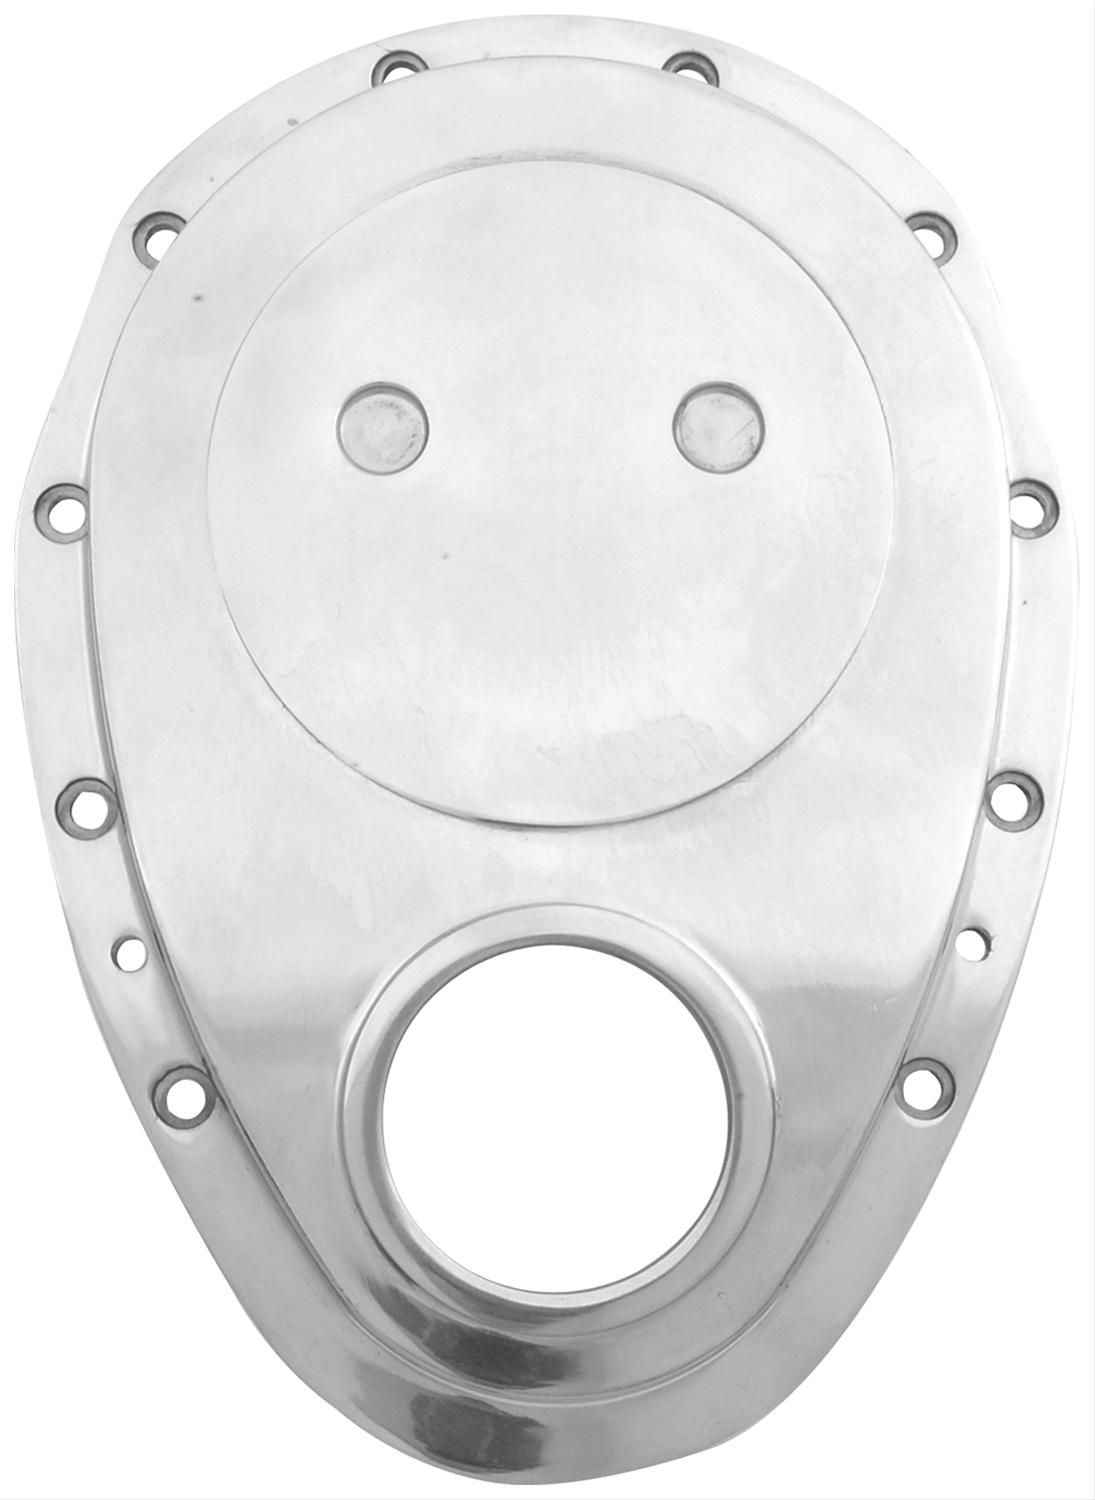
some cam timing covers are much better quality

 www.summitracing.com
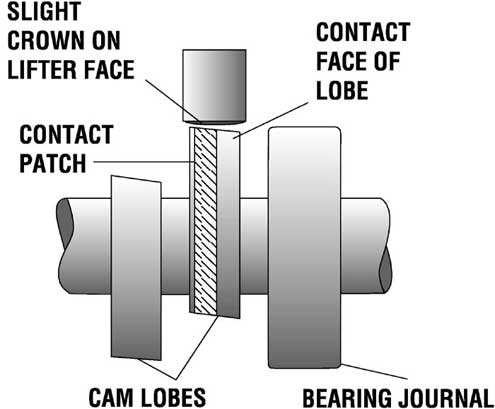
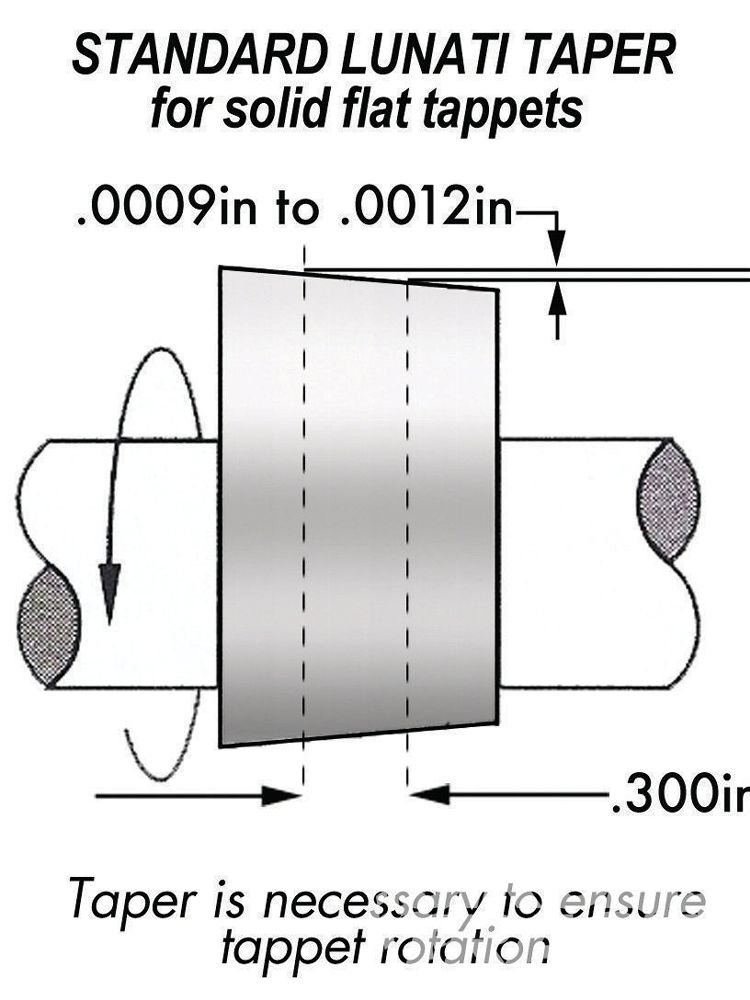
flat tappet cams lobes have a bevel ground on them,and the lifter bore center-line is slightly off-set insuring a consistent rearward pressure on the cam, but roller cam lobes do not have that beveled surface so a button or retainer plates required, and the button is not a bad idea even on a flat tappet cam, engine as it tends to add some stability.
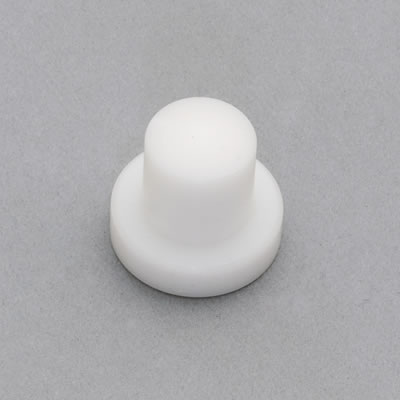
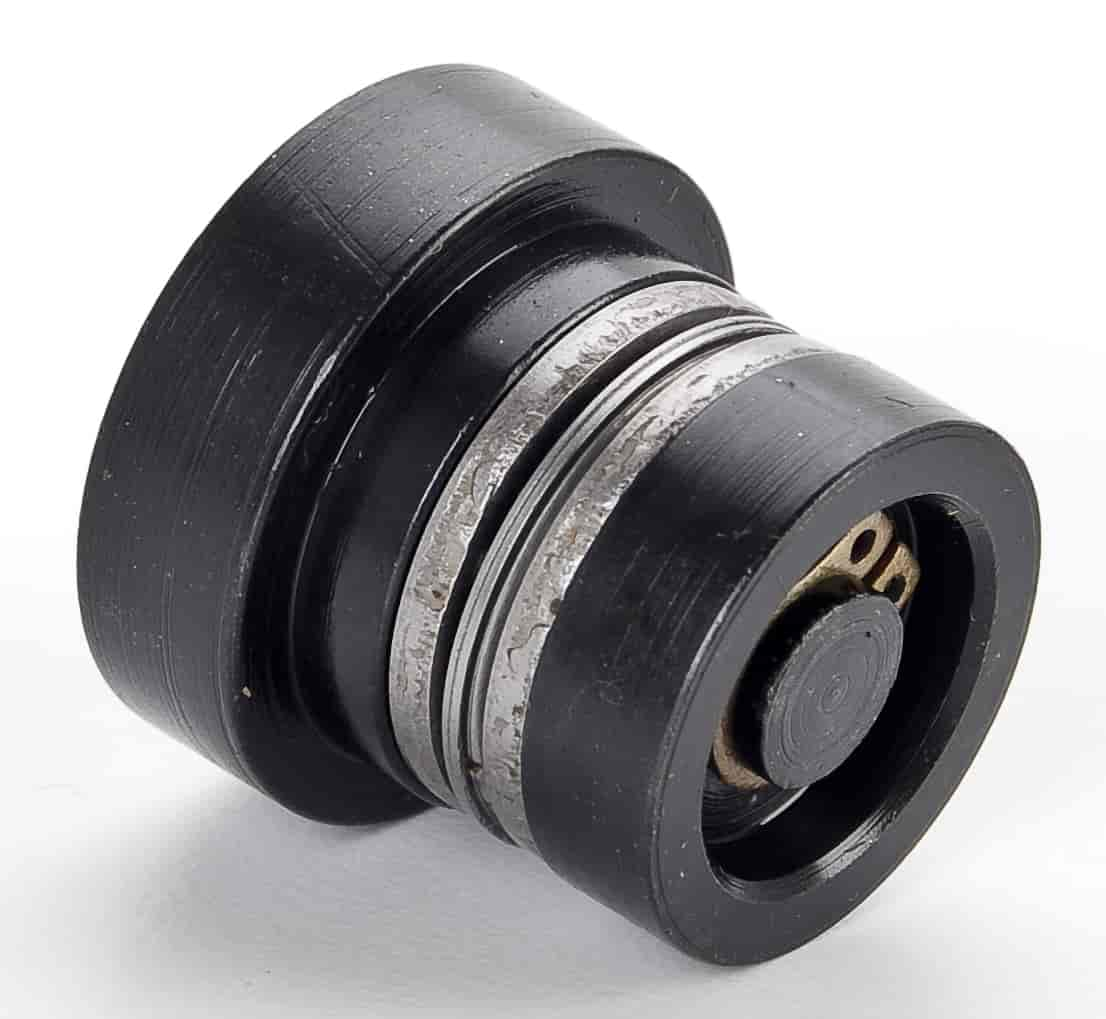
the buttons come in aluminum, nylon and roller bearing designs Ive always preferred the nylon ones as the easiest to work with,less likely to leave tiny roller bearings in the oil pan and the fastest to clearance correctly, now in theory a flat tappet cam does not need one because the slight tapper on the cam lobes, that's used to insure the lifters spin in their bores, plus the slight offset of the lifter bores tends to force the cam to the rear of the block, but in the real world having a cam button installed tends to help stabilize the cam during hard shifts when the loads rapidly change. flat tappet cams don,t require cam button use but installing one does tend to eliminate one potential source of timing variations, once the timing chain develops some slack.
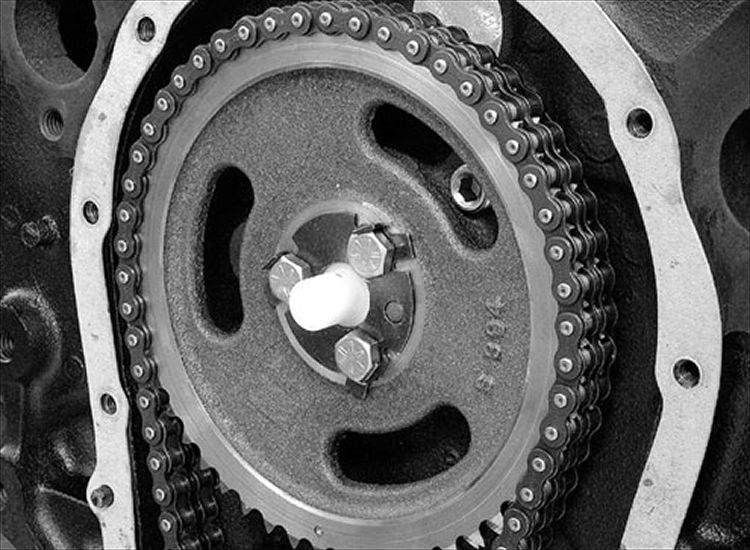
a properly installed nylon cam button with a bolt retainer plates a good idea
properly installed they cause zero problems, in fact Ive used a nylon cam button even on non-roller cam applications for many decades.
a thrust washer to protect the block surface is a good idea IF THE CAM GEAR is designed to use one AND if you have the .007-.005 clearance between the nylon cam button and the timing cover
remember flat tappet cam lobes have a micro angle that tends to force the cam to the rear as it runs so theres very little chance for the cam to move forward in the block like with a roller cam, but the button does tend to eliminate and chance of that so its a good safety measure, even if its not needed most of the time.remember the rear cam journal is covered on the rear block with a freeze plug and oil pressure tends to make the cam stay a few thousands forward as theres a pressurized disc of oil flow behind the cam
READ THIS
viewtopic.php?f=52&t=3777&p=10011&hilit=nylon+button#p10011

READ THIS
viewtopic.php?f=52&t=3777&p=10011&hilit=nylon+button#p10011
reading through the threads should help
http://garage.grumpysperformance.co...to-last-cam-install-info.90/page-2#post-89047
http://garage.grumpysperformance.com/index.php?threads/cam-degree-equipment-tools.1759/#post-4440
http://garage.grumpysperformance.com/index.php?threads/timing-tabs-and-indicators.1015/#post-39845
http://garage.grumpysperformance.com/index.php?threads/valve-train-clearances-and-problems.528/
http://garage.grumpysperformance.co...e-springs-and-setting-up-the-valve-train.181/
Last edited: 2 minutes ago
read
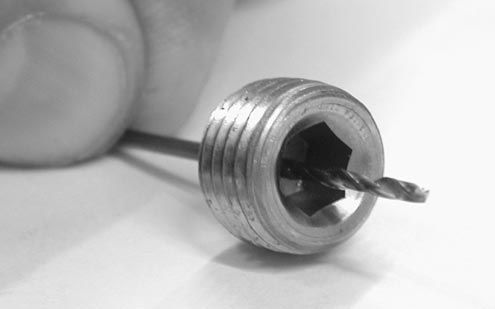
be sure only one oil passage plugs drilled, generally only the pass side oil passage plug with a single .025-.030 hole, many guys use a 1/32" drill bit because its easy to locate, I prefer the smaller #72 drill
related info
viewtopic.php?f=52&t=4548&p=12128#p12128
viewtopic.php?f=52&t=5734&p=17492#p17492
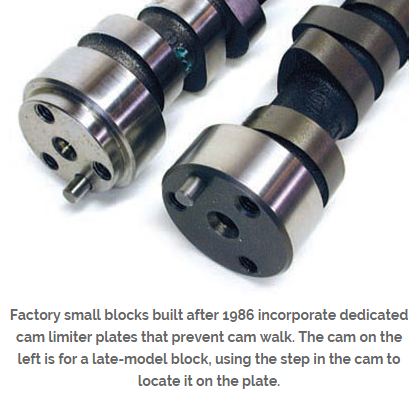
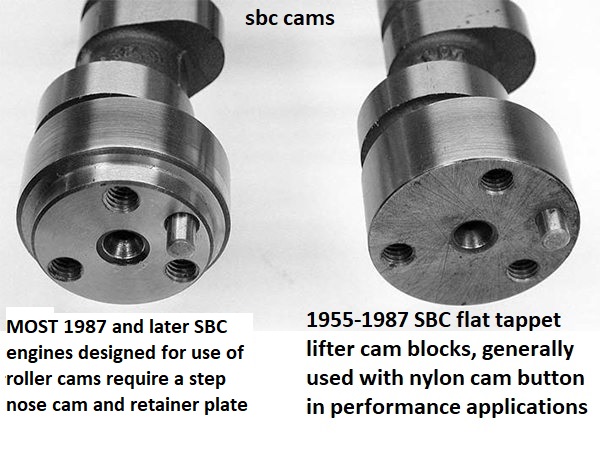
most SBC cams require a cam button in the timing gear IF YOU want the cam location to be totally stable front to back
the later cam design like in the LT1 use a retainer plate and recessed cam nose that gives you the clearance to use it

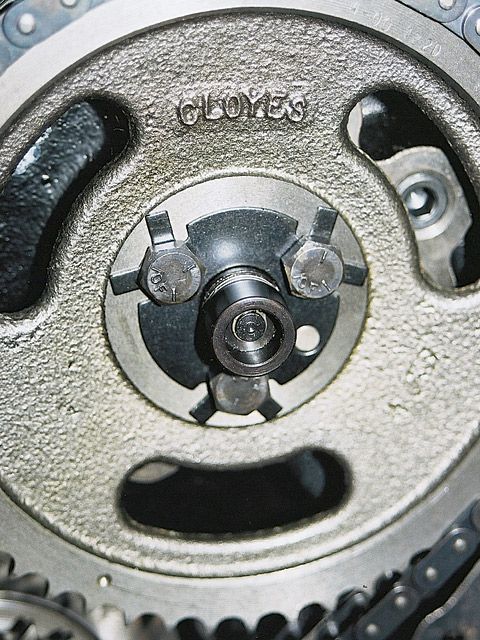
this button is improperly installed as its missing the lock plate
youll generally use LOC-TITE on the retainer bolts threads
use loc-tight on the bolt threads to reduce any tendency for them coming loose

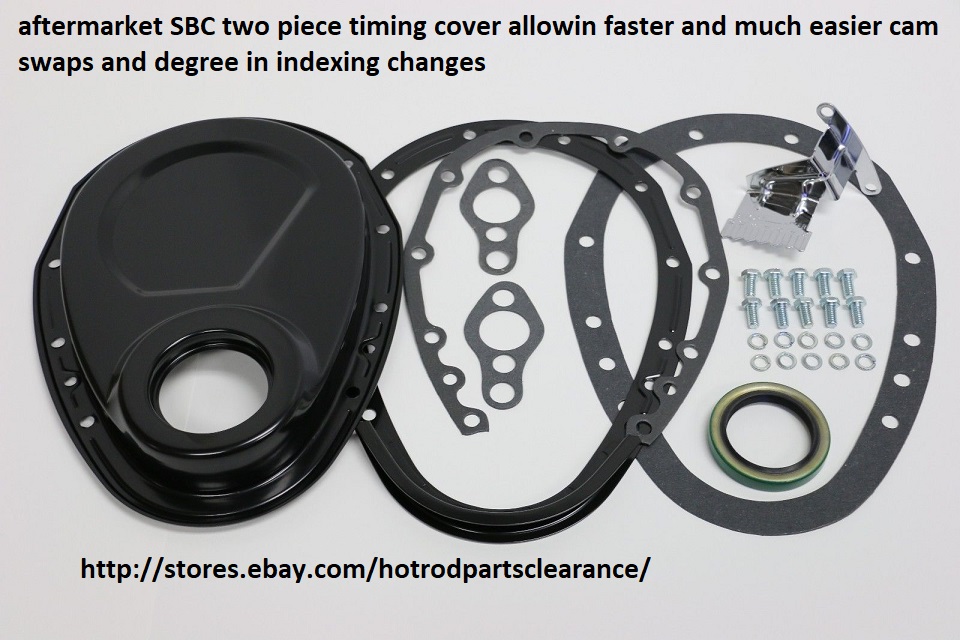
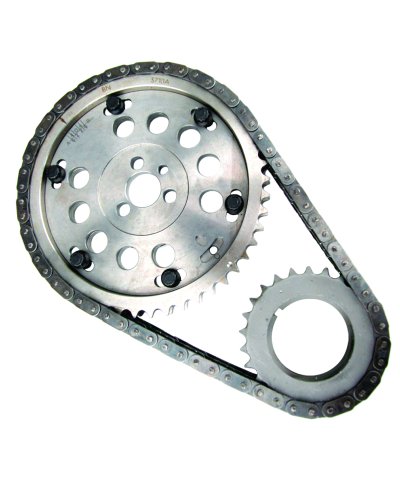
there are fully adjustable timing gear sets available
http://www.usaperform.com/timing-chain- ... =4d&page=1
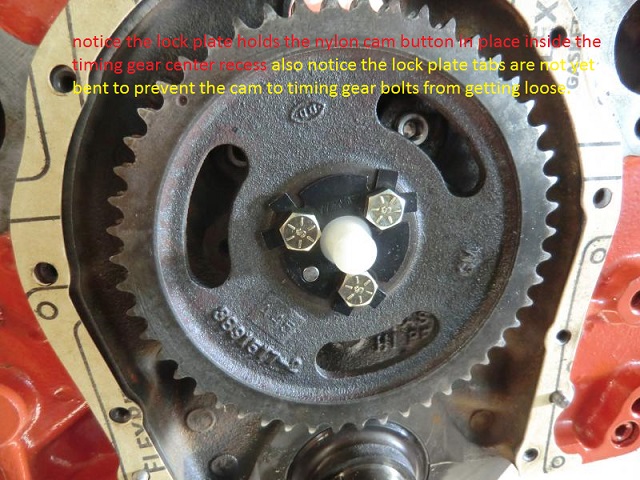
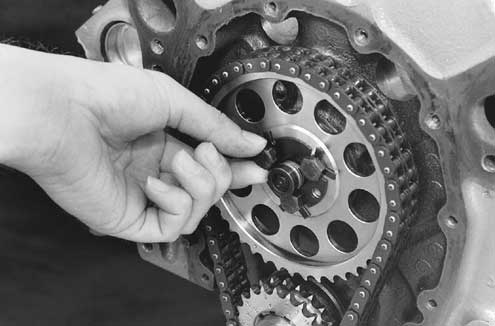
this cam buttons correctly installed but thee retainer plate tabs have not been bent up to lock the bolt heads from rotating
example
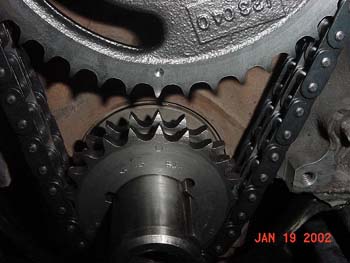
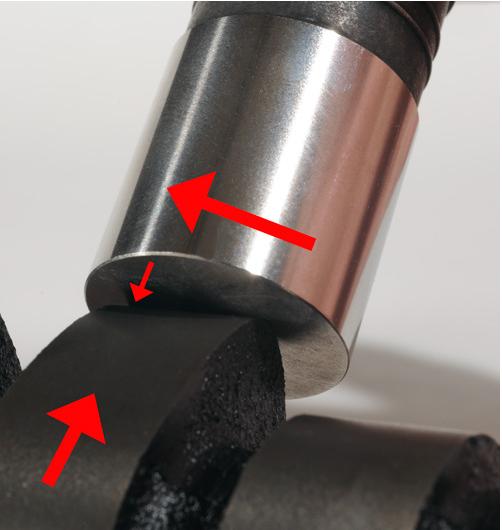
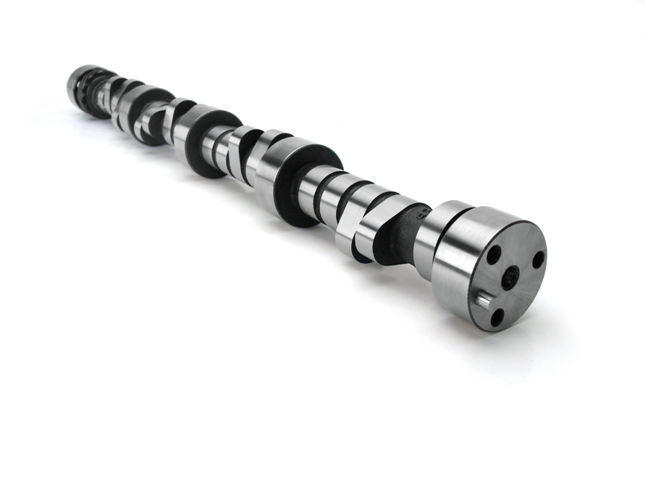
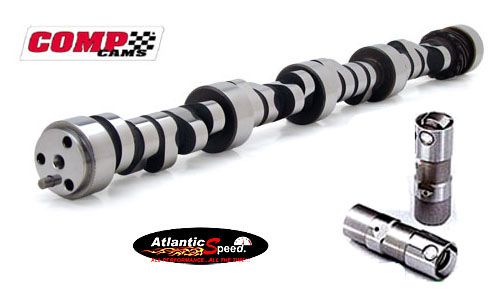
notice the more aggressive cam lobe acceleration rate on the roller cam lobes
notice the stepped cam nose to fit retainer plate
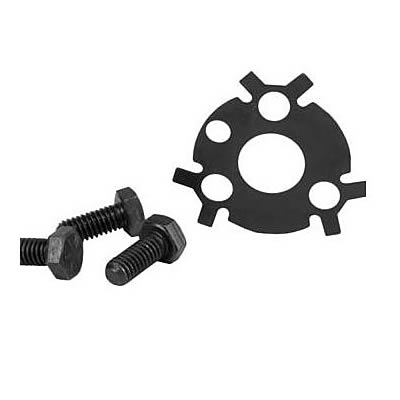
youll really want to use a cam retainer lock plate, over the cam button and under the three cam bolts to hold the cam button into the timing gears, and lock the bolts from getting loose, by bending the tabs up to prevent the bolts from turning and use of red loc-tite on those cam bolt retainer bolt threads is also a good idea.
http://www.chevyhiperformance.com/techa ... index.html
viewtopic.php?f=52&t=1759
Installation Instructions For
Cam Button Spacer
CRANE CAMS, INC.
Designed for use with roller tappet camshafts, the purpose
of the cam button spacer is to maintain the cam in
the correct location in the block. This cam button spacer
fits between the front of the cam and the inside of the
timing cover. This spacer may be held in place by the
bolt locking plate, with the large end of the cam button
spacer fitting into the hole in the cam gear. In most
cases, no machining is required. If you are using a late
model stock type aluminum cam sprocket with plastic
teeth, the center hole is die cast and may need to be
machined to fit the large end of the spacer. Install the
spacer, locking plate (where applicable) and bolts.
Torque the bolts to 20 ft./lbs.
Check camshaft end play and maintain between .005"
and .008". This must be checked with the timing cover
and gasket in place, just as it would be after final assembly,
without the tappets installed. It may be necessary to
dent out the center of the cover in the area that would
contact the spacer. This can easily be done by using a
socket (or an equivalent diameter punch) the same
diameter as the O.D. of the small end of the spacer.
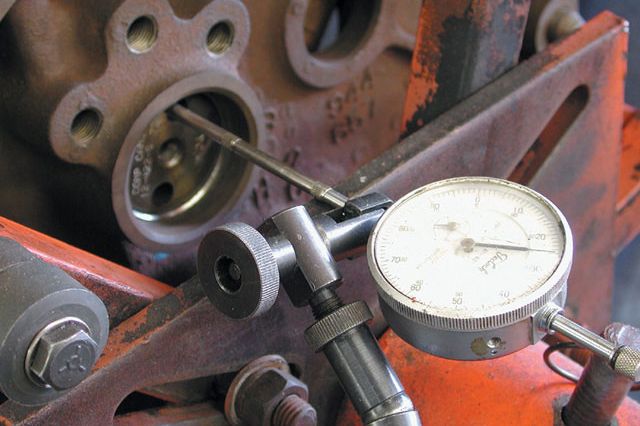
Camshaft end play can best be checked if the engine is
out of the vehicle and on an engine stand. The welch
plug that seals the back end of the cam bore needs to
be removed to access the rear of the cam. Mount a dial
indicator at this location to measure camshaft end play.
Pry the cam forward and backward by using a screwdriver
inserted into a lifter bore where a lobe on the cam
would be at full lift. Be careful not to chip the lobe or the
lifter bore.
If the engine is in the vehicle, there is no suitable place
to mount a dial indicator to detect lateral cam movement
(end play). It would then be necessary to make an educated
judgment as to the end play. Just a slight noticeable
movement, by feel, is all that is necessary.
http://store.summitracing.com/partdetai ... toview=sku
notice the more aggressive cam lobe acceleration rate on the roller cam lobes
notice the stepped cam nose to fit retainer plate
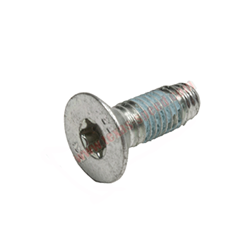
they usually use TORX SCREWS LIKE THIS
http://store.summitracing.com/partdetai ... toview=sku

Instructions for 20390, 20392, 20395 & 20397 FROM JEGS
Cam Button Spacer
Installation Instructions:
Designed for use with roller tappet camshafts, the purpose of the cam button spacer is to maintain the cam in the
correct location in the block. This cam button spacer fits between the front of the cam and the inside of the timing cover.
This spacer may be held in place by the bolt locking plate, with the large end of the cam button spacer fitting into the
hole in the cam gear. In most cases, no machining is required. If you are using a late model stock type aluminum cam
sprocket with plastic teeth, the center hole is die cast and may need to be machined to fit the large end of the spacer.
Install the spacer, locking plate (where applicable) and bolts. Torque the bolts to 20 ft./lbs.
Check camshaft end play and maintain between .005" and .008". This must be checked with the timing cover and
gasket in place, just as it would be after final assembly, without the tappets installed. It may be necessary to dent out
the center of the cover in the area that would contact the spacer. This can easily be done by using a socket (or an
equivalent diameter punch) the same diameter as the O.D. of the small end of the spacer.
Camshaft end play can best be checked if the engine is out of the vehicle and on an engine stand. The Welch plug that
seals the back end of the cam bore needs to be removed to access the rear of the cam. Mount a dial indicator at this
location to measure camshaft end play. Pry the cam forward and backward by using a screwdriver inserted into a lifter
bore where a lobe on the cam would be at full lift. Be careful not to chip the lobe or the lifter bore.
If the engine is in the vehicle, there is no suitable place to mount a dial indicator to detect lateral cam movement (end
play). It would then be necessary to make an educated judgment as to the end play. Just a slight noticeable movement,
by feel, is all that is necessary."
1
http://www.jegs.com/InstallationInstruc ... 119661.pdf
the cam button should not be binding or compressed against the front timing chain cover , when the cams installed, there should be about .010 clearance between the cam button and the front cover as installed. this can easily be measured with plasti-gauge.
step one
measure end clearance, with the cam and timing cover installed ...accurately, in most cases no trimming will be required,
if any trimming is required a figure 8 rocking motion over a sheet of 400 grit sand paper,on a hard flat surface, on the button nose, will slowly reduce the nylon button length
some cam timing covers are much better quality
Allstar Performance ALL90008 Allstar Performance Timing Covers | Summit Racing
Free Shipping - Allstar Performance Timing Covers with qualifying orders of $109. Shop Timing Covers at Summit Racing.
flat tappet cams lobes have a bevel ground on them,and the lifter bore center-line is slightly off-set insuring a consistent rearward pressure on the cam, but roller cam lobes do not have that beveled surface so a button or retainer plates required, and the button is not a bad idea even on a flat tappet cam, engine as it tends to add some stability.
the buttons come in aluminum, nylon and roller bearing designs Ive always preferred the nylon ones as the easiest to work with,less likely to leave tiny roller bearings in the oil pan and the fastest to clearance correctly, now in theory a flat tappet cam does not need one because the slight tapper on the cam lobes, that's used to insure the lifters spin in their bores, plus the slight offset of the lifter bores tends to force the cam to the rear of the block, but in the real world having a cam button installed tends to help stabilize the cam during hard shifts when the loads rapidly change. flat tappet cams don,t require cam button use but installing one does tend to eliminate one potential source of timing variations, once the timing chain develops some slack.
a properly installed nylon cam button with a bolt retainer plates a good idea
properly installed they cause zero problems, in fact Ive used a nylon cam button even on non-roller cam applications for many decades.
a thrust washer to protect the block surface is a good idea IF THE CAM GEAR is designed to use one AND if you have the .007-.005 clearance between the nylon cam button and the timing cover
remember flat tappet cam lobes have a micro angle that tends to force the cam to the rear as it runs so theres very little chance for the cam to move forward in the block like with a roller cam, but the button does tend to eliminate and chance of that so its a good safety measure, even if its not needed most of the time.remember the rear cam journal is covered on the rear block with a freeze plug and oil pressure tends to make the cam stay a few thousands forward as theres a pressurized disc of oil flow behind the cam
properly installed they cause zero problems, in fact Ive used a nylon cam button even on non-roller cam applications for many decades.
a thrust washer to protect the block surface is a good idea IF THE CAM GEAR is designed to use one AND if you have the .007-.005 clearance between the nylon cam button and the timing cover
remember flat tappet cam lobes have a micro angle that tends to force the cam to the rear as it runs so theres very little chance for the cam to move forward in the block like with a roller cam, but the button does tend to eliminate and chance of that so its a good safety measure, even if its not needed most of the time.remember the rear cam journal is covered on the rear block with a freeze plug and oil pressure tends to make the cam stay a few thousands forward as theres a pressurized disc of oil flow behind the cam
READ THIS
viewtopic.php?f=52&t=3777&p=10011&hilit=nylon+button#p10011
READ THIS
viewtopic.php?f=52&t=3777&p=10011&hilit=nylon+button#p10011
reading through the threads should help
http://garage.grumpysperformance.co...to-last-cam-install-info.90/page-2#post-89047
http://garage.grumpysperformance.com/index.php?threads/cam-degree-equipment-tools.1759/#post-4440
http://garage.grumpysperformance.com/index.php?threads/timing-tabs-and-indicators.1015/#post-39845
http://garage.grumpysperformance.com/index.php?threads/valve-train-clearances-and-problems.528/
http://garage.grumpysperformance.co...e-springs-and-setting-up-the-valve-train.181/
Last edited: 2 minutes ago
read
be sure only one oil passage plugs drilled, generally only the pass side oil passage plug with a single .025-.030 hole, many guys use a 1/32" drill bit because its easy to locate, I prefer the smaller #72 drill
related info
viewtopic.php?f=52&t=4548&p=12128#p12128
viewtopic.php?f=52&t=5734&p=17492#p17492
most SBC cams require a cam button in the timing gear IF YOU want the cam location to be totally stable front to back
the later cam design like in the LT1 use a retainer plate and recessed cam nose that gives you the clearance to use it
this button is improperly installed as its missing the lock plate
youll generally use LOC-TITE on the retainer bolts threads
use loc-tight on the bolt threads to reduce any tendency for them coming loose
there are fully adjustable timing gear sets available
http://www.usaperform.com/timing-chain- ... =4d&page=1
this cam buttons correctly installed but thee retainer plate tabs have not been bent up to lock the bolt heads from rotating
example
notice the more aggressive cam lobe acceleration rate on the roller cam lobes
notice the stepped cam nose to fit retainer plate
youll really want to use a cam retainer lock plate, over the cam button and under the three cam bolts to hold the cam button into the timing gears, and lock the bolts from getting loose, by bending the tabs up to prevent the bolts from turning and use of red loc-tite on those cam bolt retainer bolt threads is also a good idea.
http://www.chevyhiperformance.com/techa ... index.html
viewtopic.php?f=52&t=1759
Installation Instructions For
Cam Button Spacer
CRANE CAMS, INC.
Designed for use with roller tappet camshafts, the purpose
of the cam button spacer is to maintain the cam in
the correct location in the block. This cam button spacer
fits between the front of the cam and the inside of the
timing cover. This spacer may be held in place by the
bolt locking plate, with the large end of the cam button
spacer fitting into the hole in the cam gear. In most
cases, no machining is required. If you are using a late
model stock type aluminum cam sprocket with plastic
teeth, the center hole is die cast and may need to be
machined to fit the large end of the spacer. Install the
spacer, locking plate (where applicable) and bolts.
Torque the bolts to 20 ft./lbs.
Check camshaft end play and maintain between .005"
and .008". This must be checked with the timing cover
and gasket in place, just as it would be after final assembly,
without the tappets installed. It may be necessary to
dent out the center of the cover in the area that would
contact the spacer. This can easily be done by using a
socket (or an equivalent diameter punch) the same
diameter as the O.D. of the small end of the spacer.
Camshaft end play can best be checked if the engine is
out of the vehicle and on an engine stand. The welch
plug that seals the back end of the cam bore needs to
be removed to access the rear of the cam. Mount a dial
indicator at this location to measure camshaft end play.
Pry the cam forward and backward by using a screwdriver
inserted into a lifter bore where a lobe on the cam
would be at full lift. Be careful not to chip the lobe or the
lifter bore.
If the engine is in the vehicle, there is no suitable place
to mount a dial indicator to detect lateral cam movement
(end play). It would then be necessary to make an educated
judgment as to the end play. Just a slight noticeable
movement, by feel, is all that is necessary.
http://store.summitracing.com/partdetai ... toview=sku
notice the more aggressive cam lobe acceleration rate on the roller cam lobes
notice the stepped cam nose to fit retainer plate
they usually use TORX SCREWS LIKE THIS
http://store.summitracing.com/partdetai ... toview=sku
Instructions for 20390, 20392, 20395 & 20397 FROM JEGS
Cam Button Spacer
Installation Instructions:
Designed for use with roller tappet camshafts, the purpose of the cam button spacer is to maintain the cam in the
correct location in the block. This cam button spacer fits between the front of the cam and the inside of the timing cover.
This spacer may be held in place by the bolt locking plate, with the large end of the cam button spacer fitting into the
hole in the cam gear. In most cases, no machining is required. If you are using a late model stock type aluminum cam
sprocket with plastic teeth, the center hole is die cast and may need to be machined to fit the large end of the spacer.
Install the spacer, locking plate (where applicable) and bolts. Torque the bolts to 20 ft./lbs.
Check camshaft end play and maintain between .005" and .008". This must be checked with the timing cover and
gasket in place, just as it would be after final assembly, without the tappets installed. It may be necessary to dent out
the center of the cover in the area that would contact the spacer. This can easily be done by using a socket (or an
equivalent diameter punch) the same diameter as the O.D. of the small end of the spacer.
Camshaft end play can best be checked if the engine is out of the vehicle and on an engine stand. The Welch plug that
seals the back end of the cam bore needs to be removed to access the rear of the cam. Mount a dial indicator at this
location to measure camshaft end play. Pry the cam forward and backward by using a screwdriver inserted into a lifter
bore where a lobe on the cam would be at full lift. Be careful not to chip the lobe or the lifter bore.
If the engine is in the vehicle, there is no suitable place to mount a dial indicator to detect lateral cam movement (end
play). It would then be necessary to make an educated judgment as to the end play. Just a slight noticeable movement,
by feel, is all that is necessary."
1
http://www.jegs.com/InstallationInstruc ... 119661.pdf
Last edited by a moderator: