adam said:Grumpy? Ive got a LT4 Hot Cam (hydraulic roller cam and lifters that are in good condition ,donated by a friend when he upgraded to a more radical isky cam,I want to use in my 383 build with stock 882 Heads and With new valve springs, will the stock 882 sbc heads be able to handle the lift of the LT4 Hot Cam on 1.5 RR?
I have searched and read many threads, on several sites ,but it seems that theres a few mixed opinions on if it will work on basically stock heads, yes or no. One thing I did read was something about adding new springs to handle the increased lift and adding valve spring shims and off set valve keepers to allow a .050 greater clearance, plus checking if new push rod guide plates, are required. another question I have is which thickness of valve spring shims to use and how many? Any help is greatly appreciated.
(CRANE CAMS USED TO SUPPLY MANY G.M.PERFORMANCE CAMS,
Chevrolet Performance LT4 Hot Cam Hydraulic Roller Camshafts 24502586
this is no longer true and QUALITY has dropped off noticeably by who ever is currently supplying the cams)
one of the most common mistakes made during an engine assembly is the failure to verify valve train clearances and rocker geometry, closely followed by a lack of understanding that the valve spring load rates must match the intended application.
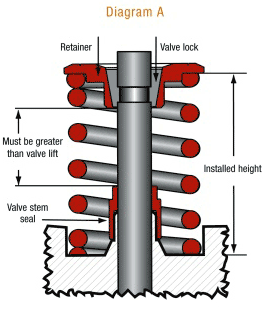
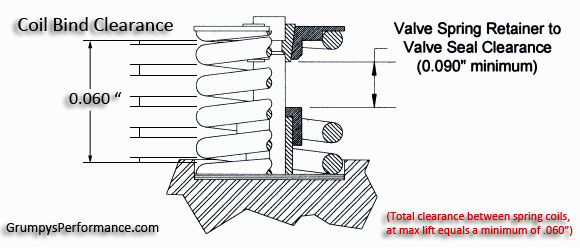
stock Chevy small block valve springs will rarely allow a .525 lift cam to function without significant machine work to the heads being done first and the stock flat tappet valve spring clearances will not be sufficient in most cases, surely the spring load rates will not work and simply swapping springs and use of an offset valve spring retainer that adds an additional .050 is by itself unlikely to allow the valve train to function reliably
now depending on your compression ratio and other components selected a HOT CAM, might be a good choice , but be aware a bit of research before you go installing it could save you as great deal of money and repairs later.
and yes almost every new guy in this hobby ignores the advice below, installs the larger cam and eventually has valve train related failures and only then starts to research WHY it failed..
a LT4 hot cam has a .525 lift with the stock rockers REQUIRING a minimum valve spring retainer to valve seal clearance of about .050 so your most likely going to need a valve spring that can be used with a .585-.600 minimum lift clearance, but keep in mind if your converting from a flat tappet valve train,most hydraulic roller cams will require different length push rods, a timing chain with a nylon cam button and valve springs with a different load rate, higher than the flat tappet spring sets provide. , swapping to the required valve springs and getting the mandatory clearances will almost always require more machine work on the cylinder heads than a simple valve spring swap and use of offset valve keepers or valve spring retainers.
Id strongly suggest taking your heads to a good local machine shop, explain what your trying to do, and have them do the required machine work to get the required clearances, and supply you with the matching hydraulic roller cam,valve springs.
so read these threads, linked below
The following recommendations are from Erson Cams. If you have questions, you can reach their tech department at 800-641-7920.
Hydraulic Flat Tappet Camshaft: 110 lbs Seat pressure/250-280 lbs open pressure
Solid Flat Tappet Camshaft: 130 lbs Seat Pressure/300-325 lbs open pressure
Hydraulic Roller Camshaft: 130-140 lbs Seat Pressure/300- 355 lbs open pressure
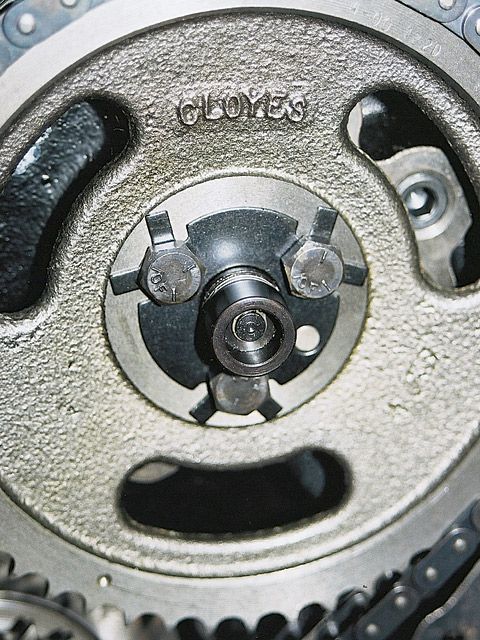
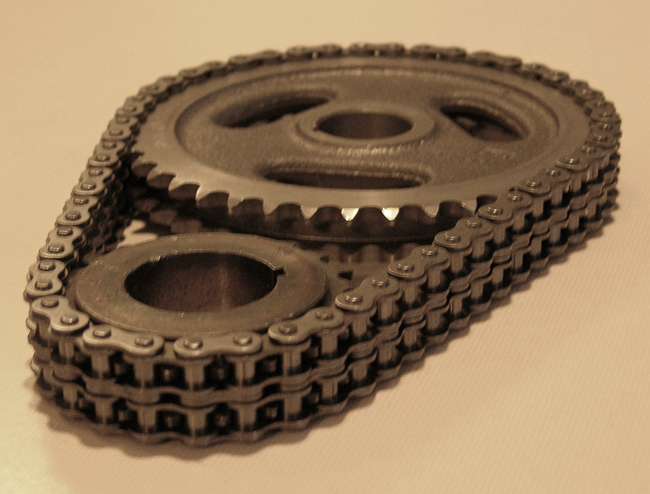
the double roller cloyes timing chains tend to last longer before they wear and have excess slack
and they can be used with the stock O.E.M timing chain cover

TRUE DOUBLE ROLLER TIMING CHAIN SETS FROM QUALITY MANUFACTURERS TEND TO BE MORE DURABLE
viewtopic.php?f=52&t=181
viewtopic.php?f=52&t=90
viewtopic.php?f=52&t=1793&p=4553&hilit=nylon+button#p4553
viewtopic.php?f=52&t=1489
viewtopic.php?f=52&t=399
viewtopic.php?f=52&t=1005&p=15534&hilit=spring+shims#p15534
viewtopic.php?f=52&t=3802
viewtopic.php?f=52&t=8460
viewtopic.php?f=52&t=528
heres a bit of potentially useful info GOFAST POSTED
["quote=GOFAST"]
SBC Stepped Nose Cam in Early Block?
Just curious if anyone has devised a way to use the later SBC "stepped-nosed" cams in the early SBC's?
We are trying to eliminate the required use of any cam-buttons in the 100% stock-appearing builds on the roller platform?
Thanks, Gary in N.Y.
P.S. Open to any suggestions/recommendations. Have my own idea but like to hear some add'l possibilities/thoughts.
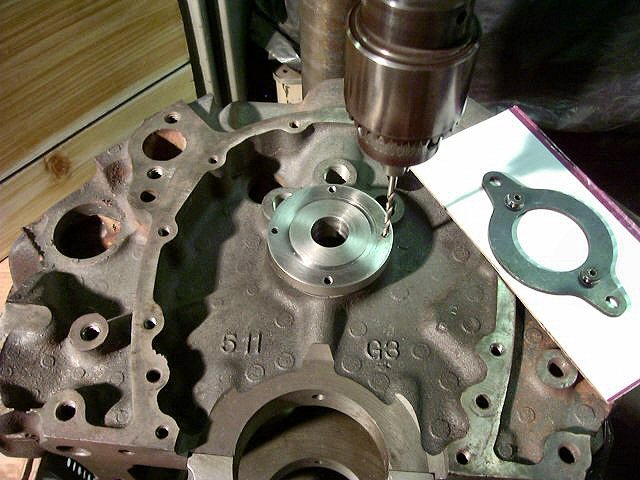
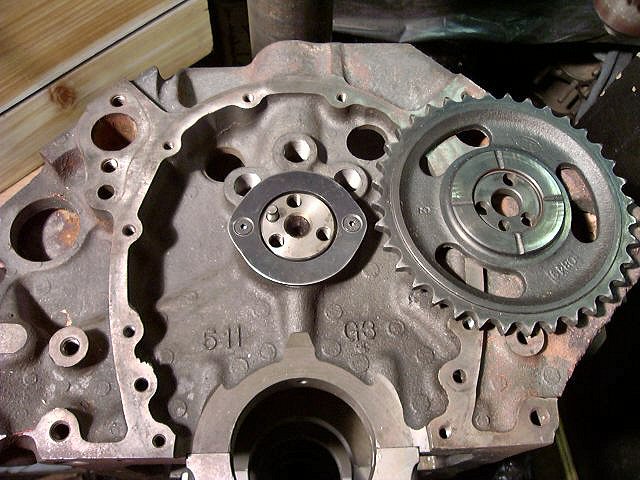
I brought this back because it turned out to be a fairly simple resolution. Wasn't sure it could be done without extensive machining, solved it easily.
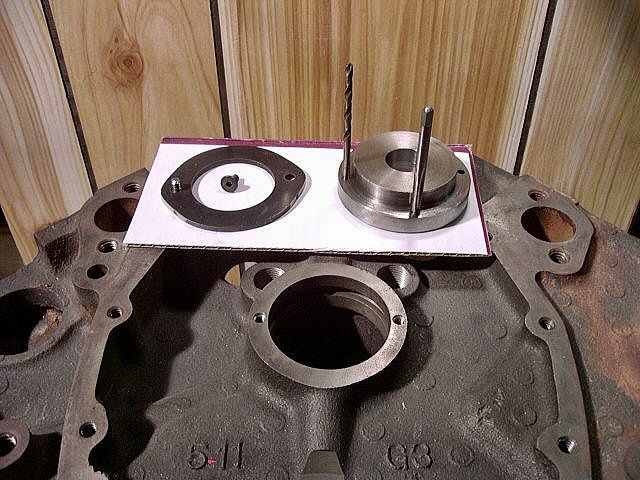
I'll put a couple shots below showing the basic's of the "fix". Takes about 30/40 minutes or so for the entire machining and can be done on a simple (decent) drill press capable of holding the block on the table.
Quote:
Originally Posted by novaderrik View Post
just use a roller cam block... the only real striking visual difference between them and an old small block once it's in the car is the size of the pad by the water pump where the id codes are stamped.
Hi nova, we do a bunch of 100% stock-appearing builds where ANY replacement block is NOT an option. Now we can set up the roller cams (mostly retro-hydraulics) with the late thrust plate. No more "playing-around" with cam buttons/end play. Much easier for us here.
Thanks, Gary in N.Y.
P.S. Anyone with any machining experience can accomplish this mod easily. With the way we designed the tool in the photo we can pick the 2 best spots on the original thrust surface to locate the 2 allen-head screws, an area that has some extra "meat" for the screw-threads.
don't need those ears on the sides anymore?
small taps in cast iron, any troubles there?
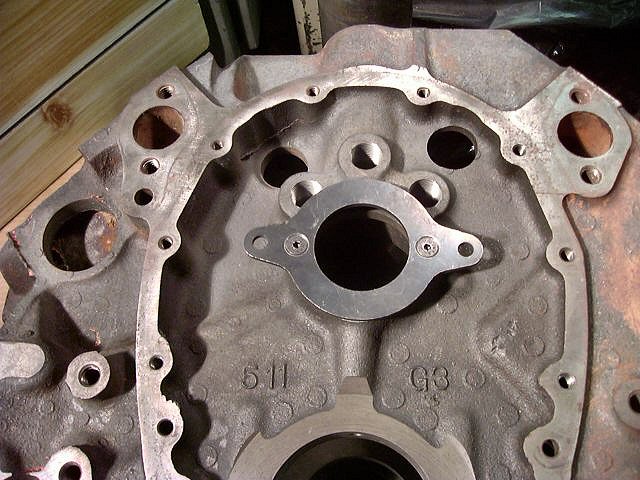
Hi Tom, correct on the "ears", they aren't needed with this method. Later today I'll put another shot here with the plate finished, "ears" removed!
No problem drilling/tapping for the fasteners, entire procedure went smoothly after devising the jig to set all the holes in place. The jig is used to locate/drill the new holes in the plate also, in the first photo you can see the "register" that holds the plate in place to back-drill these holes.
Like I stated above, was fairly easy when I finally got a handle on exactly how I was going to get it to come together.
The only potential issue on some blocks is the uniformity of the original cam-thrust surface face, many favor one side more that the other. In other words (looking at the block from the front) some castings are wider on one side making the other side narrower, we can position the 2 bolts anywhere on the surface. They don't need to be "clocked" so to speak!
(Add) This a huge breakthrough for us when doing the 100% stock-appearing builds on any roller platform. In the larger picture the cost is also less, no cam button/locking plate, just the cost of the OEM plate. Cost/labor of installing the plate is about a "wash" with the time spent on setting up the end-play with the button. We can layout the plate at the same time we drill/tap for the front (3) oil galley plugs, which are also done while on the drill press
(Add) Below is a shot of the finished plate installed.
Thanks, Gary in N.Y.
P.S. On a side note, we didn't find it necessary to drill (deep enough) into the oil groove behind the cam brg but it would not have made any difference when the bolts are installed. Also, I could put 2 more fasteners in the plate if I felt it necessary. Would take about an extra 10 minutes simply by "turning" the jig 90* and drilling the 2 add'l holes.
P.S. I've already "kicked" this around with a couple local builders just for opinion's sake, all are in agreement, looks like all will be fine! I most definitely would NOT attempt this procedure by "hand", you'll most likely ruin the casting. It takes a decent lathe, the Bridgeport, and a decent rotating table to make the tooling! Also necessary is a 10-24 "bottom" tap to get every last thread possible.
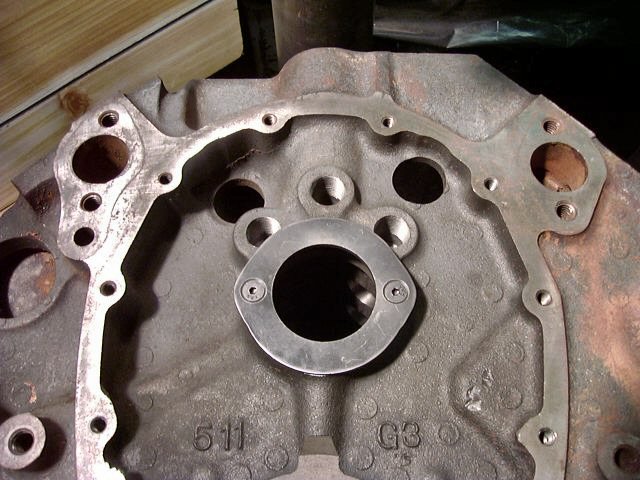
ast shot, "late" cam installed, .003" (nominal) end-play.
Worked like a charm, really.
Thanks, Gary in N.Y.
P.S. Mike (Wolfplace) thanks for the support. I'll say it once more, for us here we consider this a major accomplishment. I still need to dyno test a build or two but don't anticipate any adverse effects!
http://www.jegs.com/i/JEGS-Performa...MIiNrGptbX1gIVzYJ-Ch0grAi6EAQYAiABEgKuRvD_BwE
http://paceperformance.com/i-648452...ines-chevrolet-performance-parts-engines.html
old school
http://www.jegs.com/p/COMP-Cams/Comp-Cams-Cam-Buttons-Wear-Plate/753163/10002/-1
[/quote]
part of the reason the web site exists....its here hopefully allowing the newer guys to avoid many of the problems ,
that my, friends and I ran into, over the decades in this hobby, and hopefully the web site will help you, avoid the frustration ...
and experiences of several of the older guys ,I used to hang out with, had both good and bad, experiences ,
during 45 plus years of not being able to find a easy to access source of correct related info on how things should be done and
how knowing often,my friends and I ran into scammers at local machine shops,
and speed shops, that deliberately either gave B.S. info or did sub-standard machine work.
In this hobby of building cars and modifying drive trains for increased performance, doing your research into how things should be done correctly, is key!
if you get to know an honest machinist in a local machine shop that will take the time to explain ,
how some machine work is done and why its required you'll be far better off.
youll notice most threads have sub-links they are there to help you find related and useful info,
skip reading the links and you will generally regret it later.
while it might be initially looked at as an inconvenience,
and while it will take some time and effort youll be amazed at how often,
reading the links and sub-links,
in these threads will allow you to avoid making almost all the more common mistakes guys make,
or even in a few documented cases..a few that required true unique ingenuity,too screw it up so badly

most of us learn by making mistakes or watching the results of the trial and error process made by others...
the key to success is duplicating the successful, work others have done,and it is based
in understanding exactly why things work ,once you fully understand how and why something works you might be able to improve on its function, or the durability.
and
learning too avoid the failures other people have made,
by understanding, how and why they screwed it up.
http://garage.grumpysperformance.co...-the-rabbit-hole-with-alice.10933/#post-52567
http://garage.grumpysperformance.com/index.php?threads/hello-grumpyvette-here.278/
http://garage.grumpysperformance.com/index.php?threads/tbucket-engine-project-dart-shp.3814/
http://garage.grumpysperformance.com/index.php?threads/matching-parts-and-a-logical-plan.7722/
http://garage.grumpysperformance.com/index.php?threads/what-to-look-for-in-a-good-engine-combo.9930/
http://garage.grumpysperformance.com/index.php?threads/dorian’s-big-block-c3-build.12810/
http://garage.grumpysperformance.com/index.php?threads/383-information-overload.11137/
http://garage.grumpysperformance.com/index.php?threads/tweaking-a-350-383.13087/#post-68195
http://garage.grumpysperformance.co...ing-a-383-sbc-combo-planing.12168/#post-58778
http://garage.grumpysperformance.co...ng-and-basic-piston-ring-info-youll-need.509/
http://garage.grumpysperformance.co...e-springs-and-setting-up-the-valve-train.181/
http://garage.grumpysperformance.com/index.php?threads/precision-measuring-tools.1390/#post-68861
http://garage.grumpysperformance.com/index.php?threads/a-high-torque-406.12184/
http://garage.grumpysperformance.co...gine-to-match-the-cam-specs.11764/#post-55571
Last edited by a moderator: