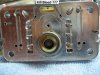
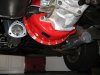
My 1st. Street 383 Build

bytor said:
One snag I discovered after the engine was installed is one of the trany mount bolt holes was stripped. Wish I had noticed it before. But fortunately, it looks like I have enough access to do a Helicoil repair. I'm thinking I'll go with studs instead of bolts this time as the trany case is aluminum.

But the bolts screw into the scatter shield and those threads are steel.....right ?

What am I missing something here?

I'm ready to take a ride and feel the back of the seat firmly !!!


I think hes referring to the TRANSMISSION TO FRAME MOUNT BOLTS
Im sure he will correct me if Im wrong


transw.JPG


transww.jpg


transwww.jpg
 
grumpyvette said:
I think hes referring to the TRANSMISSION TO FRAME MOUNT BOLTS

transw.JPG

Correct, the bolt from the transmission tail shaft housing to the mount. The mount to frame has another pair of bolts.
 

Attachments

  • yb.jpg
    yb.jpg
    55.7 KB · Views: 80
I may have a silly question here but how do you tighten the fit of the dipstick tube into the block? Mine moves rather easily once installed. Is there a way to expand the bottom for a tighter fit?

Got the transmission mount all straighten out with Heilcoils installed.


Got the headers installed. Took quite a bit of time and cursing to get them in. Not much room on a Corvette for headers.


Carburetor and exhaust next on the list.
 

Attachments

  • IMG_0698.JPG
    IMG_0698.JPG
    102.1 KB · Views: 71
  • IMG_0707.JPG
    IMG_0707.JPG
    145.3 KB · Views: 71
  • IMG_0714.JPG
    IMG_0714.JPG
    115.2 KB · Views: 71
  • IMG_0716.JPG
    IMG_0716.JPG
    112.7 KB · Views: 71
For the oil dipstick tube, i dont know mine was really hard to drive in the block, and i also used silicon to hold it and also to prevent leak.
Seem like this engine will be ready really soon :)
 
Got my dipstick dilemma straightened out. Figured I needed to expand the part of the tube that goes into the block somehow. So I started looking around the garage for something I could use to drive into the tube expand it some for a tighter fit. Realized one of my 1/4" socket had a nice taper to it and it worked perfectly.


Stuck it into the end of the tube, gave it a few wacks with a hammer until I had a tight fit. Applied some RTV and drove it back into the block. Good as new.
 

Attachments

  • IMG_0722.JPG
    IMG_0722.JPG
    78.8 KB · Views: 58

Good idea, but how did you hold on to it ???

Mine has a 20° to 30° bend in the tube and it makes it hard to do what you did.

 
Progress update, reset the old speed demon 650 carb back to it’s baseline settings and cleaned up.


More goodies came yesterday. Got my exhaust setup from Pypes. Did a quick test fit last night and very impressed with the fit and kit quality. All mandrel bent stainless pipe.


The RacePro mufflers look similar to the Dynomax Ultra Flow’s with it’s straight through design.


Here's a shot of a section of my old pipe that not mandrel bent, full of kinks. Not good.


More to come.
 

Attachments

  • IMG_0729.JPG
    IMG_0729.JPG
    157.8 KB · Views: 47
  • IMG_0735.JPG
    IMG_0735.JPG
    161 KB · Views: 46
  • IMG_0738.JPG
    IMG_0738.JPG
    156.4 KB · Views: 46
  • IMG_0745.JPG
    IMG_0745.JPG
    114.4 KB · Views: 47
  • IMG_0743.JPG
    IMG_0743.JPG
    110.2 KB · Views: 47
  • IMG_0748.JPG
    IMG_0748.JPG
    84.2 KB · Views: 47
  • IMG_0752.JPG
    IMG_0752.JPG
    119 KB · Views: 46
everything on the exhaust looks nice, Im sure youll see some gains.

BTW, Ive had several guys I know show me problems with those longer connectors (GREEN ARROW) either coming loose or breaking the carb threads, theres just too much leverage , the rear connector in the pictures fine, in my experience, I think a great deal of the problem results from vibration over time
650demon1.jpg
 

What do you think, are those the Kill Bleeds I'm pointing at in the picture ???


You are going to polish that stainless aren't you ??? At least the bottom half!


Attachments

  • DemonMeteringBlock.JPG
    DemonMeteringBlock.JPG
    41.9 KB · Views: 136
Indycars said:

What do you think, are those the Kill Bleeds I'm pointing at in the picture ???

Yep, that's them. I have played around with them in the past by sticking different sized wire in them to reduce their size. The behavior is as depicted on the bleed chart I posted a few days ago. It's one way to get the main's started earlier but I think if you having to mess with these or the emulsion holes, you have another tuning problem somewhere.

Not sure about polishing the exhaust, maybe the mufflers. Looks like a lot of effort. http://www.svtperformance.com/forums/how-230/568983-how-polish-your-exhaust.html
 
grumpyvette said:
BTW, Ive had several guys I know show me problems with those longer connectors (GREEN ARROW) either coming loose or breaking the carb threads, theres just too much leverage , the rear connector in the pictures fine, in my experience, I think a great deal of the problem results from vibration over time

Thanks for pointing that out Grumpy. I know from experience how delicate the fuel bowl threads are. If you notice both fuel bowls are nice and shiny and recently replaced. Don't ask.. :) I can see where the longer connector could be a problem especially if you are running a solid fuel from the pump to the carb and don't have it aligned correctly.
 
Just a few more to-do's before the initial fire up. Hopefully this weekend.

Wraping up the exhaust install. Had to have some header extensions made up to complete the connection to the rest of the system. I decided to add some flex joints just after the reducers. Seemed to make since to reduce vibration and noise. Below's the mockup before heading to the muffler shop for welding it up.


Decided to take some time and check the calibration of my stock temperature and oil pressure gauges. I suspected both were off. I was right, the temperature gauge is relatively accurate after 200*but before that it's all over the place. The oil pressure gauge is way off and jumped around all over the place. I always thought it was my sending unit. I guess this is expected for 30yr old gauges so I intend to replace them both. I know these stock gauges we never supposed to be that accurate but I wanted to get them as close as I could. The fuel and volt gauges are good and tested fine.

I tested my stock and replacement NAPA temp sending units resistance curves by heating them in a pot of water and measuring the resistance. (wife was not happy about me cooking car parts in the kitchen) The new NAPA unit matches the gauge specifications the closest. I used a 15 turn potentiometer acting as the sending unit to test each gauges accuracy at different resistance points.


I used an air compressor to get the resistance curve of the oil pressure sending unit.


Since I have the gauge cluster out of the car I'll clean it up some, fix the clock and replace the light bulbs.
 

Attachments

  • IMG_0753.JPG
    IMG_0753.JPG
    151.1 KB · Views: 118
  • IMG_0740.JPG
    IMG_0740.JPG
    143.1 KB · Views: 117
  • Tempchart.jpg
    Tempchart.jpg
    52.7 KB · Views: 117
  • IMG_0756.JPG
    IMG_0756.JPG
    130.5 KB · Views: 118
  • IMG_0757.JPG
    IMG_0757.JPG
    140.8 KB · Views: 118
Ive always been amazed at the blind faith I see so many guys place in the stock gauges and sensors, many in my experience might as well be idiot lights because any hope of accurate reading are wishful thinking at best!
Ive also always drilled several holes in the T-stat flange as I find far more consistent coolant temps doing it that way, surely indicating that the stock t-stats tend to fully shut and open rather inconsistently

drilling a couple small air bleed holes in the t-stat is almost mandatory in corvettes,
to allow filling the radiator with coolant easily ,
and it tends as stated earlier to minimize engine temp swings, it can't hurt and in my opinion helps.
related links to useful info

viewtopic.php?f=35&t=3399&p=8965&hilit=corvette+gauges#p8965

viewtopic.php?f=44&t=469&p=7163&hilit=shop+manual+purchase#p7163

viewtopic.php?f=80&t=728&p=25843&hilit=sensor+location#p25843

viewtopic.php?f=57&t=4701&p=19139&hilit=sensor+location#p19139

viewtopic.php?f=36&t=63&p=76&hilit=vacuum+gage#p76

viewtopic.php?f=36&t=317&p=25593&hilit=multi+meter#p25593

viewtopic.php?f=50&t=609&p=1298&hilit=multi+meter#p1298

viewtopic.php?f=50&t=609&p=810&hilit=multi+meter#p810

viewtopic.php?f=57&t=4974&p=13868&hilit=INFRARED+TEMP+GUN#p13868
 
Last edited by a moderator:
grumpyvette said:
"might as well be idiot lights"

I agree 100%. That's the main reason I wanted to go through this exercise to get some visibility into what the temperature and oil pressure are really doing and what the offset was. I would hate to smoke a new build because a crappy gauge was off..

grumpyvette said:
I've also always drilled several holes in the T-stat flange as I find far more consistent coolant temps doing it that way, surely indicating that the stock t-stats tend to fully shut and open rather inconsistently

Yep, I got the T-stat hole thing covered..
 

Attachments

  • IMG_0491.JPG
    IMG_0491.JPG
    128.1 KB · Views: 120
Indycars said:

Did you notice what the repeatability was, does it read the same every time ???


I did test the gauges and senders multiple times. The outcome was consistent each time.
 
bytor said:
I did test the gauges and senders multiple times. The outcome was consistent each time.

That's better than absolute accuracy, if you know the offset. If every reading is different, then you have no idea where you are at.

 
Back
Top