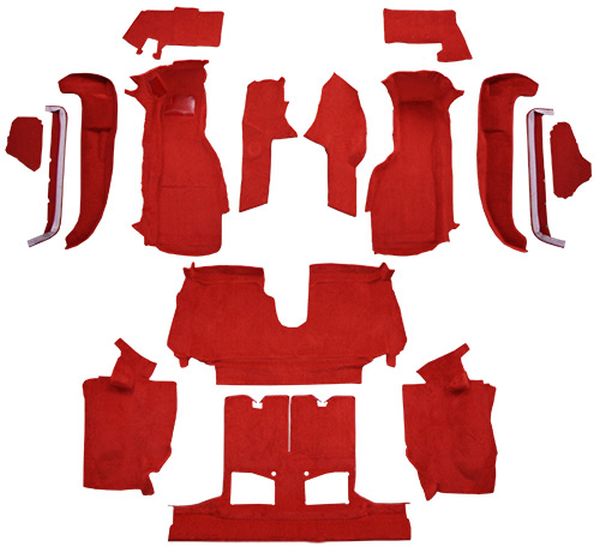
step one buy a QUALITY PREFORMED CARPET SET, and it won,t be cheap! but it beats the hell out of fighting a cheap knock-off import set that won,t fit correctly, or flimsy crap that won,t fit correctly or last more than a few months
example
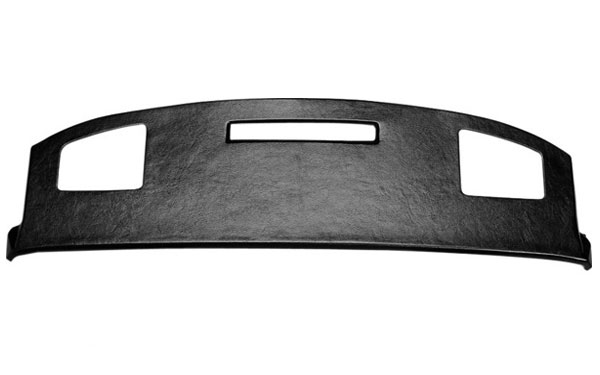
When you see bargains in replacement corvette parts, they rarely ARE!
I purchased a dash cover from , mid America corvette, awhile back, that shrived up in the Florida sun in a matter of days making it totally useless, I should have returned it but following the instructions that came with it it was glued to the car, making removing it without further damage very difficult, by the time I got it off it was a shredded mess, of cheap warped plastic
http://www.superchevy.com/how-to/0306vet-c4-interior-upgrade-install/
http://www.mamotorworks.com/corvette?frame=1.1019
http://www.mamotorworks.com/Corvette/product/dash-cap-black-603138-1
YES youll need to remove the seats and console and yes its not going to be a 1-2 hour under taking, plan on a full week end if you have never done it before! this is NOT a difficult job, to do, but I find its rather intimidating for most guys too do the first time, when I help them.
they hesitate, mostly because it looks like they are trashing the corvettes ,interior and they are rather reluctant to do something new, that they may have never done, not trusting their ability to get it re-installed correctly, to look like it should from the factory instal.
but its just not that difficult if you approach it logically and it helps to take pictures at each stage of the diss-assembly so you remember how it came apart.
Id advise talking with A FEW auto repair shops too get prices and tips on how to do the job!
http://www.ecklerscorvette.com/corvette ... uct_Viewed
I just last year replaced the seats and interior in my 1985 corvette, the only parts I could not find (YET) was the center arm rest /glove compartment cover /lid and the dash pad ,in a QUALITY replacement parts, the cheap trash they charge dearly for, that I temporarily bought and installed, are no where near factory quality
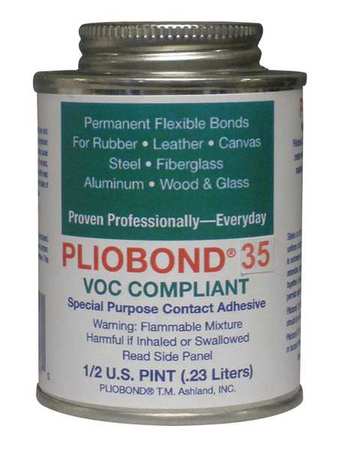
youll need a quart of contact cement like PLIOBOND and some weather strip adhesive
FOR SOME INSULATION YOULL WANT CONTACT CEMENT

http://www.centralvacuumstores.com/Cent ... 7AodHhwAAQ
BTW when carpets NEW or COLD it is resistant to being easily forced into matching curves and contours, like where the floor meets the trans tunnel, a HAIR DRYER can be used to WARM and mold the carpet much more easily but don,t use a HEAT GUN, it is far too hot and will cause plastic interior parts and carpet to warp , shrink or be damaged, just be aware to work in smaller areas and remember contact type adhesive glues and heat can be dangerous with fumes and some types are very flammable
several corvette restoration parts supply houses sell NEW screw kits and door sill plates,these are usually helpful.
its also generally a good idea to take each piece of the old carpet out and label it with a large piece of masking tape and a marker and as you take the new carpet out of the container it comes n, match the same component part side by side before you start so you know how many pieces you have, where they go and if your missing any.
before you get too far into the project ask a local auto repair shop what they would charge to replace the carpet professionally , it may not be enough more than what you may pay to make it worth doing, or it may encourage you to learn a new skill and save several hundred dollars
[/b]
BASIC GENERIC INSTRUCTIONS
1. LAY CARPET FLAT. FOLD IN HALF BY PULLING FRONT EDGE BACK OVER TO MEET REAR EDGE.
2. CENTER FOLDED CARPET OVER THE TRANSMISSION HUMP JUST IN FRONT OF THE FRONT SEAT.
3. SLOWLY UNFOLD THE CARPET TOWARD THE FRONT FIREWALL.
4. WHEN YOU REACH A SHIFT LEVER CUT A SMALL "X" SHAPED SLIT JUST LARGE ENOUGH FOR THE SHIFT LEVER ROD TO FIT THROUGH.
5. LIFT THE CARPET UP AND SLIDE IT DOWN OVER THE LEVER THROUGH THE "X" SLIT.
6. REPEAT STEPS 3, 4 AND 5 IF A SECOND SHIFT LEVER EXIST.
7. AFTER THE FULL INSTALLATION OF YOUR CARPET IS COMPLETE, RETURN TO THE SHIFT LEVERS AND CUT THE HOLES LARGER. BE CAREFUL NOT TO CUT THE HOLE LARGER THAN THE BOOT THAT WILL COVER THE AREA.
8. USE THE SAME "X" SLIT SYSTEM IF YOUR VEHICLE REQUIRES A CUTOUT FOR THE FLOOR DIMMER SWITCH.
9. CENTER THE CARPET OVER THE TRANSMISSION HUMP AND STARTING FROM THE CENTER OF THE HUMP, WORK OUT TOWARDS EACH SIDE SMOOTHING OUT WRINKLES AND PULLING THE CARPET TIGHT.
NOTE: MANY PEOPLE ALSO PREFER TO USE BRUSH OR SPRAY ADHESIVE ON THE FLOOR TO GIVE A BETTER, SMOOTHER FIT WHICH IS LESS LIKELY TO MOVE OVER TIME. AFTER CORRECT FIT IS DETERMINED, FOLD BACK SECTIONS OF THE CARPET. APPLY ADHESIVE THEN SMOOTH DOWN AND PRESS INTO POSITION.
10. ON SOME CARPETS YOU WILL FIND SLIGHT EXCESS OF MATERIAL ON BOTH SIDES AT THE SILL PLATES. THIS IS PURPOSELY INCLUDED TO PROVIDE FOR POSSIBLE VARIATIONS OF INDIVIDUAL INSTALLATIONS. IF EXCESS EXISTS ON YOUR CAR, MERELY TRIM IT OFF WITH SCISSORS.
11. SLIP END OF CARPET UNDER SILL PLATE AT EITHER SIDE.
12. REPLACE ACCELERATOR PEDAL, AND SMOOTH OUT CARPET SO THAT IT LIES FLAT. REPLACE SILL PLATE AND SCREWS.
13. SLIT TO EDGE OF CARPET UNDER VALANCE, IF YOUR VEHICLE HAS ONE.
NOTE: SOME MODELS WILL REQUIRE HOLE OPENINGS FOR STEER POST PEDALS, MOUNTING BRACKETS, ETC. THESE HOLES SHOULD BE CUT CAREFULLY AFTER VERIFYING THAT CARPET FITS PROPERLY.
READ THE LINKS THEY CONTAIN MUCH OF THE USEFUL INFO YOULL NEED
viewtopic.php?f=35&t=5998&p=18555#p18555
http://www.stockinteriors.com/AutoCarpe ... ModelId=69
http://www.automotiveinteriors.com/install_carpet.htm
http://www.zip-corvette.com/84-96-c4/in ... -sets.html
http://www.ecklerscorvette.com/catalogs ... &x=16&y=13
heat and sound barrier layers help
http://www.ecklerscorvette.com/corvette ... -1996.html
viewtopic.php?f=89&t=2004&p=5314#p5314
http://www.mamotorworks.com/corvette/su ... t-products
viewtopic.php?f=89&t=10341&p=42459#p42459
viewtopic.php?f=35&t=5998&p=18555&hilit=corvette+carpet#p18555
http://www.superchevy.com/how-to/vemp-0 ... placement/
http://www.mamotorworks.com/corvette/su ... t-products
http://www.superchevy.com/how-to/0306ve ... m#cxrecs_s
http://www.superchevy.com/how-to/0307ve ... storation/
example
When you see bargains in replacement corvette parts, they rarely ARE!
I purchased a dash cover from , mid America corvette, awhile back, that shrived up in the Florida sun in a matter of days making it totally useless, I should have returned it but following the instructions that came with it it was glued to the car, making removing it without further damage very difficult, by the time I got it off it was a shredded mess, of cheap warped plastic
http://www.superchevy.com/how-to/0306vet-c4-interior-upgrade-install/
http://www.mamotorworks.com/corvette?frame=1.1019
http://www.mamotorworks.com/Corvette/product/dash-cap-black-603138-1
YES youll need to remove the seats and console and yes its not going to be a 1-2 hour under taking, plan on a full week end if you have never done it before! this is NOT a difficult job, to do, but I find its rather intimidating for most guys too do the first time, when I help them.
they hesitate, mostly because it looks like they are trashing the corvettes ,interior and they are rather reluctant to do something new, that they may have never done, not trusting their ability to get it re-installed correctly, to look like it should from the factory instal.
but its just not that difficult if you approach it logically and it helps to take pictures at each stage of the diss-assembly so you remember how it came apart.
Id advise talking with A FEW auto repair shops too get prices and tips on how to do the job!
http://www.ecklerscorvette.com/corvette ... uct_Viewed
I just last year replaced the seats and interior in my 1985 corvette, the only parts I could not find (YET) was the center arm rest /glove compartment cover /lid and the dash pad ,in a QUALITY replacement parts, the cheap trash they charge dearly for, that I temporarily bought and installed, are no where near factory quality
youll need a quart of contact cement like PLIOBOND and some weather strip adhesive
FOR SOME INSULATION YOULL WANT CONTACT CEMENT
http://www.centralvacuumstores.com/Cent ... 7AodHhwAAQ
BTW when carpets NEW or COLD it is resistant to being easily forced into matching curves and contours, like where the floor meets the trans tunnel, a HAIR DRYER can be used to WARM and mold the carpet much more easily but don,t use a HEAT GUN, it is far too hot and will cause plastic interior parts and carpet to warp , shrink or be damaged, just be aware to work in smaller areas and remember contact type adhesive glues and heat can be dangerous with fumes and some types are very flammable
several corvette restoration parts supply houses sell NEW screw kits and door sill plates,these are usually helpful.
its also generally a good idea to take each piece of the old carpet out and label it with a large piece of masking tape and a marker and as you take the new carpet out of the container it comes n, match the same component part side by side before you start so you know how many pieces you have, where they go and if your missing any.
before you get too far into the project ask a local auto repair shop what they would charge to replace the carpet professionally , it may not be enough more than what you may pay to make it worth doing, or it may encourage you to learn a new skill and save several hundred dollars
[/b]
BASIC GENERIC INSTRUCTIONS
1. LAY CARPET FLAT. FOLD IN HALF BY PULLING FRONT EDGE BACK OVER TO MEET REAR EDGE.
2. CENTER FOLDED CARPET OVER THE TRANSMISSION HUMP JUST IN FRONT OF THE FRONT SEAT.
3. SLOWLY UNFOLD THE CARPET TOWARD THE FRONT FIREWALL.
4. WHEN YOU REACH A SHIFT LEVER CUT A SMALL "X" SHAPED SLIT JUST LARGE ENOUGH FOR THE SHIFT LEVER ROD TO FIT THROUGH.
5. LIFT THE CARPET UP AND SLIDE IT DOWN OVER THE LEVER THROUGH THE "X" SLIT.
6. REPEAT STEPS 3, 4 AND 5 IF A SECOND SHIFT LEVER EXIST.
7. AFTER THE FULL INSTALLATION OF YOUR CARPET IS COMPLETE, RETURN TO THE SHIFT LEVERS AND CUT THE HOLES LARGER. BE CAREFUL NOT TO CUT THE HOLE LARGER THAN THE BOOT THAT WILL COVER THE AREA.
8. USE THE SAME "X" SLIT SYSTEM IF YOUR VEHICLE REQUIRES A CUTOUT FOR THE FLOOR DIMMER SWITCH.
9. CENTER THE CARPET OVER THE TRANSMISSION HUMP AND STARTING FROM THE CENTER OF THE HUMP, WORK OUT TOWARDS EACH SIDE SMOOTHING OUT WRINKLES AND PULLING THE CARPET TIGHT.
NOTE: MANY PEOPLE ALSO PREFER TO USE BRUSH OR SPRAY ADHESIVE ON THE FLOOR TO GIVE A BETTER, SMOOTHER FIT WHICH IS LESS LIKELY TO MOVE OVER TIME. AFTER CORRECT FIT IS DETERMINED, FOLD BACK SECTIONS OF THE CARPET. APPLY ADHESIVE THEN SMOOTH DOWN AND PRESS INTO POSITION.
10. ON SOME CARPETS YOU WILL FIND SLIGHT EXCESS OF MATERIAL ON BOTH SIDES AT THE SILL PLATES. THIS IS PURPOSELY INCLUDED TO PROVIDE FOR POSSIBLE VARIATIONS OF INDIVIDUAL INSTALLATIONS. IF EXCESS EXISTS ON YOUR CAR, MERELY TRIM IT OFF WITH SCISSORS.
11. SLIP END OF CARPET UNDER SILL PLATE AT EITHER SIDE.
12. REPLACE ACCELERATOR PEDAL, AND SMOOTH OUT CARPET SO THAT IT LIES FLAT. REPLACE SILL PLATE AND SCREWS.
13. SLIT TO EDGE OF CARPET UNDER VALANCE, IF YOUR VEHICLE HAS ONE.
NOTE: SOME MODELS WILL REQUIRE HOLE OPENINGS FOR STEER POST PEDALS, MOUNTING BRACKETS, ETC. THESE HOLES SHOULD BE CUT CAREFULLY AFTER VERIFYING THAT CARPET FITS PROPERLY.
READ THE LINKS THEY CONTAIN MUCH OF THE USEFUL INFO YOULL NEED
viewtopic.php?f=35&t=5998&p=18555#p18555
http://www.stockinteriors.com/AutoCarpe ... ModelId=69
http://www.automotiveinteriors.com/install_carpet.htm
http://www.zip-corvette.com/84-96-c4/in ... -sets.html
http://www.ecklerscorvette.com/catalogs ... &x=16&y=13
heat and sound barrier layers help
http://www.ecklerscorvette.com/corvette ... -1996.html
viewtopic.php?f=89&t=2004&p=5314#p5314
http://www.mamotorworks.com/corvette/su ... t-products
viewtopic.php?f=89&t=10341&p=42459#p42459
viewtopic.php?f=35&t=5998&p=18555&hilit=corvette+carpet#p18555
http://www.superchevy.com/how-to/vemp-0 ... placement/
http://www.mamotorworks.com/corvette/su ... t-products
http://www.superchevy.com/how-to/0306ve ... m#cxrecs_s
http://www.superchevy.com/how-to/0307ve ... storation/
Last edited by a moderator: