spark plug info

grumpyvette

Administrator
Staff member
spark plug info..SO!...read thru the links theres a ton of good info,
but its spread over all the links, if you can get that skill mastered your well ahead of most guys who fail to take the time and effort to learn that skill
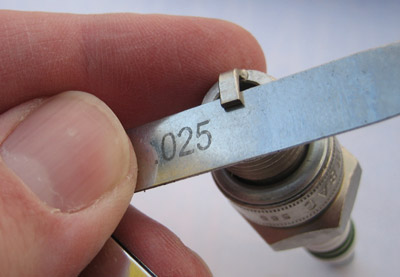
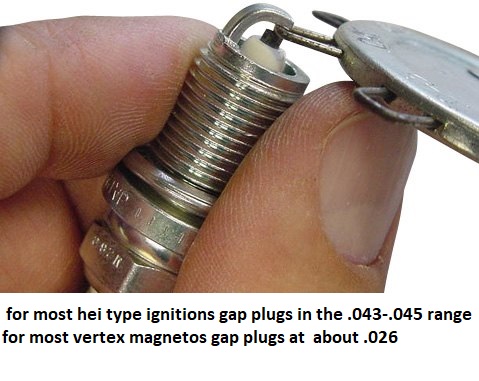
guys frequently ask me what plug gap to use, Provided your ignition functions correctly and your using the correct heat range plugs and a reasonably close fuel/air ratio and timing advance, Ive never seen any improvements in gaps tighter or wider than .045.
Ive never seen any advantage to gaps over .045 and Ive seen plug gaps as wide as .060 or under .035 cause misfires with some ignitions in a FEW applications so after years of testing and racing I generally set plug gaps at .045, if your having issues with misses at .045 its not the plug gap thats the cause,its some other problem with your ignition or fuel/air ratio or ignition timing advance,high resistance ignition wire, moisture,a bad coil,loose connections, firing order or arcing ignition etc..
gappingpl.jpg
80078.jpg
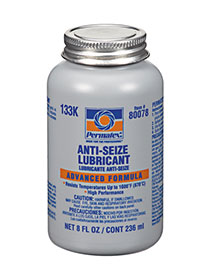
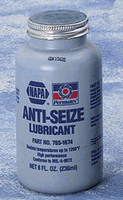
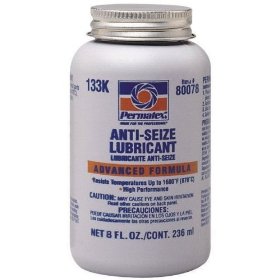
always use a bit of anti-seize paste on spark plugs, threads, being used in aluminum cylinder heads even if not required and its best to remove & install them when the engines not very hot, be very careful to start threading them into the heads by hand, and don,t over tighten them as its all too easy to strip soft aluminum plug threads in aluminum cylinder heads, if you have access to a 3/8" drive inch/la torque wrench 12-13 ft lbs is about correct torque

http://garage.grumpysperformance.com/index.php?threads/installing-hard-to-access-plugs.962/

index.php

BTW some of the older guys will remember that the SBC used to have 13/16" spark plugs and they were changed to the smaller 5/8" style in the early 1970s, and if your wondering why they changed it was because they found that smaller diam. plug threads allowed slightly larger coolant passages and allowed moving the plug location slightly closer to the exhaust valve and also allowed a slightly changed angle all of which allowed lower emissions, better control on combustion and less chance of stripped or cross threading plugs.
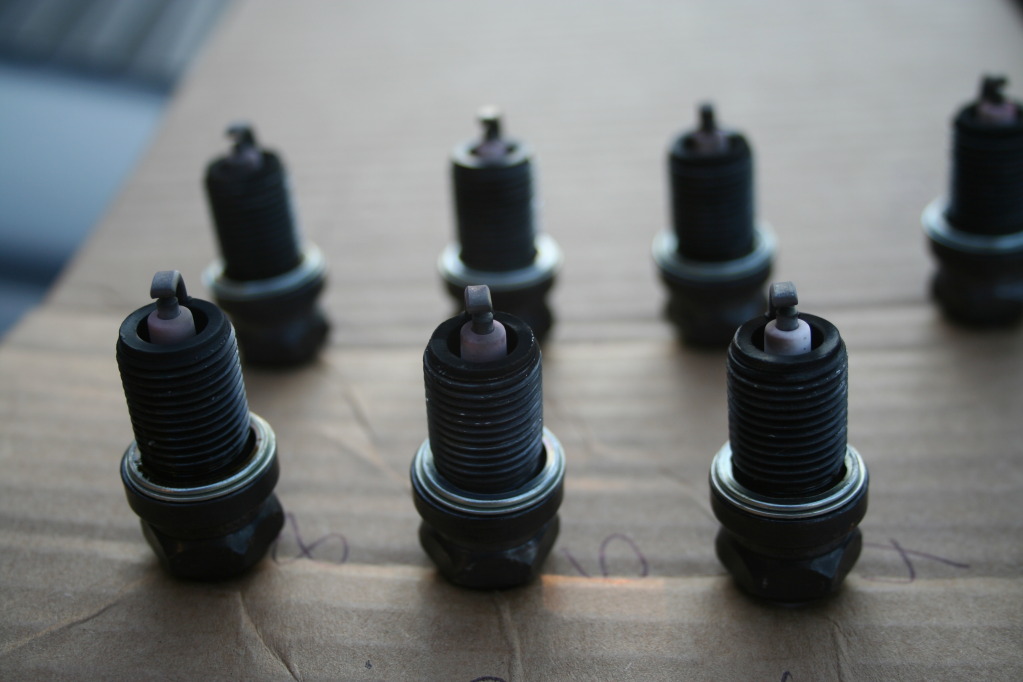
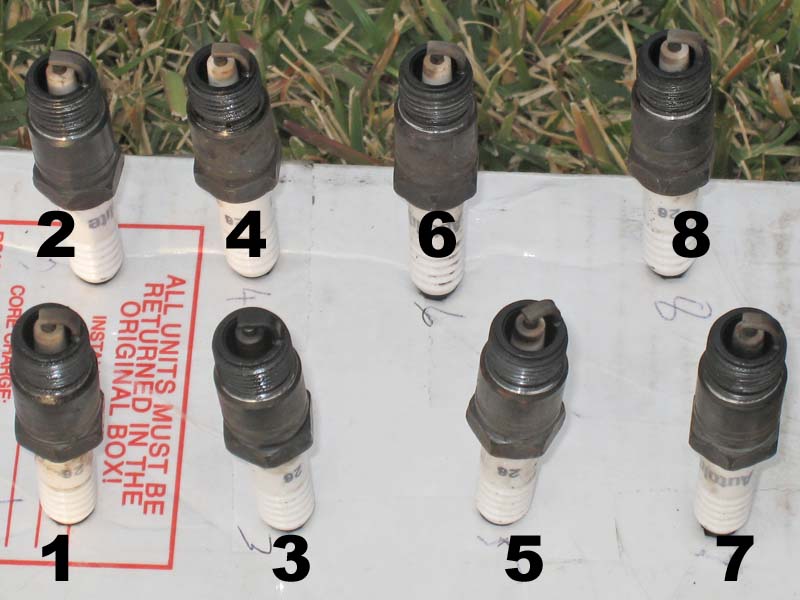
post very clear pictures of your spark plugs, label the cylinder # they came from, and measure the fuel pressure you can tell a good deal if you know those factors and how to read plugs.
most engine misses are related to either fuel/air ratio changes or ignition, so the first step is isolate the problem, or the cause, it could be the timing, advance curve, fuel pressure , a vacuum leak,or a defective ignition etc, you need to do a few tests

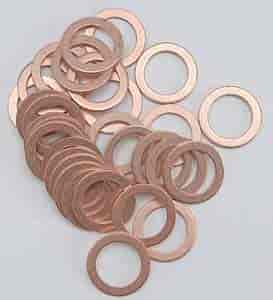
they make adapter crush gaskets
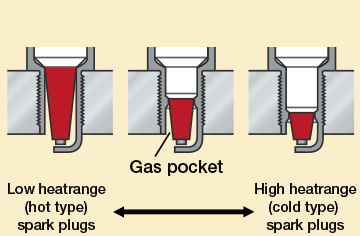
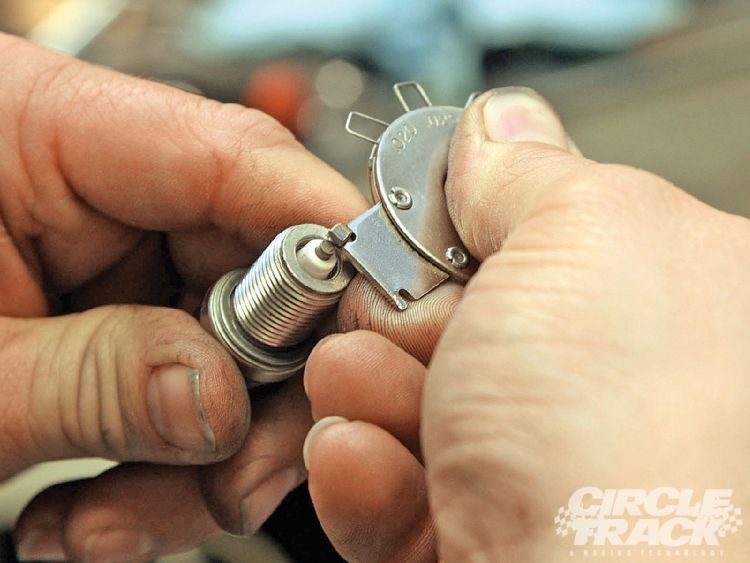
The sole purpose of an ignition system is to serve the spark plugs, and to start the combustion process, the electrical current generated by the coil must be strong enough to jump across the gap at the tip of the spark plug. Every engine has a unique specification for its spark plugs’ gap, which is why it’s incredibly important to properly gap a spark plug for optimum performance.
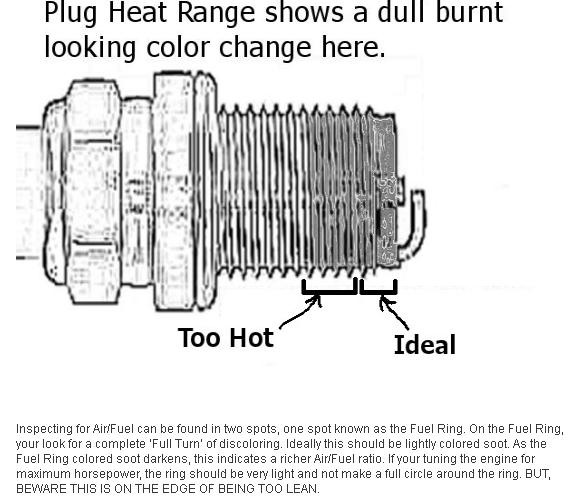
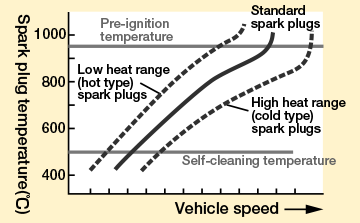
A spark plug only functions completely when its center electrode temperature is between these temperatures of about 500°C and 950°C.

heatrange_img_02.png

The following examples detail the typical temperatures of various combustion-related engine parts during normal operation:
  • Intake valve: 475° F
  • Exhaust valve: 1,200° F
  • Spark plug: 1,100° F
  • Piston face: 575° F
  • Cylinder wall: 375° F
heatrange_img_03.png

"The most commonly known flammable liquid is gasoline.
It has a flash point of about −50° F (−65° C). The ignition temperature is about 495° F (232(232° C) [sic], a comparatively low figure."
The temperature of the burning gases inside the combustion chamber is typically around 2,800° F. In a diesel engine, this temperature remains fairly steady. In a gasoline-powered engine, the temperature can climb to 4,500° F or more under certain circumstances. However, the vehicle's engine cooling system keeps the walls of the combustion chamber at a temperature of between 265° F and 475° F.


    • If the gap is too wide, the electrical voltage may not be high enough to arc across, which would result in a misfire.
    • If the gap is too narrow, the spark may not ignite a lean air/fuel mixture, which would also result in a misfire.
    • A spark plug’s voltage requirement is directly proportional to the size of the gap.
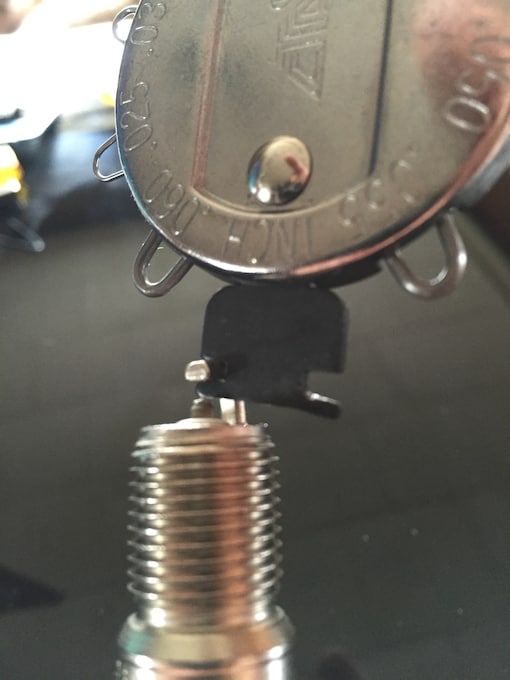
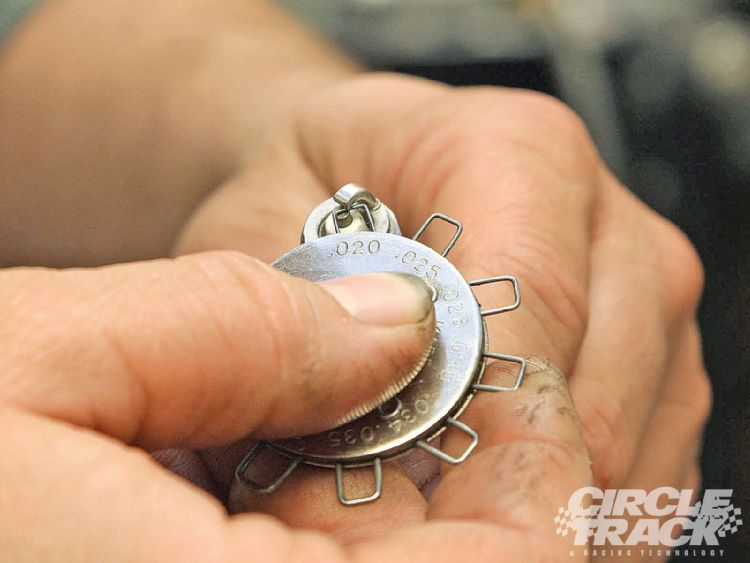
While Autolite engineers pre-gap spark plugs for the most popular applications, a spark plug may be designed for two different engines. These engines may specify distinctive gaps. Before you install new spark plugs, reference your manual and adjust the gap using a spark plug gap tool or gauge.


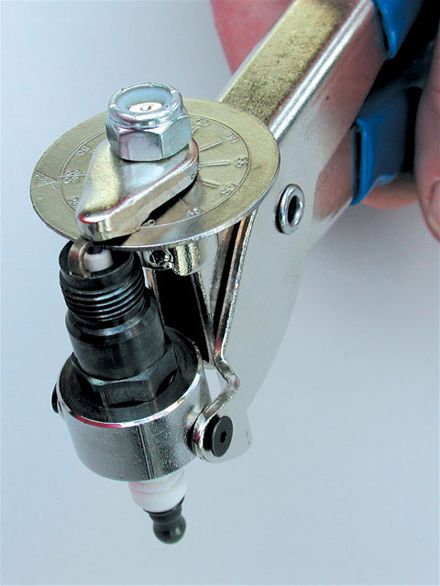
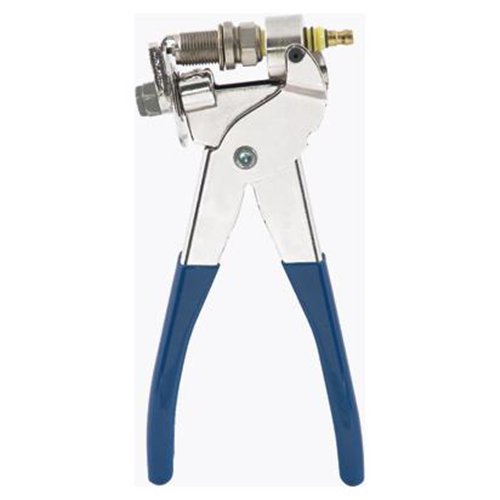
    • If you need to widen the gap, use the spark plug gap tool to pull back on the ground strap (also called the side electrode).
    • If you need to close up the gap, gently tap the ground strap electrode on a hard surface.
    • Do not touch the center electrode or the insulator during this procedure, since these can be damaged.
You can be sure that the Autolite spark plug recommended for your application has been engineered to meet the requirements of your engine and that the gap can easily be adjusted as required. Visit Autolite.com for more tech tips and to learn about out full line of premium plugs.

https://www.jegs.com/i/Moroso/710/71900/10002/-1
PlugSeats.jpg


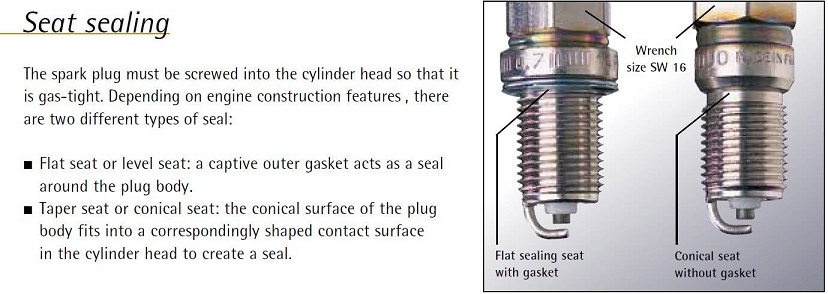
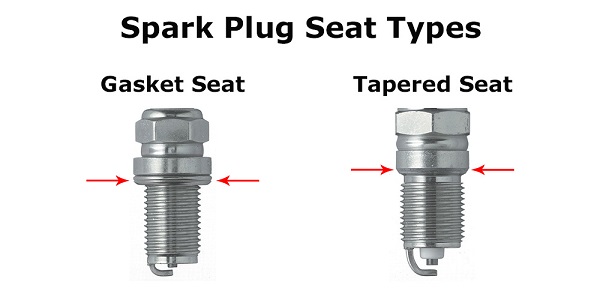
there are both 13/16" and 5/8" spark plug sockets, used on most chevy engines,
and both tapered and flat seats that use a crush washer seal design


taperseat1.jpg


THE >>> TS <<< STANDS FOR "TAPERED SEAT" PLUGS.
NO STEEL GASKET
5391067_acd_r44ts_pri_larg.jpg


5531802_ngk_2411_pri_larg.jpg


http://www.harborfreight.com/3x-magnify ... 94367.html
image_14883.jpg

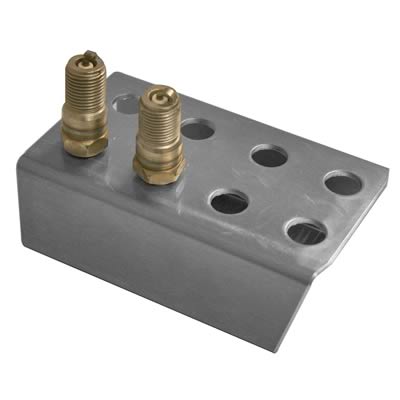
having a spark plug holder with numbered holes and a good inspection tool helps
sparkplugholder.JPG

sparkplugholder2.jpg


plugseat.jpg

testing ignition coil
http://www.aa1car.com/library/ignition_coils.htm

http://garage.grumpysperformance.com/index.php?threads/installing-hard-to-access-plugs.962/

gappingpl.jpg


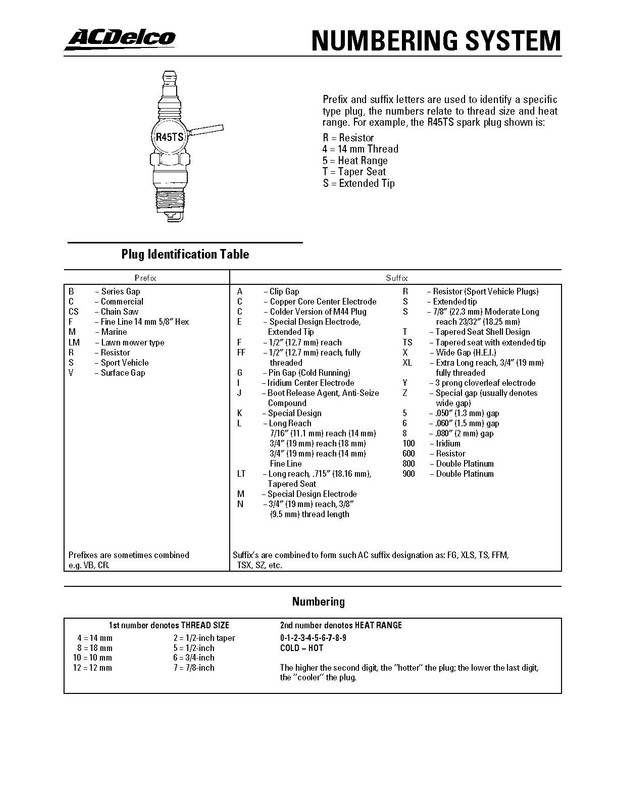
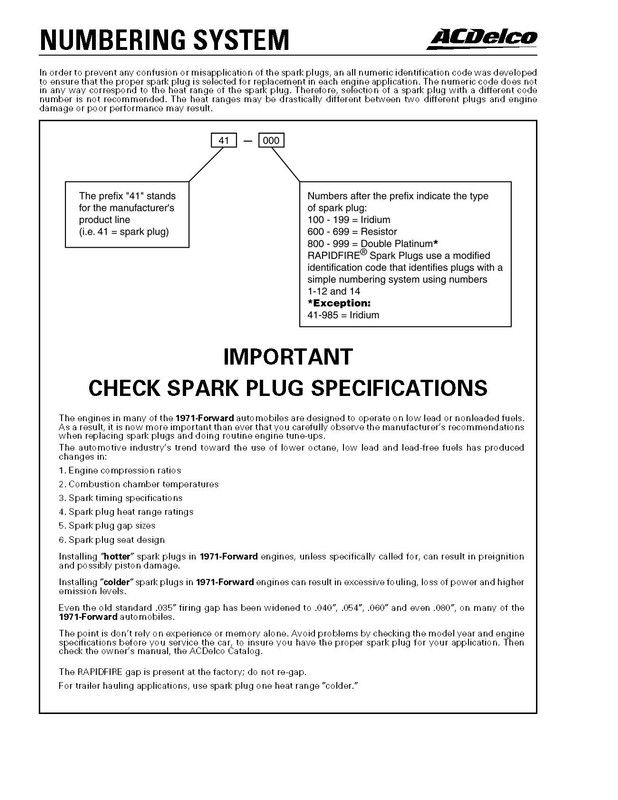
The images below are pages out of the ACDelco plug catalog and shows the old and new numbering system. The new system doesn't have as detailed "intelligence" built into it like the old system.


acdelco-spark-plugs-numbering-system-Page-3.jpg


WATCH THE VIDEO


Recommended Spark Plugs for Vortec Heads


  • AC Delco Rapid Fire Spark Plugs R44LTS
  • AC Delco Rapid Fire Spark Plugs MR43LTS
  • AC Delco RapidFire No 3 Sparkplug
  • ACCEL P526S U-Groove “SHORTY” Double Platinum (approximately 3/16″ shorter then R44LTS)
  • ACCEL 516
  • Autolite 26
  • Autolite 104
  • Champion RS12YC
  • Bosch HR10B
  • Bosch HR10BX
  • Bosch HR9DC
http://garage.grumpysperformance.com/index.php?threads/reading-plugs.5428/

http://garage.grumpysperformance.com/index.php?threads/spark-plug-info.202/

http://garage.grumpysperformance.co...that-some-guys-don-t-look-at-the-clues.11176/

http://garage.grumpysperformance.com/index.php?threads/changing-long-over-due-spark-plugs.10404/

http://garage.grumpysperformance.com/index.php?threads/why-use-anti-seize-paste.9424/

http://garage.grumpysperformance.co...ition-wires-getting-the-header-clearance.840/

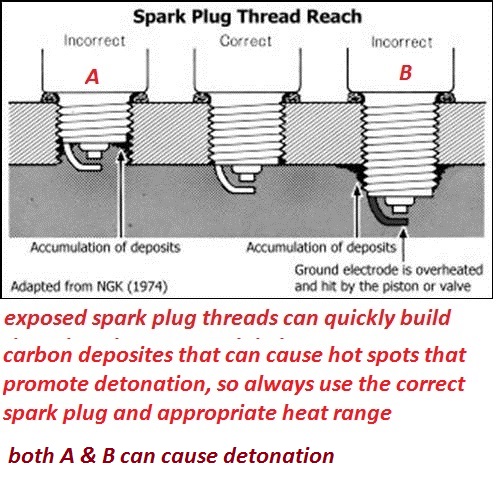
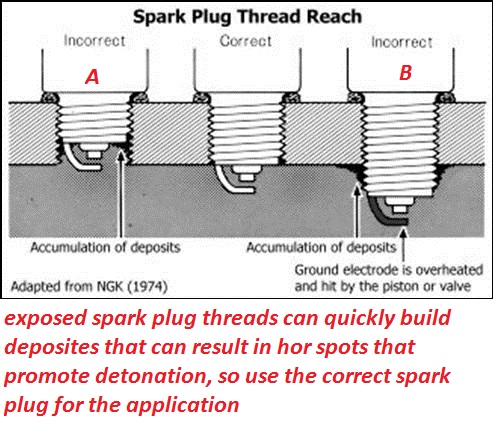
plugreachza.jpg

http://www.summitracing.com/parts/PIT-229/
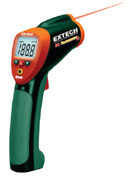
Ive found its a whole lot faster to use a quality IR temp gun, to locate a individual cylinder that's mis-firing as it tends to run significantly cooler than adjacent cylinders, or hotter if its a vacuum leak at times, as lean F/A mixes tend to run hotter
(Ive used this one for years)
irtemp.jpg

http://www.professionalequipment.com/ex ... ermometer/
Wide temperature range from -58 to 1832°F (-50 to 1000°C)

many temp guns don,t read high enough or accurately enough
http://www.professionalequipment.com/ex ... ermometer/
that you can use on the engine to check ALL 8 exhaust temps, individually, this quickly locates plugged injectors or vacuum leaks ETC
Wide temperature range from -58 to 1832°F

when selecting an IR gun for automotive use, you really want to be able to read from 0 F deg-about 1400F deg. to cover most conditions you'll test for

READ THRU LINKS AND SUB LINKS

http://www.4secondsflat.com/Spark_plug_reading.html

viewtopic.php?f=70&t=3949&p=25481#p25481

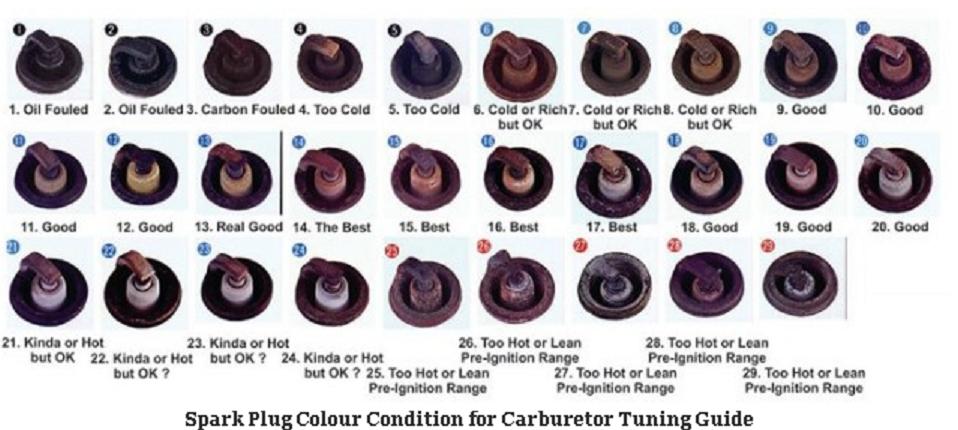
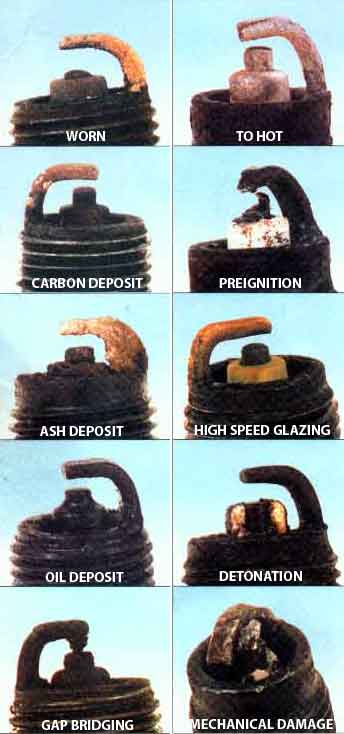
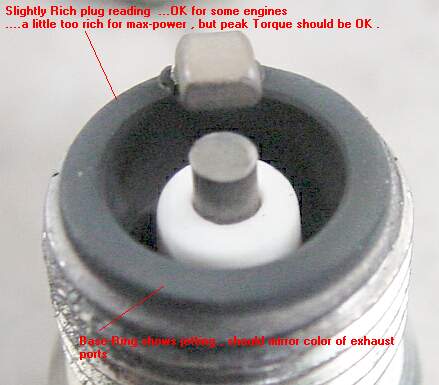
learning to correctly read plugs is a KEY FACTOR in learning how to tune and diagnose engine conditions, ignition temperatures,fuel/air ratios and detect detonation

example
Here is a link to AC Delco for information on the codes.

On the R45TSX for example:

R=resistor spark plug
45=heat range
T=tapered plug
S=extended tip
X=wide gap

http://www.acdelco.com/parts/sparkplugs ... cation.jsp
0706_551.jpg


lomSfNl.jpg

some reference chart info

http://www.sparkplug-crossreference.com ... ence8.html

http://www.spark-plugs.co.uk/pages/tech ... htm#ISOJIS

http://www.summitracing.com/parts/msd-3508

http://www.pcmforless.com/index.php?opt ... &Itemid=56

http://www.mirage-performance.com/tech/sparkplugs.html

http://go.mrgasket.com/pdf/sparkplugs/U ... erence.pdf

http://www.autorepairinstructions.com/?cat=7


http://www.kennedysdynotune.com/Spark Plug Tech.htm

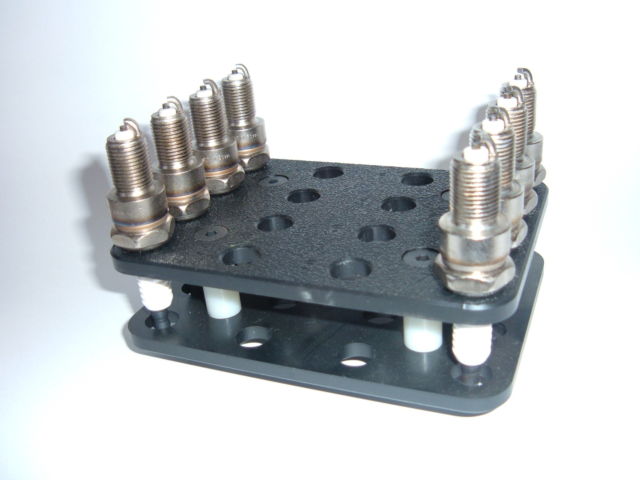
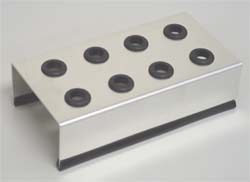
IF your trying to tune an engine or track down a problem,When you inspect plugs ,pull all 8 plugs , drill some (8) 1/2 holes in 2 parallel lines in a 12"" section of 2"X6" wood and label the holes, to indicate the cylinders
2-4-6-8
1-3-5-7

so you can stick the porcelain ends , of each plug ,the wires snap onto, into the holes so you can photograph and inspect the tips and electrodes in clear detail as they can tell you a great deal about the engines running conditions


viewtopic.php?f=50&t=892&hilit=+socket

I frequently get asked what brand of plugs I use or suggest,
Ive had good luck with
AC DELCO
NGK
BOSCH PLATINUM plugs
most gapped at .043-.045
these are companys making a decent plug, your engine might run better with something else but Ive had good results with these brands
all work well in most LT1 and L98 chevy SB engines
just stick to the single electrode ground designs as in most cases Ive found the multi ground plugs cost more and don,t provide ANY improvement, and before you go linking in tests showing plug brand XYZ makes 5- 7 extra hp you should realize any decent experienced dyno operator can rig the results that much, either way at will, and if company xyz pays you several hundred dollars to show their plugs provide a small margin of extra power you can bet your butt the dyno operator will find it!
and when the next company ABC stops by for a TEST, you can bet they also show a small advantage

reading plugs can tell you a great deal, but if you don,t read thru and understand the linked info youll be at a big disadvantage heres a very useful chart, depicting plug conditions to look for indicating combustion chamber temp and air/fuel ratio indicators

http://www.4secondsflat.com/plug_chart.html

http://www.4secondsflat.com/Spark_plug_reading.html

http://www.dragstuff.com/techarticles/r ... plugs.html

http://www.custom-car.us/ignition/spark ... range.aspx

http://ngksparkplugs.com/tech_support/s ... p?mode=nml

http://www.autorepairinstructions.com/?cat=7

viewtopic.php?f=70&t=5428

http://www.power-21.com/AutolitePower21 ... preads.pdf

http://kb-silvolite.com/article.php?action=read&A_id=63

http://www.autohausaz.com/html/spark-pl ... wires.html

http://en.wikipedia.org/wiki/Spark_plug

http://www.ngksparkplugs.com/techinfo/s ... lation.asp
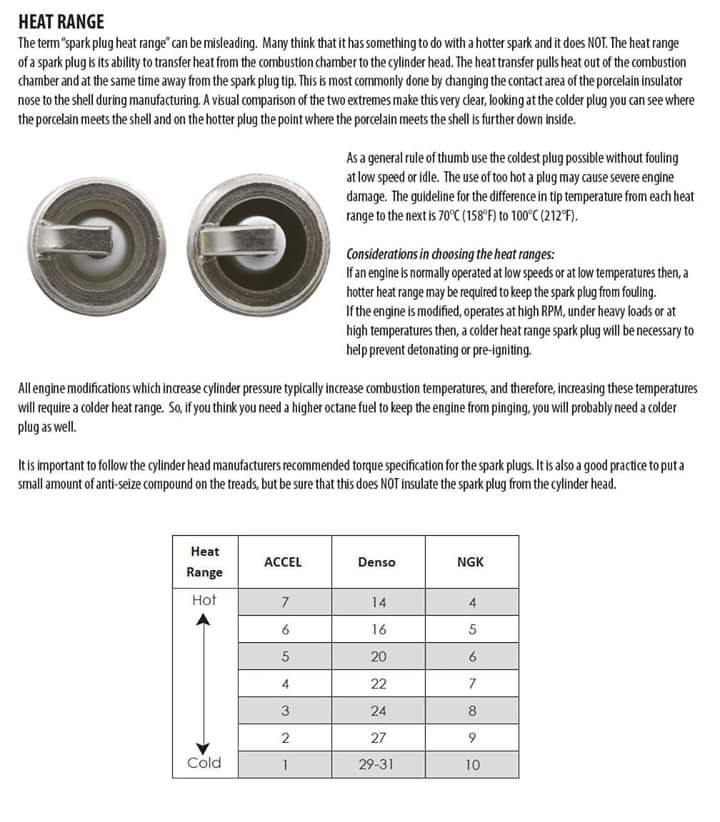
ngkheat.jpg

http://www.verrill.com/moto/sellingguid ... rchart.htm

http://www.strappe.com/plugs.html

http://www.wallaceracing.com/plug-reading-lm.html


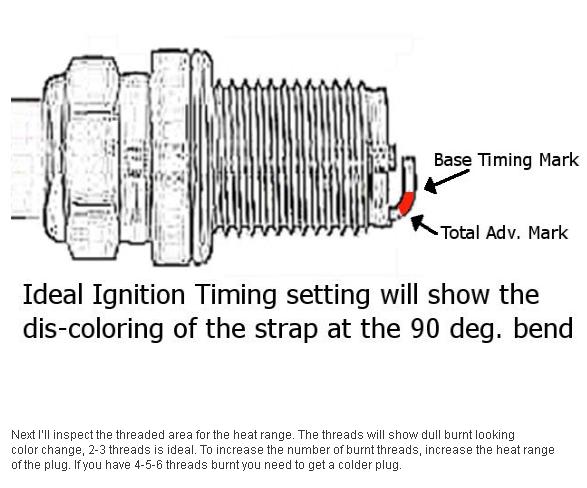
timing%20indicator%20mark.jpg

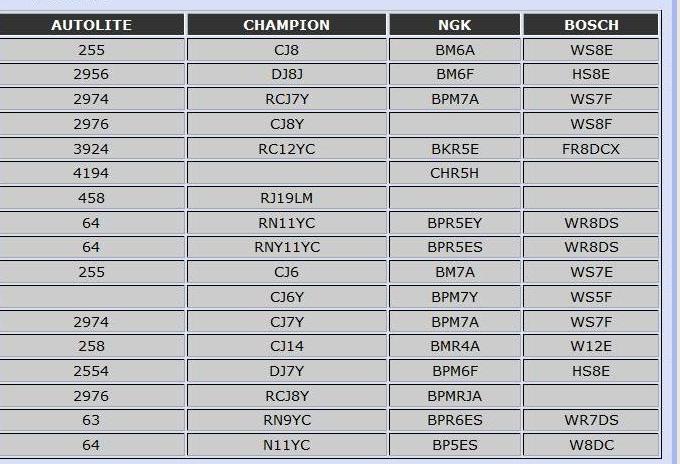
cross reference
http://www.angelfire.com/extreme4/skido ... ERENCE.htm

viewtopic.php?f=50&t=1853&p=4848#p4848
QUOTE
"Heat range

The operating temperature of a spark plug is the actual physical temperature at the tip of the spark plug within the running engine. This is determined by a number of factors, but primarily the actual temperature within the combustion chamber. There is no direct relationship between the actual operating temperature of the spark plug and spark voltage. However, the level of torque currently being produced by the engine will strongly influence spark plug operating temperature because the maximum temperature and pressure occurs when the engine is operating near peak torque output (torque and RPM directly determine the power output). The temperature of the insulator responds to the thermal conditions it is exposed to in the combustion chamber but not vice versa. If the tip of the spark plug is too hot it can cause pre-ignition leading to detonation/knocking and damage may occur. If it is too cold, electrically conductive deposits may form on the insulator causing a loss of spark energy or the actual shorting-out of the spark current.

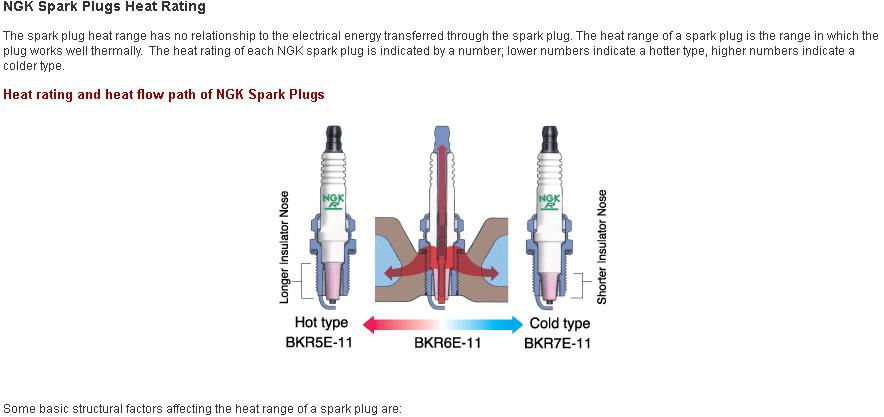
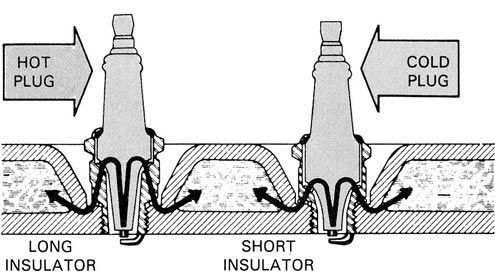
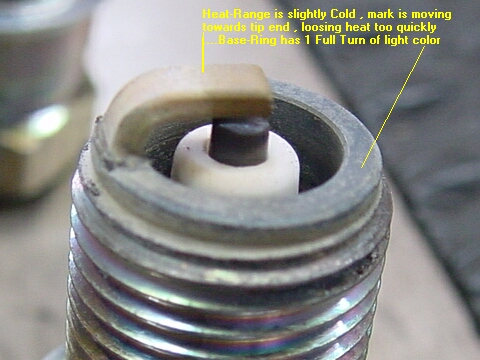
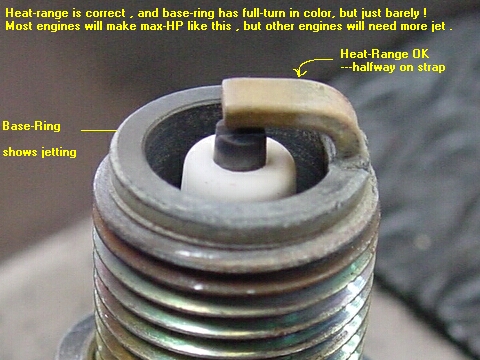
A spark plug is said to be "hot" if it is a better heat insulator, keeping more heat in the tip of the spark plug. A spark plug is said to be "cold" if it can conduct more heat out of the spark plug tip and lower the tip's temperature. Whether a spark plug is "hot" or "cold" is known as the heat range of the spark plug. The heat range of a spark plug is typically specified as a number, with some manufacturers using ascending numbers for hotter plugs and others doing the opposite, using ascending numbers for colder plugs.

The heat range of a spark plug (i.e. in scientific terms its thermal conductivity characteristics) is affected by the construction of the spark plug: the types of materials used, the length of insulator and the surface area of the plug exposed within the combustion chamber. For normal use, the selection of a spark plug heat range is a balance between keeping the tip hot enough at idle to prevent fouling and cold enough at maximum power to prevent pre-ignition leading to engine knocking. By examining "hotter" and "cooler" spark plugs of the same manufacturer side by side, the principle involved can be very clearly seen; the cooler plugs have more substantial ceramic insulators filling the gap between the center electrode and the shell, effectively carrying off the heat, while the hotter plugs have less ceramic material, so that the tip is more isolated from the body of the plug and retains heat better.

Heat from the combustion chamber escapes through the exhaust gases, the side walls of the cylinder and the spark plug itself. The heat range of a spark plug has only a minute effect on combustion chamber and overall engine temperature. A cold plug will not materially cool down an engine's running temperature. (Too hot of a plug may, however, indirectly lead to a runaway pre-ignition condition that can increase engine temperature.) Rather, the main effect of a "hot" or "cold" plug is to affect the temperature of the tip of the spark plug.

It was common before the modern era of computerized fuel injection to specify at least a couple of different heat ranges for plugs for an automobile engine; a hotter plug for cars which were mostly driven mildly around the city, and a colder plug for sustained high speed highway use. This practice has, however, largely become obsolete now that cars' fuel/air mixtures and cylinder temperatures are maintained within a narrow range, for purposes of limiting emissions. Racing engines, however, still benefit from picking a proper plug heat range. Very old racing engines will sometimes have two sets of plugs, one just for starting and another to be installed once the engine is warmed up, for actually driving the car."
learn how read the spark plugs their condition will tell you a good deal about cylinder burn conditions, get an IR temp gun,vacuum gauge and timing light they are a great tuning and diagnostic aid,as they can indicate problems like a clogged cat or faulty ignition, etc. don,t solely relie on a single indicator

http://www.strappe.com/plugs.html

http://performanceunlimited.com/illustrations/sparkplugs.html

http://www.dragstuff.com/techarticles/s ... rence.html

http://www.ngksparkplugs.com/techinfo/s ... country=US

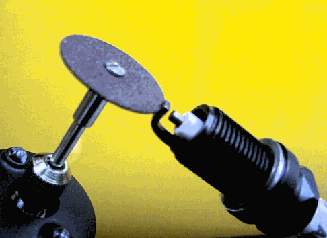
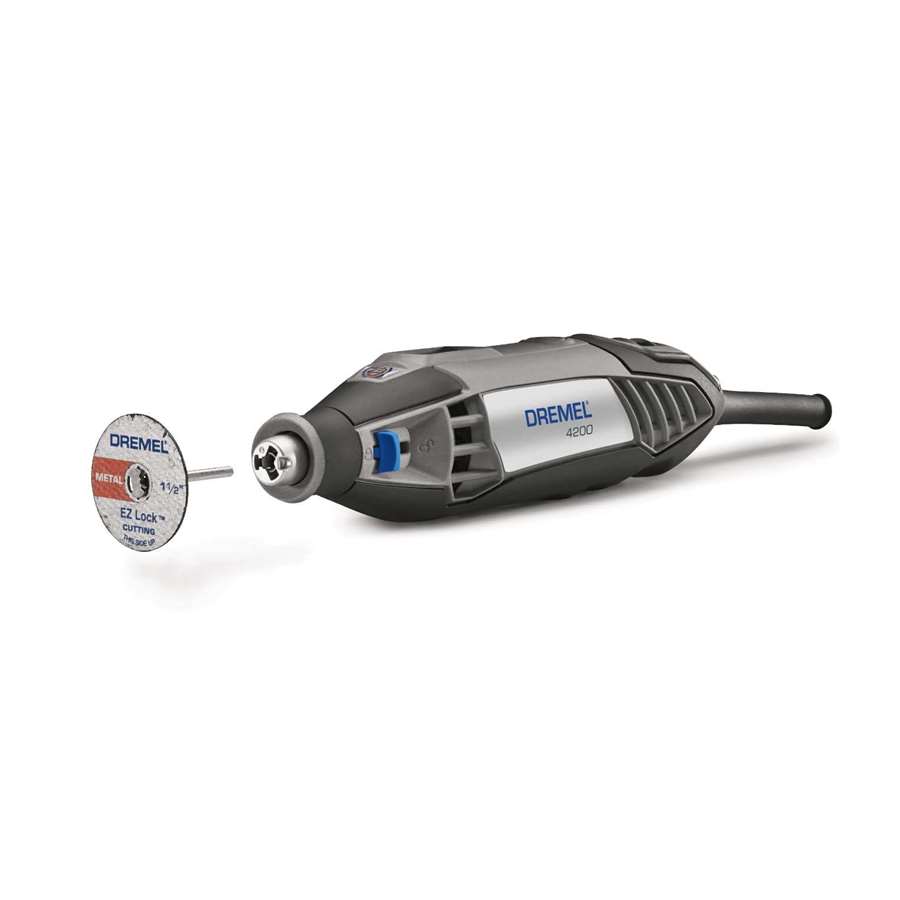
the plugs are normally done (the electrodes cut back)with a dremel tool cutting disk
img113.gif

shortplug.jpg

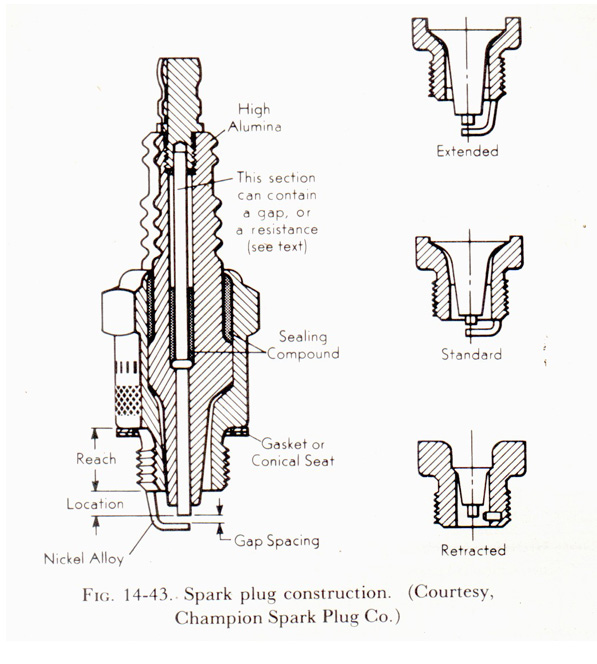
sprd.jpg

sparks-plug-reading.jpg%20w=344&h=734.jpg

http://www.autorepairinstructions.com/?cat=7
plugsread1.jpg

plugsread2.jpg

plugsread3.jpg

plugreachz.jpg

Plugs002.jpg

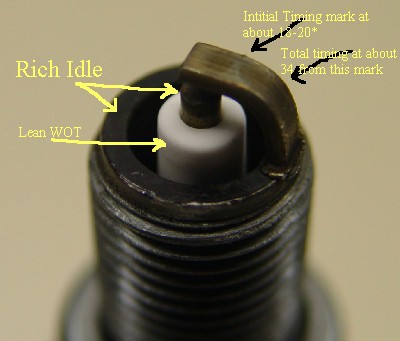
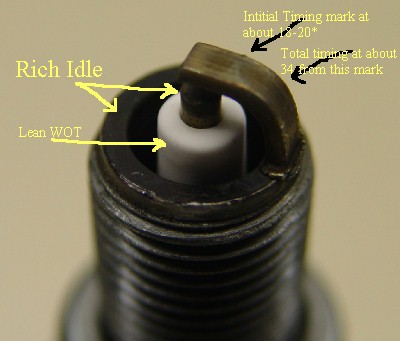
heres a good indication of plugs running a bit rich at idle and real lean in the upper rpm range

Plug-2.jpg

keep in mind that different brands of plugs will have different lengths that can be critical with ignition wire to header clearances
http://www.centuryperformance.com/spark ... g-192.html

http://www.carcraft.com/techarticles/sp ... index.html

a few places to look for more info on plugs

http://www.centuryperformance.com/spark ... pg-26.html

http://www.dragstuff.com/techarticles/h ... plugs.html


http://opc.mr2oc.com/online_parts_catal ... _plugs.jpg

http://www.gofastzone.com/techtips/sparkplugs/sparkplugs.htm

http://www.ngksparkplugs.ca/documents/partnumberkey.pdf

http://www.autohausaz.com/html/spark-pl ... wires.html

http://www.acdelco.com/html/pi_plugs_ident.htm

http://www.autolite.com/framer.cgi?page=http://www.autolite.com/products/racing.htm

http://members.uia.net/pkelley2/sparkplugreading.html

http://www.circletrack.com/enginetech/c ... index.html

http://www.atlanticjetsports.com/_techtalk/00000005.htm

http://www.strappe.com/plugs.html

http://www.babcox.com/editorial/cm/cm59910.htm

http://www.4secondsflat.com/Spark_plug_reading.html

http://www.ngksparkplugs.com/techinfo/spark_plugs/partnumberkey.pdf

http://www.nightrider.com/biketech/spkplghnbook.htm

http://www.tsrsoftware.com/sparkplug.htm

viewtopic.php?f=70&t=1809&p=4671#p4671

http://www.gnttype.org/techarea/engine/plugs.html

http://www.dansmc.com/sparkplugs1.htm

http://www.ngksparkplugs.com/techinfo/spark_plugs/overviewp2.asp

http://www.pajjakid.com/ubipa/sparkplugs.htm

http://www.edelbrock.com/automotive/sparkplugs.html

http://www.bullittarchive.com/Maintenance/Sparkplugoverview/

http://www.powerarc.com/sparkplug.htm

http://www.carcraft.com/techarticles/64378/

http://www.wakularacing.com/TechnicalInfo.htm

https://garage.grumpysperformance.com/index.php?threads/reading-plugs.5428/

http://www.geocities.com/MotorCity/Flats/3877/spark.html


BTW IF YOU WANT TO AVOID ETHANOL LACED FUEL
http://pure-gas.org/
 
Last edited by a moderator:
heres an old post that will answer most questions if you read thru the links
https://www.sparkplugs.com/Automotive-Parts-l134.aspx
in 35 years of engine building and racing I have not yet seen any increase in power or reliability or any other advantage to increasing the spark plug gap to more than the .043-.045 gap, and regularly gap my corvettes at .043-.045 regardless of the ignition system used, and I use VERTEX MAGNETOS and MSD, and HOLLEY ignitions extensively , and used to use the HEI and points ignitions in the past,, I have seen a reduction in power using under .040 or over .047 in some applications

asking for spark plug info..SO!...

a few places to look for more info on plugs
plugs.jpg


http://www.carcraft.com/techarticles/sp ... index.html

http://www.carcraft.com/howto/116_0703_ ... index.html

http://garage.grumpysperformance.com/index.php?threads/ignition-wire-crimp-tool.2749/

http://www.acdelco.com/html/pi_plugs_ident.htm

viewtopic.php?f=50&t=892

http://members.uia.net/pkelley2/sparkplugreading.html

http://www.atlanticjetsports.com/_techtalk/00000005.htm

http://www.strappe.com/plugs.html

http://www.babcox.com/editorial/cm/cm59910.htm

http://www.ngksparkplugs.com/techinfo/spark_plugs/partnumberkey.pdf

http://www.nightrider.com/biketech/spkplghnbook.htm

http://www.tsrsoftware.com/sparkplug.htm

http://www.gnttype.org/techarea/engine/plugs.html

http://www.dansmc.com/sparkplugs1.htm

http://www.ngksparkplugs.com/techinfo/spark_plugs/overviewp2.asp

http://www.centuryperformance.com/spark.asp

http://www.centuryperformance.com/spark ... pg-26.html


http://www.edelbrock.com/automotive/sparkplugs.html


http://www.powerarc.com/sparkplug.htm

http://www.carcraft.com/techarticles/64378/

http://dodgeram.org/tech/gas/spark_plugs/s_plug_faq.htm

http://www.centuryperformance.com/spark.asp

http://www.powerarc.com/sparkplug.htm

http://www.edelbrock.com/automotive/sparkplugs.html

http://www.answers.com/topic/spark-plug

lots more info here in the sub links, of this thread, keep in mind reading plugs tells you a great deal about the conditions, of temperature and fuel/air ratio, and heat ranges the combustion chamber sees, info that with experience can be used to tune and diagnose an engines condition and burn characteristics

viewtopic.php?f=44&t=773

WHAT IS DETONATION?

Detonation (also called "spark knock") is an erratic form of combustion that can cause head gasket failure as well as other engine damage. Detonation occurs when excessive heat and pressure in the combustion chamber cause the air/fuel mixture to autoignite. This produces multiple flame fronts within the combustion chamber instead of a single flame kernel. When these multiple flames collide, they do so with explosive force that produces a sudden rise in cylinder pressure accompanied by a sharp metallic pinging or knocking noise. The hammer-like shock waves created by detonation subject the head gasket, piston, rings, spark plug and rod bearings to severe overloading.

Mild or occasional detonation can occur in almost any engine and usually causes no harm. But prolonged or heavy detonation can be very damaging. So if you hear knocking or pinging when accelerating or lugging your engine, you probably have a detonation problem.

A DOZEN WAYS TO PREVENT DETONATION
1. Try a higher octane fuel. The octane rating of a given grade of gasoline is a measure of its detonation resistance. The higher the octane number, the better able the fuel is to resist detonation. Most engines in good condition will run fine on regular grade 87 octane fuel. But engines with high compression ratios (over 9:1), turbochargers, superchargers, or with accumulated carbon deposits in the combustion chamber may require 89 or higher octane fuel.
How a vehicle is used can also affect its octane requirements. If a vehicle is used for towing or some other application where the engine is forced to work hard under load, a higher octane fuel may be necessary to prevent detonation.

If switching to a higher octane fuel fails to eliminate a persistent detonation problem, it probably means something else is amiss. Anything that increases normal combustion temperatures or pressures, leans out the air/fuel mixture, or causes the engine to run hotter than normal can cause detonation.

2. Check for loss of EGR. The Exhaust Gas Recirculation (EGR) system is one of the engine's primary emission controls. Its purpose is to reduce oxides of nitrogen (NOX) pollution in the exhaust. It does this by "leaking" (recirculating) small amounts of exhaust into the intake manifold through the EGR valve. Though the gases are hot, they actually have a cooling effect on combustion temperatures by diluting the air/fuel mixture slightly. Lowering the combustion temperature reduces the formation of NOX as well as the octane requirements of the engine.
If the EGR valve is not opening, either because the valve itself is defective or because its vacuum supply is blocked (loose, plugged or misrouted vacuum hose connections, or a defective vacuum control valve or solenoid), the cooling effect is lost. The result will be higher combustion temperatures under load and an increased chance of detonation.


Refer to a service manual for the configuration and hose routing of your engine's EGR system, and the recommended procedure for checking the operation of the EGR system.

3. Keep compression within reasonable limits. A static compression ratio of 9:1 is usually the recommended limit for most naturally aspirated street engines (though some newer engines with knock sensors can handle higher compression ratios).
Compression ratios over 10.5:1 may create a detonation problem even with 93 octane premium gasoline. So unless an engine is being built to run on racing fuel, keep the compression ratio within a reasonable range for pump gasoline. This, in turn, may require using lower compression pistons and/or cylinder heads with larger combustion chambers. Another option would be to use a copper head gasket shim with the stock head gasket to reduce compression.

Retarding the cam timing can also lower cylinder pressures to reduce detonation at low r.p.m., but doing so hurts low speed torque which is not recommended for street engines or cars with automatics.

For supercharged or turbocharged applications, a static compression ratio of 8:1 or less may be required depending on the amount of boost pressure.

Another point to keep in mind is that boring an engine's cylinders to accept oversized pistons also increases the static compression ratio. So too does milling the cylinder heads. If such modifications are necessary to compensate for cylinder wear, head warpage or damage, you may have to use a thicker head gasket if one is available for the application or a head gasket shim (a dead soft copper spacer shim) to offset the increase in compression.

4. Check for over-advanced ignition timing. Too much spark advance can cause cylinder pressures to rise too rapidly. If resetting the timing to stock specifications doesn't help, retarding the timing a couple of degrees and/or recalibrating the distributor advance curve may be necessary to keep detonation under control.

5. Check for a defective knock sensor. Many late model engines have a "knock sensor" on the engine that responds to the frequency vibrations characteristically produced by detonation (typically 6-8kHz). The knock sensor produces a voltage signal that signals the computer to momentarily retard ignition timing until the detonation stops.
If the "check engine" light is on, check the vehicle's onboard computer system using the prescribed procedure for a "trouble code" that would correspond to a bad knock sensor (code 42 or 43 for GM, code 25 for Ford, or code 17 for Chrysler).


A knock sensor can usually be tested by rapping a wrench on the manifold near the sensor (never hit the sensor itself!) and watching for the timing change while the engine is idling. If the timing fails to retard, the sensor may be defective -- or the problem may be within the electronic spark timing control circuitry of the computer itself. To determine the cause, you'll have to refer to the appropriate diagnostic chart in a service manual and follow the step-by-step test procedures to isolate the cause.
Sometimes a knock sensor will react to sounds other than those produced by detonation. A noisy mechanical fuel pump, a bad water pump or alternator bearing, or a loose rod bearing can all produce vibrations that can trick a knock sensor into retarding timing.


6. "Read" your spark plugs. Get them replaced if necessary. The wrong heat range plug can cause detonation as well as preignition. If the insulators around the electrodes on your plugs appear yellowish or blistered, they may be too hot for the application. Try the next heat range colder spark plug. Copper core spark plugs generally have a broader heat range than ordinary plugs, which lessens the danger of detonation.

7. Check for engine overheating. A hot engine is more likely to suffer spark knock than one which runs at normal temperature. Overheating can be caused by a low coolant level, a slipping fan clutch, too small a fan, too hot a thermostat, a bad water pump, or even a missing fan shroud. Poor heat conduction in the head and water jackets can be caused by a buildup of lime deposits or steam pockets (which can result from trapped air pockets).

8. Check the operation of the heated air intake system. The thermostatically controlled air cleaner's job is to provide a carbureted engine with hot air when the engine is cold started. This aids fuel vaporization during engine warm-up. If the air control door sticks shut or is slow to open so that the carburetor continues to receive heated air after the engine is warm, the added heat may be enough to cause a detonation problem -- especially during hot weather. Check the operation of the air flow control door in the air cleaner to see that it opens as the engine warms up. No movement may mean the vacuum motor or thermostat is defective. Also, check the heat riser valve to make sure it's opening properly, as it, too, can affect the air intake system.

9. Check for a lean fuel mixture. Rich fuel mixtures resist detonation while lean ones do not. Air leaks in vacuum lines, intake manifold gaskets, carburetor gaskets or the induction plumbing downstream of a fuel injection throttle can all admit extra air into the engine and lean out the fuel mixture. Lean mixtures can also be caused by dirty fuel injectors, carburetor jets clogged with fuel deposits or dirt, a restricted fuel filter or a weak fuel pump.
If the fuel mixture becomes too lean, "lean misfire" may occur as the load on the engine increases. This can cause a hesitation, stumble and/or rough idle problem as well.
The air/fuel ratio can also be affected by changes in altitude. As you go up in elevation, the air becomes less dense.
A carburetor that's calibrated for high altitude driving will run too lean if driven at a lower elevation. Altitude changes are generally not a problem with engines that have electronic feedback carburetors or electronic fuel injection because the oxygen and barometric pressure sensors compensate for changes in air density and fuel ratios.


10. Remove carbon deposits. An accumulation of carbon deposits in the combustion chamber and on the top of the pistons can increase compression to the point where detonation becomes a problem. Carbon deposits are a common cause of detonation in high-mileage engines, and can be especially thick if the engine consumes oil because of worn valve guides and seals, worn or broken piston rings and/or cylinder wear. Infrequent driving and not changing the oil often enough can also accelerate the buildup of deposits.
In addition to increasing compression, carbon deposits also have an insulating effect that slows the normal transfer of heat away from the combustion chamber into the head. A thick layer of deposits can therefore raise combustion temperatures and contribute to "preignition" as well as detonation.
Carbon deposits can often be removed from an engine that's still in service by using a chemical "top cleaner." This type of product is poured into an idling engine through the carburetor or throttle body. The engine is then shut off so the solvent can soak into and loosen the deposits. When the engine is restarted the deposits are blown out of the combustion chamber.
If chemical cleaning fails to remove the deposits, it may be necessary to pull the cylinder head and scrape the deposits off with a wire brush or scraper (be careful not to scratch the face of the cylinder head or engine deck!).


11. Check the boost pressure. Controlling the amount of boost in a turbocharged engine is absolutely critical to prevent detonation. The turbo wastegate bleeds off boost pressure in response to rising intake manifold pressure. On most late-model engines, a computer-controlled solenoid helps regulate the operation of the wastegate. A malfunction with the manifold pressure sensor, the wastegate control solenoid, the wastegate itself or a leak in the vacuum connections between these components can allow the turbo to deliver too much boost, which destroys the head gasket as well as the engine in short order if not corrected.
Improved intercooling can help reduce detonation under boost. The intercooler's job is to lower the incoming air temperature after it exits the turbo compressor. Adding an intercooler to a turbo motor that isn't intercooled (or installing a larger or more efficient intercooler) can eliminate detonation worries while also allowing the engine to safely handle more boost.


12. Change your driving habits. Instead of lugging the engine, try downshifting to a lower gear and/or accelerating more gradually. Keep in mind, too, that the engine and drivetrain have to be matched to the application. If you're working your engine too hard, perhaps you need a transmission with a wider gear ratio or a higher final drive ratio in the differential.

PRE-IGNITION
Another condition that is sometimes confused with detonation is "preignition." This occurs when a point within the combustion chamber becomes so hot that it becomes a source of ignition and causes the fuel to ignite before the spark plug fires. This, in turn, may contribute to or cause a detonation problem.

Instead of the fuel igniting at the right instant to give the crankshaft a smooth kick in the right direction, the fuel ignites prematurely (early) causing a momentarily backlash as the piston tries to turn the crank in the wrong direction. This can be very damaging because of the stresses it creates. It can also localize heat to such an extent that it can partially melt or burn a hole through the top of a piston!

Preignition can also make itself known when a hot engine is shut off. The engine may continue to run even though the ignition has been turned off because the combustion chamber is hot enough for spontaneous ignition. The engine may continue to run-on or "diesel" and chug erratically for several minutes.

To prevent this from happening, some engines have a "fuel cutoff solenoid" on the carburetor to stop the flow of fuel to the engine once the ignition is turned off. Others use an "idle stop solenoid" that closes the throttle completely to shut of the engine's air supply. If either of these devices is misadjusted or inoperative, run-on can be a problem. Engines with electronic fuel injection don't have this problem because the injectors stop spraying fuel as soon as the ignition is turned off.

CAUSES OF PRE-IGNITION
Carbon deposits form a heat barrier and can be a contributing factor to preignition. Other causes include: An overheated spark plug (too hot a heat range for the application). Glowing carbon deposits on a hot exhaust valve (which may mean the valve is running too hot because of poor seating, a weak valve spring or insufficient valve lash).


A sharp edge in the combustion chamber or on top of a piston (rounding sharp edges with a grinder can eliminate this cause).

Sharp edges on valves that were reground improperly (not enough margin left on the edges).

A lean fuel mixture.

Low coolant level, slipping fan clutch, inoperative electric cooling fan or other cooling system problem that causes the engine to run hotter than normal.

Detonation - Causes and Effects

This article was taken from a series of postings on the Supra Club of New Zealand mailing list. The contributors were Stuart Woolford and Tony Bryant. The article was edited together by Cully Paterson.

Knock, detonation, pinging, pre-ignition, etc are basically two things:

1 - Compression ignition, usually from over-advance of ignition and/or excessive compression (e.g. having added a turbo to an NA engine without lowering the compression) - this only happens after ignition, and is where the last of the combustible mix ignites from over-pressure during the last of the burn, giving a sudden detonation. A little is OK, and keeps the cylinder clean ;) but causes larger stresses in an engine, this is what knock sensors monitor, as the detonation produces quite specific, and audible, noises.

2 - Pre-ignition/thermal ignition, this is often caused by too 'hot' spark plugs or hot-spots in the carbon crud that builds up in cylinders. It causes the combustible mix to start burning from a point/cause other than the spark plug ignition spark. This can be VERY bad if it happens very early in the compression stroke, where it can destroy an engine in one cycle! This is, fortunately, less common, however it can be caused by runaway compression ignition. This causes additional heat to build up and the can cause pre-ignition to start, and to then happen progressively earlier in the cycle (until BOOM!).

The causes of knock can be:

* Excessive compression - increases pressure / temperature

* Not enough octane rating - fuel more likely to explode

* Wrong mixture - excessive heating / lowering effective octane

* Ignition timing - too much advance increases peak cylinder pressures a LOT

* Poor cooling - leading to high cylinder temps and pre-ignition

* Dirty cylinders - more candidate points for pre-ignition

* ECU/sensor fault - lots of options

and no doubt more.

The most 'efficient' place for an engine to run if often just on the edge of knock (from compression ignition) - so many modern ECUs use a knock sensor to hold the engine just on the edge of knock, but preventing damage due to excessive knock.

'Lean knock' is sometimes not actually a lean mixture (in fact, very lean mixtures will misfire, not knock), but rather an insufficiently rich mixture, as rich mixtures will delay the burn and burn cooler, thus reducing the chances of knock. This is very typical of the behaviour of turbo engines under boost, where they are deliberately run very rich to prevent the onset of knock. This explains why turbo engines in perfect condition can often be seen producing black smoke under power. On the other hand, get the mixture too rich, and the temperatures start coming back up rapidly...

  • Is knocking the same as pinging and detonation?
Yes, It all refers to the same phenomenon, which is the simultaneous burning of all/most of the fuel/air mix, due to the auto-ignition temperature of the unburnt mixture being exceeded.

We have a few possible heat sources.

1) Normal ignition. The normally controlled burning process obviously adds heat to the whole mixture.

2) The compression itself. In the same way a turbo heats its compressed air, the piston will heat the mixture at it compresses it.

3) Pre-ignition. Where a hot spot initiates ignition in addition to the spark plug, thus burning the mixture faster than usual.

When knock happens, its usually a combination of factors e.g. over-advanced timing combines the heating effects of 1 & 2, thus hitting the auto-ignition temperature, and wammo! the whole mixture goes up simultaneously, resulting in a "step" pressure rise, and general destruction eventually ensues.

  • So are the ECUs quick enough to regulate the air/fuel ratio and keep knock under control? Surely at high RPM the rate of change is going to become fairly critical?
The effect at a higher rpm, is less noticeable because of 2 reasons:

1) The difference in injector duration between boot planted and not at all is less at higher RPMs. e.g. from my own map:

1.0 atm, 5000 RPM ~ 7.0 ms

1.0 atm, 1000 RPM ~ 7.0 ms

0.3 atm, 5000 RPM ~ 2.1 ms

0.3 atm, 1000 RPM ~ 1.2 ms

I.e. if you boot it at 1000 RPM you are momentarily providing 17% of the required fuel, vs. 30% at 5000 RPM. 17% is a lot more likely to ‘lean misfire’ than 30% is. Also higher turbulence at higher RPM will allow a leaner mixture to fire.

However it's not quite that bad, because the MAP (which is what controls %VE and hence injector duration) doesn't change THAT fast - the plenum takes some time (independent of RPM) to fill when you snap open the throttle. So you never end up with figures as bad as that just described, you just run a touch lean for a few cycles.

A software throttle pump is often touted as a way around that, but once again, the ECU has to react fast enough, so you're back to square one. The ECU must react at at least the same speed as the minimum plenum fill time. That’s why huge throttle plate(s) tend to exaggerate this effect.

As for the effect on the engine: pretty negligible. Lean engine damage is caused largely by heating effects (e.g. melting a piston), which is obviously a longish term effect, i.e. in the order of 10s of seconds. Lean induced knock however is a cycle by cycle effect, BUT I don't think its a concern because

a) The mixture is likely to be lean enough to be below peak temperatures.

b) You're off boost, and hence also will be well below peak temperatures.

An aside on knock:

Note that knock is a combustion temperature related phenomenon. Richening the mixture cools the combustion down via evaporation of the excess fuel. Leaning the mixture to well lean of 14.7:1 (= the perfect mixture) cools it down via the excess air having thermal inertia. Ignition of course effects the peak pressure, and hence temperature rise via compression. Knock is most likely to happen around the area of 14.7:1 where neither the fuel or air cooling effects occurs.

I believe you've got more fuel hanging around in suspension in the plenum and runners, due to the average amount of fuel being consumed (==duty cycle). This provides a certain amount of "reserve" fuel.

Conclusion, I think you're safe from bad transients.


BTW
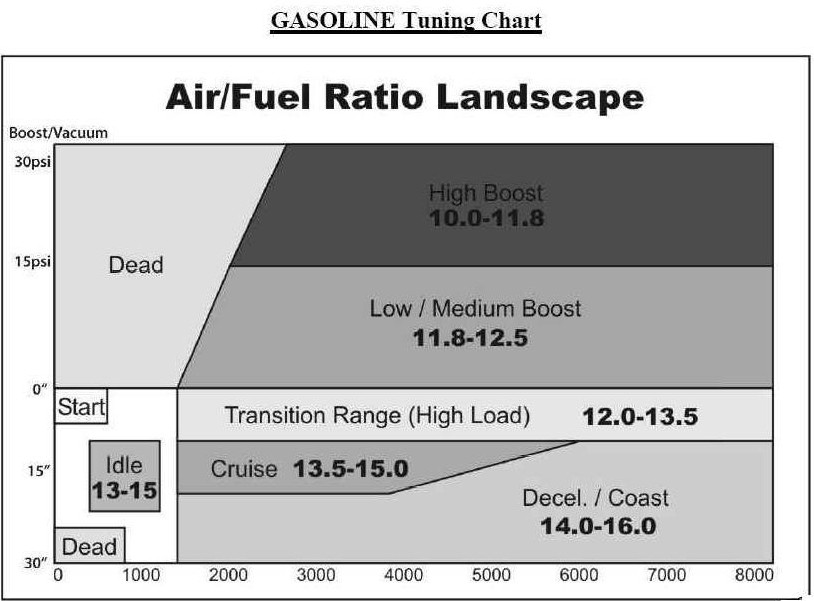
A/F RATIO CHARACTERISTICS
5 RICH BURN LIMIT: Combustion is weak/erratic.
6-9 EXTREMELY RICH: Black smoke and low power.
10-11 VERY RICH: Some supercharged engines run in this range at full power as a means of controlling detonation.
12-13 RICH: Best power A/F: Un-supercharged WOT.
14-15 CHEMICALLY IDEAL: At 14.6 the A/F is at the theoretical ideal ratio with no excess fuel or oxygen after combustion. Good A/F for part
throttle cruise and light to moderate acceleration.
16-17 LEAN: Best economy A/F ratio. Borderline for part throttle Drive ability) (worse than borderline if EGR is used).
18-19 VERY LEAN: Usual lean limit (Drive ability).
20-25 LEAN BURN LIMIT: Varies with engine
and system.

cross over chart
plugchart6.jpg


btw if your at the track on test & tune and screw up the tune getting the plugs fuel soaked you don,t have to pitch nearly new fuel soaked plugs in the trash, they can be cleaned, thats why having a few tools and a spare set of plugs at the track along with things like carb jets,power valves and a spare set of ignition wires won,t hurt
TUNING LINK
viewtopic.php?f=55&t=109

if they are not in bad shape a 5 minute soak in brake parts cleaner solvent or a good spray down,then use a propane torch to dry the tips threads and porcelain, insulator and ground electrode and threads, off.
doing so usually has them operating ok if they just got oil or fuel soaked, don,t forget the ANTI-SEIZE paste on the plug threads, and to verify the gap, before you re-install them

antiseize.gif


gappingrtool.jpg


engine+gap_tool.jpg

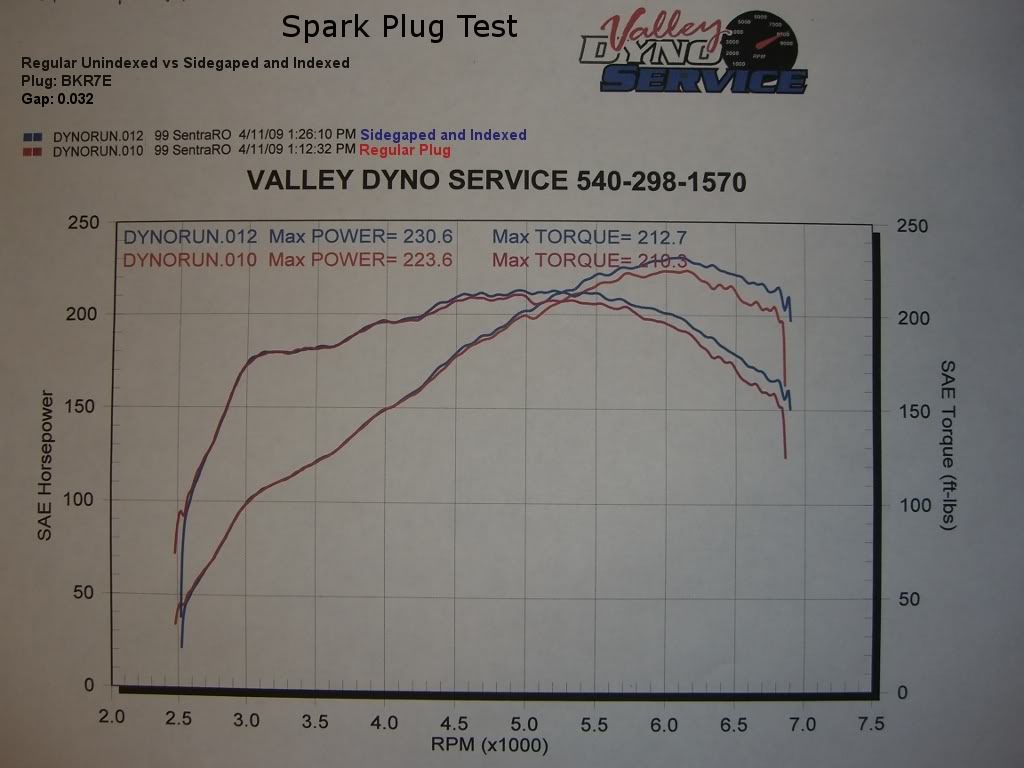
now I freely admit before I start this thread that the methods used for testing were less than exact or something Id suggest you do, and yes much of the improvement noted might be related to the newer plugs and checking over a good deal of the ignition system, but at the same time I was impressed with how the work obviously made a difference, and we didn,t change much but the plugs and distributor cap.

BOB, stopped back over with his 1966 chevelle and asked for a bit of help with a tune-up ,
(HERES A PREVIOUS related THREAD)
viewtopic.php?f=87&t=8801&p=35305#p35305

he brought over a new distributor cap, plugs and asked me for help installing and side gaping plugs as he had read some place it was worth a few extra hp, now I pointed out that it was not likely to be something worth the time and effort required and it was hardly something that was likely to provide a long term benefit on a street driven car but if he wanted to try it we could do so, but I pointed out that it might result in a set of spark plugs that would not last nearly as long as the standard plugs might in a similar application.
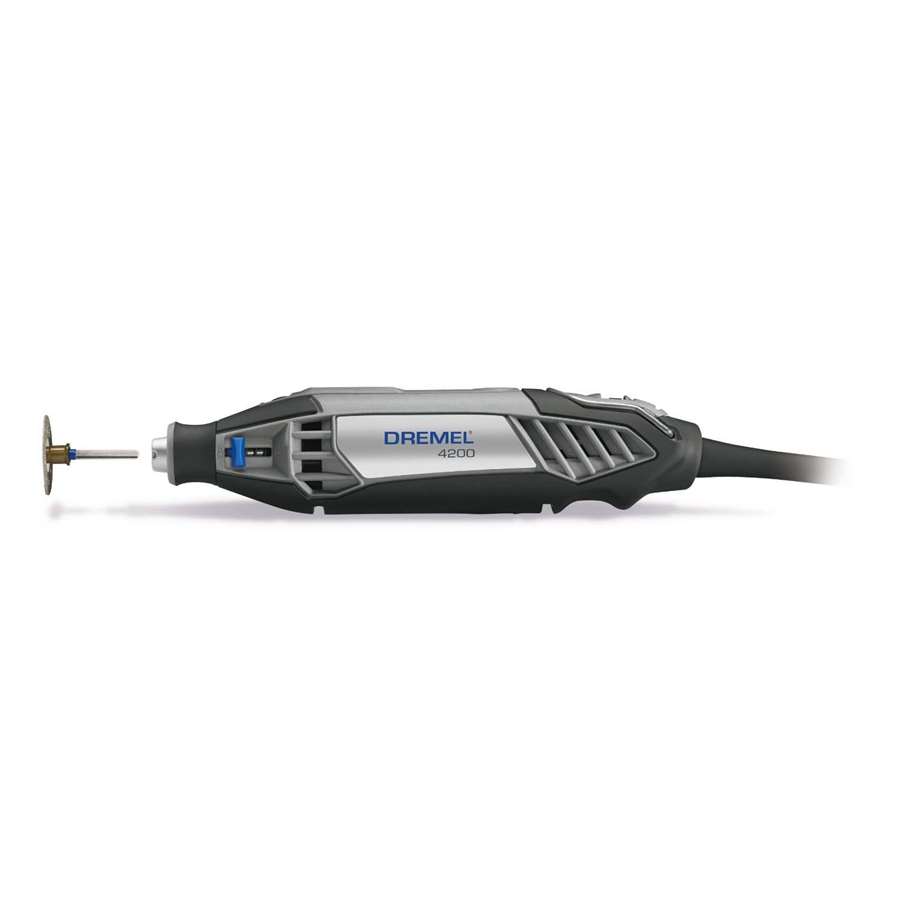
we would need a dremel tool with a cut off disc,side gapping plugs generally works best on 12:1-14.1 compression engines that are well tuned with about 12.7:1 fuel air ratios where you can actually see the small benefit in ignition improvement at peak rpms I doubt its measurable on your average 9:1-10:1 street engine that rarely sees over 5000rpm, and runs closer to a 14.7:1 fuel air ratio.
12555.JPG

a plug gap measuring tool
gappingrtool.jpg

and he would need to understand what we were doing and why!
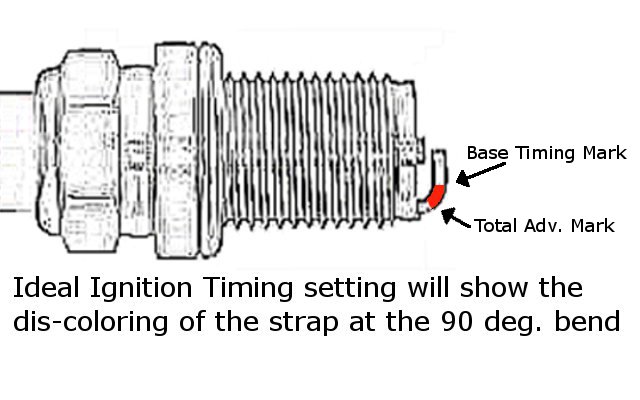
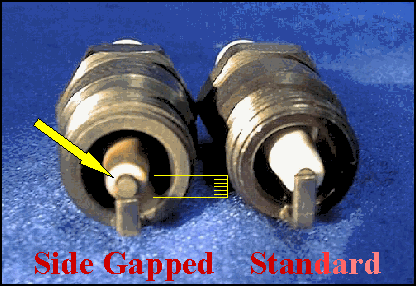
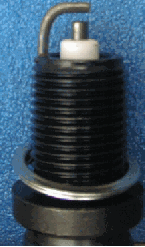
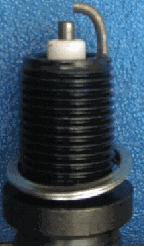
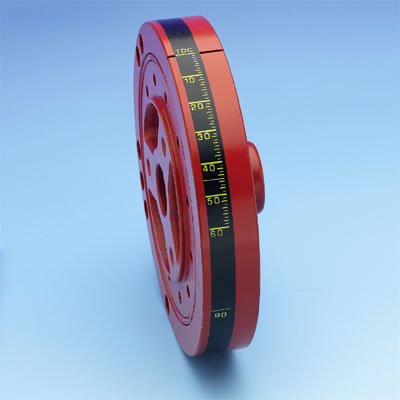
we used the cut off disc to cut the ground strap on the plugs so the tip of the round strap ended with about only 1/4 of the edge of the central electrode under it and gaped the plug ground at a .040 gap, we replaced the distributor cap, and checked the ignition firing order and timing and timing advance, this was set at 10 BTDC at 900RPM which was as low as the idle speed would work on that engine.
we verified total timing came in at 38 degrees at 3400rpm, while thats most likely not ideal, we felt it was close and the older plugs we removed looked to be running reasonably well and have a decent heat range and showed a decent fuel/air ratio
http://performanceunlimited.com/documents/plugsidegapping.html
sidegapelg.gif


sidegapelg1.gif

sidegapelg3.gif

sidegapelg2.gif

sidegapelg4.gif

sidegapelg5.gif

dremel42ct.jpg

dremel43ct.jpg

SparkPlugDynosdg.jpg


HOW SIDE GAPPING WORKS:
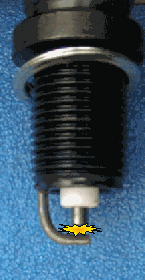
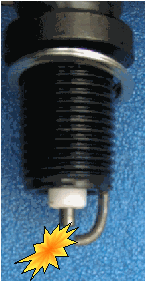
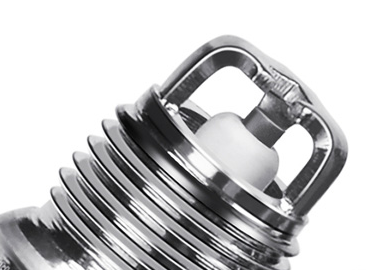
The closer gap (1-Yellow) allows for easier ignition while the angled surfaces (2-orange) allow the ignited spark to grow in size to exceed that of normally shaped plugs. As the spark column flows along the electrode surface it grows outwards in size towards the combustion chamber and down towards the piston (3) creating a larger spark presence but with an easier starting spark for situations where more spark is needed, such as high compression cylinders, high rpm's and increased fuel conditions as well as preventing "spark blow-out" in nitrous and super/turbo charging applications.

the plugs used were the 5/8" hex long reach champion plugs I don,t remember the number, but I think they were RN14YC but the end result was that after they were installed the engine seemed noticeably more responsive or "CRISPER"and when he drove off, he was able to leave two long black parallel tire burn marks and significant tire smoke and he called a few minutes later to thank me for the help!
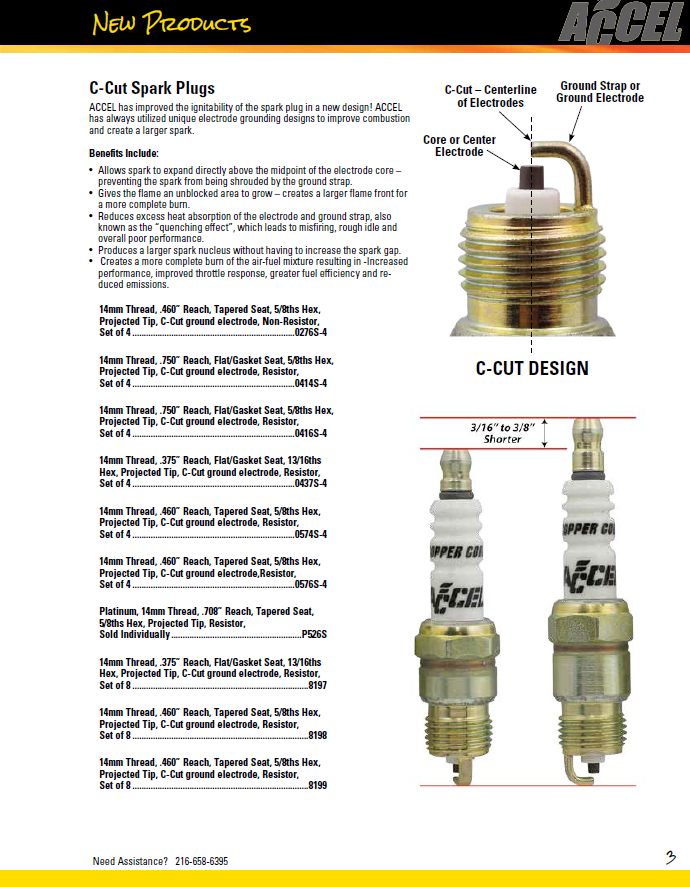
Accel C Cut.png

btw the old plugs were
R43XLS

· R = Resistor
· 4 = 14 mm Thread
· 3 = Heat Range (range 1-5 start with a 3)
· T = Taper Seat (No T for your gasketed plug)
· XL = Extra Long Reach, 3/4" fully threaded
· S = Extended Tip

e3sh.png

plugs like the E3 with multiple ground electrodes , are designed rather counter productive in that they shroud the ignition spark flame point or arc spark significantly more than even a standard plugs electrode the exact opposite of side gaped plugs
 
Last edited by a moderator:
related info that might help when tuning an engine

obviously you need to have a consistent base line advance curve to work with,
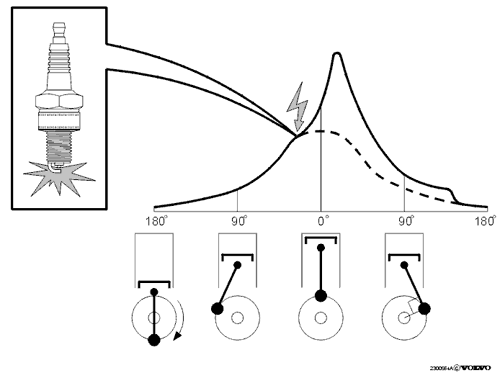
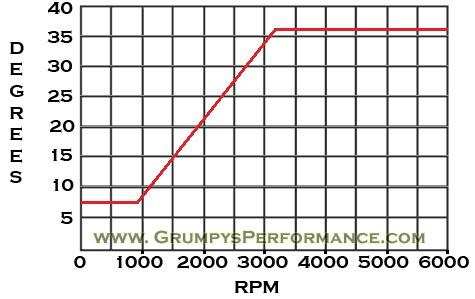
on most Chevy v8 engines that run cams designed for street/strip use Ive generally found a advance that goes from about 8 degrees at idle speed (800-900rpm in most cases) and smoothly advances the ignition to about 36 degrees or about 28 degrees advance from where it started at to reach 36 degrees at about 3200rpm , is generally a good place to start, or about 82 rpm increase per degree of ignition advance , up to about 3200rpm, where increase turbulence and squish tends to speed the burn process, you can then play with the engine and determine what changes MIGHT be require
ignitiontiming.png

chart3e.jpg

timingtape1.jpg


IgnitionDiagramw.gif

viewtopic.php?f=4&t=1337&p=2921&hilit=+infrared#p2921

http://www.dragstuff.com/techarticles/reading-spark-plugs.html

viewtopic.php?f=44&t=773

viewtopic.php?f=55&t=1639

viewtopic.php?f=55&t=635

viewtopic.php?f=55&t=1115

viewtopic.php?f=55&t=211

viewtopic.php?f=70&t=1411

viewtopic.php?f=70&t=967

viewtopic.php?f=70&t=1015

viewtopic.php?f=70&t=875

viewtopic.php?f=70&t=251

viewtopic.php?f=44&t=1788

viewtopic.php?f=44&t=777
 
Last edited by a moderator:
indexing the spark plug in the cylinder head info
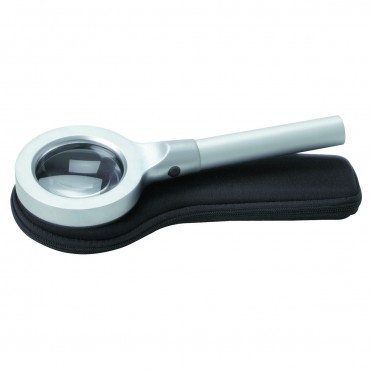
BUY ONE OF THESE IT MAKES READING PLUGS EASIER

http://www.harborfreight.com/3x-magnifying-glass-with-8-led-lamp-94367.html?hftref=cj
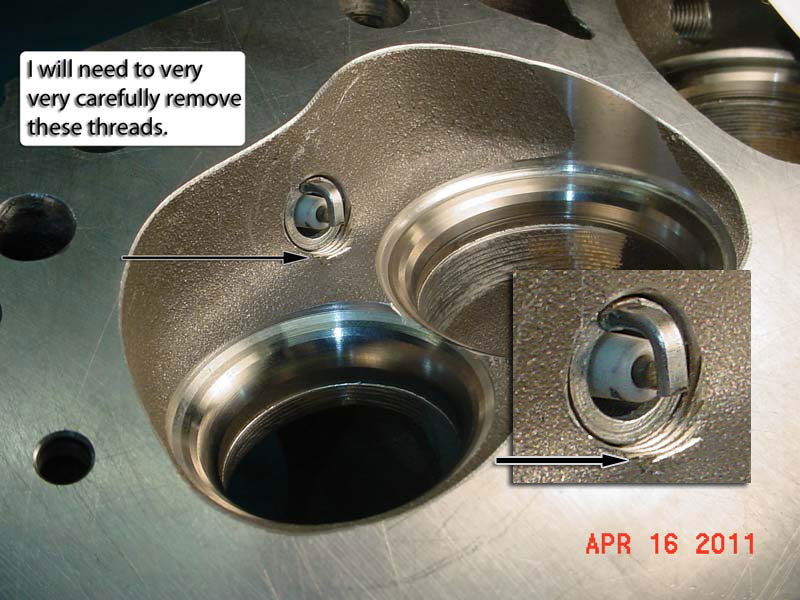
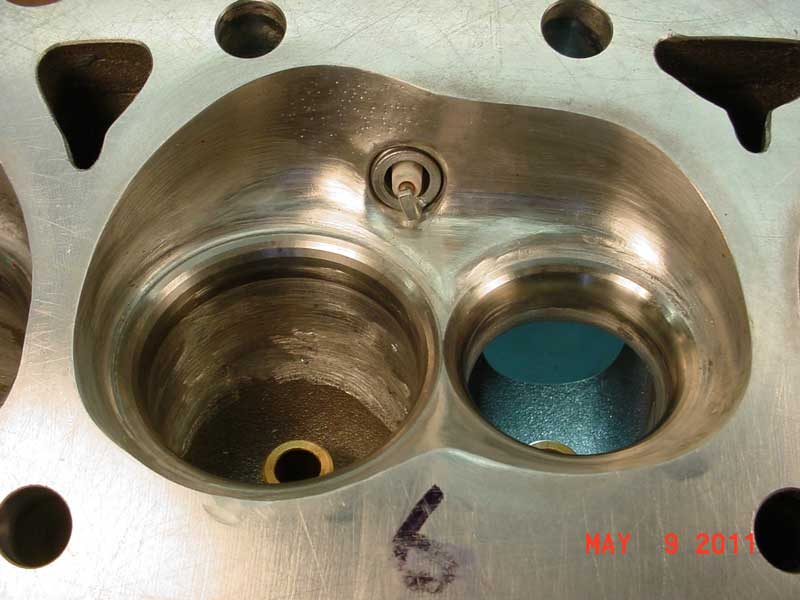
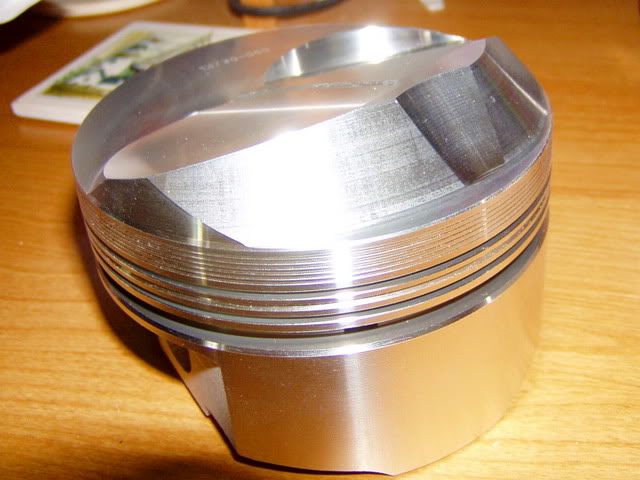
read the links below, if you want to take the time to index the spark plugs in your heads you'll need to carefully mark where the electrode ground is on the plugs insulator where you can easily see it with a permanent marker and use spacer washers to insure that the open area of the plug faces the area between the valves but slightly favoring the exhaust valve location, WITH THE GROUND ELECTRODE INDEXED UPWARD TOWARD THE COMBUSTION CHAMBER ROOF , because in some high compression applications, its fairly common for the pop-up piston dome to contact the ground electrode and bend it, closing the gap if the plugs ground electrode is placed in the lower 270 degrees on the plug when its installed , especially ,if you failed to correctly check clearances, between the piston and combustion chamber
in this example the plugs GROUND electrode is ALMOST EXACTLY OPPOSITE, OF THE IDEAL INDEXED location

grounddown.jpg

example , similar too...
DSC00757.jpg

if your using high compression pistons like these youll soon see the reason for indexing plug ground electrodes
P1010482.jpg


555-805010.jpg

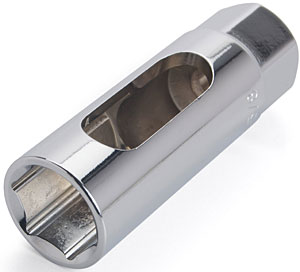
OBVIOUSLY A PLUG SOCKET DESIGNED TO HELP INDEX PLUGS IS HELPFUL AT TIMES
http://www.jegs.com/i/JEGS-Performance- ... 0/10002/-1


http://garage.grumpysperformance.com/index.php?threads/spark-plug-info.202/#post-35388
80078.jpg

always use a bit of anti-seize paste on spark plugs, threads, being used in aluminum cylinder heads even if not required and its best to remove & install them when the engines not very hot, be very careful to start threading them into the heads by hand, and don,t over tighten them as its all too easy to strip soft aluminum plug threads in aluminum cylinder heads, if you have access to a 3/8" drive inch/la torque wrench 12-13 ft lbs is about correct torque

http://garage.grumpysperformance.com/index.php?threads/installing-hard-to-access-plugs.962/

,this can in some cases smooth the idle slightly and add a few hp, in other applications its basically wasted effort, but in some cases the engine clearances make it mandatory, a good deal depends on the compression, intake runner and combustion chamber design, and it should be obvious that if your not running up close to the limits on your ignition advance curve and octane limits on your fuel you probably won,t notice the slight improvements in ignition,only careful testing in your engine will tell you if its worth the effort in your combination.....now I have guys that tell me its always wasted effort, and if you use the 2-4 electrode ground strap plugs is not going to change, well thats true, if you have several ground straps on the plugs you shroud the spark enough that youve effectively reduced its efficiency too ignite a clean flame front, so yeah if you use those its wasted effort[/color]


http://www.jegs.com/i/Moroso/710/71910/10002/-1
710-71910.jpg

128-30510.jpg


http://en.wikipedia.org/wiki/Spark_plug

http://corp.advanceautoparts.com/englis ... 1001sp.asp

http://www.boatsetup.com/PlgIndex.pdf

http://www.bullittarchive.com/5005.htm

http://www.hubgarage.com/mygarage/summi ... logs/10030

http://dodgeram.org/tech/gas/spark_plug ... dexing.htm

http://www.aa1car.com/library/sprkplg2.htm

BTW don,t forget to use ANTI SEIZE on the plug threads

antiseize.jpg


z90708.jpg

12-21375.jpg

common but not very accurate
spark-plug-gap-025.jpg

slightly more accurate

2327.gif


http://www.sears.com/shc/s/p_10153_12605_00994133000P

good accuracy at a low price
stylespilotshop_2090_220344251

thread chaser

stylespilotshop_2090_498933252

inspection tool

http://www.verrill.com/moto/sellingguid ... rchart.htm

http://www.4secondsflat.com/plug_chart.html

http://www.ngksparkplugs.com/tech_suppo ... aqread.asp
94367.gif

http://www.harborfreight.com/3x-magnify ... 94367.html
dirt cheap plug inspection tool
 
Last edited by a moderator:
do yourself a favor and build a spark plug holder you simply take a scrap section of 2"x 6" lumber about 14" long and drill two parallel lines of 4 holes in each line and label them.
IF your trying to tune an engine or track down a problem,When you inspect plugs ,pull all 8 plugs , drill some (8) 1/2 holes in 2 parallel lines in a 12"" section of 2"X 6" soft pine wood and label the holes,clearly with large numbers, to indicate the cylinders
2-4-6-8
1-3-5-7

so you can stick the porcelain ends , of each plug ,the wires snap onto, into the holes so you can photograph and inspect the tips and electrodes in clear detail as they can tell you a great deal about the engines running conditions, glue a couple strong magnets to the lower side and then glue a thin sheet of old inner tube rubber to the base so the block will stick to a fender or radiator shroud and not fall, slide or mar paint, its a very good tool to have

vaguely similar to this, but this ones holding the plugs wrong end up, you want to have the porcelain, side the plug wire snaps to inserted in the holes so you can read the electrodes grounds and temp. indications in the combustion chambers

sparkplugholder.jpg


SparkPlugHolder1.jpg

heres a cheap professional version but you can make a really nice one for a couple dollars that will last your lifetime
holder.jpg

2078.jpg

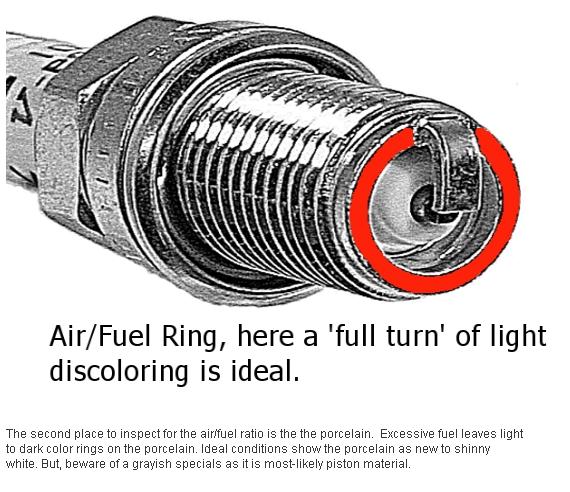
its amazing what you can learn about engine combustion chamber conditions, air/fuel distribution and temps, from reading spark plugs

sp11a.jpg


heres some pictures from the other spark plug thread that might prove useful
spr1.jpg

spr2.jpg

spr3.jpg

spr4.jpg


http://www.4secondsflat.com/

http://performanceunlimited.com/documents/plugsidegapping.html

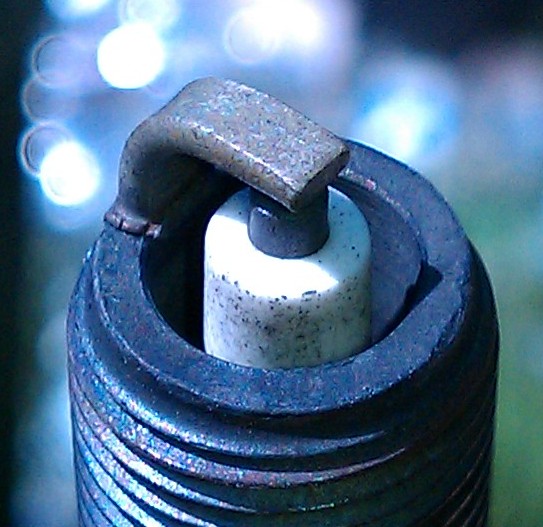
Black or brown specs: This is an indication of detonation usually caused by too hot of a plug, drop one or two heat ranges and it should go away. The plug gets so hot that it will start to detonate the fuel before the ignition fires, this cause a double flame front and reduces the efficiency of the combustion process as these two flame fronts battle each other in the combustion chamber. The black spots are the result of the fuel deposits being burned onto the porcelain by the double flame front. Once you cool down the plug and remove the secondary ignition source you can re-set your timing to produce the correct combustion chamber temp for optimum power.

I've heard 100's of so called tuners and engine builders tell people that this is normal and nothing to worry about......WRONG. Do not underestimate the damage that this condition can do to your engine, drop the plug heat range.
plugseat.jpg

BTW swapping to a colder plug and increasing the fuel octane DID prevent this. below is a colder plug after the changes from the same engine
sparkplug7411.jpg


viewtopic.php?f=70&t=202

viewtopic.php?f=57&t=4701&p=12741&hilit=detonation#p12741

viewtopic.php?f=50&t=208&p=244&hilit=detonation#p244

viewtopic.php?f=44&t=331&p=405&hilit=detonation#p405

firing_order.gif

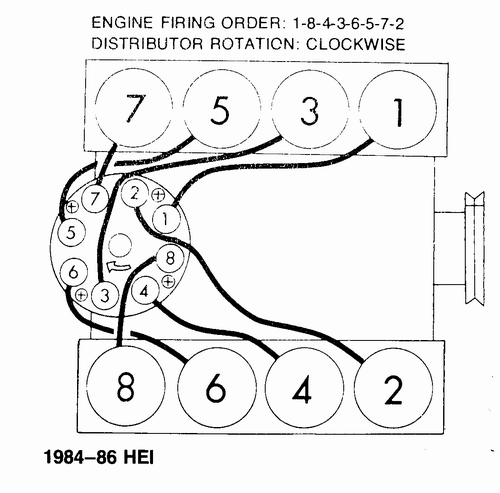
it would hurt nothing to print this picture and glue it between the plug rows

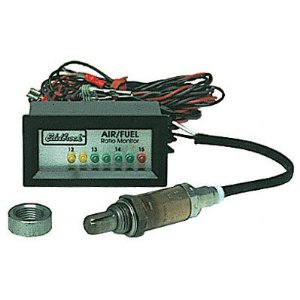
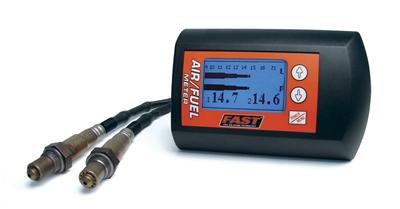
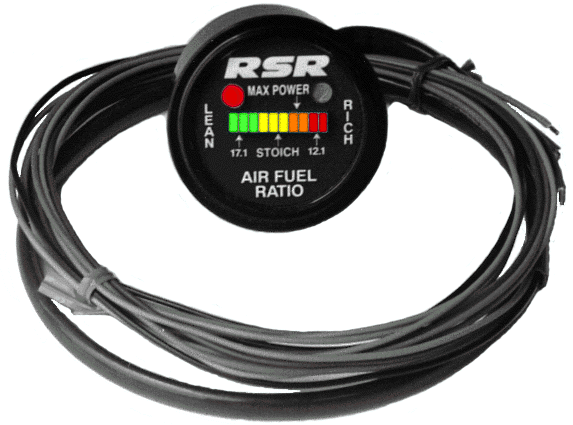
it certainly won,t hurt to have access to a fuel/air gauge

Edelbrock 6593 Air/Fuel Ratio Gauge
edlafgauge.jpg

http://www.summitracing.com/parts/EDL-6593/


fast air fuel gauge
fastafgauge.jpg

http://www.summitracing.com/parts/FST-170402/?rtype=10

rsr air fuel gauge
rsfagauge.gif

http://www.rbracing-rsr.com/rsrgauge.htm


http://www.competitiondata.com/air_fuel ... _vs_nb.htm


If you do a little research you will find lots of “Air/Fuel Meters” on the market priced in the $100 to $ 400 range. These are “narrow band” products based on production car Oxygen or Lambda sensors. You will also find products priced at $ 1000 to $ 4000 per channel and even higher. These are wide band products.

What’s the Difference?

Wide Band

* Shows Actual Air/Fuel ratio.
* Precise display of ratio on the rich side of “stoichiometric”, which is where all performance engines run. Usually displays Air /Fuel ratio to the second decimal place.
* Useful for maximizing power from race and other performance engines.
* Fully temperature compensated.
* Higher cost.


Narrow Band

* Shows indication of rich vs lean.
* Usually has very “coarse” display of ratio on the rich side of “stoichiometric. Some units only have 2 LEDs for the entire rich range!
* Really only useful for making sure your engine is not running on the lean side.
* Usually not temperature compensated, so the same air/fuel condition in the motor will result in an indication on the meter that will vary depending on sensor temperature.
* Low cost.


Bottom Line:

If you are a builder or tuner of performance engines who needs to maximize performance of the engines you work with, then you need to be measuring Air/Fuel ratio with a wide band meter.

If you simply want an indication that you are rich or lean to make sure you are not going to burn the motor up, you can get by with a narrow band meter


Narrow Band vs. Wide Band Air Fuel Ratio Meter

An air fuel ratio meter is a type of gauge that is used in cars, boats or any vehicle that has an internal combustion engine. Its job is to detect how much voltage is emitted by the engine’s oxygen sensor, and in so doing, it can gauge the engine’s air-fuel ratio. Air fuel ratio meters are important because they help to ensure that your vehicle is using fuel efficiently, helps your catalytic converter to work optimally and thus cuts down on toxic emissions, and maximizes the engine’s performance in general. Nowadays, there are 2 types of air fuel ratio meters on the market: narrow-band readers, and wide-band readers. Keep reading to find out how the two are different, and their pros and cons.
Narrow Band vs. Wide Band Air Fuel Ratio Meter: Physical Qualities

The narrow band meter has long been the standard in cars, although now it’s becoming a bit antiquated. They are present in your car in a round-shaped housing. Like the other gauges in your car, the mounting usually measures in either 2 1/16 inch diameter or 2 5/8 inch diameter, with 10 to 20 LEDs. Some are available with a needle-style gauge interface. The reliability of the narrow band meter can be negatively affected by increasing gas temperatures, so they have to be used with care.

www. Siemens. com/ Air_Flowmeters


Wide band meters are newer and more accurate. They can either stand alone or be mounted in round housings also. Unlike the narrow band meters, these have a numeric display, and can display much more sensitive and accurate information. They have a linear output of 0 to 5 V and can function no matter what the temperature of your car’s engine.
Narrow Band vs. Wide Band Air Fuel Ratio Meters: Which One Should I Use?

If you have an older car that you just need to check on from time to time, especially if you suspect that something might be wrong with the oxygen sensor, then a plain old narrow band reader will probably do just fine. These models are cheaper, and as long as you’re not worried about getting a very sensitive reading, then the narrow band should do just fine.

On the other hand, if it’s your treasured sports car that we’re talking about, or if you need to perform some really sensitive, highly refined maintenance, then you should really spring for the wide band meter. The wide band meter gives you more accurate information, gives you more precise numbers, is reliable no matter the temperature and is easier to read. If you feel that there’s a lot at stake for the health of your car, then, it’s worth the extra investment in a wide band air fuel ratio meter.
viewtopic.php?f=55&t=109

viewtopic.php?f=50&t=2891&p=9279&hilit=ratio+meter#p9279

viewtopic.php?f=50&t=1853&p=4848&hilit=ratio+meter#p4848


viewtopic.php?f=70&t=3438&p=10844&hilit=vacuum+gauge#p10844

viewtopic.php?f=70&t=4683

http://www.classictruckshop.com/clubs/e ... ac/uum.htm

READ THRU THE LINKS ABOVE


fuelaratio1b.jpg


Read more: http://www.doityourself.com/stry/narrow ... z104zOE8IJ


Read more: http://www.doityourself.com/stry/narrow ... z104z4RvcZ

read these links below

http://autospeed.com/cms/title_InCar-Ai ... ticle.html

http://autospeed.com.au/cms/article.html?&A=2191
 
Last edited by a moderator:
Re: spark plug info posted by BonneRisque

Spark Plug Info

Stock replacement plugs for the C5 Corvette are as follows
There were 3 different AC/Delco plug designs on c5. And each one had a different electrode protrusion. 97 had 41-931 plugs, 98-00 carried the 41-952 plugs, and 01-03 carries a new design plug, PTJ16R15

If anyone Else would like to add to this thread for the LS7,
LS2,LS3, ZR1 including your combo and the plugs you are running, Post em up !

Also if you care to list OEM Direct replacements for all the various model years of corvette from 1953-2010
Don't forget to include plug gap And OEM # !

Bon

Aftermarket plugs


**Note: Heat ranges are determined by NGK standards. Not all plug manufacturers follow the same guidelines.

***Note: List is intended for reference only. Please consult with head mfg. and ignition mfg. for proper gap.

****Note: NGK IX and Denso plugs are Iridium.

LT1
Thread – 14mm
Reach - .708”
Socket – 5/8 hex
Seat - Taper
Stock Heat Range: 5
Gap: .050
Plug: NGK TR55 (stock number 3951); NGK TR55IX (stock number 7164); Autolite 764; Champion RS14YC6 (stock number 13); Denso IT-16 (stock number 5325)

Nitrous (one step colder)
Heat range: 6
Gap: .035 - .038
Plug: NGK TR6 (stock number 4177); NGK TR6IX (stock number 3689); Autolite 103; Denso IT-20 (stock number 5326)

Nitrous (two steps colder)
Heat Range: 7
Gap: Consult
Plug: NGK BR7EF (stock number 3346); NGK TR7IX (stock number 3690); Autolite AR94; Denso IT22 (stock number 5327)


LT1 w/ AFR heads
Thread – 14mm
Reach – 3/4”
Socket – 5/8 hex
Seat – Gasket
Stock – MFG Recommendations
Heat Range: 9
Gap: Consult ignition mfg.
Plug: NGK 5672A-9 (stock number 7405); Autolite AR3910; Champion C59YC (stock number 792); Denso IQ27 (stock number 5315); Denso IQ01-27 (stock number 5708)(diagonal platinum ground); Denso IQ02-27 (stock number 5711)(horizontal platinum ground)

Nitrous (one step colder)
Heat Range: 10
Gap: Consult ignition mfg.
Plug: NGK 5672A-10 (stock number 7942); Autolite AR50; Denso IQ31 (stock number 5323)

Nitrous (two steps colder)
Heat Range: 11
Gap: Consult ignition mfg.
Plug: Denso IQ34 (stock number 5324)


LT1 w/ Trick Flow & Edelbrock Heads
Thread – 14mm
Reach – 3/4”
Socket – 5/8 hex
Seat – Gasket

Stock – MFG Recommendations: approx under 9:1 compression
Heat Range: 4
Gap: Consult ignition mfg.
Plug: NGK FR4 (stock number 5155); NGK BKR5EIX (stock number 6341); Autolite 3926; Champion RC12YC (stock number 71); Denso IK16 (stock number 5303)

MFG Recommendations: approx 10.5:1 compression
Heat Range: 5
Gap: Consult ignition mfg.
Plug: NGK FR5 (stock number 7373); Autolite AR3924 (Racing Plug); Autolite 3924; Champion RC9YC (stock number 2075); Denso K20PR-U (stock number 3145); Denso IK20 (stock number 5304)

MFG Recommendations: approx 11:1 compression
Heat Range: 8
Gap: Consult ignition mfg.
Plug: NGK R5672A-8 (stock number 7173); Autolite AR3911; Champion C63YC (stock number 796); Denso IQ24 (stock number 5314)

MFG Recommendations: approx 12:1 compression
Heat Range: 9
Gap: Consult ignition mfg.
Plug: NGK R5672A-9 (stock number 7405); Autolite AR3910; Champion C61YC (stock number 785); Denso IQ27 (stock number 5315)

MFG Recommendations: approx 13:1 compression
Heat Range: 9 - 10
Gap: Consult ignition mfg.
Plug: NGK R5671A-9 (stock number 5238); Autolite AR3933; Champion C59CX (stock number 296); Denso IK27 (stock number 5312)

MFG Recommendations: approx 14:1 compression
Heat Range: 10
Gap: Consult ignition mfg.
Plug: NGK R5671A-10 (stock number 5820); Autolite AR3932; Champion C57CX (stock number 295); Denso IK-31 (stock number 5321)

**NOTE: Use chart for static compression and adjust heat range for nitrous use accordingly.


LS1/LS6 Stock and AFR HEADS
Thread – 14mm
Reach - .708”
Socket – 5/8 hex
Seat - Taper
Stock Heat Range: 5
Gap: .060
Plug: NGK TR55 (stock number 3951); NGK TR55IX (stock number 7164); Autolite 764; Denso IT-16 (stock number 5325)

Nitrous (one step colder)
Heat Range: 6
Gap: .035 - .038
Plug: NGK TR6 (stock number 4177); NGK TR6IX (stock number 3689); Autolite 103; Denso IT-20 (stock number 5326)

Nitrous (two steps colder)
Heat Range: 7
Gap: Consult
Plug: NGK BR7EF (stock number 3346); NGK TR7IX (stock number 3690); Autolite AR94; Denso IT22 (stock number 5327)

Nitrous (two and a half steps colder)
Heat Range: 8
Gap: Consult
Plug: NGK R5724-8 (stock number 7317); NGK TR8IX (part number 3691); Denso IT-24 (stock number 5328)

Nitrous (three steps colder)
Heat Range: 9
Gap: Consult
Plug: NGK R5724-9 (stock number 7891); Autolite AR93; Denso IT-27

Nitrous (four steps colder)
Heat Range: 10
Gap: Consult
Plug: NGK R5724-10 (stock number 7993); Autolite AR92


LS1 w/ Edelbrock and Dart Heads
Thread – 14mm
Reach – 3/4”
Socket – 5/8 hex
Seat – Gasket

Stock – MFG Recommendations: approx under 9:1 compression
Heat Range: 4
Gap: Consult ignition mfg.
Plug: NGK FR4 (stock number 5155); NGK BKR5EIX (stock number 6341); Autolite 3926; Champion RC12YC (stock number 71); Denso IK16 (stock number 5303)

MFG Recommendations: approx 10.5:1 compression
Heat Range: 5
Gap: Consult ignition mfg.
Plug: NGK FR5 (stock number 7373); Autolite AR3924 (Racing Plug); Autolite 3924; Champion RC9YC (stock number 2075); Denso K20PR-U (stock number 3145); Denso IK20 (stock number 5304)

MFG Recommendations: approx 11:1 compression
Heat Range: 8
Gap: Consult ignition mfg.
Plug: NGK R5672A-8 (stock number 7173); Autolite AR3911; Champion C63YC (stock number 796); Denso IQ24 (stock number 5314)

MFG Recommendations: approx 12:1 compression
Heat Range: 9
Gap: Consult ignition mfg.
Plug: NGK R5672A-9 (stock number 7405); Autolite AR3910; Champion C61YC (stock number 785); Denso IQ27 (stock number 5315)

MFG Recommendations: approx 13:1 compression
Heat Range: 9 - 10
Gap: Consult ignition mfg.
Plug: NGK R5671A-9 (stock number 5238); Autolite AR3933; Champion C59CX (stock number 296); Denso IK27 (stock number 5312)

MFG Recommendations: approx 14:1 compression
Heat Range: 10
Gap: Consult ignition mfg.
Plug: NGK R5671A-10 (stock number 5820); Autolite AR3932; Champion C57CX (stock number 295); Denso IK-31 (stock number 5321)

**NOTE: Use chart for static compression and adjust heat range for nitrous use accordingly.

for canfield Race rite 180 and 220
Spark Plug Starting Points:
CHAMPION RN12YC or AUTOLITE 3924
for Pump Gas (RR 180 & RR 200)
NGK R5671A-8 for Racing Gas (RR 200)
 
Indycars POSTED THIS INFO


I did a short search of this forum, but didn't find anything on Torquing Spark Plugs in an aluminum head. When I found
this info I thought it might be helpful for others. Hope I'm not duplicating info that is already on the website.

http://www.ngksparkplugs.com/techinfo/s ... lation.asp


A. Installing spark plugs

Torque is one of the most critical aspects of spark plug installation. Torque directly affects the spark plugs' ability to transfer heat out of the combustion chamber. A spark plug that is under-torqued will not be fully seated on the cylinder head, hence heat transfer will be slowed. This will tend to elevate combustion chamber temperatures to unsafe levels, and pre-ignition and detonation will usually follow. Serious engine damage is not far behind.

An over-torqued spark plug can suffer from severe stress to the Metal Shell which in turn can distort the spark plug's inner gas seals or even cause a hairline fracture to the spark plug's insulator...in either case, heat transfer can again be slowed and the above mentioned conditions can occur.

The spark plug holes must always be cleaned prior to installation, otherwise you may be torquing against dirt or debris and the spark plug may actually end up under-torqued, even though your torque wrench says otherwise. Of course, you should only install spark plugs in a cool engine, because metal expands when its hot and installation may prove difficult. Proper torque specs for both aluminum and cast iron cylinder heads are listed below.


B. Installing spark plugs - Lawn & Garden Equipment

1. Confirm that the thread reach of the spark plug is the right one for your engine.

2. Remove the dirt at the gasket seal of the cylinder head.

3. Tighten the spark plug finger tight until the gasket reaches the cylinder head, then tighten about 1/2-2/3 turn more with a spark plug wrench. (Taper seat: About 1/16 turn more).

C. Gapping

Since the gap size has a direct affect on the spark plug's tip temperature and on the voltage necessary to ionize (light) the air/fuel mixture, careful attention is required. While it is a popular misconception that plugs are pre-gapped from the factory, the fact remains that the gap must be adjusted for the vehicle that the spark plug is intended for. Those with modified engines must remember that a modified engine with higher compression or forced induction will typically require a smaller gap settings (to ensure ignitability in these denser air/fuel mixtures). As a rule, the more power you are making, the smaller the gap you will need.

A spark plug's voltage requirement is directly proportionate to the gap size. The larger the gap, the more voltage is needed to bridge the gap. Most experienced tuners know that opening gaps up to present a larger spark to the air/fuel mixture maximizes burn efficiency. It is for this reason that most racers add high power ignition systems. The added power allows them to open the gap yet still provide a strong spark.

With this mind, many think the larger the gap the better. In fact, some aftermarket ignition systems boast that their systems can tolerate gaps that are extreme. Be wary of such claims. In most cases, the largest gap you can run may still be smaller than you think.

D. Indexing

This is for racers only !!
Indexing refers to a process whereby auxiliary washers of varying thickness are placed under the spark plug's shoulder so that when the spark plug is tightened, the gap will point in the desired direction.

However, without running an engine on a dyno, it is impossible to gauge which type of indexing works best in your engine. While most engines like the spark plug's gap open to the intake valve, there are still other combinations that make more power with the gap pointed toward the exhaust valve.

In any case, engines with indexed spark plugs will typically make only a few more horsepower, typically less than 1% of total engine output. For a 500hp engine, you'd be lucky to get 5hp. While there are exceptions, the bottom line is that without a dyno, gauging success will be difficult.

E. Heat Range selection

Let's make this really simple: when you need your engine to run a little cooler, run a colder plug. When you need your engine to run a little hotter, run a hotter spark plug. However, NGK strongly cautions people that going to a hotter spark plug can sometimes mask a serious symptom of another problem that can lead to engine damage. Be very careful with heat ranges. Seek professional guidance if you are unsure.

With modified engines (those engines that have increased their compression) more heat is a by-product of the added power that normally comes with increased compression. In short, select one heat range colder for every 75-100 hp you add, or when you significantly raise compression. Also remember to retard the timing a little and to increase fuel enrichment and octane. These tips are critical when adding forced induction (turbos, superchargers or nitrous kits), and failure to address ALL of these areas will virtually guarantee engine damage.

An engine that has poor oil control can sometimes mask the symptom temporarily by running a slightly hotter spark plug. While this is a "Band-Aid" approach, it is one of the only examples of when and why one would select a hotter spark plug.

F. Using "racing" spark plugs

Be cautious! In reality, most "racing" spark plugs are just colder heat ranges of the street versions of the spark plug. They don't provide any more voltage to the spark plug tip! Their internal construction is no different (in NGK's case, as all of our spark plugs must conform to the same level of quality controls) than most standard spark plugs.

There are some exceptions, though. Extremely high compression cars or those running exotic fuels will have different spark plug requirements and hence NGK makes spark plugs that are well-suited for these requirements. They are classified as "specialized spark plugs for racing applications". Some are built with precious metal alloy tips for greater durability and the ability to fire in denser or leaner air/fuel mixtures. However, installing the same spark plugs Kenny Bernstein uses in his 300+ mph Top Fuel car (running Nitromethane at a 2:1 air/fuel ratio and over 20:1 dynamic compression) in your basically stock Honda Civic (running 15:1 a/f ratios with roughly 9.5:1 compression) will do nothing for you! In fact, since Kenny's plugs are fully 4 heat ranges colder, they'd foul out in your Honda in just a few minutes.

NGK as a company tries to stay clear of saying that a racing spark plug (or ANY spark plug) will give you large gains in horsepower. While certain spark plugs are better suited to certain applications (and we're happy to counsel you in the right direction) we try to tell people that are looking to "screw in" some cheap horsepower that, in most cases, spark plugs are
not the answer.

To be blunt, when experienced tuners build race motors, they select their spark plugs for different reasons: to remove heat more efficiently, provide sufficient spark to completely light all the air/fuel mixture, to survive the added stresses placed upon a high performance engine's spark plugs, and to achieve optimum piston-to-plug clearance.

Some of these "specialized racing plugs" are made with precious metal alloy center/ground electrodes or fine wire tips or retracted-nose insulators. Again, these features do not necessarily mean that the spark plug will allow the engine to make more power, but these features are what allow the spark plug to survive in these tortuous conditions. Most racers know screwing in a new set of spark plugs will not magically "unlock" hidden horsepower.

G. Using high power ignition systems

Many of the more popular aftermarket ignition systems are of the capacitive discharge type. They store voltage, or accumulate it, until a point at which a trigger signal allows release of this more powerful spark. Companies like Mallory, MSD, Crane and Accel, to name a few, offer such systems.

They affect spark plugs in that they allow the gaps to be opened up to take advantage of the increased capacity. The theory is that the larger and the more intense the spark you are able to present to the air/fuel mixture, the more likely you will be to burn more fuel, and hence the more power you will make.

We encourage the use of such systems, but only on modified or older non-computer controlled vehicles.

In reality, computer controlled vehicles do such a good job of lighting off the air/fuel mixture (as evidenced by the ultra-low emissions), added ignition capacity would do little to burn more fuel since the stock configuration is doing such a good job. Older non-computer controlled vehicles or those that have been modified with higher compression or boosted (nitrous, turbo, supercharged) engines can certainly take advantage of a more powerful ignition system.
 

Attachments

  • SparkPlugTorqueValues.JPG
    SparkPlugTorqueValues.JPG
    39.6 KB · Views: 2,049
I am going to try an recap this a bit because it is somewhat inconsistent in my mind:

Spark plugs need to be examined immediately shut down at the RPM and load to be analyzed. In other words, you can read plugs for WOT as well as for idle and cruise - but difficult to do both together.

The Ground Strap
This one is a bit ambiguous to me but possibly it's not as inconsistent as I think. The ground strap reads timing (and?) or heat range. There basically a colored line across the strap where the metal has been annealed due to the very high temps it is subjected to. If the mark is tending toward the tip - the metal has seen little excessive heat: timing is too conservative for top performance and efficiency (and/or the plug is too cold?) If the mark is tending toward the ground, the metal has seen significantly high heat: too much timing (and/or the plus is too hot???)

The mark should be at the elbow or thereabouts and producing max power. That seems easy enough to tweak. However it becomes more complicated if you can adjust the heat range there.

From my perspective - I tend to conclude that I can read the timing there - and will not tune the heat range that way. From what I read BTW, heat range really only plays a significant role at the very edge of performance. Most plugs, as recommended, will be in right range.

Finally - there can be more than one mark on the strap: cruise and WOT.


The Porcelain
From what I understand this divides in to three. Deep inside is where you read WOT. The tip is where idle/cruise is read. The mid area: power valve on but not WOT. Once again - you shut down immediately after the range you are to examine. The porcelain progressively loses its color from tip to base - that is why you examine deep down the effects of WOT on the porcelain. It get quickly colored over from tip on through mid to base.

So once again - you can examine the idle/cruise here by looking at the tip of the porcelain. Sooty/tan/white-ashed. Rich/good/lean. So that is a change of primary jets

!!!!! But you can also read the heat range here... THAT is confusing again. My feeling here is if jetting down a bit doesn't clean up plug soot - try a hotter plug. And of course vice versa.

For WOT you would shut down immediately and look for a grayish tan line that rings around the base. Incomplete ring needs more jet. Too fat rings: less jet.

Speckles on porcelain indicate detonation.

Glazing: too hot!


Base-ring
Here it is unclear - some say this is jetting idle/cruise. Others say this is idle and has nothing to do with jetting.

From my little experience. Leaning out the idle has cleaned my base ring. The soot is dryer and doesn't go all the way around... and that is what one should shoot for. Tailpipes still smell rich but there is no wispiness

I have ALSO read that the three first threads are an indication of heat range: 3 = good. more = too cold. Less = too hot. Possibly not inconsistent.


Hmmmmmmmmmmmmmm
 
over all your correct in your basic assumptions, there are factors that can and do tweak the observed results and the fact that your running a supercharger is one, because a rapid increase in combustion pressure tends to make the plugs and fuel air ratio a bit harder to diagnose simply because your exhaust temps tend to go up with the increased volume of fuel air mix being burnt, as the rpms increase, while the combustion chamber temps don,t climb AS rapidly , and the fact that any supercharged engines tends to push a bit of unburnt fuel/air mix out the exhaust during the cam overlap

Plug-2.jpg

this is a very informative picture, you will not normally see plugs in this clean condition after being run awhile of course, but
ID expect to see the total timing mark just a bit closer to the threads
ID expect to see the the porcelain a light tan or beige
ID expect to see the threaded body a bit lighter ,dry and a darker tan or beige not what looks oily black

read thru these again

http://www.4secondsflat.com/Spark_plug_reading.html

http://www.dragstuff.com/techarticles/h ... plugs.html
 
http://www.summitracing.com/parts/SUM-900313/
pluggapingpliers.jpg

BUY ONE OF THESE IT MAKES READING PLUGS EASIER
http://www.harborfreight.com/3x-magnifying-glass-with-8-led-lamp-94367.html?hftref=cj

pluggapingpliers1.jpg

pluggapingpliers2.jpg


Im always amazed at the guys that not only don,t have decent spark plug tools but don,t even know what they look like or are used for for that mater.
I went to the local napa stores to buy a decent spark plug gaping tool and could not find one, when I described the tool he stated he had never seen or heard of anything similar, he had those little throw away dollar tools only

12-21375.jpg


and when I asked him what the ohms resistance was per foot in the spark plug wire, in the set of spark plug wires he had for sale, I got the very strong impression he had no clue what I was asking, Id bet at least $20 hes never bothered to measure ignition wire resistance on a car with an ohms meter, in his life!
and while Im sure he had heard of gaping plugs Id bet he installs them right out of the package without checking a darn thing


image_12926.jpg

http://www.harborfreight.com/5-in-1-dig ... 98674.html

http://www.ehow.com/how_7592234_test-ig ... wires.html

http://www.aa1car.com/library/spark_plug_wires.htm
 
Last edited by a moderator:
side gapping and a quick test result

now I freely admit before I start this thread that the methods used for testing were less than exact or something Id suggest you do, and yes much of the improvement noted might be related to the newer plugs and checking over a good deal of the ignition system, but at the same time I was impressed with how the work obviously made a difference, and we didn,t change much but the plugs and distributor cap.

BOB, stopped back over with his 1966 chevelle and asked for a bit of help with a tune-up ,
(HERES A PREVIOUS related THREAD)
viewtopic.php?f=87&t=8801&p=35305#p35305

he brought over a new distributor cap, plugs and asked me for help installing and side gaping plugs as he had read some place it was worth a few extra hp, now I pointed out that it was not likely to be something worth the time and effort required and it was hardly something that was likely to provide a long term benefit on a street driven car but if he wanted to try it we could do so, but I pointed out that it might result in a set of spark plugs that would not last nearly as long as the standard plugs might in a similar application.
we would need a dremel tool with a cut off disc,side gapping plugs generally works best on 12:1-14.1 compression engines that are well tuned with about 12.7:1 fuel air ratios where you can actually see the small benefit in ignition improvement at peak rpms I doubt its measurable on your average 9:1-10:1 street engine that rarely sees over 5000rpm, and runs closer to a 14.7:1 fuel air ratio.
12555.JPG

a plug gap measuring tool
gappingrtool.jpg

and he would need to understand what we were doing and why!
we used the cut off disc to cut the ground strap on the plugs so the tip of the round strap ended with about only 1/4 of the edge of the central electrode under it and gaped the plug ground at a .040 gap, we replaced the distributor cap, and checked the ignition firing order and timing and timing advance, this was set at 10 BTDC at 900RPM which was as low as the idle speed would work on that engine.
we verified total timing came in at 38 degrees at 3400rpm, while thats most likely not ideal, we felt it was close and the older plugs we removed looked to be running reasonably well and have a decent heat range and showed a decent fuel/air ratio

img113.gif

the plugs used were the 5/8" hex long reach champion plugs I don,t remember the number, but I think they were RN14YC but the end result was that after they were installed the engine seemed noticeably more responsive or "CRISPER"and when he drove off, he was able to leave two long black parallel tire burn marks and significant tire smoke and he called a few minutes later to thank me for the help!

btw the old plugs were
R43XLS

· R = Resistor
· 4 = 14 mm Thread
· 3 = Heat Range (range 1-5 start with a 3)
· T = Taper Seat (No T for your gasketed plug)
· XL = Extra Long Reach, 3/4" fully threaded
· S = Extended Tip

e3sh.png

plugs like the E3 with multiple ground electrodes shroud the spark significantly more than standard plugs
 
Re: side gapping and a quick test result
http://performanceunlimited.com/documents/plugsidegapping.html
Has Bob noticed a driving improvement with the Side Gapped spark plugs Grumpy ?

The trick works pretty good in high RPM engines with over 12.0 :1 static compression ratios, cam of 250-280 degree duration @ .050" lift, 108- 98 Intake centerline, Vertex Magneto.
High octane race fuel.. Timing locked out.
Even better results on Methanol alcohol .

On street only good indication is throttle response improvements.
 
Last edited by a moderator:
I have (4) ,454's.
I have never been able to find the correct gap for the plugs.
I get a different gap from different sources!
I asked at O'Reilley's the other day and was told .035
Other times it's .045
Once it was .060
The engine I'm putting new a/c plugs in now is a 1986,454 from a motorhome.It's completely stock with the RV cam.H.E.I. with 350 trans and the car is blue!
What's Ya'lls best guess?
Thanks,Mike.

the spark plug gap varies with the ignition design, and characteristics, and limitations,a fairly stock hei, tends to work well with a .043-.045 gap in my experience.
you,ll also find that the distributor, ignition coil and ignition wires also effect results
adding an MSD box also helps in many cases

https://www.msdperformance.com/products/ignitions/street_and_strip/parts/6421

http://www.jegs.com/p/MSD-Ignition/MSD-6-Series-Ignition-Control-Boxes/747792/10002/-1
 
https://www.dragstuff.com/techarticles/spark-plug-cross-reference.html

https://www.jegs.com/PDFs/111-UGroove.pdf

https://www.ngkpartfinder.co.uk/files/NGK_Classic_Vehicles.pdf

https://www.clubplug.net/

https://www.briskusa.com/brisk_usa_spark_plug_cross_reference_table

a wire diam gauge tends to give the most consistent results

a wire diam gauge tends to give the most consistent results
https://www.amazon.com/CNRAQR-Unive...06d-bb62-52e7b13184ad&pd_rd_i=B0CSN2YH2S&th=1

a wire diam gauge tends to give the most consistent results

www.summitracing.com

Wright Tool 9531 Wright Tool Spark Plug Wire Gap Tools | Summit Racing

Free Shipping - Wright Tool Spark Plug Wire Gap Tools with qualifying orders of $109. Shop Spark Plug Gap Tools at Summit Racing.
www.summitracing.com
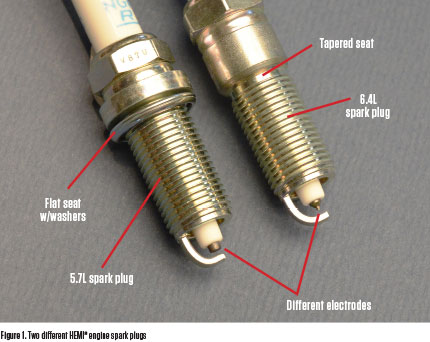
Powerbuilt Tools 648397

Free Shipping - Powerbuilt Tools 648397 with qualifying orders of $109. Shop Spark Plug Gap Tools at Summit Racing.
www.summitracing.com


Powerbuilt Tools 648397

Free Shipping - Powerbuilt Tools 648397 with qualifying orders of $109. Shop Spark Plug Gap Tools at Summit Racing.
www.summitracing.com


www.summitracing.com

Wright Tool 9531 Wright Tool Spark Plug Wire Gap Tools | Summit Racing

Free Shipping - Wright Tool Spark Plug Wire Gap Tools with qualifying orders of $109. Shop Spark Plug Gap Tools at Summit Racing.
www.summitracing.com

Powerbuilt Tools 648397

Free Shipping - Powerbuilt Tools 648397 with qualifying orders of $109. Shop Spark Plug Gap Tools at Summit Racing.
www.summitracing.com
 
Last edited:
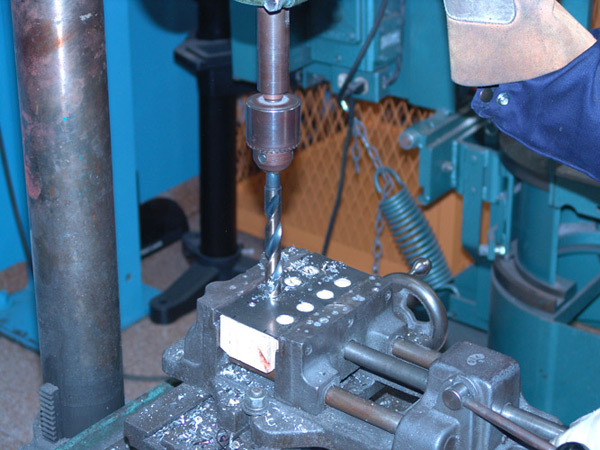
I am having fantastic results with The Accel C-cut Spark plugs Grumpy in the Olds 425.
They fit many Vintage Chevy SBC & BBC .
Pontiac V8 1955-1971.
Perfect heat range for street race on 87 pee water pump gas.
A bit expensive at $33 a set from Summit Racing.
Left my Feedback on Summit...AWESOME !
You can post your pictures there also on Summit feedback. Sometimes I do.

Made In Romaina now ACCEL.
Not Japan like in past.

No Fu man chu stuff.
 
Got a whole lot out of reading this thread a few years ago, especially the part about reading plugs. It took me quite a while but I think I finally got the 4bbl Holley dialed in perfectly on my 383 SBC with the aggressive cam.

Life has changed and I'm on another project now. Several people in the forums I'm following now have said that with today's fuels you can't really depend on plug reading any more. You need an in-line wide-band O2 sensor. Huhhh??????????????

Really?

Before you ask, these aren't 21st century tuners, I'm talking about a 1941 Ford flathead V8. Flathead guys rarely plumb O2 sensors into their exhaust.
 
Last edited:
more modern tuners have come to depend on sensor readouts and damn few can or even want to read plugs, yeah reading plugs correctly works,and works very well.. but it takes experience, and few guys want to learn, older school skills, or take the effort


Last edited:
Back
Top