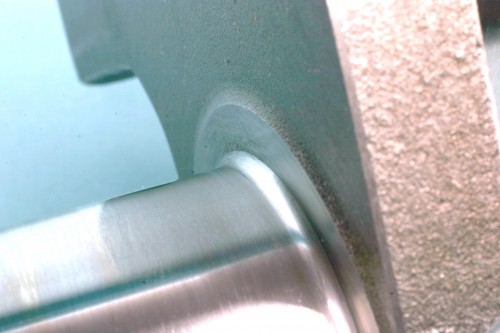
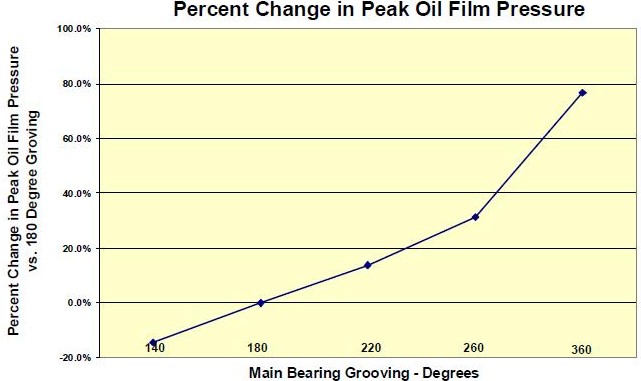
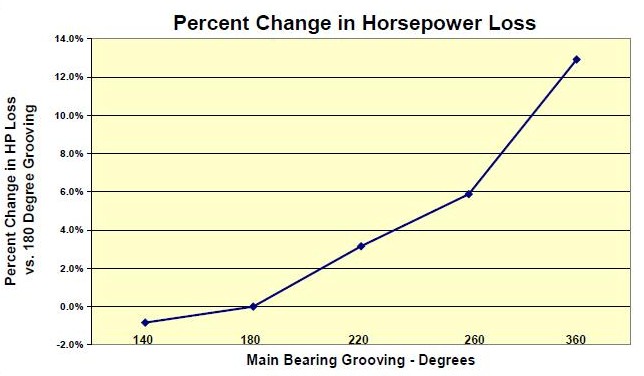
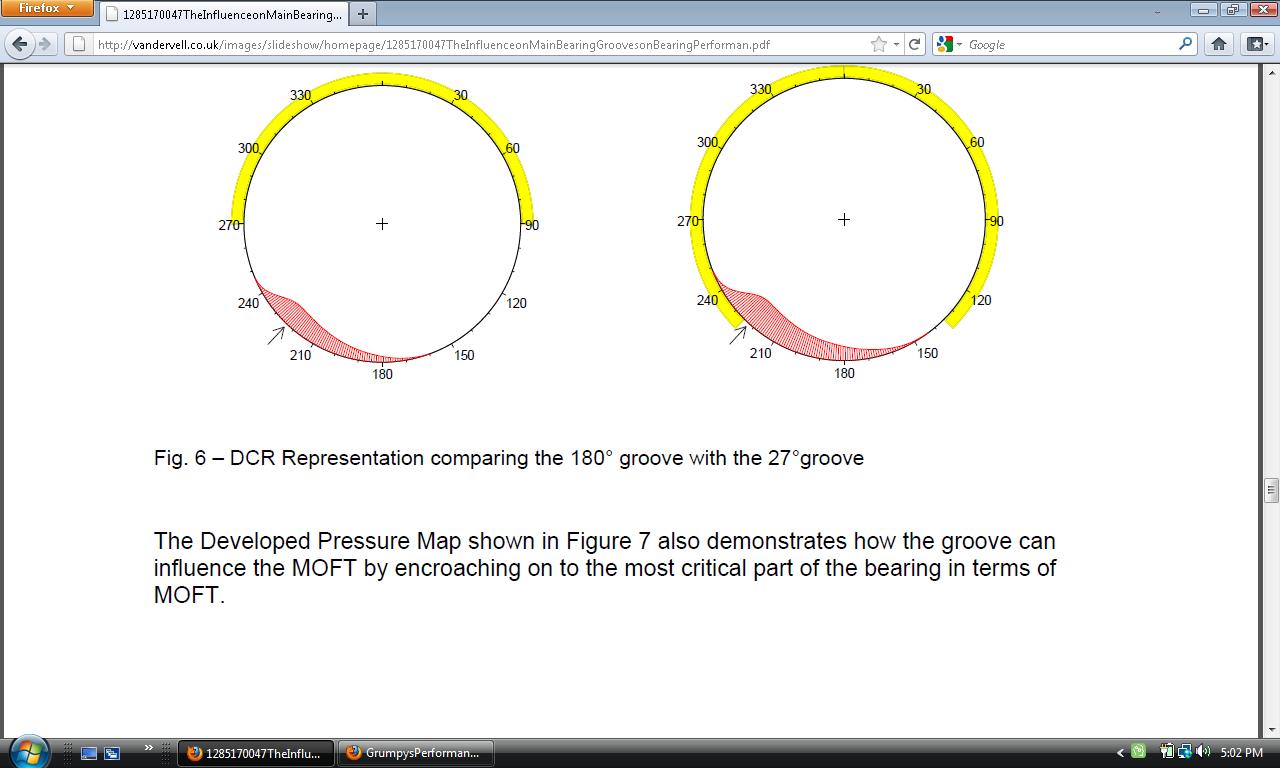
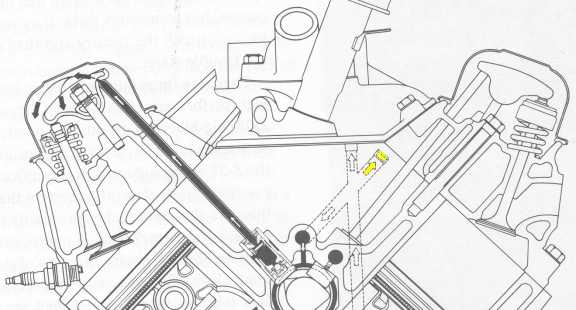
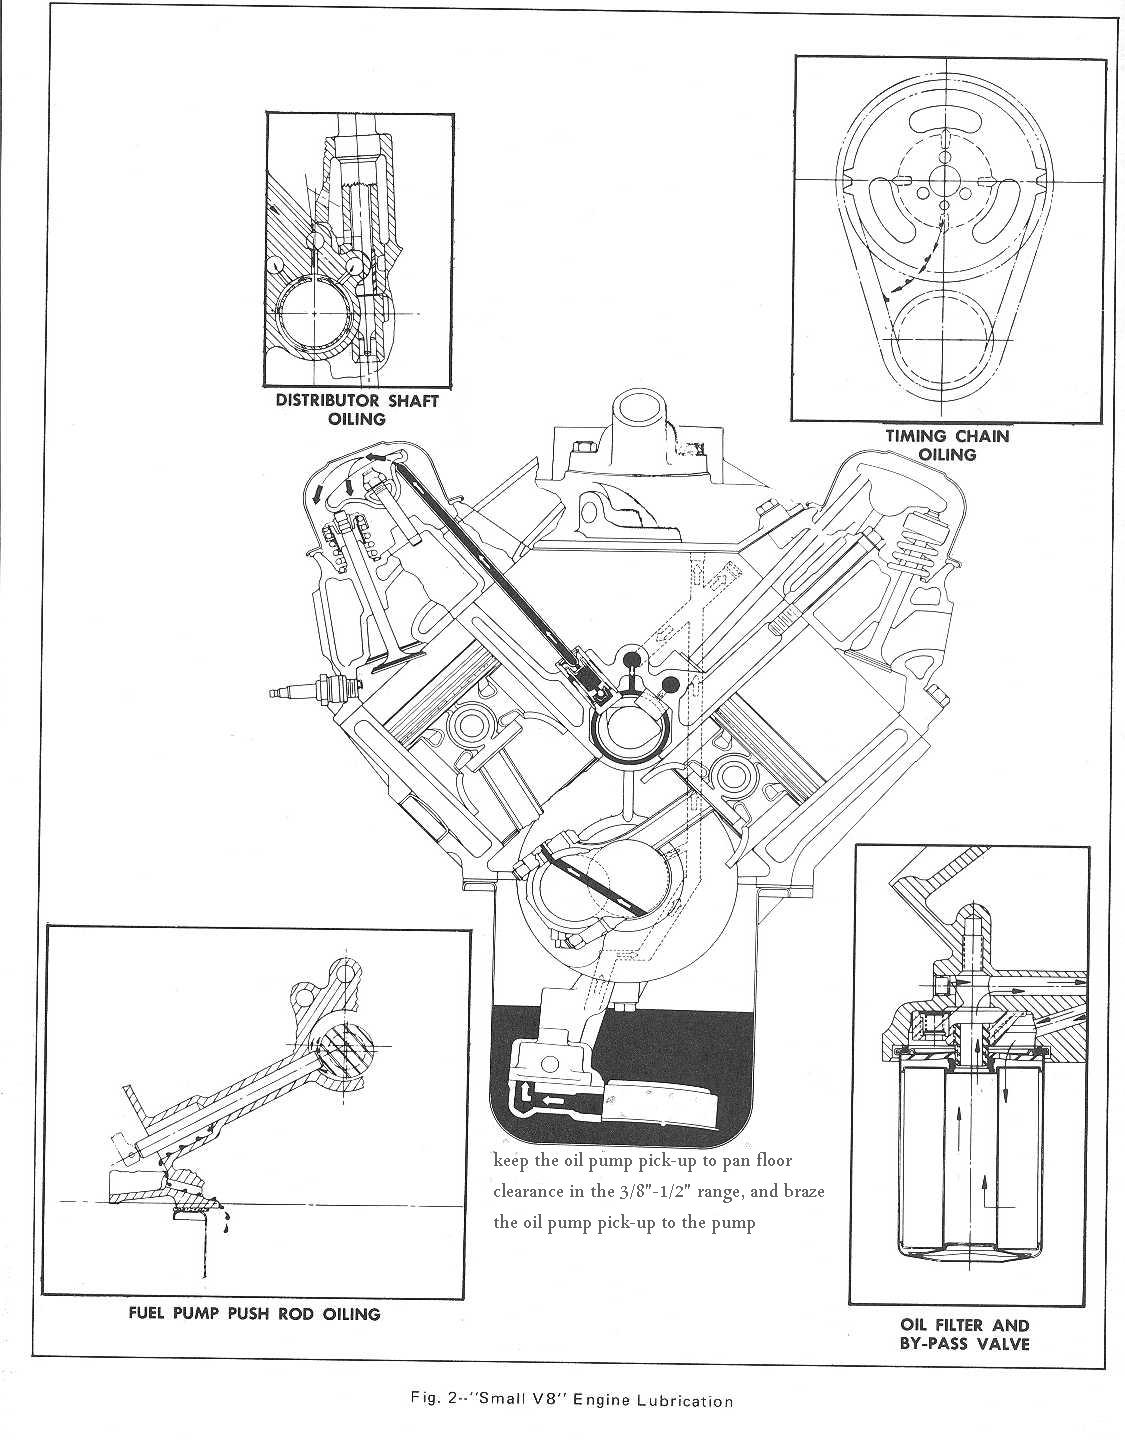
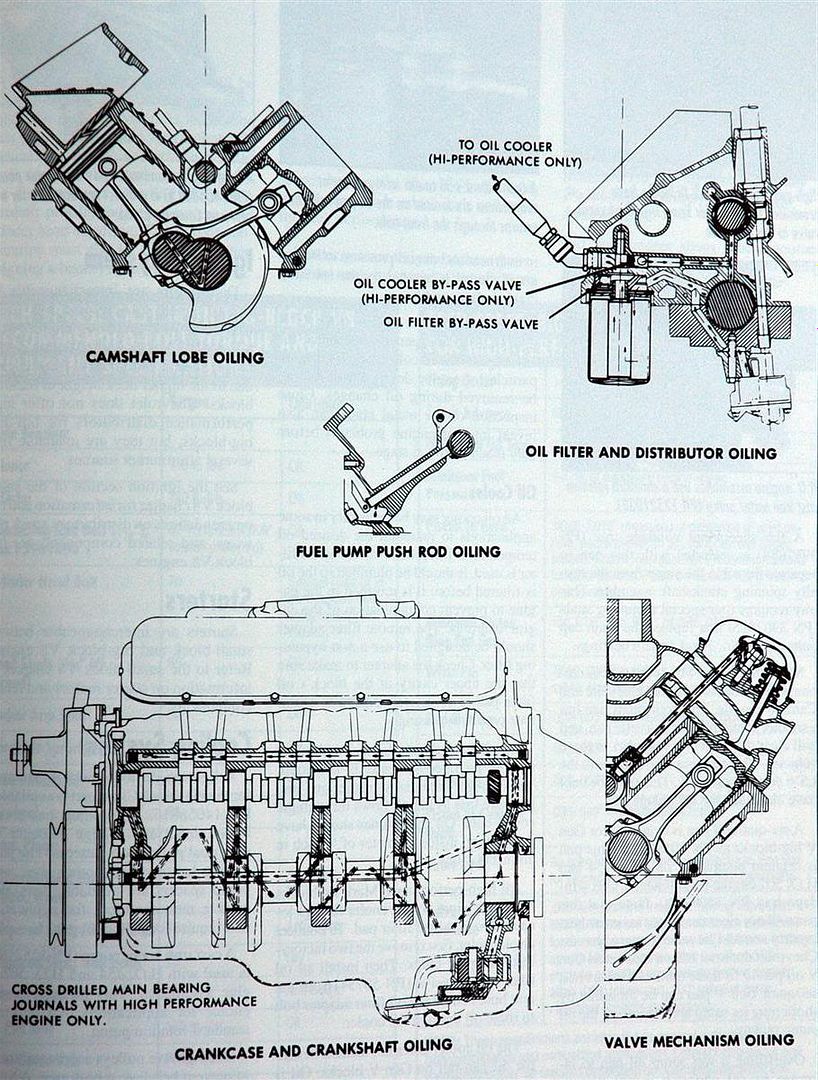
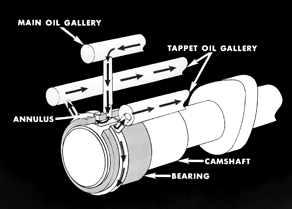
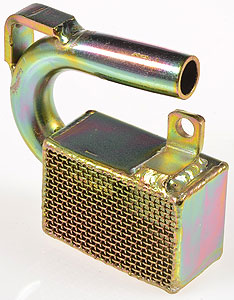
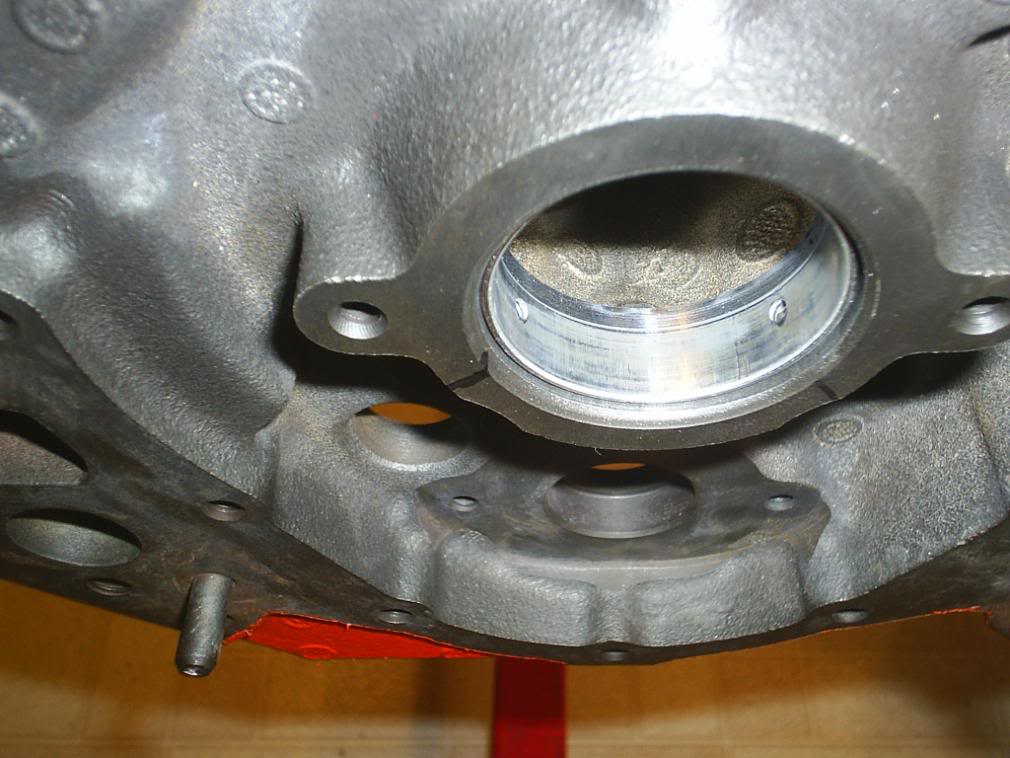
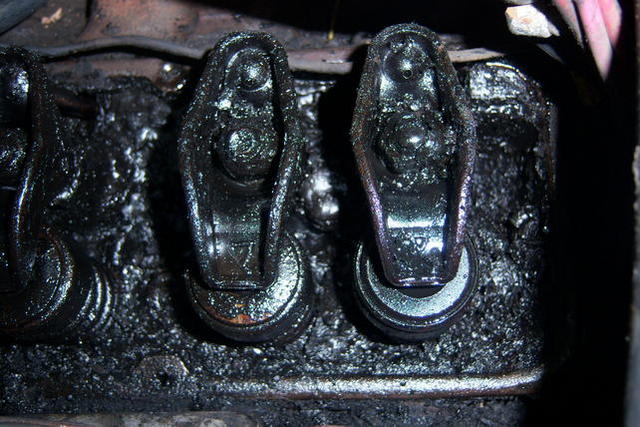
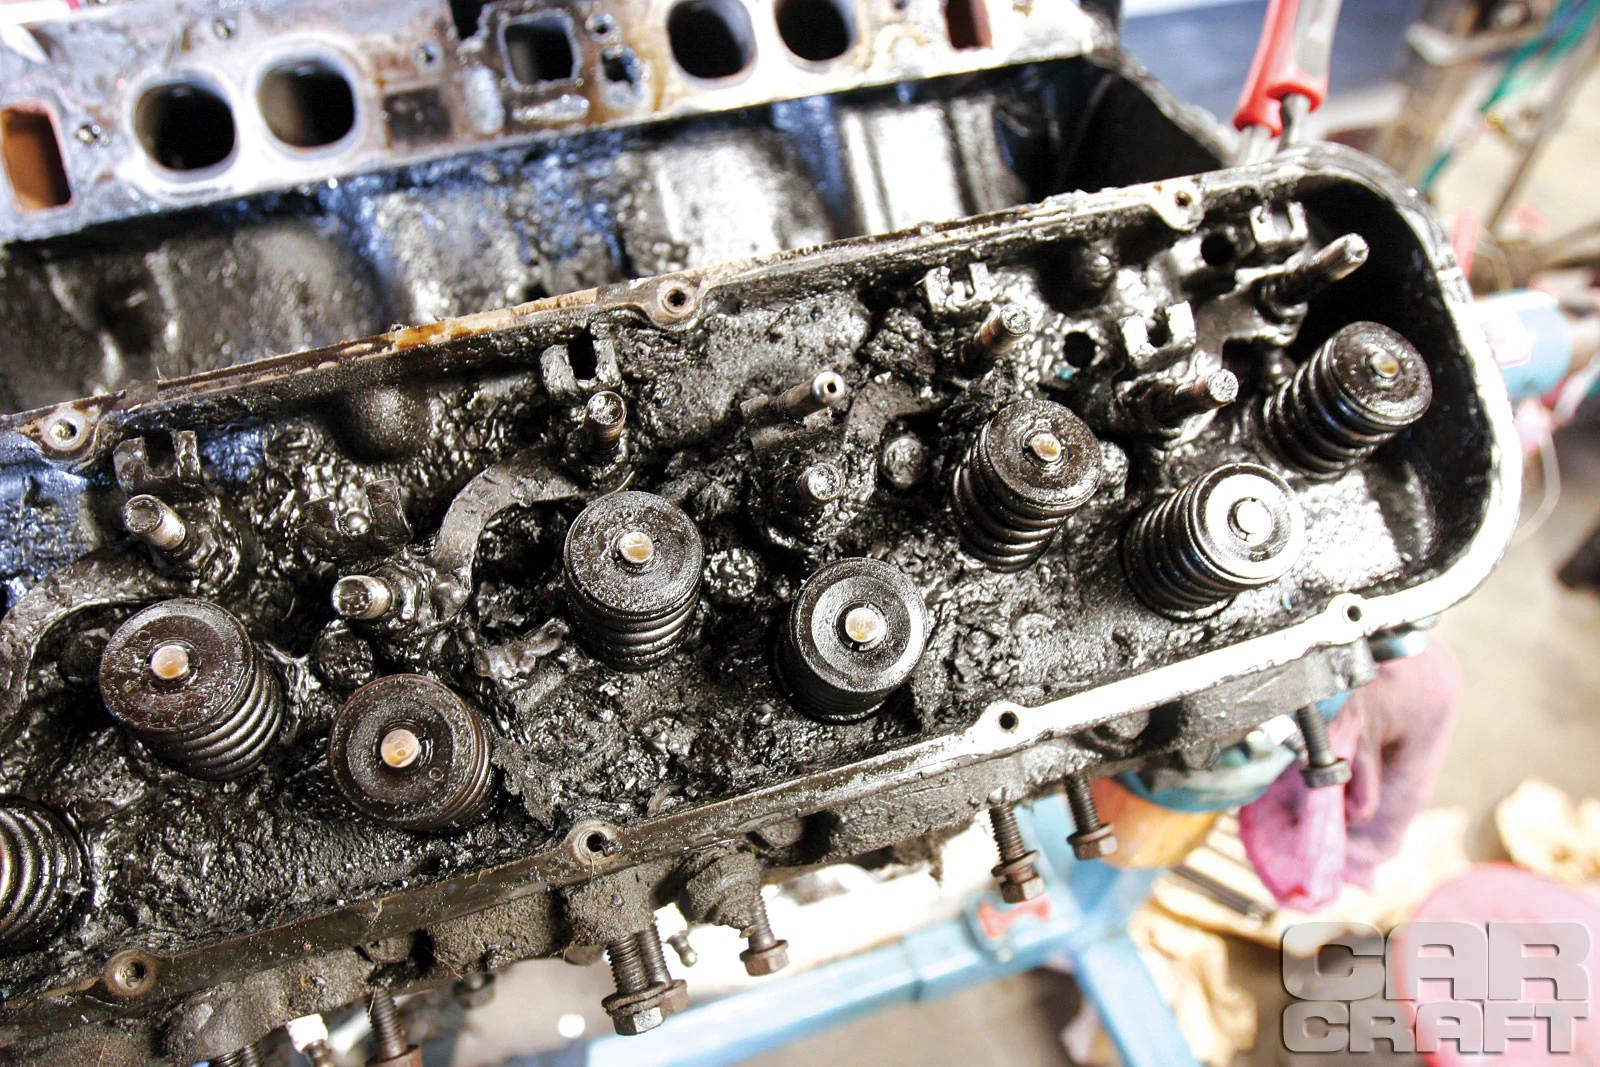
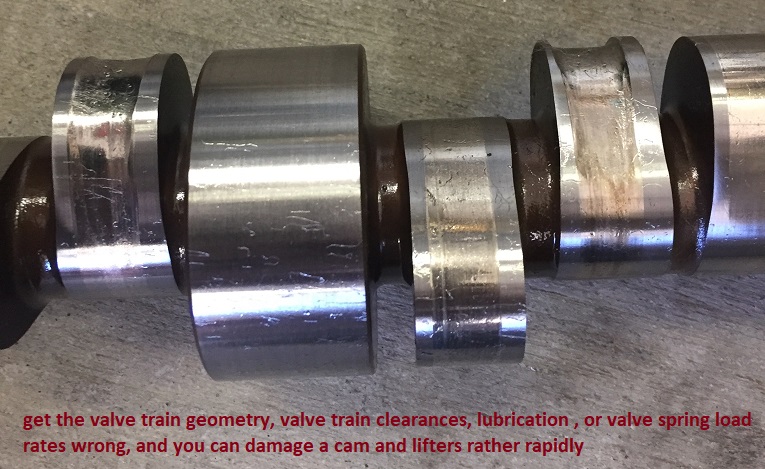
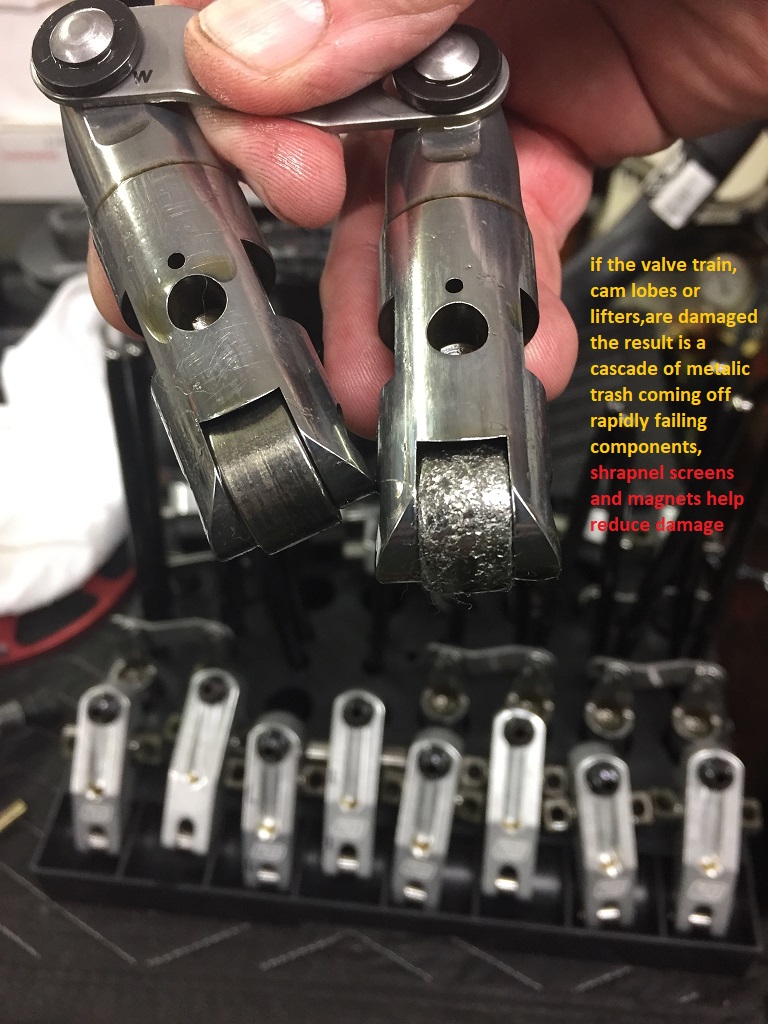
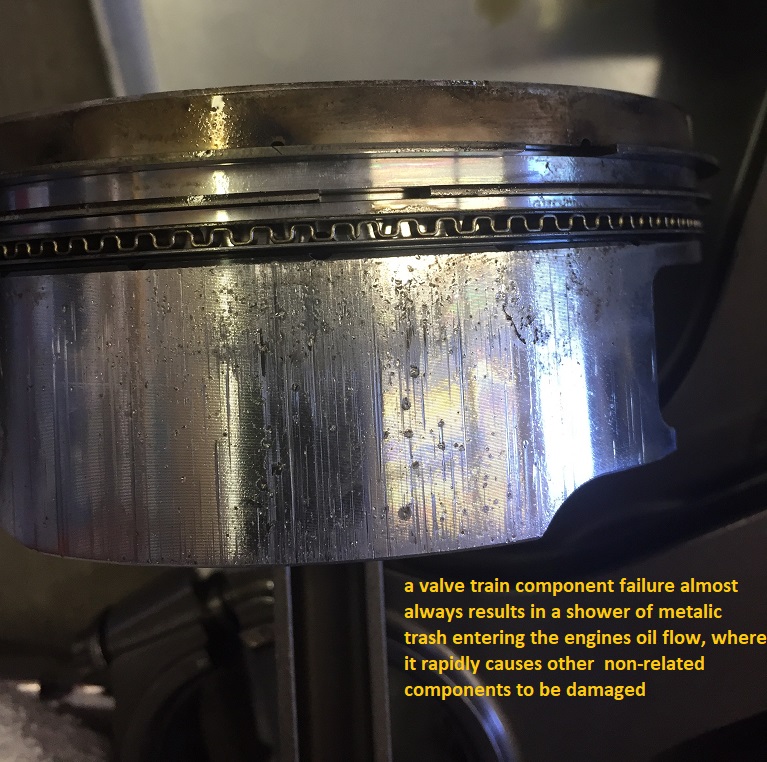
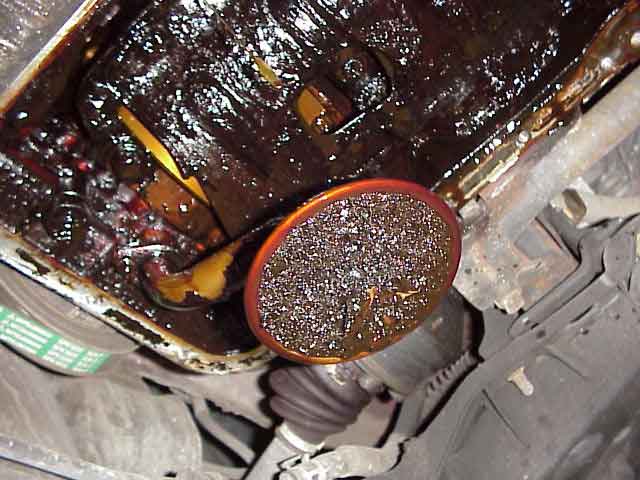
while your engines running theres several gallons of oil per minutes circulating thru your blocks oil pump and the blocks internal oil passages, if you have any crud suspended in that oil like particles of sealant or micro bits of bearing or cam lobe etc, its pumped, thru the oil system along with the oil flow until its trapped by the oil filter. the problem is that theres several potential flaws in the system, the first one is the oil pump pick-up, on many cars the screen on the pick-up is easy too clog with debris, and that restricts or blocks oil flow, with bits of gasket or silicone gasket cement. once the filters partly restricted with crud in the oil, some oil almost always bye-passes the filter, carrying crud into the oil passages and blocking them and the internal push-rod passages as it accumulates, further restricting oil flow.
keep in mind, if youve installed parts in an engine thats previously had a cam ,lifters,rockers,bearings etc. fail you need to rod out the oil passages,and clean out the push-rods internally and verify valve train geometry and clearances, trash pumped into those passages may be restricting current oil flow.
If you intend to remove the oil pan to check, or replace the oil pump or bearings with the engine still in the car,
be aware that the cranks front journal counterweights position may not allow you to slide the oil pan back out,
from under the engine and out,
over the front cross member and allow clearance required.
that oil pan may only slide out over the cross member,
only if the front crank counterweight is in the 12 o'clock location
and yes removing the motor mount bolts and jacking the engine up a few inches certainly tends to help
, but if you do, remove the distributor before you start,
more than a few guys ignored that bit of advice and the result gets darn expensive
and yes check the oil pump pick-up to oil pan floor clearance, if its not 3/8"-1/2" it will cause flow issues
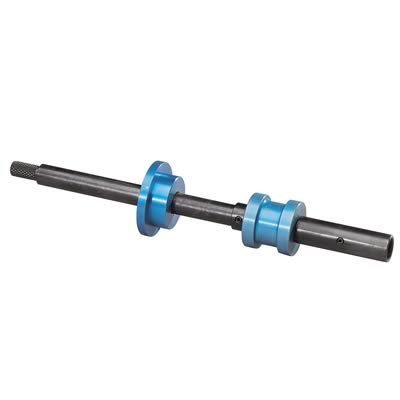
http://www.summitracing.com/parts/SUM-901010/?rtype=10
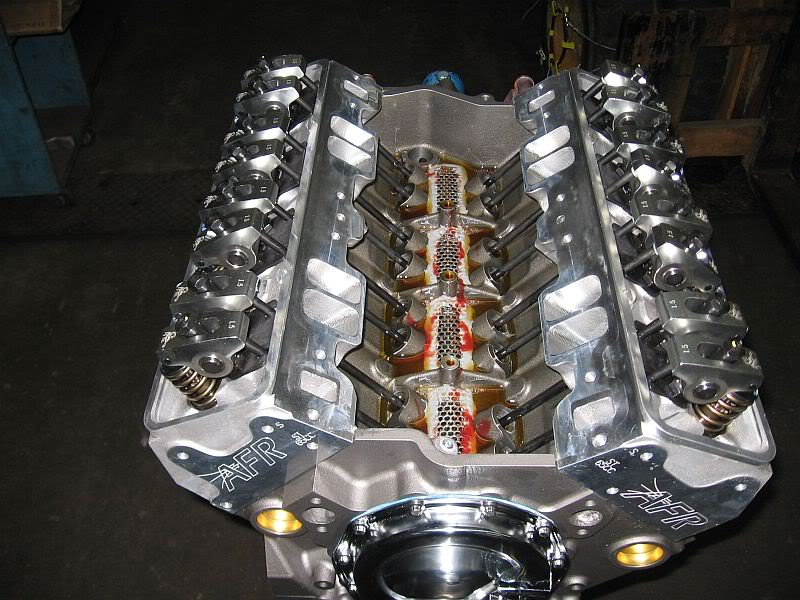
shrapnel screens epoxied into the block to prevent valve train failure shrapnel from inducing bearing failure if crap gets sucked into the oil pump is a good idea IF you do frequent oil changes so the screens won,t get sledged up
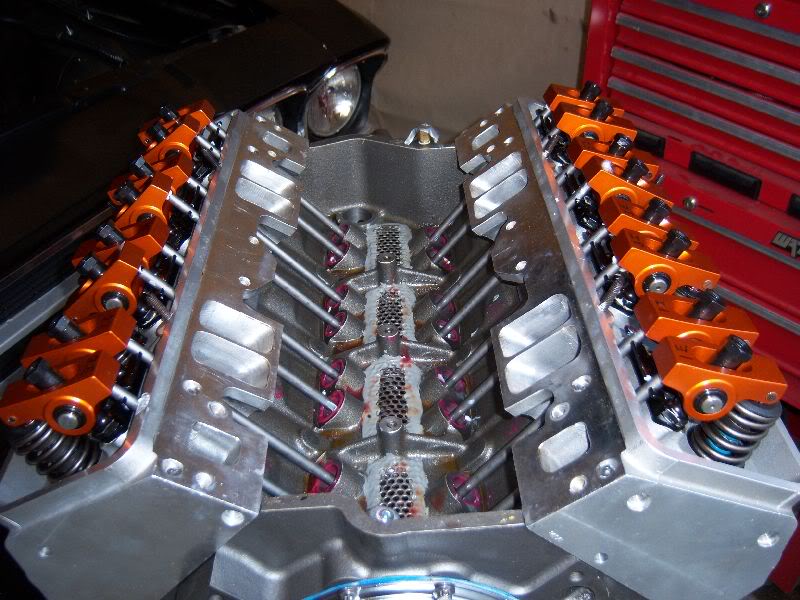
THE SCREEN ABOVE IS CLOSE TO BEING IDEAL
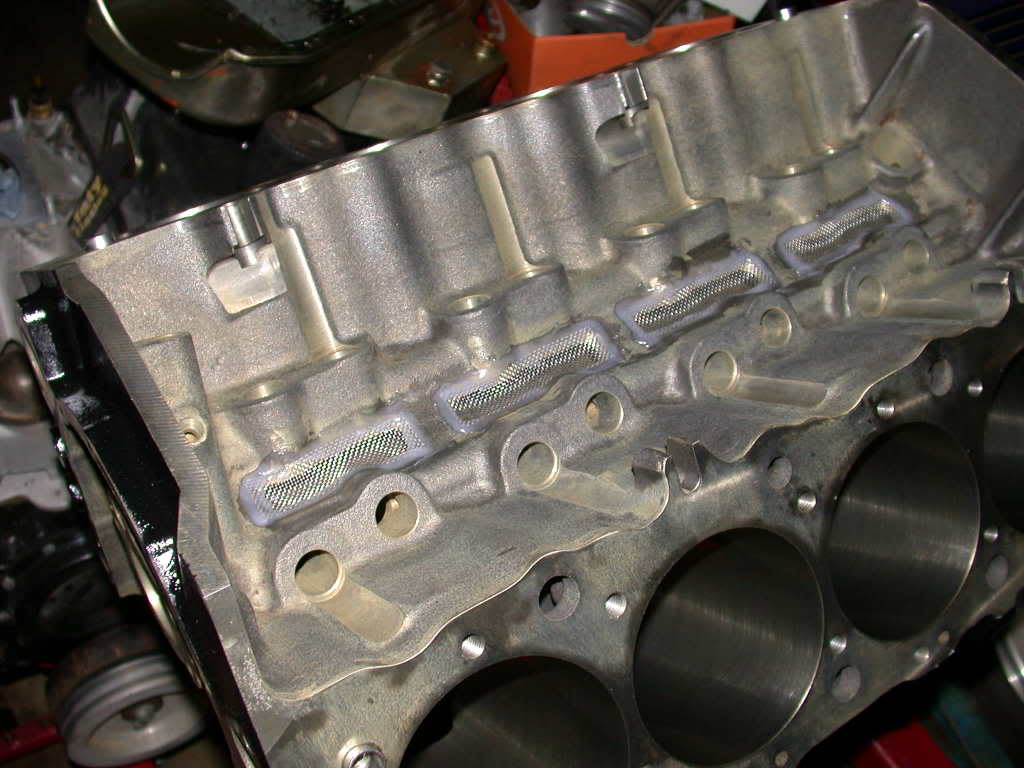
THE SCREEN ABOVE IS TOO SMALL TO BE IDEAL
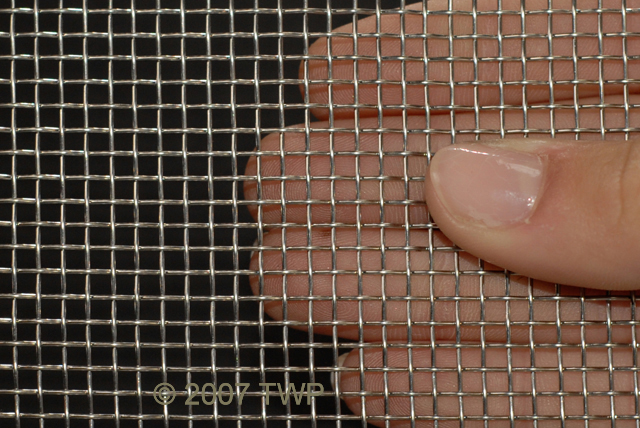
while I generally use stainless 6 or 8 mesh screens theres lots of options that will work just fine, just remember to keep the oil changed regularly or theres some potential for sludge to clog ANY size shrapnel screens
http://www.twpinc.com/twpinc/products/T ... 6T0350W36T
http://www.twpinc.com/twpinc/products/T ... 8S0280W36T
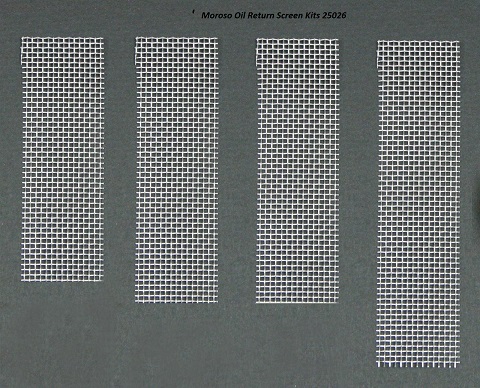
http://www.summitracing.com/parts/mor-25026?seid=srese1&gclid=COOf2IODscgCFZKAaQodHWoF1Q
IVE typically used these magnets in an engine, one in the rear oil drain on each cylinder head, one near each lifter gallery drain and 4 in the oil pan sump
proper magnets trap metallic debris
SmCo Samarium Cobalt Disc Magnets
http://www.magnet4less.com/

proper magnets trap metallic debris
SmCo Samarium Cobalt Disc Magnets
http://www.magnet4less.com/
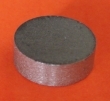
https://www.magnet4sale.com/smco-disk-magnet-dia-1x1-4-samarium-cobalt-magnets-608-f-temperature/
https://www.magnet4less.com/smco-magnets-1-in-x-1-4-in-samarium-cobalt-disc-magnet
Samarium Cobalt MAGNETS HELP
http://www.magnet4sale.com/smco-disk-magnet-dia-1x1-4-samarium-cobalt-magnets-608-f-temperature/
magnets are ceramic and glass hard, don,t try to drill or grind them, as they can shatter

Model# SMCO-D8
Samarium Cobalt Magnets 3/4 in x 1/4 in Disc
Suitable for high temperature applications
Wholesale Price Range:
$2.99
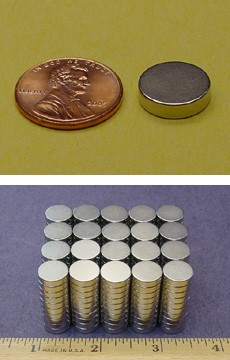
http://www.kjmagnetics.com/proddetail.asp?prod=D82SH
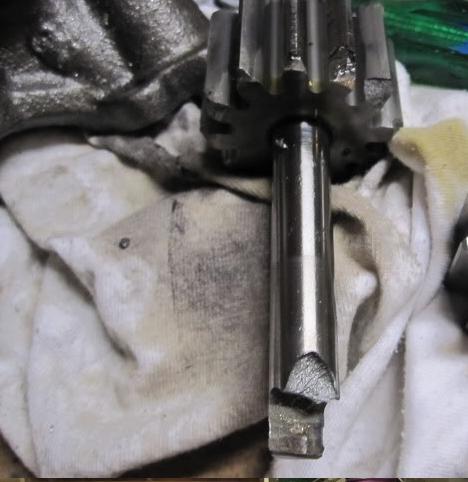
heres a good example of why keeping small metallic debris like valve locks and rocker arm bearing parts out of the oil pump gears is a good idea, shrapnel screens and magnets tend to reduce that from occurring
to furnish the oil pressure without putting any wear on the bearings as you slowly rotate the crank to allow oil to flow easily
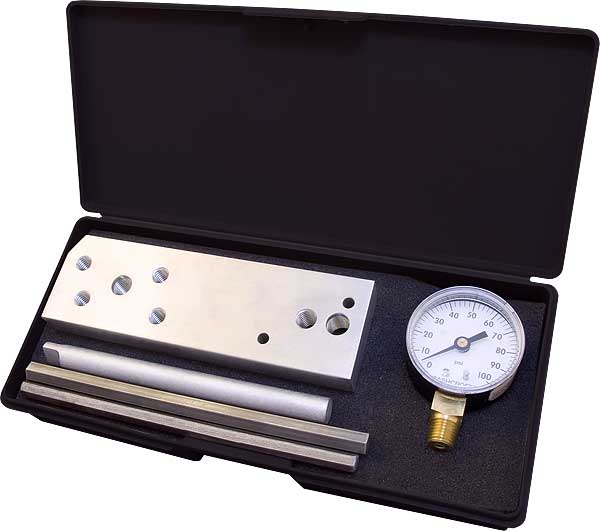
there are oil pump testers available commercially or if your mechanically inclined you can fabricate one with reasonable care, after a bit of measuring and purchasing a gauge, if you don,t test you won,t know whats going on,
http://cvrproducts.com/oil-pressure-test-kit/
you should NEVER shim an oil pumps pressure relief spring as it may prevent the piston it holds from moving down its bore far enough to allow it to open the bay-pass passage, that allows the pressure on the high pressure side of the oil pump from bleeding off back into the intakes side of the oil pump, the springs come in several resistance strength levels, but extensive testing has shown now increased bearing protection at pressure levels exceeding 65 psi, higher strength pressure relief springs, just increase engine rotational resistance
http://www.summitracing.com/parts/mel-77070/overview/
Oil Pump Springs, 70 psi, Steel, Pink, Pins, Chevy, Big Block, Kit
http://www.summitracing.com/parts/mel-7760m/overview/
http://www.summitracing.com/parts/stf-35250/overview/
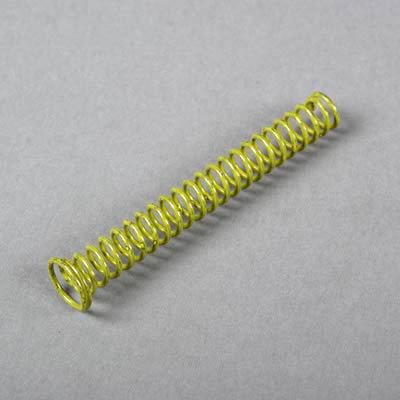
Melling 55070
70 psi, Steel, Pink, Pins, Chevy, Small Block, Kit
Melling 77070
Oil Pump Springs, 70 psi, Steel, Pink, Pins, Chevy, Big Block, Kit
Melling 55058
Oil Pump Springs, 58 psi, Steel, Yellow, Pins, Chevy, Small Block, Kit
Melling 55078
Oil Pump Springs, 78 psi, Steel, Green, Pins, Chevy, Small Block, Kit
Melling 77060
Oil Pump Springs, 60 psi, Steel, Black, Pins, Chevy, Big Block, Kit
Melling 55049
Oil Pump Springs, 49 psi, Steel, Green, Pins, Chevy, Small Block, Kit
Melling 77052
Oil Pump Springs, 52 psi, Steel, Purple, Pins, Chevy, Big Block, Kit
Melling 7770M
Oil Pump Springs, 70 psi, Steel, Pink, Chevy, Big Block, Set of 5
Melling 5556F
Oil Pump Springs, 55 psi of Force, Steel, Chevy, Small Block, Set of 5
Melling 5570F
Oil Pump Springs, 70 psi, Steel, Pink, Chevy, Small Block, Set of 5
Melling 7760M
Oil Pump Springs, 60 psi, Steel, Black, Chevy, Big Block, Set of 5
Melling 7752M
Oil Pump Springs, 52 psi, Steel, Purple, Chevy, Big Block, Set of 5

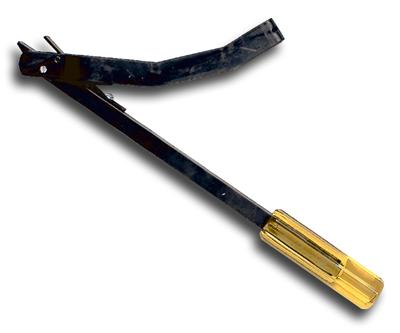
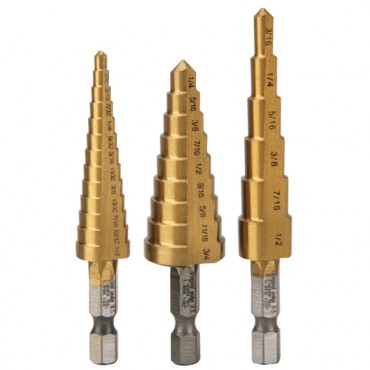
http://garage.grumpysperformance.com/index.php?threads/drill-bits.4714/#post-12806
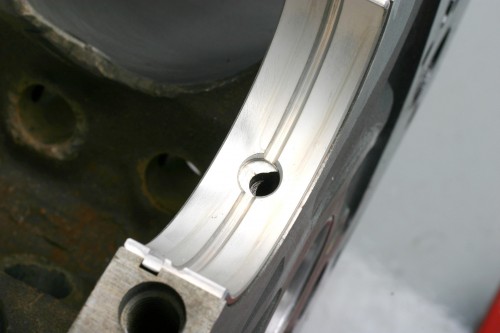
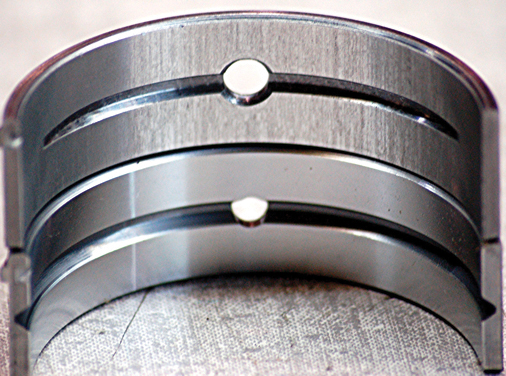
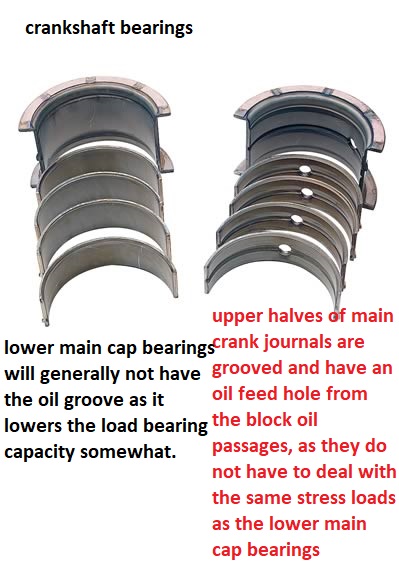
at times having a long small diameter light that you can stick through the blocks oil passages to check the oil feed to the bearings passage alignment helps
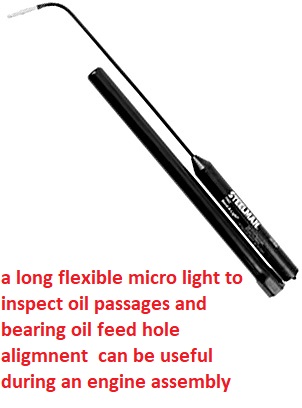
https://www.tooltopia.com/steelman-...MI4s7coYzY2AIV3I2zCh3U6AFUEAQYAiABEgI0PfD_BwE
on others the screen does not fully cover the oil pump inlet and that crap gets sucked thru the oil pump gears and pushed into the blocks oil passages,
AFTER potentially damaging the oil pump.
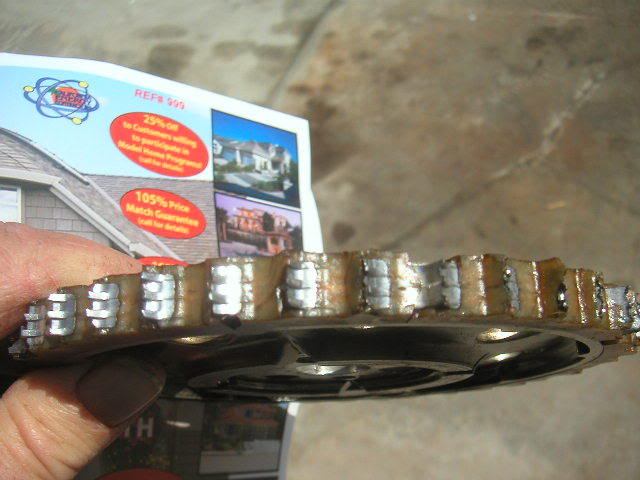
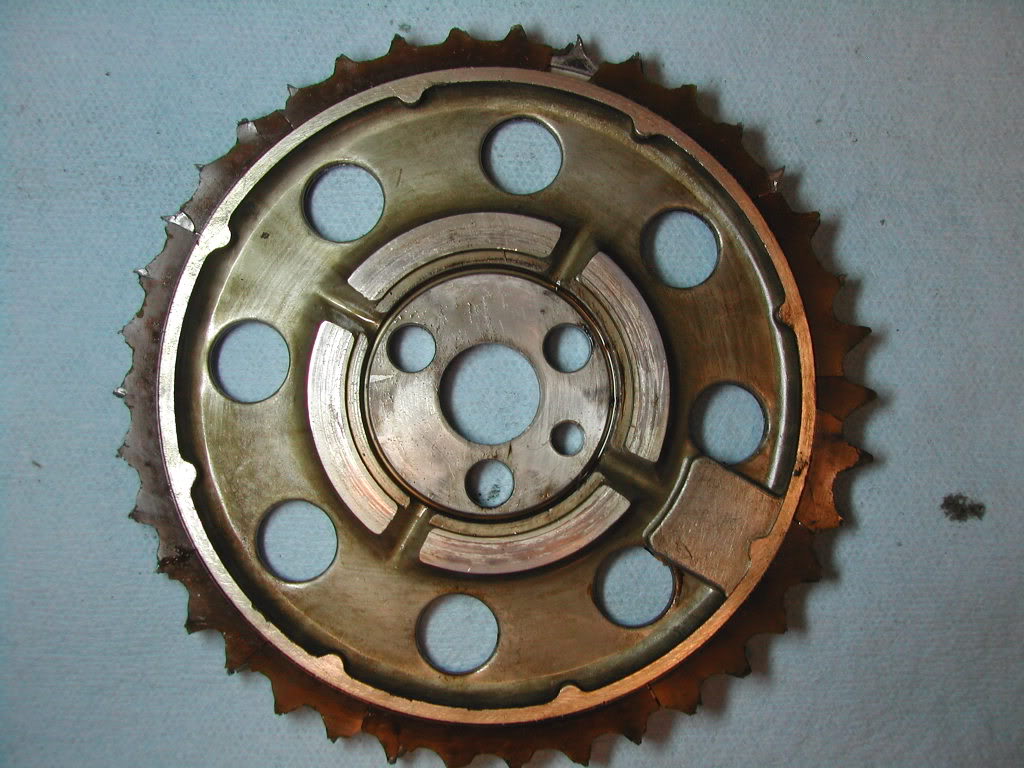
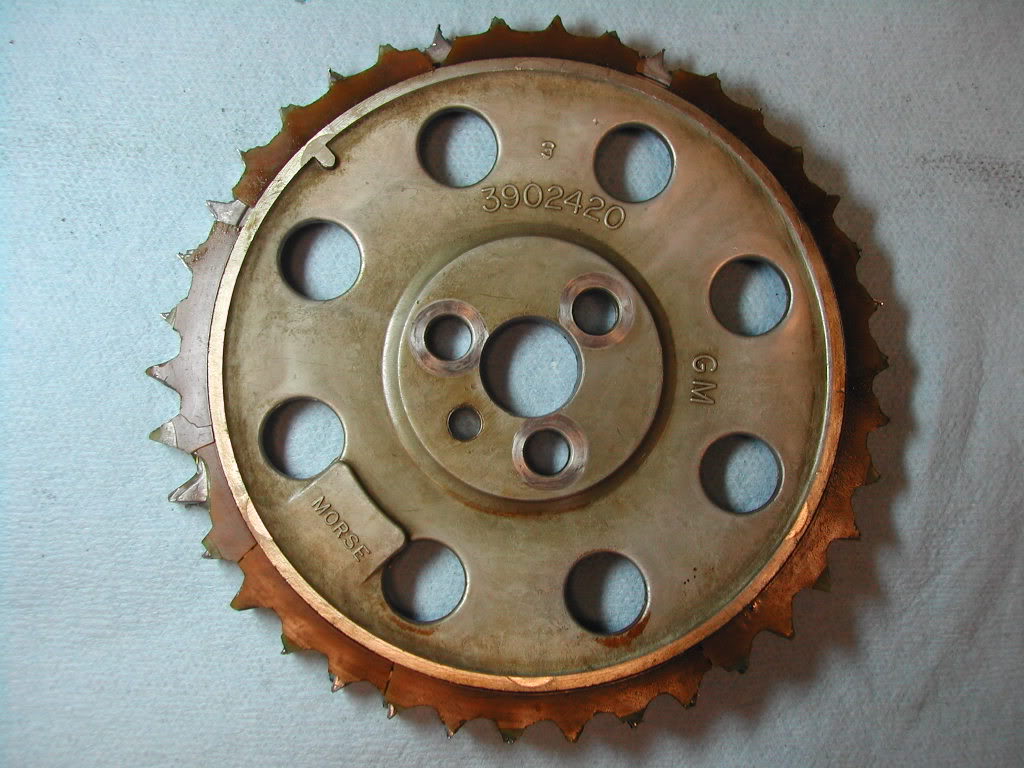
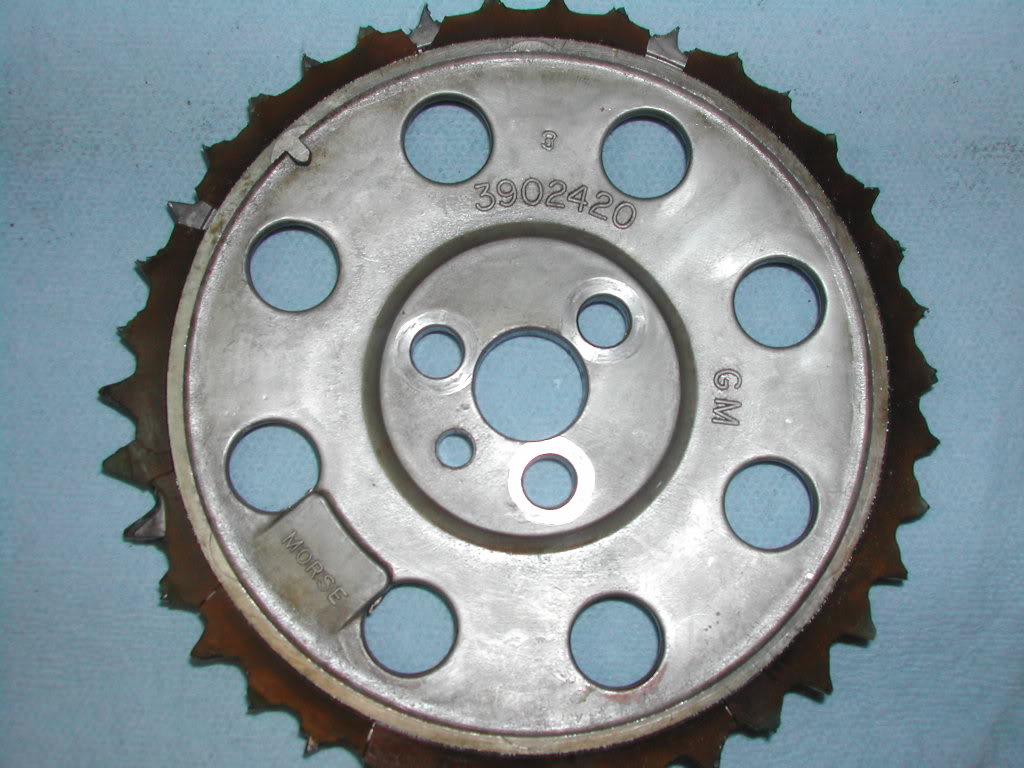
the nylon covered timing gear sets placed in some engines from the factory were horrible sources of shredded nylon in some cars.
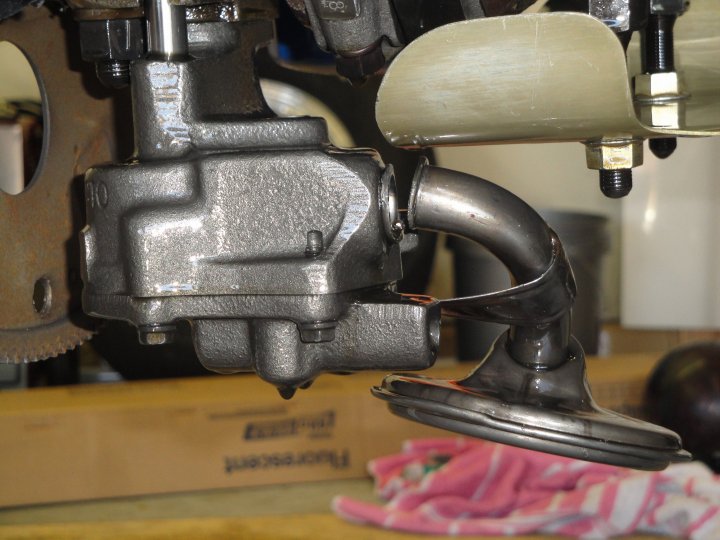
broken , or improperly installed oil pump pick-ups can cause several major oil pressure issues
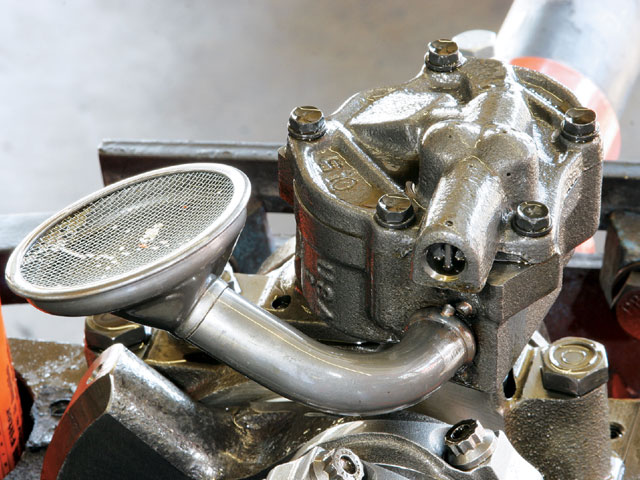
ITS always a good idea to verify the oil pan floor to oil pump pick-up clearance and to braze the pick-up to the oil pump, to reduce the potential for it to come loose.
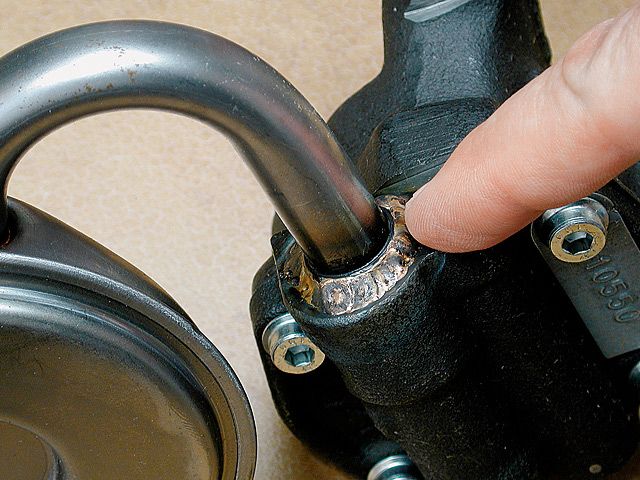
yes you can MIG ,TIG or TORCH WELD the pick-up but I found BRAZING works the best and is less likely to warp or crack the pump or pick-up
"how in hell do those twisty, safety wire pliers work?"
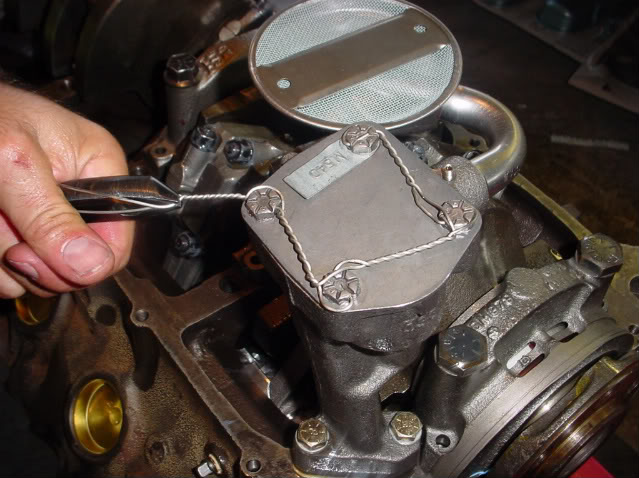
well a video should be helpful here! Id also point out that you can buy the wire in several diameters and the thicker sizes are far more difficult to use, home depot sells the 22 gauge and 18 gauge, the 22-24 gauge is what youll use far more commonly, as its much easier to use,both stainless (PREFERED) and galvanized are used, and will work on 95% of the applications on a car your likely to use.
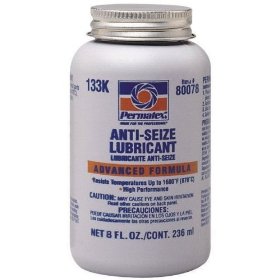
using anti-seize paste on bolt or stud threads helps prevent future problems
using safety wire pliers
viewtopic.php?f=54&t=3194
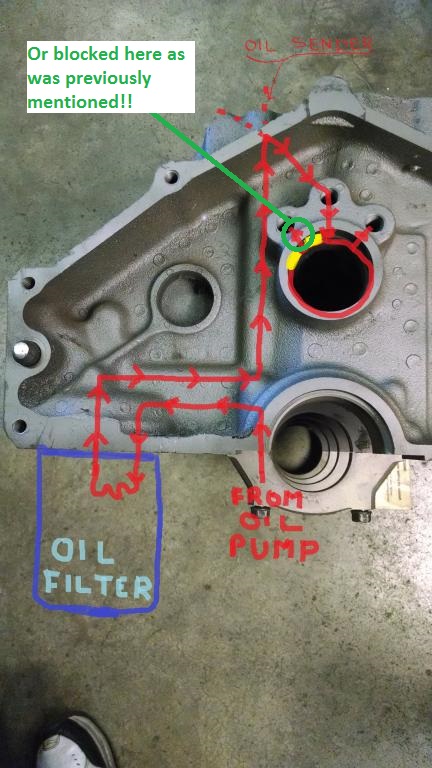
many Automotive oil pumps use a mesh type screen to filter out loose crud, bits of silicone sealant and bits of gasket material, and other contaminants before they get into the engine and cause damage. As with any other screen filter type, over time the screen can get clogged, restricting oil flow into the oil pump,. Once the screen gets clogged with debris, the oil pump cannot flow as efficiently,ans wear on the pumps gears increases which means less oil to the engine of the vehicle. If the screen ever gets completely clogged up, the engine will only survive a few minutes at most. Therefore, if you are experiencing a low oil pressure situation and cannot find the cause, it is recommended to inspect your oil pump screen and replace if necessary. Regular oil changes can drastically reduce the amount of sludge buildup in the oil.
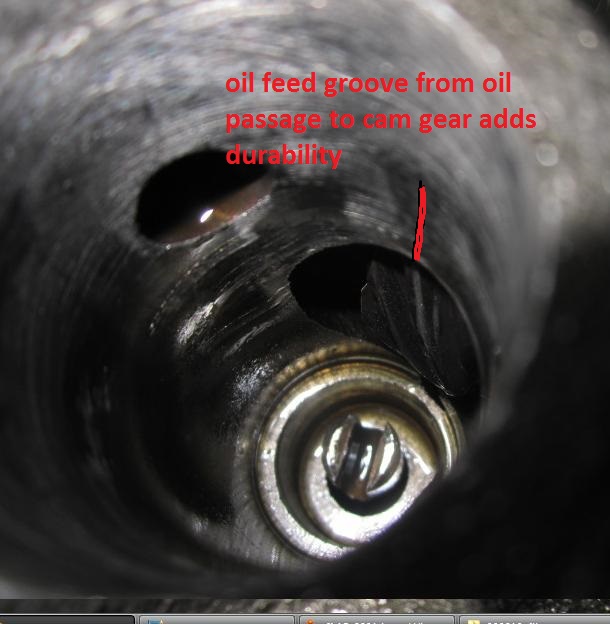
keep in mind the distributor base forms one wall of the lifter gallery oil passage

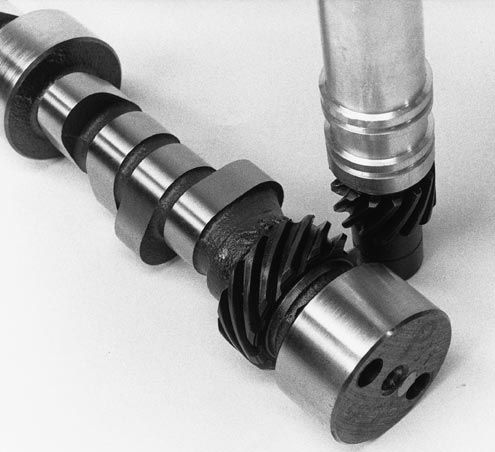
so grooving the lower oil band helps spray extra oil on the distributor/cam gears contact area
yes the oil passage feeds the reduced diameter area on/around the lifter waist, and even as the lifter cycles it does not block oil flow from the oil passage , and if you read the link below there's a section on how you can improve oil flow rates and drill the oil passages just a bit larger and thus allow more consistent and higher oil flow rates.
a dart SBC block is a huge step up in strength over the factory production SBC block
as is the DART BBC BLOCK
reading the links, in most threads we post here on the forum,
always helps readers gain more related info
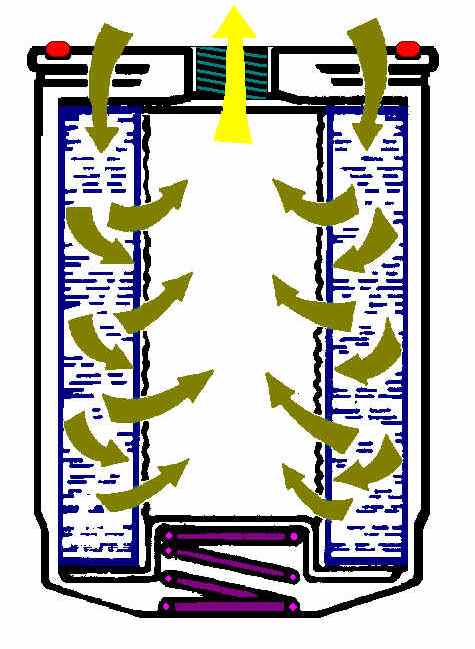
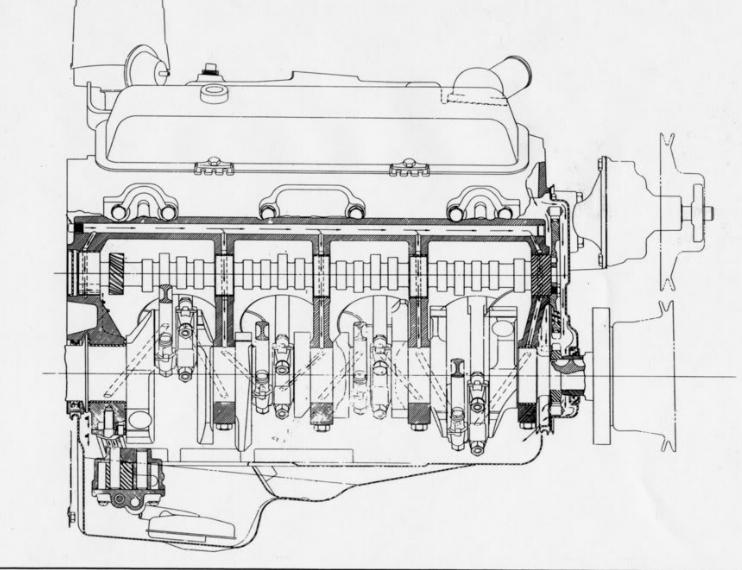
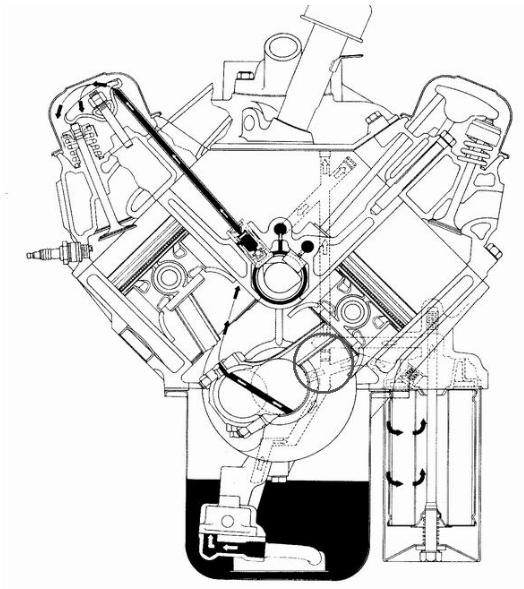
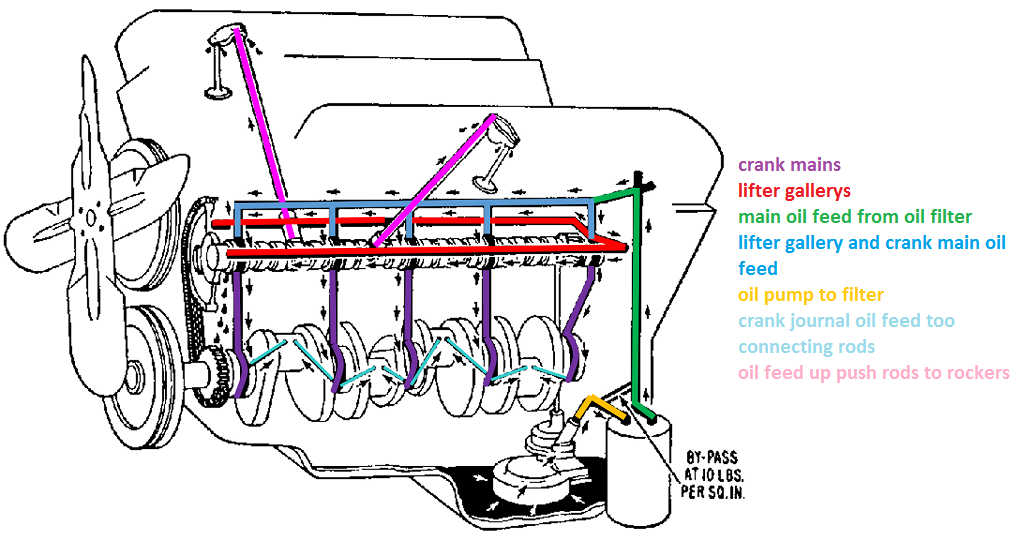
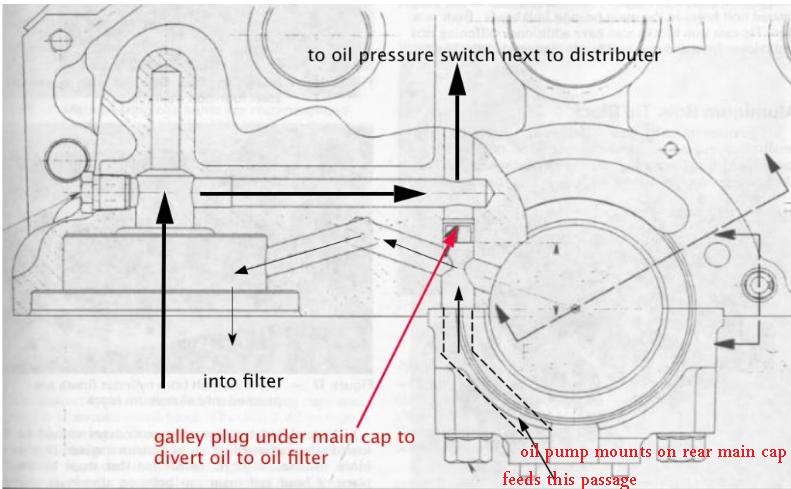
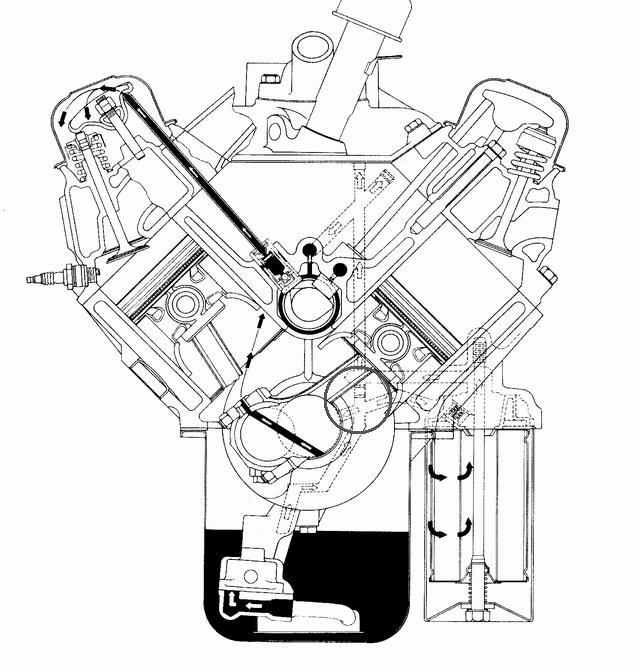
read the related threads and linked info, below
it sure can't hurt and in most cases will help a great deal
probably 90% of the timing sets being installed are installed with the crank gear flush with the shoulder on the crank snout and with never a single thought being given to proper alignment being an issue, and with thousands of those engines making well over 100K miles before the timing chains replaced, that doesn,t mean they are correctly aligned it just indicates that the basic design is rather forgiving as to the conditions it will continue to function in without causing major problems AND THAT in most cases the manufacturing tolerances are close enough to correct to have few issues with wear. but Id also point out that most engines are not running at near their full power potential and most engines have basic flaws costing them both some horse-power and durability problems
Ive had several guys bring in c4 corvettes with both flat tappet and roller cams that had sticky or only semi functional hydraulic lifters.
the first symptom is both noise in the valve train and little or no oil flow out of the push rods feeding oil flow too the rocker but you've got good oil pressure
this seems too be rather common in cars where for one reason or another the engines not been started for several months or years.
now obviously you might have mechanical issues or parts failure,
but in many cases its simply built up varnish or sludge,
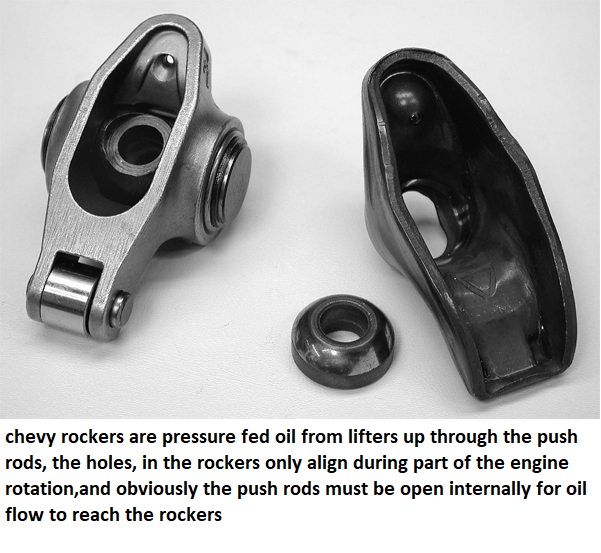
or minor rust from moisture trapped in the engine during longer term storage.
first step is always doing an oil change to a good brand of high detergent 10w30 oil and a new WIX or PUREOLATOR or similar quality oil filter.
STEP TWO
remove each push rod and soak it briefly (10-15 minutes)in a can of 50% gas and 50% carb cleaner, then use a compressor and high velocity air nozzle to blow out and verify the push rods completely clean and free of internal debris, or sludge.
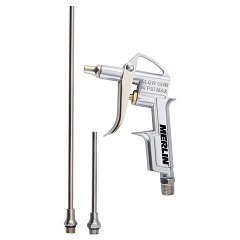
https://www.harborfreight.com/catalog/product/view/id/13295/
to get the best results I found loosening the valve lash 1/2 turn out so the lifters click almost like solid lifters speeds up the process of getting stuck lifter internals on hydraulic lifters to free up and driving the car for a couple hours tends to do a great deal of good
adding a quart of MMO


and a can of liquid moly
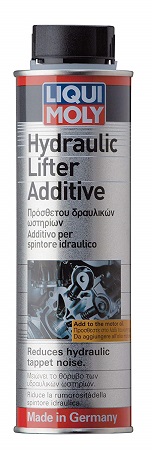
https://www.amazon.com/Liqui-Moly-20004-Hydraulic-Additive/dp/B0096Y6XPC/?tag=newcarpassionate-20
seafoam engine additives all help
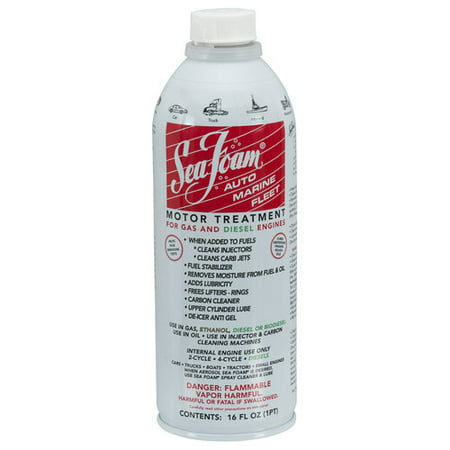
additive's with solvents and detergents and added lubricants certainly won,t hurt the process of removing contaminants , and temporarily allowing a few extra thousands clearance in the valve train seems to speed up the process, after youve driven the car for an hour or so with the fresh oil, new oil filter and additives youll generally find the lifters have freed up unless theres a mechanical wear issue like a damaged cam lobe or defective or worn lifter, so you can re-adjust the valves correctly
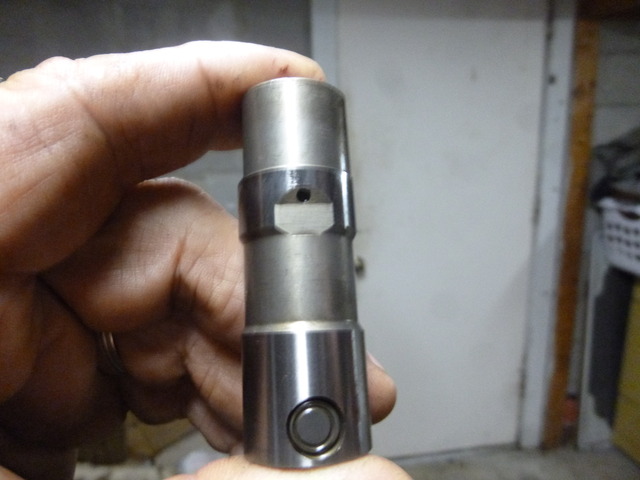
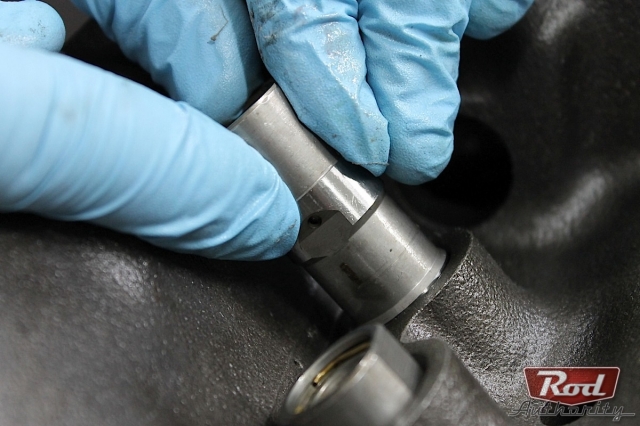
youll generally want to install hydraulic roller lifter's with the oil feed holes pointing to the rear of the engine,
but its not super critical as hydraulic pressure in the blocks lifter gallery,
oil feed passages ,
insures the roller lifters get sufficient oil flow facing in either direction.

you should read these posted link's, and sub links
http://garage.grumpysperformance.co...ter-pumps-oil-and-traps-oil.15555/#post-92843
http://garage.grumpysperformance.co...er-lifter-install-direction.11398/#post-52208
http://garage.grumpysperformance.com/index.php?threads/correctly-adjusting-valves.196/#post-90731
http://garage.grumpysperformance.com/index.php?threads/can-t-adjust-the-valve-lash.15404/#post-90613
http://garage.grumpysperformance.co...ulic-lifters-mystery-solved.12263/#post-60159
http://garage.grumpysperformance.com/index.php?threads/oil-system-mods-that-help.2187/
http://garage.grumpysperformance.com/index.php?threads/oil-pump-priming.15211/
Chevy for years used NYLON gear teeth on aluminum gears, its not like they were concerned with getting the alignment correct to the last possible 2-5 thousands of an inch, they designed the timing sets to be easy to install and reasonably durable and run QUIETLY , and yes they eventually realized that was a HUGE mistake! but in this thread we are dealing with building an engine correctly, to gain all potential hp, and enhance durability here, not in merely allowing it to run once assembled
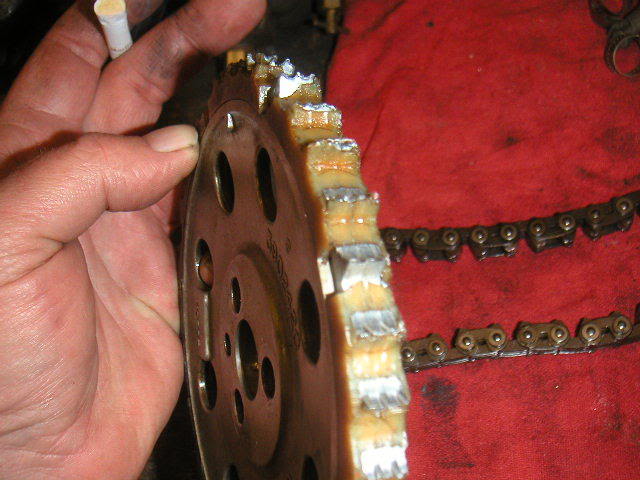
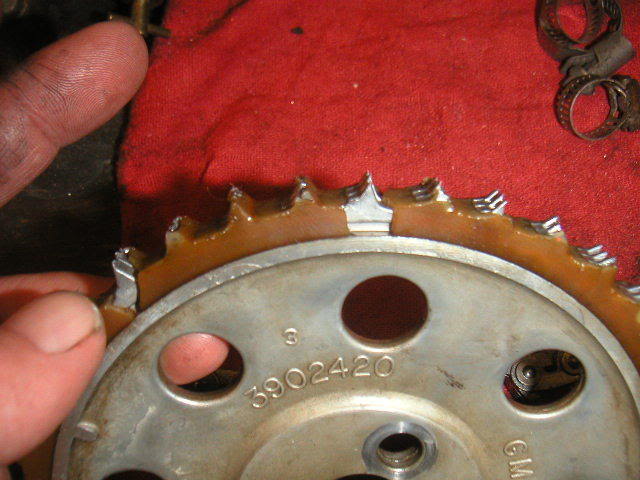
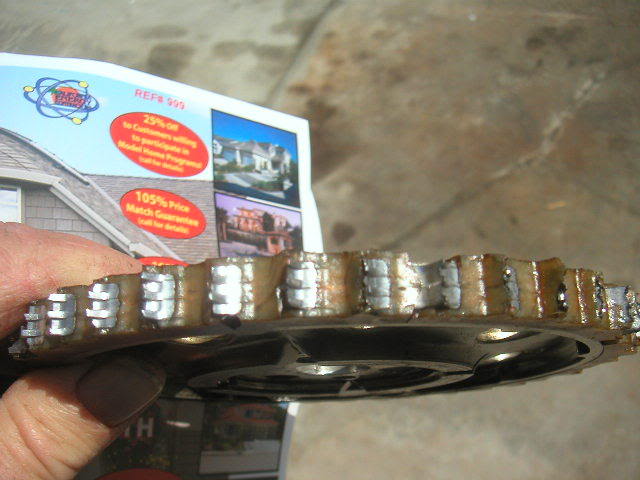
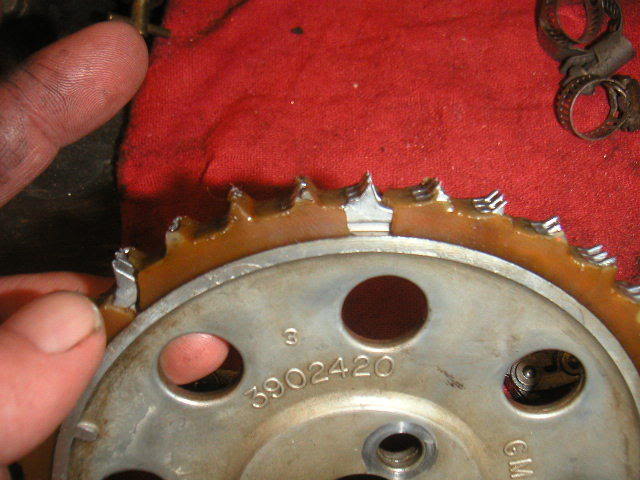

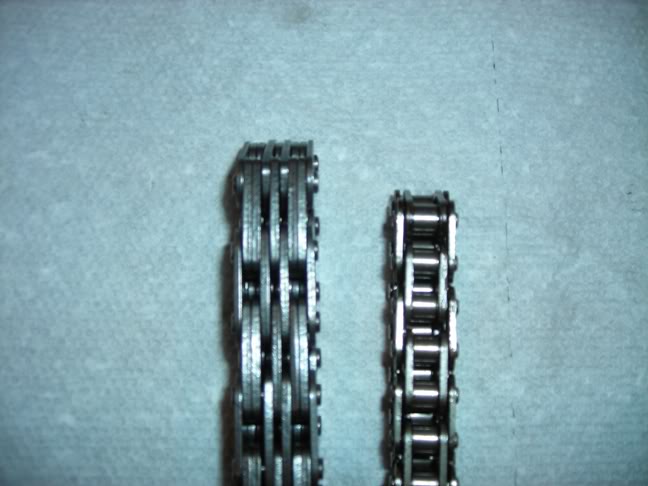
READ THESE LINKS
viewtopic.php?f=54&t=2187
viewtopic.php?f=54&t=4537&p=13350#p13350
viewtopic.php?f=54&t=3194
http://garage.grumpysperformance.com/index.php?threads/crank-case-blow-bye-and-related-info.16790/
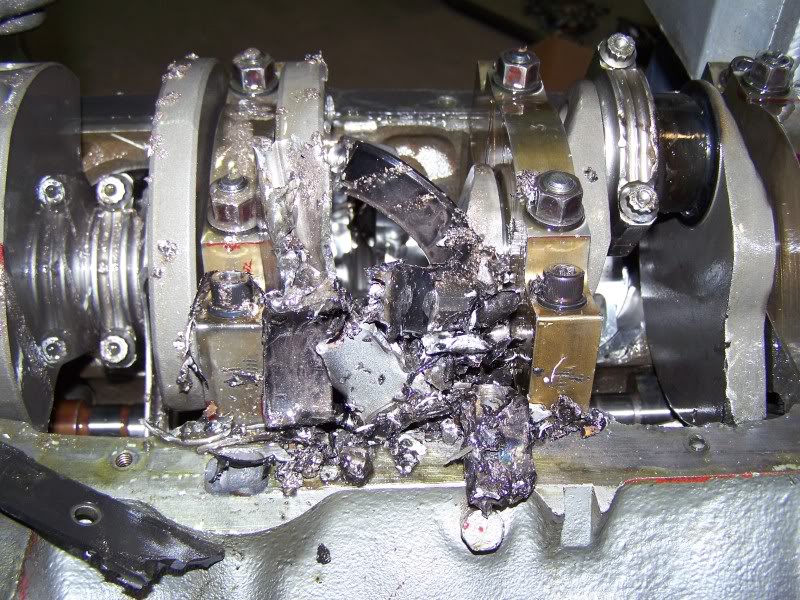
THIS is a good example of what happens to bearings if the oil passages are allowed to push small metallic debris, from wear like rockers,valve tips,cam and lifter wear thru the engine, use of a few small magnets, and shrapnel screens helps reduce or eliminate this
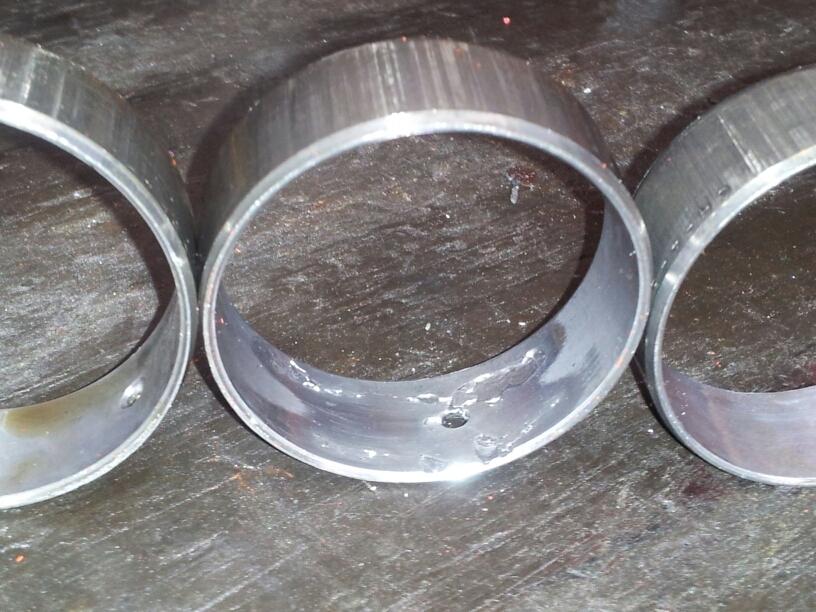
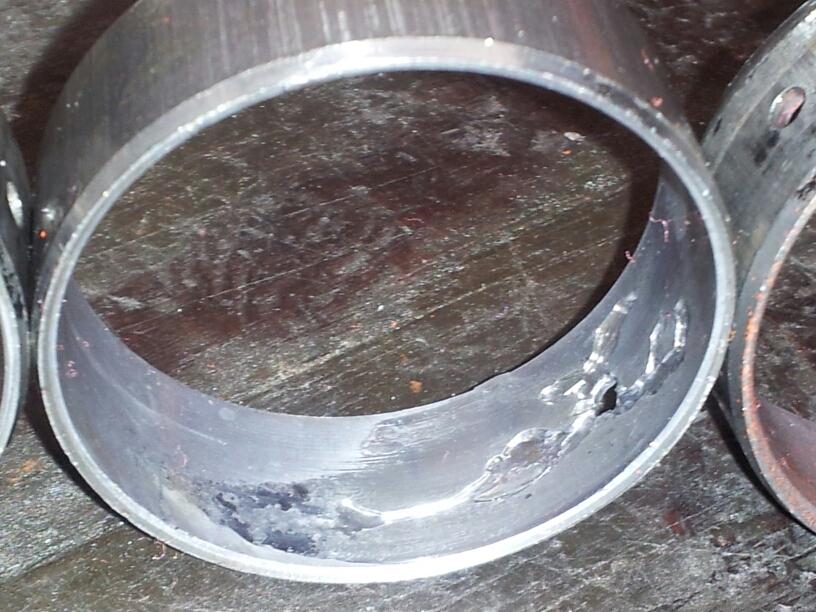
or MAGNETS in the oil system or in some cases the screen on the oil pump pick-up
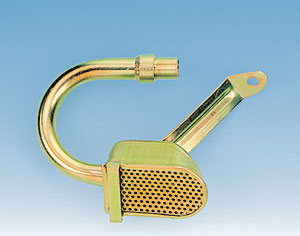
all that extra silicone sealant that gets squeezed out off the gaskets tends to get carried by the oil flow into the oil pan where some of its trapped in the oil filter during each successive trip thru the engine, but bits that get trapped in the oil passages can rapidly reduce oil flow and destroy bearings, cam lobes and rockers and lifters.
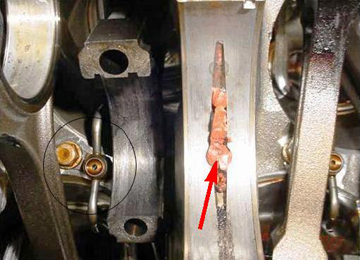
but once it reaches the bearings the clearances are far tighter and either they restrict oil flow or get trapped and damage the bearings, cam lobes lifters,rockers or crank journals
ONE very common source in years past was nylon gear teeth


viewtopic.php?f=54&t=3194&p=8510&hilit=aluminum+nylon+teeth#p8510
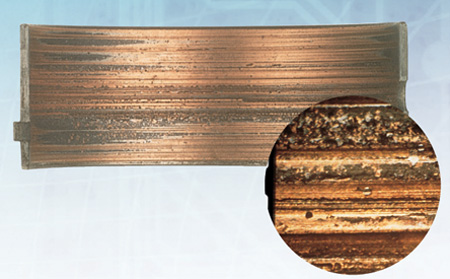
http://store.summitracing.com/partdetai ... toview=sku
heres a helpful diagnostic tool,
IT should be obvious that you'll need to pre-prime the blocks oil passages and adjust the rockers so oil flows from the rockers with the engine being pre-primed with a priming tool being used BEFORE trying to start any engine with a new cam to insure oil flow begins instantly on the engines start-up,you WON,T get oil to all lifters equally unless the engines crank & cam are spinning,(so during testing spin the engine slowly with a breaker bar or ratchet), because the oil passages feeding the lifters aligns differently at different lifts,your oil leak at the distributor base is normal, but the clearances and flow may be excessive, with a priming tool, some are not nearly to spec. ID measure the diam. of the oil pump primer and then measure the distributor base, Id bet the distributor base is larger and fits better, which reduces the potential for leakage.
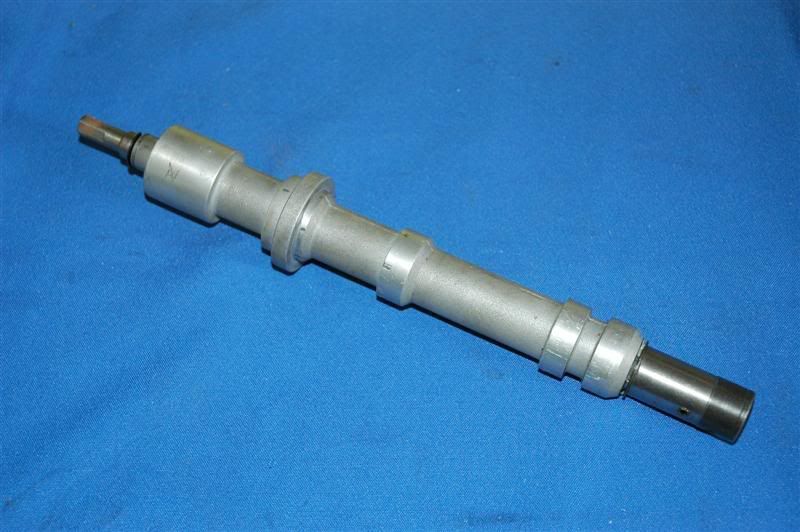
you would be amazed at the sludge build up in some engines
thats a good reason to weld a 1/2 drive socket to the top of your oil pump priming tool and use a 1/2" drive air ratchet,too spin it, they don,t tend to burn up and they do have the required torque!
Ive always said that pre-filling the oil filter and having a buddy rotating the crank with a large breaker bar or a flywheel turning tool during the oil passage priming process speeds up your results
http://store.summitracing.com/partdetai ... toview=sku
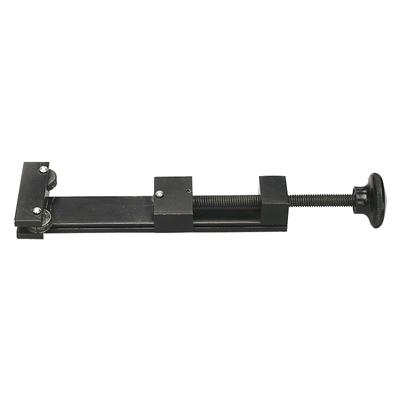
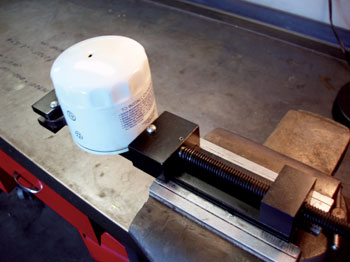
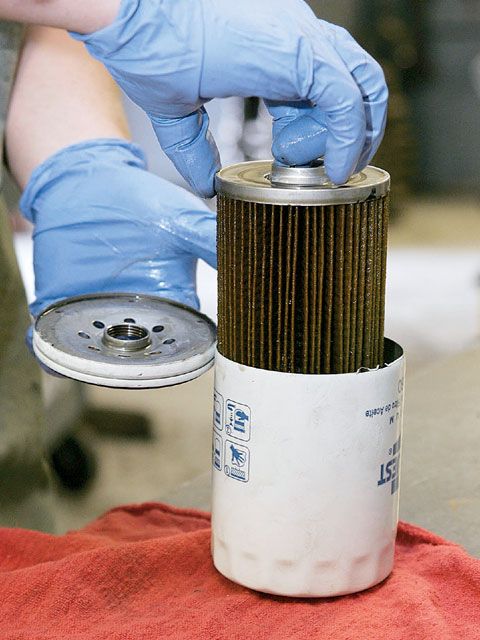
its basically a heavy duty can opener , or an oil filter cutter designed to make it easy to internally inspect oil filters, by allowing you to remove the filter element , from inside the surrounding (CAN) for close visual inspection.
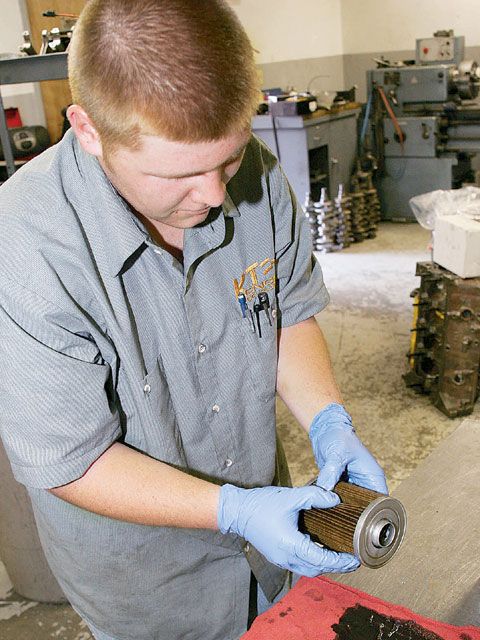
If you don,t have one, and have not used one, your unlikely to see, or appreciate the benefits,close inspection can and does frequently give you prior evidence of impending or at least gradually occurring wear and with practice you can make an excellent guess as to the parts and condition of those components.
IT also helps to trap crud if you install a couple high temp magnets on the filter and in the oil pan.
Regular oil changes can drastically reduce the amount of sludge buildup in the oil.
Basic filter cutting & inspection procedures
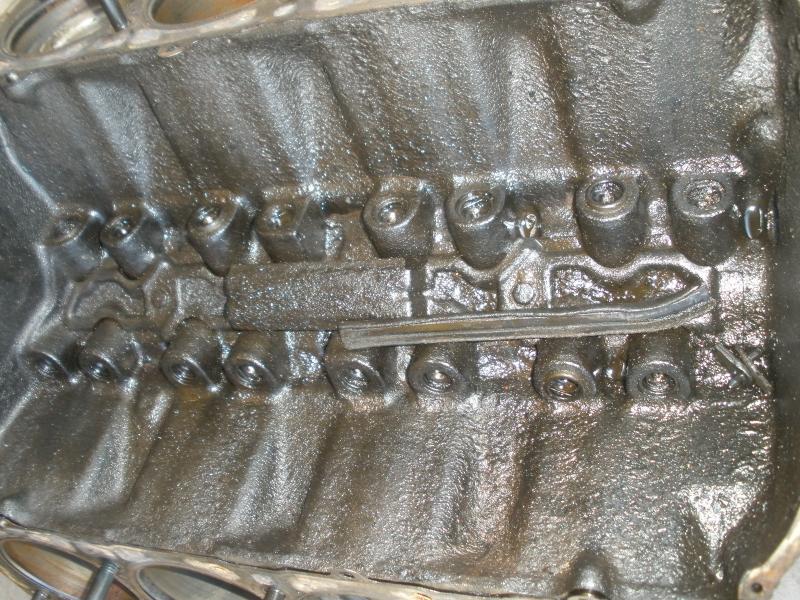
you would be amazed at the sludge build up in some engines
· Visually check the filter and or filter canister for cracks and leaks.
· Inspect the filter`s bypass valve to ensure it is operating correctly.
· Drain the filter of its contents (dispose of this liquid in the correct manner in accordance with local environmental guidelines).
· Firmly hold the filter in an upright position (head on top) taking care not to crush or damage the housing.
· Using a specially designed filter cutting tool (for example, Komatsu part number 3310587S )
heres a helpful diagnostic tool,

carefully cut off the top of the filter.
· Remove the element from the filter housing and pour the contents of the housing onto some clean absorbent paper.
· Inspect the absorbent paper for traces of foreign particles.
· Inspect the filter medium for signs of damage and blockages. Blockages force the bypass valve into operation, allowing unfiltered fluid to travel to and enter major components.
· Remove the filter medium from the filter by cutting between 2030 mm (about one inch) from the end plate and cut the medium into small pieces.
· Carefully inspect the filter medium for traces of metal contaminants.
Most engine trouble involves the lube system, and cutting waste filters apart often reveals warning signs that will help avert major damage. As a disposable element of the system, the filter sometimes acts as a fuse, calling attention to problems by failing before engine components are damaged. Problems associated with wear in the combustion chamber inevitably show up in the oil, and the filter collects clues. Field maintenance operations that take time to read the signs will have another tool for anticipating failures and reducing repair costs.
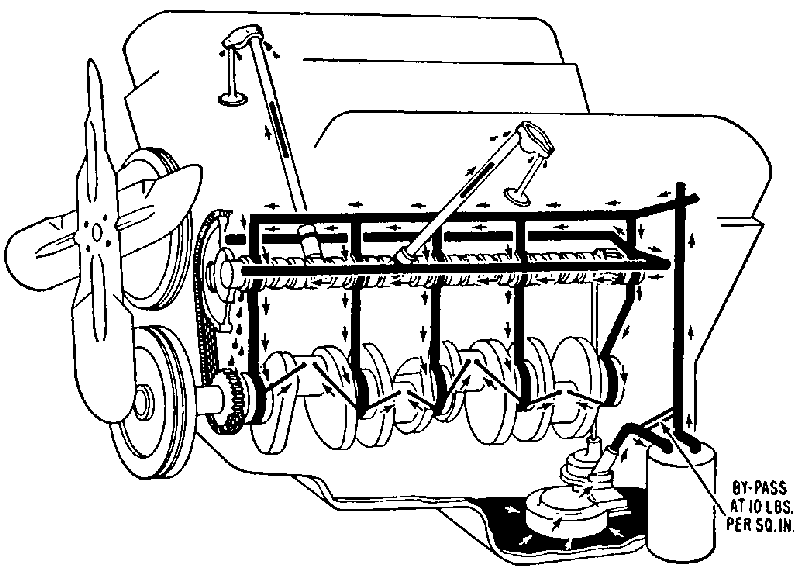
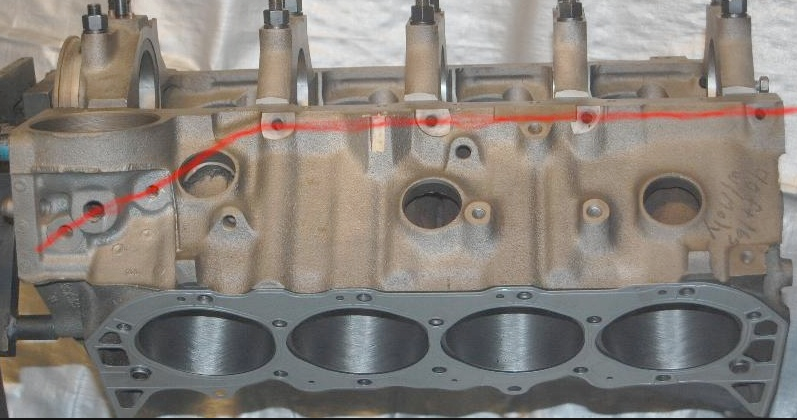
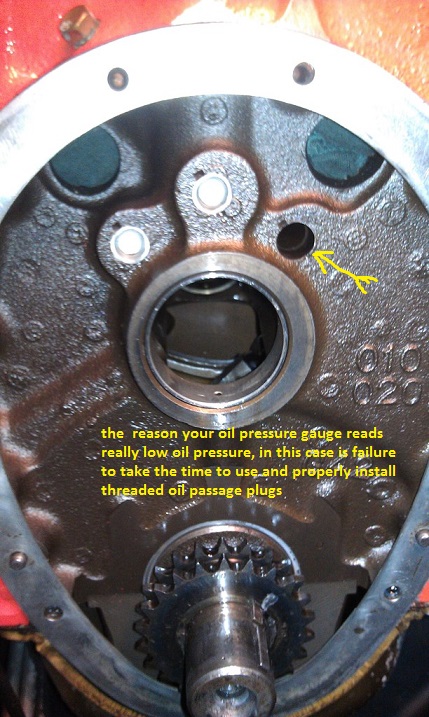
http://garage.grumpysperformance.com/index.php?threads/oil-system-mods-that-help.2187/
http://garage.grumpysperformance.com/index.php?threads/drill-bits.4714/#post-12806
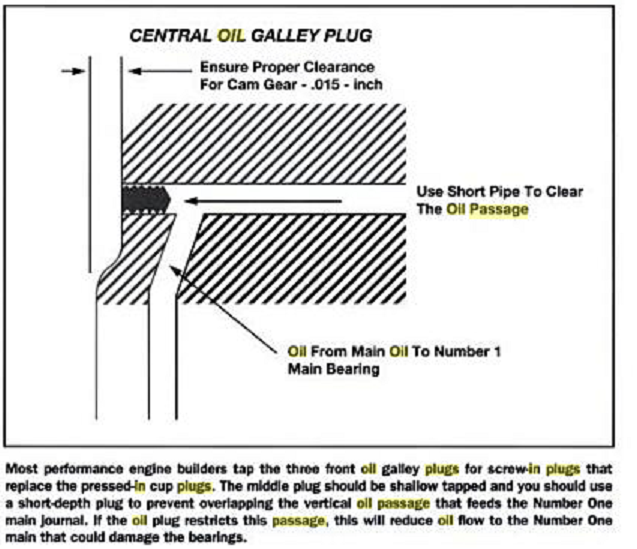
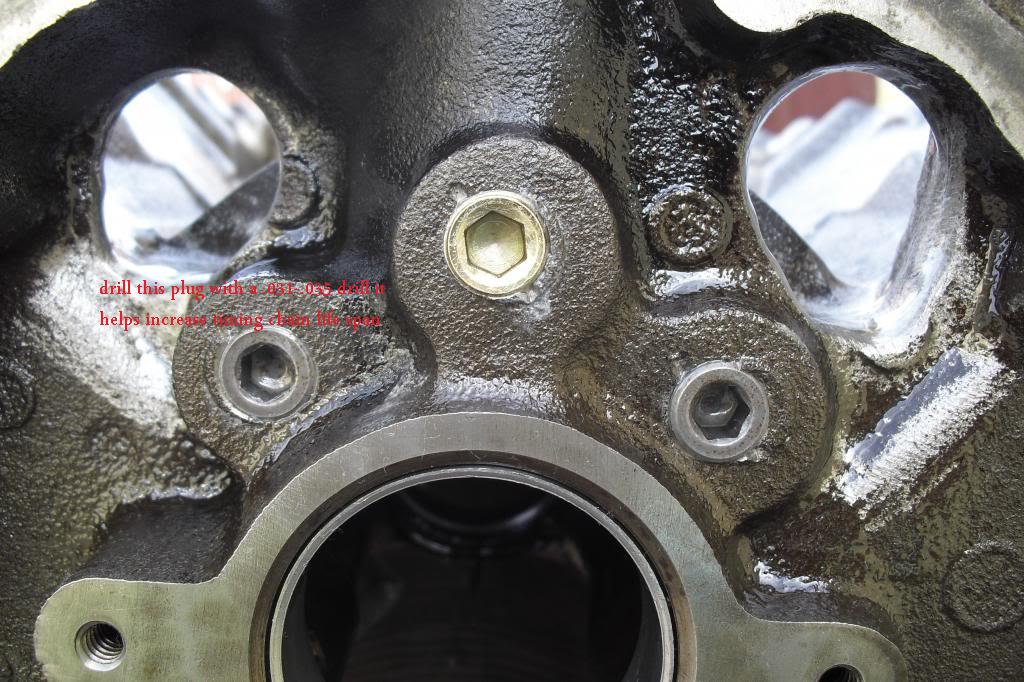
http://www.machinerylubrication.com/Rea ... inspection
http://www.tomorrowstechnician.com/Arti ... lters.aspx
http://www.tomorrowstechnician.com/Arti ... lures.aspx

http://www.summitracing.com/parts/SUM-9 ... toview=sku
http://www.circletrack.com/techarticles ... index.html
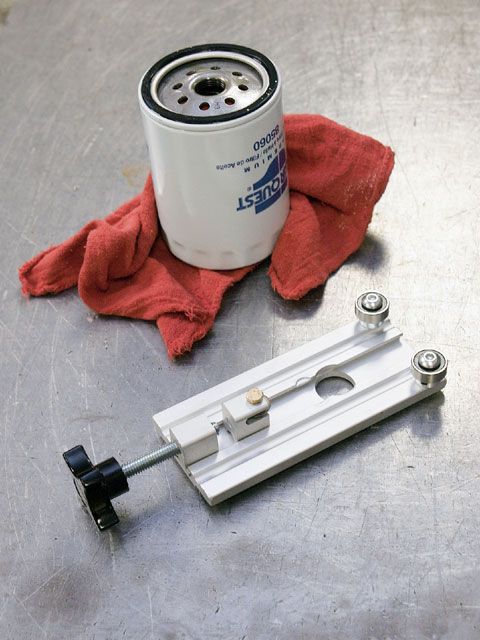
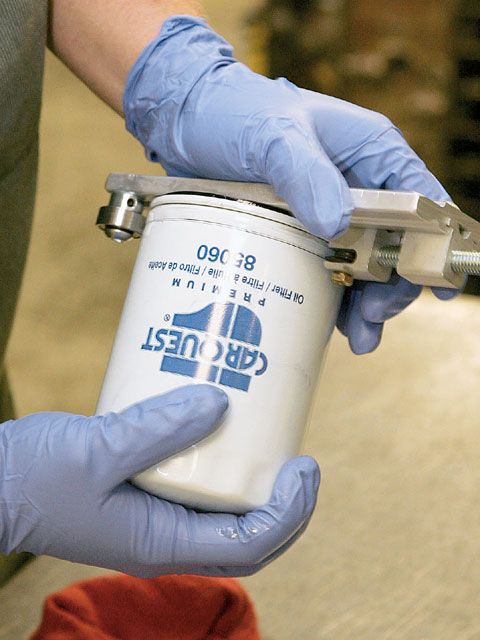
related info
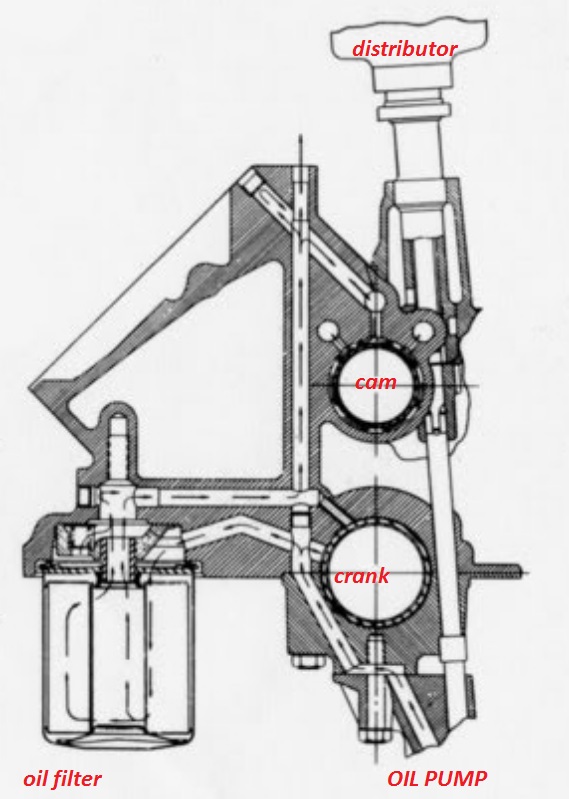
your totally correct that adding a large magnet to the base of the oil filter helps a great deal in collecting fine metallic crap,
like the finer ,worn cam lobe , lifter debris, and dust from the ring bore seating process from continuing to circulate in the engine,
trapping it in the filter with the added security of the large magnet makes a great deal of sense
yet, the use of the high heat resistance magnets, is a very useful added precaution, thus, I also try to prevent larger debris from ever reaching the oil pump,where it can severely damage the oil pump
or the potential resulting trash from being pumped into the oil passages, keep in mind the oil pump and filter will in some cases BYPASS the filter if its clogged with crap.
I place several of these in the engine, generally one in the rear drain area of both heads
a couple in the lifter gallery near each drain hole, especially near the rear distributor area,
and 4 in the corners of the oil pan sump, and use of shrapnel screens is also useful.

these are placed there in the engine to prevent bits of broken/worn lifters, valve springs, push rods
ever entering the oil pump or collecting around the oil pump pick-up
Proper magnets trap metallic debris
SmCo Samarium Cobalt Disc Magnets
http://www.magnet4less.com/

Samarium Cobalt MAGNETS HELP
http://www.magnet4sale.com/smco-disk-magnet-dia-1x1-4-samarium-cobalt-magnets-608-f-temperature/
related links with good related info
garage.grumpysperformance.com
garage.grumpysperformance.com
garage.grumpysperformance.com
http://garage.grumpysperformance.co...king-how-other-people-might.11959/#post-56957
btw, add a few magnets to the oil pan and drain back area in your engine, the trap and hold metalic dust that comes from wear and increase engine life span by preventing that crap embedding in the bearings
http://www.kjmagnetics.com/proddetai...d=D66SH&cat=13
http://www.kjmagnetics.com/proddetail.asp?prod=D66SH
http://www.kjmagnetics.com/proddetail.asp?prod=D82SH
these are even more tollerant of temp swings and retain strength at even higher engine oil temps plus they are smaller and easier to use
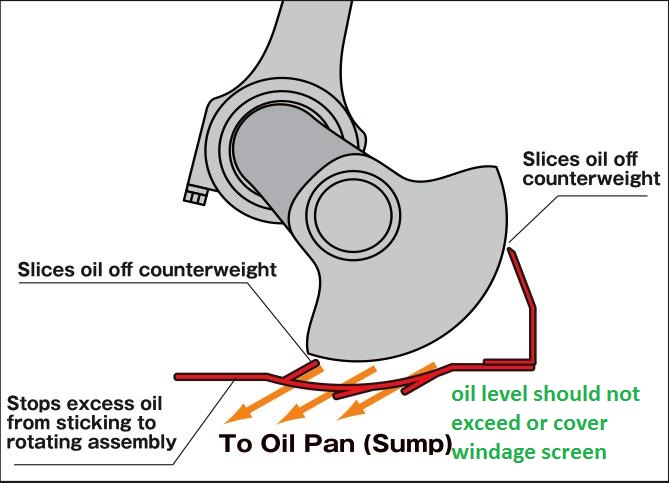
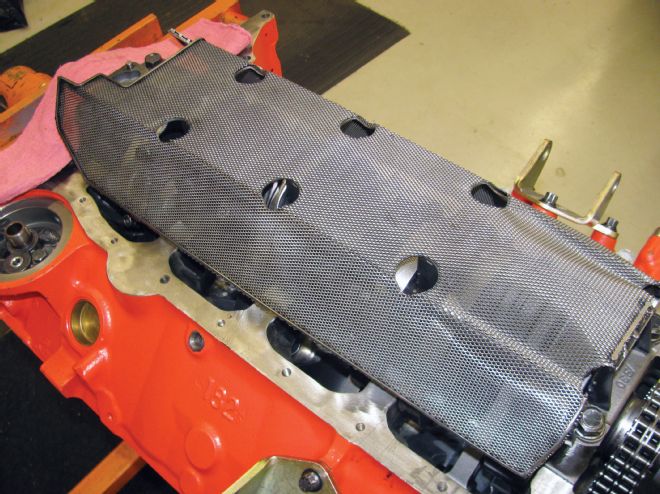
a very effective custom built windage tray can be fabricated for most oil pans from perforated steel, if you have minimal metal working and measuring skills
The SH material in the D66SH magnets, means that the magnets can be heated to 300° F without any loss of magnetic strength, unlike standard neodymium magnets that begin to lose strength at 175° F. Suitable for many high temperature applications.
I think you might find READING THRU these links very useful
http://www.chevelles.com/techref/ScreenInstall.pdf
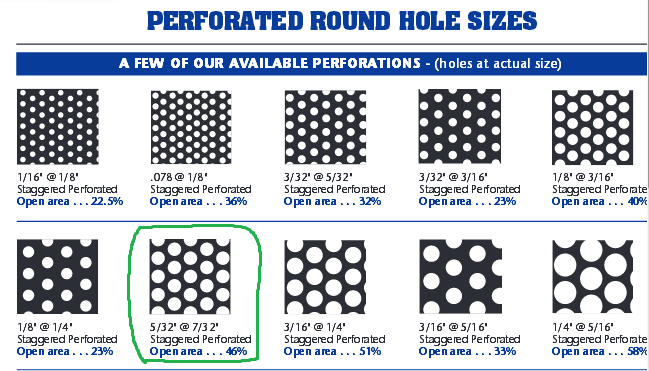
but look at this chart, I circled the type I used in green notice the percentage of open area vs closed sheet changes a great deal with the pattern and hole sizes selected ONE BIG ADVANTAGE TO USING PREFORATED STEEL , for a windage screen or a shrapnel , SCREEN or windage screen, IS THAT IF YOU PLACE SEVERAL HIGH TEMP CREAMIC MAGNETS ON A PREFORATED STEEL SHAPNEL SCREEN OR WINDAGE TRAY ITS MAGNNITIZED MAKING IT VERY DIFICULT FOR METALIC FERIOUS CRAP TO FLOW PAST THE BARRIER AND BACK TO THE OIL PUMP AS THE WHOLE SURFACE TENDS TO TRAP AND HOLD EVEN FINE DEBRIS,
I generally want holes covering at least 45%-50% coverage and at least 1/4"-3/16" in diam. in a windage screen perforated sheet
http://www.kjmagnetics.com/proddetail.asp?prod=D82SH

BE AWARE magnets heat tolerance differs so ask for and pay attention to the heat limitations, a MINIMUM of 300F for any magnet expected to be used bathed in hot engine oil would be smart

while I generally use stainless 6 or 8 mesh for shrapnel screens theres lots of options that will work just fine, just remember to keep the oil changed regularly or theres some potential for sludge to clog ANY size shrapnel screens
http://www.twpinc.com/twpinc/products/T ... 6T0350W36T
http://www.twpinc.com/twpinc/products/T ... 8S0280W36T
New
magnet size is not all that critical, but get the high heat tolerant types linked, above ,
I generally use the 1" x 1/4" in the oil pan and lifter gallery and the, smaller 1/2" x 1/4" near the cylinder head oil drain back holes,
placed where oil draining back to the lifter gallery will run over them,you'll be amazed at the amount of metallic debris they catch.
read the link's on the shrapnel screens, and oil mods as thats also useful info.
the first time you tear down and inspect the crud trapped on those magnets, in an engine that has a few hundred hours of running time,
that was prevented from reaching the oil pump gears and bearings youll become convinced of the value
http://garage.grumpysperformance.com/index.php?threads/oil-system-mods-that-help.2187/#post-54398
http://garage.grumpysperformance.co...e-used-prw-stainless-steel-rocker-arms.14896/
http://garage.grumpysperformance.com/index.php?threads/magnets.120/#post-76609
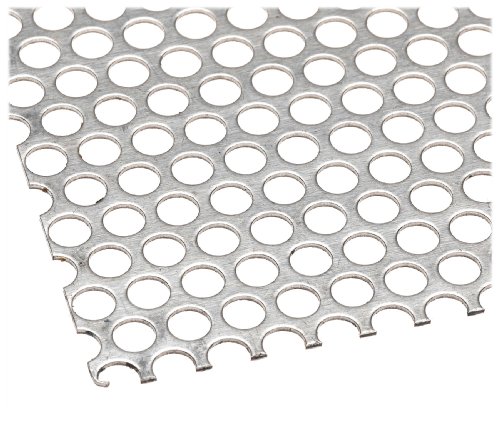
a 36"x 40" aluminum perforated sheet like this, that costs about $40-$60 will provide windage screens and shrapnel for 3 engines,
I vastly prefer STEEL not aluminum perforated sheet as a base material, thats an option, if your semi skilled at fabrication, that beats the crap out of buying $300 plus worth of milodon screens that don't work as well in my experience as a carefully fabricated custon screen will
http://www.summitracing.com/parts/mil-32260/overview/
http://www.centuryperformance.com/tunin ... g-148.html
http://www.secondchancegarage.com/public/186.cfm
http://www.corvette-101.com/
(info on left border)
http://www.summitracing.com/search/?key ... kers&dds=1
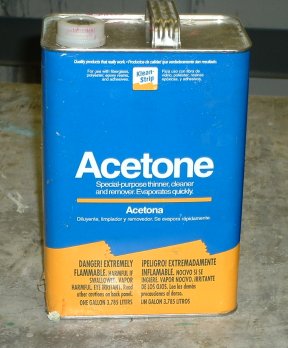
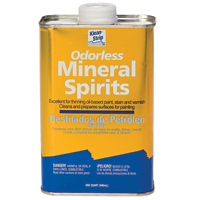
BTW I have on several occasions seen guys who complain about various oil leaks on valve covers and rear seals ETC.
Used, engine parts will have oil embedded deeply into the micro surfaces.
almost all replacement parts will have a wax or grease preservative coating to prevent corrosion during shipping!
IF YOU simply wipe off oil soaked surfaces with a paper towel, who then smear on the sealant of there choice and proceed to install gaskets,
YOU WILL OCCASIONALLY HAVE LEAKS!
and then they wonder or maybe be in shock when you find the seeping oil leak has returned in a few weeks time!
metal surfaces may look smooth as glass but under a microscope they look like the surface of the moon , with lots of jagged surface cracks, so you really need to wash out the micro lubricants trapped in those cracks with a thin fast evaporating grease solvent and a lint free rag , followed by a second repeat of the process and in many cases a few minutes with a heat gun to dry and evaporate the solvent in the micro cracks ,
STOP AND READ THE SEALANT PACKAGE DIRECTIONS!
you'll generally find some rather amazing , bits of info such as temperature requirements, temperature limitations, what solvents work best to remove the cement or sealant, only after reading the directions, do you then smear the gasket sealant on both mating surfaces before bonding the two gasket & metal surfaces.(and in many cases you use a brush as dirt or oil on fingers prevents a good seal!)
there ARE reduced ratio roller rockers designed to significantly lower the lifter to lobe pressures during the cam break-in process, and its a whole lot easier to swap rockers during the break-in process than swap to lower pressure springs or remove inner springs from dual spring valve trains during the break in process
heres a couple darn good links you need to read thru, lets have some additional info or comments and questions??
keep in mind, if youve installed parts in an engine thats previously had a cam ,lifters,rockers,bearings etc. fail you need to rod out the oil passages,and clean out the push-rods internally and verify valve train geometry and clearances, trash pumped into those passages may be restricting current oil flow.
If you intend to remove the oil pan to check, or replace the oil pump or bearings with the engine still in the car,
be aware that the cranks front journal counterweights position may not allow you to slide the oil pan back out,
from under the engine and out,
over the front cross member and allow clearance required.
that oil pan may only slide out over the cross member,
only if the front crank counterweight is in the 12 o'clock location
and yes removing the motor mount bolts and jacking the engine up a few inches certainly tends to help
, but if you do, remove the distributor before you start,
more than a few guys ignored that bit of advice and the result gets darn expensive
and yes check the oil pump pick-up to oil pan floor clearance, if its not 3/8"-1/2" it will cause flow issues

http://www.summitracing.com/parts/SUM-901010/?rtype=10

shrapnel screens epoxied into the block to prevent valve train failure shrapnel from inducing bearing failure if crap gets sucked into the oil pump is a good idea IF you do frequent oil changes so the screens won,t get sledged up

THE SCREEN ABOVE IS CLOSE TO BEING IDEAL

THE SCREEN ABOVE IS TOO SMALL TO BE IDEAL

while I generally use stainless 6 or 8 mesh screens theres lots of options that will work just fine, just remember to keep the oil changed regularly or theres some potential for sludge to clog ANY size shrapnel screens
http://www.twpinc.com/twpinc/products/T ... 6T0350W36T
http://www.twpinc.com/twpinc/products/T ... 8S0280W36T

http://www.summitracing.com/parts/mor-25026?seid=srese1&gclid=COOf2IODscgCFZKAaQodHWoF1Q
IVE typically used these magnets in an engine, one in the rear oil drain on each cylinder head, one near each lifter gallery drain and 4 in the oil pan sump
proper magnets trap metallic debris
SmCo Samarium Cobalt Disc Magnets
http://www.magnet4less.com/

proper magnets trap metallic debris
SmCo Samarium Cobalt Disc Magnets
http://www.magnet4less.com/

https://www.magnet4sale.com/smco-disk-magnet-dia-1x1-4-samarium-cobalt-magnets-608-f-temperature/
https://www.magnet4less.com/smco-magnets-1-in-x-1-4-in-samarium-cobalt-disc-magnet
Samarium Cobalt MAGNETS HELP
http://www.magnet4sale.com/smco-disk-magnet-dia-1x1-4-samarium-cobalt-magnets-608-f-temperature/
magnets are ceramic and glass hard, don,t try to drill or grind them, as they can shatter

Model# SMCO-D8
Samarium Cobalt Magnets 3/4 in x 1/4 in Disc
Suitable for high temperature applications
Wholesale Price Range:
$2.99

http://www.kjmagnetics.com/proddetail.asp?prod=D82SH

heres a good example of why keeping small metallic debris like valve locks and rocker arm bearing parts out of the oil pump gears is a good idea, shrapnel screens and magnets tend to reduce that from occurring
to furnish the oil pressure without putting any wear on the bearings as you slowly rotate the crank to allow oil to flow easily
there are oil pump testers available commercially or if your mechanically inclined you can fabricate one with reasonable care, after a bit of measuring and purchasing a gauge, if you don,t test you won,t know whats going on,
http://cvrproducts.com/oil-pressure-test-kit/

you should NEVER shim an oil pumps pressure relief spring as it may prevent the piston it holds from moving down its bore far enough to allow it to open the bay-pass passage, that allows the pressure on the high pressure side of the oil pump from bleeding off back into the intakes side of the oil pump, the springs come in several resistance strength levels, but extensive testing has shown now increased bearing protection at pressure levels exceeding 65 psi, higher strength pressure relief springs, just increase engine rotational resistance
http://www.summitracing.com/parts/mel-77070/overview/
Oil Pump Springs, 70 psi, Steel, Pink, Pins, Chevy, Big Block, Kit
http://www.summitracing.com/parts/mel-7760m/overview/
http://www.summitracing.com/parts/stf-35250/overview/

Melling 55070
70 psi, Steel, Pink, Pins, Chevy, Small Block, Kit
Melling 77070
Oil Pump Springs, 70 psi, Steel, Pink, Pins, Chevy, Big Block, Kit
Melling 55058
Oil Pump Springs, 58 psi, Steel, Yellow, Pins, Chevy, Small Block, Kit
Melling 55078
Oil Pump Springs, 78 psi, Steel, Green, Pins, Chevy, Small Block, Kit
Melling 77060
Oil Pump Springs, 60 psi, Steel, Black, Pins, Chevy, Big Block, Kit
Melling 55049
Oil Pump Springs, 49 psi, Steel, Green, Pins, Chevy, Small Block, Kit
Melling 77052
Oil Pump Springs, 52 psi, Steel, Purple, Pins, Chevy, Big Block, Kit
Melling 7770M
Oil Pump Springs, 70 psi, Steel, Pink, Chevy, Big Block, Set of 5
Melling 5556F
Oil Pump Springs, 55 psi of Force, Steel, Chevy, Small Block, Set of 5
Melling 5570F
Oil Pump Springs, 70 psi, Steel, Pink, Chevy, Small Block, Set of 5
Melling 7760M
Oil Pump Springs, 60 psi, Steel, Black, Chevy, Big Block, Set of 5
Melling 7752M
Oil Pump Springs, 52 psi, Steel, Purple, Chevy, Big Block, Set of 5


http://garage.grumpysperformance.com/index.php?threads/drill-bits.4714/#post-12806
at times having a long small diameter light that you can stick through the blocks oil passages to check the oil feed to the bearings passage alignment helps

https://www.tooltopia.com/steelman-...MI4s7coYzY2AIV3I2zCh3U6AFUEAQYAiABEgI0PfD_BwE
on others the screen does not fully cover the oil pump inlet and that crap gets sucked thru the oil pump gears and pushed into the blocks oil passages,
AFTER potentially damaging the oil pump.
the nylon covered timing gear sets placed in some engines from the factory were horrible sources of shredded nylon in some cars.

broken , or improperly installed oil pump pick-ups can cause several major oil pressure issues

ITS always a good idea to verify the oil pan floor to oil pump pick-up clearance and to braze the pick-up to the oil pump, to reduce the potential for it to come loose.

yes you can MIG ,TIG or TORCH WELD the pick-up but I found BRAZING works the best and is less likely to warp or crack the pump or pick-up
"how in hell do those twisty, safety wire pliers work?"

well a video should be helpful here! Id also point out that you can buy the wire in several diameters and the thicker sizes are far more difficult to use, home depot sells the 22 gauge and 18 gauge, the 22-24 gauge is what youll use far more commonly, as its much easier to use,both stainless (PREFERED) and galvanized are used, and will work on 95% of the applications on a car your likely to use.
using anti-seize paste on bolt or stud threads helps prevent future problems

using safety wire pliers
viewtopic.php?f=54&t=3194

many Automotive oil pumps use a mesh type screen to filter out loose crud, bits of silicone sealant and bits of gasket material, and other contaminants before they get into the engine and cause damage. As with any other screen filter type, over time the screen can get clogged, restricting oil flow into the oil pump,. Once the screen gets clogged with debris, the oil pump cannot flow as efficiently,ans wear on the pumps gears increases which means less oil to the engine of the vehicle. If the screen ever gets completely clogged up, the engine will only survive a few minutes at most. Therefore, if you are experiencing a low oil pressure situation and cannot find the cause, it is recommended to inspect your oil pump screen and replace if necessary. Regular oil changes can drastically reduce the amount of sludge buildup in the oil.

keep in mind the distributor base forms one wall of the lifter gallery oil passage

so grooving the lower oil band helps spray extra oil on the distributor/cam gears contact area

yes the oil passage feeds the reduced diameter area on/around the lifter waist, and even as the lifter cycles it does not block oil flow from the oil passage , and if you read the link below there's a section on how you can improve oil flow rates and drill the oil passages just a bit larger and thus allow more consistent and higher oil flow rates.
a dart SBC block is a huge step up in strength over the factory production SBC block
as is the DART BBC BLOCK
reading the links, in most threads we post here on the forum,
always helps readers gain more related info
oil system mods that help
heres a short list REMEMBER the object or goal in building and maintaining the lubrication system is too maintain a 100% dependable pressurized cooling flow of lubricant to the bearings, rockers ,valves etc. your most important tool, is your ability to think about how things are supposed to...
garage.grumpysperformance.com
block prep.
you really should read these links for a lot more USEFUL info, on block pre prep use the best block you can afford, the better aftermarket blocks are faR STRONGER THAN THE oem BLOCKS IN ALMOST ALL CASES one of the least discussed & acknowledged, and yet more common reasons engines fail , is...
garage.grumpysperformance.com
Which Dart SHP 4.0" or 4.125"
Both blocks are the very same casting, therefore the 4.0" bore has another 1/16" cylinder wall thickness. I would love to be able to say I have 400 cu in sbc, but for just 23 less cubic inches (377) I would gain the extra wall thickness. This would provide more wall thickness for boring when...
garage.grumpysperformance.com
Engine Block Cylinder Wall Thickness
HOW FAR CAN YOU BORE A BLOCK? before you begin to have a engine block bored more than about .030 over size its a good idea to have the blocks bore walls sonic tested Have your machinist sonic check the block before you bore it. calculate the remaining bore wall thickness, and if its not thick...
garage.grumpysperformance.com
Three... two... one... lift off! - CorvetteForum - Chevrolet Corvette Forum Discussion
C3 General - Three... two... one... lift off! - Well, I'm still at the Three stage, but have been working all summer towards a body off resto of my '77. First I built a multi-purpose wooden structure, mainly to take the body off. So far I used it to install some cheap light on the 14' garage...
www.corvetteforum.com


read the related threads and linked info, below
it sure can't hurt and in most cases will help a great deal
not getting oil to rockers
" HEY GRUMPYVETTE??? What would cause 70lbs of oil pressure at idle and none to the push rods? Gauge is good. I put in a new hv oil pump and still no oil. HELP!!!!!!!!" just a tip guys, any ELECTRIC DRILL is going to have a difficult time spinning an oil pump priming tool , without heating up...
garage.grumpysperformance.com
Oil pump priming
I have attempted to prime and pre oil the system in my 355 build using the tool shown on Grumpy's stickys but am not sure if all is as it should be. The filter was filled pre installation and the balance of the 5 quarts of oil poured into the lifter valley. The tool in inserted and run with a...
garage.grumpysperformance.com
oil system mods that help
heres a short list REMEMBER the object or goal in building and maintaining the lubrication system is too maintain a 100% dependable pressurized cooling flow of lubricant to the bearings, rockers ,valves etc. your most important tool, is your ability to think about how things are supposed to...
garage.grumpysperformance.com
installing an oil pump pick-up tube
there's two ways ,...... you can use the correct tool, which is ADVISABLE! use this oil pump(link below) in most stock SBC builds, as it produces a 10% increase in oil volume and standard pressure which is just fine , but obviously check your bearing clearances and oil pump to oil pan floor...
garage.grumpysperformance.com
how your oil pumps pressure bye-pass circuit works,
theres seems to be a lot of mis-information about , how the oil pump regulates its pressure curve, and the related subject of shimming oil pump springs and how your oil pumps pressure bye-pass circuit works. PRESSURE, that you see displayed on the oil pressure gauge is a measure of the...
garage.grumpysperformance.com
probably 90% of the timing sets being installed are installed with the crank gear flush with the shoulder on the crank snout and with never a single thought being given to proper alignment being an issue, and with thousands of those engines making well over 100K miles before the timing chains replaced, that doesn,t mean they are correctly aligned it just indicates that the basic design is rather forgiving as to the conditions it will continue to function in without causing major problems AND THAT in most cases the manufacturing tolerances are close enough to correct to have few issues with wear. but Id also point out that most engines are not running at near their full power potential and most engines have basic flaws costing them both some horse-power and durability problems
Ive had several guys bring in c4 corvettes with both flat tappet and roller cams that had sticky or only semi functional hydraulic lifters.
the first symptom is both noise in the valve train and little or no oil flow out of the push rods feeding oil flow too the rocker but you've got good oil pressure
this seems too be rather common in cars where for one reason or another the engines not been started for several months or years.
now obviously you might have mechanical issues or parts failure,
but in many cases its simply built up varnish or sludge,

or minor rust from moisture trapped in the engine during longer term storage.
first step is always doing an oil change to a good brand of high detergent 10w30 oil and a new WIX or PUREOLATOR or similar quality oil filter.
STEP TWO
remove each push rod and soak it briefly (10-15 minutes)in a can of 50% gas and 50% carb cleaner, then use a compressor and high velocity air nozzle to blow out and verify the push rods completely clean and free of internal debris, or sludge.

https://www.harborfreight.com/catalog/product/view/id/13295/
to get the best results I found loosening the valve lash 1/2 turn out so the lifters click almost like solid lifters speeds up the process of getting stuck lifter internals on hydraulic lifters to free up and driving the car for a couple hours tends to do a great deal of good
adding a quart of MMO


and a can of liquid moly

https://www.amazon.com/Liqui-Moly-20004-Hydraulic-Additive/dp/B0096Y6XPC/?tag=newcarpassionate-20
seafoam engine additives all help

additive's with solvents and detergents and added lubricants certainly won,t hurt the process of removing contaminants , and temporarily allowing a few extra thousands clearance in the valve train seems to speed up the process, after youve driven the car for an hour or so with the fresh oil, new oil filter and additives youll generally find the lifters have freed up unless theres a mechanical wear issue like a damaged cam lobe or defective or worn lifter, so you can re-adjust the valves correctly

youll generally want to install hydraulic roller lifter's with the oil feed holes pointing to the rear of the engine,
but its not super critical as hydraulic pressure in the blocks lifter gallery,
oil feed passages ,
insures the roller lifters get sufficient oil flow facing in either direction.


you should read these posted link's, and sub links
http://garage.grumpysperformance.co...ter-pumps-oil-and-traps-oil.15555/#post-92843
http://garage.grumpysperformance.co...er-lifter-install-direction.11398/#post-52208
http://garage.grumpysperformance.com/index.php?threads/correctly-adjusting-valves.196/#post-90731
http://garage.grumpysperformance.com/index.php?threads/can-t-adjust-the-valve-lash.15404/#post-90613
http://garage.grumpysperformance.co...ulic-lifters-mystery-solved.12263/#post-60159
http://garage.grumpysperformance.com/index.php?threads/oil-system-mods-that-help.2187/
http://garage.grumpysperformance.com/index.php?threads/oil-pump-priming.15211/
Chevy for years used NYLON gear teeth on aluminum gears, its not like they were concerned with getting the alignment correct to the last possible 2-5 thousands of an inch, they designed the timing sets to be easy to install and reasonably durable and run QUIETLY , and yes they eventually realized that was a HUGE mistake! but in this thread we are dealing with building an engine correctly, to gain all potential hp, and enhance durability here, not in merely allowing it to run once assembled


READ THESE LINKS
viewtopic.php?f=54&t=2187
viewtopic.php?f=54&t=4537&p=13350#p13350
viewtopic.php?f=54&t=3194
http://garage.grumpysperformance.com/index.php?threads/crank-case-blow-bye-and-related-info.16790/
THIS is a good example of what happens to bearings if the oil passages are allowed to push small metallic debris, from wear like rockers,valve tips,cam and lifter wear thru the engine, use of a few small magnets, and shrapnel screens helps reduce or eliminate this


or MAGNETS in the oil system or in some cases the screen on the oil pump pick-up

all that extra silicone sealant that gets squeezed out off the gaskets tends to get carried by the oil flow into the oil pan where some of its trapped in the oil filter during each successive trip thru the engine, but bits that get trapped in the oil passages can rapidly reduce oil flow and destroy bearings, cam lobes and rockers and lifters.

but once it reaches the bearings the clearances are far tighter and either they restrict oil flow or get trapped and damage the bearings, cam lobes lifters,rockers or crank journals
ONE very common source in years past was nylon gear teeth


viewtopic.php?f=54&t=3194&p=8510&hilit=aluminum+nylon+teeth#p8510

http://store.summitracing.com/partdetai ... toview=sku
heres a helpful diagnostic tool,
IT should be obvious that you'll need to pre-prime the blocks oil passages and adjust the rockers so oil flows from the rockers with the engine being pre-primed with a priming tool being used BEFORE trying to start any engine with a new cam to insure oil flow begins instantly on the engines start-up,you WON,T get oil to all lifters equally unless the engines crank & cam are spinning,(so during testing spin the engine slowly with a breaker bar or ratchet), because the oil passages feeding the lifters aligns differently at different lifts,your oil leak at the distributor base is normal, but the clearances and flow may be excessive, with a priming tool, some are not nearly to spec. ID measure the diam. of the oil pump primer and then measure the distributor base, Id bet the distributor base is larger and fits better, which reduces the potential for leakage.

"GRUMPY if I waited on every engine I primed for oil to pour out of the rocker arms I think I would have sure burned up a lot of drills over the years.
you would be amazed at the sludge build up in some engines
thats a good reason to weld a 1/2 drive socket to the top of your oil pump priming tool and use a 1/2" drive air ratchet,too spin it, they don,t tend to burn up and they do have the required torque!
Ive always said that pre-filling the oil filter and having a buddy rotating the crank with a large breaker bar or a flywheel turning tool during the oil passage priming process speeds up your results
http://store.summitracing.com/partdetai ... toview=sku

its basically a heavy duty can opener , or an oil filter cutter designed to make it easy to internally inspect oil filters, by allowing you to remove the filter element , from inside the surrounding (CAN) for close visual inspection.
If you don,t have one, and have not used one, your unlikely to see, or appreciate the benefits,close inspection can and does frequently give you prior evidence of impending or at least gradually occurring wear and with practice you can make an excellent guess as to the parts and condition of those components.
IT also helps to trap crud if you install a couple high temp magnets on the filter and in the oil pan.
Regular oil changes can drastically reduce the amount of sludge buildup in the oil.
Basic filter cutting & inspection procedures

you would be amazed at the sludge build up in some engines
· Visually check the filter and or filter canister for cracks and leaks.
· Inspect the filter`s bypass valve to ensure it is operating correctly.
· Drain the filter of its contents (dispose of this liquid in the correct manner in accordance with local environmental guidelines).
· Firmly hold the filter in an upright position (head on top) taking care not to crush or damage the housing.
· Using a specially designed filter cutting tool (for example, Komatsu part number 3310587S )
heres a helpful diagnostic tool,

carefully cut off the top of the filter.
· Remove the element from the filter housing and pour the contents of the housing onto some clean absorbent paper.
· Inspect the absorbent paper for traces of foreign particles.
· Inspect the filter medium for signs of damage and blockages. Blockages force the bypass valve into operation, allowing unfiltered fluid to travel to and enter major components.
· Remove the filter medium from the filter by cutting between 2030 mm (about one inch) from the end plate and cut the medium into small pieces.
· Carefully inspect the filter medium for traces of metal contaminants.
Most engine trouble involves the lube system, and cutting waste filters apart often reveals warning signs that will help avert major damage. As a disposable element of the system, the filter sometimes acts as a fuse, calling attention to problems by failing before engine components are damaged. Problems associated with wear in the combustion chamber inevitably show up in the oil, and the filter collects clues. Field maintenance operations that take time to read the signs will have another tool for anticipating failures and reducing repair costs.


http://garage.grumpysperformance.com/index.php?threads/drill-bits.4714/#post-12806


http://www.machinerylubrication.com/Rea ... inspection
http://www.tomorrowstechnician.com/Arti ... lters.aspx
http://www.tomorrowstechnician.com/Arti ... lures.aspx

http://www.summitracing.com/parts/SUM-9 ... toview=sku
http://www.circletrack.com/techarticles ... index.html


related info
your totally correct that adding a large magnet to the base of the oil filter helps a great deal in collecting fine metallic crap,
like the finer ,worn cam lobe , lifter debris, and dust from the ring bore seating process from continuing to circulate in the engine,
trapping it in the filter with the added security of the large magnet makes a great deal of sense
yet, the use of the high heat resistance magnets, is a very useful added precaution, thus, I also try to prevent larger debris from ever reaching the oil pump,where it can severely damage the oil pump
or the potential resulting trash from being pumped into the oil passages, keep in mind the oil pump and filter will in some cases BYPASS the filter if its clogged with crap.
I place several of these in the engine, generally one in the rear drain area of both heads
a couple in the lifter gallery near each drain hole, especially near the rear distributor area,
and 4 in the corners of the oil pan sump, and use of shrapnel screens is also useful.

these are placed there in the engine to prevent bits of broken/worn lifters, valve springs, push rods
ever entering the oil pump or collecting around the oil pump pick-up

Proper magnets trap metallic debris
SmCo Samarium Cobalt Disc Magnets
http://www.magnet4less.com/

Samarium Cobalt MAGNETS HELP
http://www.magnet4sale.com/smco-disk-magnet-dia-1x1-4-samarium-cobalt-magnets-608-f-temperature/
related links with good related info
how your oil pumps pressure bye-pass circuit works,
theres seems to be a lot of mis-information about , how the oil pump regulates its pressure curve, and the related subject of shimming oil pump springs and how your oil pumps pressure bye-pass circuit works. PRESSURE, that you see displayed on the oil pressure gauge is a measure of the...garage.grumpysperformance.com
trash in the oil passages, and improved oil flow mods
while your engines running theres several gallons of oil per minutes circulating thru your blocks oil pump and the blocks internal oil passages, if you have any crud suspended in that oil like particles of sealant or micro bits of bearing or cam lobe etc, its pumped, thru the oil system along...garage.grumpysperformance.com
oil system mods that help
heres a short list REMEMBER the object or goal in building and maintaining the lubrication system is too maintain a 100% dependable pressurized cooling flow of lubricant to the bearings, rockers ,valves etc. your most important tool, is your ability to think about how things are supposed to...garage.grumpysperformance.com
http://garage.grumpysperformance.co...king-how-other-people-might.11959/#post-56957
btw, add a few magnets to the oil pan and drain back area in your engine, the trap and hold metalic dust that comes from wear and increase engine life span by preventing that crap embedding in the bearings
http://www.kjmagnetics.com/proddetai...d=D66SH&cat=13
http://www.kjmagnetics.com/proddetail.asp?prod=D66SH
http://www.kjmagnetics.com/proddetail.asp?prod=D82SH
these are even more tollerant of temp swings and retain strength at even higher engine oil temps plus they are smaller and easier to use

a very effective custom built windage tray can be fabricated for most oil pans from perforated steel, if you have minimal metal working and measuring skills


The SH material in the D66SH magnets, means that the magnets can be heated to 300° F without any loss of magnetic strength, unlike standard neodymium magnets that begin to lose strength at 175° F. Suitable for many high temperature applications.
I think you might find READING THRU these links very useful
http://www.chevelles.com/techref/ScreenInstall.pdf
but look at this chart, I circled the type I used in green notice the percentage of open area vs closed sheet changes a great deal with the pattern and hole sizes selected ONE BIG ADVANTAGE TO USING PREFORATED STEEL , for a windage screen or a shrapnel , SCREEN or windage screen, IS THAT IF YOU PLACE SEVERAL HIGH TEMP CREAMIC MAGNETS ON A PREFORATED STEEL SHAPNEL SCREEN OR WINDAGE TRAY ITS MAGNNITIZED MAKING IT VERY DIFICULT FOR METALIC FERIOUS CRAP TO FLOW PAST THE BARRIER AND BACK TO THE OIL PUMP AS THE WHOLE SURFACE TENDS TO TRAP AND HOLD EVEN FINE DEBRIS,
I generally want holes covering at least 45%-50% coverage and at least 1/4"-3/16" in diam. in a windage screen perforated sheet
http://www.kjmagnetics.com/proddetail.asp?prod=D82SH

BE AWARE magnets heat tolerance differs so ask for and pay attention to the heat limitations, a MINIMUM of 300F for any magnet expected to be used bathed in hot engine oil would be smart


while I generally use stainless 6 or 8 mesh for shrapnel screens theres lots of options that will work just fine, just remember to keep the oil changed regularly or theres some potential for sludge to clog ANY size shrapnel screens
http://www.twpinc.com/twpinc/products/T ... 6T0350W36T
http://www.twpinc.com/twpinc/products/T ... 8S0280W36T
New
magnet size is not all that critical, but get the high heat tolerant types linked, above ,
I generally use the 1" x 1/4" in the oil pan and lifter gallery and the, smaller 1/2" x 1/4" near the cylinder head oil drain back holes,
placed where oil draining back to the lifter gallery will run over them,you'll be amazed at the amount of metallic debris they catch.
read the link's on the shrapnel screens, and oil mods as thats also useful info.
the first time you tear down and inspect the crud trapped on those magnets, in an engine that has a few hundred hours of running time,
that was prevented from reaching the oil pump gears and bearings youll become convinced of the value
http://garage.grumpysperformance.com/index.php?threads/oil-system-mods-that-help.2187/#post-54398
http://garage.grumpysperformance.co...e-used-prw-stainless-steel-rocker-arms.14896/
http://garage.grumpysperformance.com/index.php?threads/magnets.120/#post-76609
a 36"x 40" aluminum perforated sheet like this, that costs about $40-$60 will provide windage screens and shrapnel for 3 engines,
I vastly prefer STEEL not aluminum perforated sheet as a base material, thats an option, if your semi skilled at fabrication, that beats the crap out of buying $300 plus worth of milodon screens that don't work as well in my experience as a carefully fabricated custon screen will
http://www.summitracing.com/parts/mil-32260/overview/
http://www.centuryperformance.com/tunin ... g-148.html
http://www.secondchancegarage.com/public/186.cfm
http://www.corvette-101.com/
(info on left border)
http://www.summitracing.com/search/?key ... kers&dds=1


BTW I have on several occasions seen guys who complain about various oil leaks on valve covers and rear seals ETC.
Used, engine parts will have oil embedded deeply into the micro surfaces.
almost all replacement parts will have a wax or grease preservative coating to prevent corrosion during shipping!
IF YOU simply wipe off oil soaked surfaces with a paper towel, who then smear on the sealant of there choice and proceed to install gaskets,
YOU WILL OCCASIONALLY HAVE LEAKS!
and then they wonder or maybe be in shock when you find the seeping oil leak has returned in a few weeks time!
metal surfaces may look smooth as glass but under a microscope they look like the surface of the moon , with lots of jagged surface cracks, so you really need to wash out the micro lubricants trapped in those cracks with a thin fast evaporating grease solvent and a lint free rag , followed by a second repeat of the process and in many cases a few minutes with a heat gun to dry and evaporate the solvent in the micro cracks ,
STOP AND READ THE SEALANT PACKAGE DIRECTIONS!
you'll generally find some rather amazing , bits of info such as temperature requirements, temperature limitations, what solvents work best to remove the cement or sealant, only after reading the directions, do you then smear the gasket sealant on both mating surfaces before bonding the two gasket & metal surfaces.(and in many cases you use a brush as dirt or oil on fingers prevents a good seal!)
there ARE reduced ratio roller rockers designed to significantly lower the lifter to lobe pressures during the cam break-in process, and its a whole lot easier to swap rockers during the break-in process than swap to lower pressure springs or remove inner springs from dual spring valve trains during the break in process
heres a couple darn good links you need to read thru, lets have some additional info or comments and questions??
Last edited by a moderator:

