81 Malibu "Uncaged" Performance Therapy project

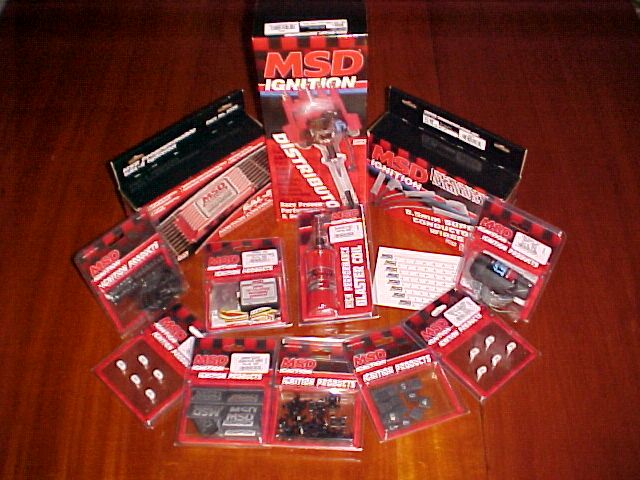
The last prize shipment for the Malibu from the Performance Therapy contest arrived!! Each company asked me to "make a list" of what I wanted from their company for the project and so I'd given MSD a list of things I wanted for the new engine, nitrous control, and a shift light. Here's what I recieved! Sweet deal eh? THANKS MSD!!!!!

Pro Billet Distributor
Programable 6AL-2 box The new model that gets programmed with a laptop and has dual rev limiters.
Blaster 2 coil
8.5 Superconductor "make your own" wire set in black.
6' Pro boot guard Headers and wires always seem to be a sore spot for me with a lightning show on occasion.
Shrinksleeves
Wire number set I'm getting old, don't want to make a mistake in the dark in the pits checking plugs or something. LOL
Timing tapes for the balancer
RPM activated window switch Module to control nitrous eventally
LED stand alone shift light
2 sets RPM module sets one for nitrous activation switch, and one set for the shift light
Plug wire holders

My car didn't have a factory tach. I've got a couple old aftermarket tachs (without shift lights) and I'll see if I can get one hooked up, so combined with the MSD shift light I should be set there. I had the nice MSD terminal crimp tool already so I'm set to make a custom wire set.

MVC-031F-1.jpg
 
Thats awesome! Which pro-billet part number is that?
Andy McCatherine

1982 Monte Carlo SS (clone)

Wow, it's good to win a contest now and again, but this one takes the cake. I am still wondering which Rushforth's the 14 Car is getting.
Stephen


Andy: It's the MSD 85551. The new programable box is what I'm really psyched to play with because of the 2 step rev limiter and the ability of adjusting the advance curve quickly and easily with a laptop.

The MSD system with Pro Billet distributor I've had in my Firebird the past 6-7 years has performed flawlessly but only has a 6 A box with no limiter at all and advance adjustments need to be done underhood (so I never did any. LOL). This new Programable 6AL- 2 box allows easy adjustments to be programed from a laptop to the box without reaching to the back of the engine compartment to swap springs/weights while holding a light only to bang your head and have your reading glasses fall off! AHAHAHA Gettin old.

Stephen: I'll be installing the Baers on the Firebird soon and then have to make the final decision on the model of Rushforth wheels after I measure new backspacing requirements. They'll be 18 X 10's all around.

Todays good news is, I scored a 12 bolt posi rear out of a pickup for $25.00. If I can figure out a cost effective way to use it for the bu I will and if not, then hopefully I can flip it for a few bucks toward the project.
 
montessaj;739976 said:
Thanks for the P/N John! As a G-body guy, I can't wait to see this project finished!

It'll be a couple more months I'm sure Andy. I've got a lot of projects going at the same time. The bu's in storage while I'm building the engine etc. so there's no urgency to keep me moving but I'm trying to get something done every day so that I keep making progess. Todays little project was removing the stock timing tab from a used timing cover in great shape a bud gave me. It had a tab for an 8" balancer and I'm going to run a 6" balancer with a bolt on timing tab.

MVC-016F.jpg
 
I didn't have a long enough piece of vinyl for the rollover so I had to have a seam. Hand stitching the center seam came out fine so I test fitted the pieces and clamped them in place with paint sticks so I could see the material would lay when finished. The original vinyl piece and padding were sewn to the cardboard shelf. Thats not going to be possible with the hardboard so I've got to try and figure out a good way to bind them. Will test on scraps.

MVC-021F.jpg
 
I tried a few ways of making the vinyl rollover using various materials and tools available to me already and here's what I came up with.

1. Tack vinyl with trim adhesive to the edge of the shelf to keep it from moving.
2. Tack 3/8" batting with adhesive along the edge of the piece with about 5/8" on the shelf.
3. Separate batting in the middle along the 5/8" wide section. (I cut out the upper part of the split batting in the pics below so you can see what I'm doing.)
4. Tack paint sticks cut down to 5/8" width on top of the batting with adhesive.
5. Use A type spring clamps to hold everything tight.
6. Drill 13/64 holes through everything for pop rivets.
7. Install 3/16" medium length aluminum pop rivets.

When I do the shelf the sub box material will already be on it and there will be a thin layer of the batting on top of the paint sticks. When the seatback is slid down to lock it in position in the car, it will pull the vinyl rollover down.

MVC-014F.jpg


MVC-015F.jpg
 
Rear shelf project is on temporary hold waiting on a saw to cut the speaker holes nicely. Meanwhile I finished up the rods and I've been working on the heads for the engine. I cut the heads for installation of hardened exhaust valve seats. Installed the seats (they get pounded in), made a bowl blend cut, then 3 angle cut for both intakes and exhaust while checking heights. Next was a cut around the edge of the chamber to unshroud the valves. You can't get the full effect of running bigger valves without unshrouding the edge close to the side of the chamber so they can breathe. Good camera's still dead so I can't get really good pics of the bits used because the picture definition isn't good enough.

MVC-030F-4.jpg


Cutting the edge of the chamber to unshroud the intake valve in this pic. Chamber on left is done, right is still stock. Unshrouding exhausts gets done next.

MVC-010F-2.jpg
 
I keep spending a little time on my own heads at the machine shop. Funny, but hundreds of heads have passed through my hands at the shop while mine sit on a shelf next to me! I've been there a while now and learned a lot, also realize how much calculating, measuring, machining, parts matching, etc. goes into the building of performance engines. I work on mine an hour or two here and there after I work on other peoples stuff. Kinda like a roofer with a leaky roof. Everybody else comes first. LOL Soooo.... almost all the work on my heads gets done between 11PM and 2 AM! AHAHAHA Last night was no exception and I stopped working on my heads about 1:30 AM. Here's the latest update.

To measure the valve stem height while cutting the valve seats a special gauge is used. The base of the gauge is held against the spring seat and then the valve to be used for that chamber is inserted and pressed tightly against the seat. The valve stem pushes against a plunger in the gauge which measures how far the stem protrudes. As each valve seat is cut the stem height is checked occasionally so the stem heights will be very, very close when done and the seats are cut to a almost equal depth. A procedure later insures all the stem heights are exactly the same.

MVC-025F-2.jpg


As a young man I always thought a multi angle valve cut required separate steps for each angle, however they're done in one step. The tool for cutting the valve seats cuts all the angles at the same time. The cutting blade is adjustable and is set for the diameter of the valve, then a pilot is inserted into the valve guide of the seat to be cut. The head has been leveled to the drill press and the pilot keeps the cutting tool straight with the valve guide. There's a spring that gets slid onto the pilot that pushes the cutting tool up away from the valve seat until the drill press pushes it down. The seat is then cut and intermittantly the stem height is checked, once the stem height is correct you're done and move on to the next valve.

MVC-026F-2.jpg


Because the cutting tool needs to be moved out of the way to constantly check the stem height etc. the tool is not mounted in the drill chuck but rather an attachment with a notch in it is mounted in the drill press and the tool slides into it as the press is lowered. A small bar on the tool fits in the groove which spins the cutting tool.

MVC-027F-2.jpg
 
Had an opportunity to show a main cap with oil passages opened up next to my untouched cap before opening up mine, so one more thing's done and here's pics.

MVC-010F-1.jpg


My cap isn't finished in the pic below but I was waiting for the compressor to catch up because a couple of us were using a lot of air so it was a good time to take a pic.

MVC-011F.jpg


Kinda out of the normal order of procedures but I had some time, so I did the grinding to blend in the bowl cut with a stone on a grinder. Now the bowls are opened up with a nice radius to the exhaust seats.

MVC-013F-2.jpg
 
When I left off on the package shelf I was waiting for a saw from a buddy. I could have chewed the speaker holes like a beaver by the time I got the saw! Anyway, I got it this week and got right on the shelf.

dustshield002.jpg


With the holes cut I moved onto getting the pieces ready to create the rollover to the rear seatback. I cut down paint sticks with a utility knife against a straight edge, then pinched them all together and sanded them all to the same width. Not really the optimal way to do this but the paint sticks were free and already here so....

MVC-020F.jpg


MVC-021F-1.jpg


Next I drilled the holes for the speaker grill screws then used 3 M spray adhesive and stuck the speaker box material to the hardboard shelf.

rearshelf003.jpg


Then the time consuming process of attaching the rollover. I decided to rivet the strips to pinch the vinyl rollover and carpet material. Holes through the paint sticks were drilled. The pieces were clamped in place and the holes for the rivets were melted with a mini soldering iron through the vinyl and carpet. This prevents the material from wrapping up on the drill bit. Then the holes were drilled through the hardboard. Once the holes were set I inserted rivets in each to keep the pieces aligned while I pulled each rivet and used washers on the backside so the rivets wouldn't pull through the hardboard.

MVC-001F.jpg


A section of padding was glued to the rollover similar to the original and gives the rollover a factory look. The rear seatback holds the rollover down when it's installed in the car. I left extra material on the ends and will trim to fit when I put the shelf in the car.

MVC-002F.jpg


I looked around for some black machine screws for the speaker grills but didn't have any so I splurged and bought some new ones for a whopping $1.88 LOL the only cash spent to build the shelf. With the speaker grills installed the shelf is ready! I may use some dum dum or other deadener to be sure the rivets or speaker grill bolts don't rattle when it's installed in the car.

MVC-004F.jpg


MVC-006F.jpg
 
i dont know if you get tired of hearing this but you are a bad ass... that package tray looks awesome for recycled shit on speaker carpet
 
philly said:
i dont know if you get tired of hearing this but you are a bad ass... that package tray looks awesome for recycled shit on speaker carpet

Thanks Phil! Like bringing a woman to climax, you never get tired of hearing it! (or seeing, feeling, ahahahaha.)

Three words for this thread update.... GRAND NATIONAL REAR. For a mild build G-body this is the affordable "bolt in" holy grail of rears. For years I've been outbid on Ebay, missed ones on CL and in local traders, looked for cars with them I could part out etc. etc. etc. I spotted a listing on a forum for a rear when I was taking a break while working online last Sat. and picked it up today.

So now I've got a 8.5" housing, axles (and spares), posi unit, yoke, and most of the brake components to work with including.... (insert drumroll here) ALUMINUM DRUMS! (+ a spare) The aluminum drums have a lower MOI so they speed up quicker as well as lowering unsprung weight. Hey, I need all the help I can get to make this car go! ahahaha So now I need to find a set of gears, and a rebuild kit etc. and then I'll have a rear that should hold up behind the 357 I'm building that I can put in while I'm doing the Hotchkis suspension install. Here's a pic of the parts I got. In the boxes are a brake hardware kit and new wheel cylinders Dan included above and beyond the deal.

MVC-016F-1.jpg
 
Quote Originally Posted by HectorM52 View Post
Ever consider getting Blazer rear brakes or LS1 rears? Those things are going for cheap nowadays.


I've been looking at options for years and I'm waaaaay too patient waiting for the "deal" to come along. I looked at swapping rears from other vehicles, bracket kits for other 10 bolts 12 bolts and 9"s etc. The GN rear is a direct bolt in and should make it a fairly straightforward (read cheap) install when I put the Hotchkis TVS in. Hopefully I'll avoid any expense with U joints, driveshafts, etc. I have a 70 Firebird "The 14 Car" for road tracks and I can't afford to run it on them as often as I'd like, so there's no need to build another track car. If I didn't win the contest this thread wouldn't even be on this forum. I would have reassembled the car after the paint job and put it back into DD status. The Malibu will still go back into service as my daily driver. I'll probably try some Auto-X with it and take it to the local dragstrip for cheap test and tune nights for fun. So it's gotta be a rock solid reliable combination I have no fear of breaking because I won't be trailering it.

I should have mentioned the "deal" on this rear in my last post. Right now I have no disposable income for cars. The rear was listed on Maliburacing.com for $350.00 and seller offered to deliver within 100 miles for additional money. I contacted the seller and he offered to meet me half way (we're a couple hundred miles apart) for $50.00. I told a bud about the rear who knows I've been scouring the earth to figure out an inexpensive way to get a rear that will hold up. He offered to pay for the rear and the extra $50.00 in exchange for me doing a brake upgrade/repair and aftermarket AC install on a car. So no out of pocket expense for me. I did the brakes already and I started working on the AC install (paint drying on brackets as I type) which I should get finished up in the next couple days if I can get all the misc ,pulleys, etc. for the other accessories sorted out. The car had a SBC to BBC swap and someone tried to rig all the accessory brackets out of junk they had, nothing was correct.

As for the brakes. After I install the new Baer brakes on the Firebird (which come with new spindles), I have to swap the front spindles from my Firebird over to the Malibu because the Hotchkis TVS requires early 2nd gen spindles. Since I've been tracking the bird on road courses, I have a set of dedicated road track pads/rotors for them I'd use for Auto X with the bu even though they may be a little higher temp pad than ideal. For the rears I had custom made race compound brake shoes for the bird with dedicated drums I will also have leftover after the Baer install so I'll use those shoes for Auto X and figure out which drums I'd use based on diameters. Haven't checked to see if they're the same yet but I suspect they may be.
 
Although I wasn't working on the Malibu I slowly continued to collect parts I need/want for it. I got back to porting the heads a couple weeks ago but caught a piece that flung out of the grinder right in the eye even though I had glasses on. Luckily, a gentleman I'm building a car for is an eye surgeon and fixed me up immediately even though it was late Sunday night on Labor day weekend.

As for an update, I've also gotten started on building the rear. A few weeks ago I took all 4 axles to the machine shop I still work out of part of the time and checked them out after putting them in the washer to clean them up. The outer bearing surface was scored on one and a dial indicator showed one as slightly bent so the choice of which 2 to use was a no brainer. I bought a set of new Richmond 3.73 gears from a member here (thanks Ron!) and ordered a complete rebuild kit from Ratech for bearings, shims etc. The previous owner of the rear had cleaned up the rust on the outside of the housing and hit it with some POR !5 or something but because I want to weld the axle tubes to the center section the paint needed to come off that area. I figured I'd just clean and smooth the whole housing so I got started stripping it today.

001-2.jpg
 
NOT A TA said:
Although I wasn't working on the Malibu I slowly continued to collect parts I need/want for it. I got back to porting the heads a couple weeks ago but caught a piece that flung out of the grinder right in the eye even though I had glasses on. Luckily, a gentleman I'm building a car for is an eye surgeon and fixed me up immediately even though it was late Sunday night on Labor day weekend.

As for an update, I've also gotten started on building the rear. A few weeks ago I took all 4 axles to the machine shop I still work out of part of the time and checked them out after putting them in the washer to clean them up. The outer bearing surface was scored on one and a dial indicator showed one as slightly bent so the choice of which 2 to use was a no brainer. I bought a set of new Richmond 3.73 gears from a member here (thanks Ron!) and ordered a complete rebuild kit from Ratech for bearings, shims etc. The previous owner of the rear had cleaned up the rust on the outside of the housing and hit it with some POR !5 or something but because I want to weld the axle tubes to the center section the paint needed to come off that area. I figured I'd just clean and smooth the whole housing so I got started stripping it today.

001-2.jpg


most of the time you'll find a few seconds time to put on safety equipment and the minimal cost spent is far FAR less than it costs in time and money to deal with the medical cost resulting from rushing into a job without their use!Ive generally used and strongly suggest you consider using, one or both of these when using angle grinders or while porting heads due to learning from past experiences
safegog.png

http://www.homedepot.com/p/DEWALT-Safet ... 220499-_-N

http://www.harborfreight.com/adjustable ... 46526.html
faceshield2.jpg
 
yea man glasses alone really arent adequate protection... good thing it wasnt too tragic
 
I'm a pretty safety conscious guy. When I was porting and got the chips in my eye I had on my reading glasses and an open face shield. In the past I've always used the sealed type goggles similar to the dewalts posted above. However the old age thing requires that I wear reading glasses for work like this now and I haven't found any of the sealed type that fit over glasses. I also haven't found the goggles available with reading glass magnification. I figured someone must make them but I haven't found any.

When I got the chips in my eye there were fans and one of them blew the chips up under the open shield. I'm going to go to the machine shop and finish porting the heads so I can assemble the engine which is what prompted me to bring this thread over and get it up to date so you guys would know whats going on as I get back into the project.
 
Finished stripping the paint and prepped it for welding the tubes to the center section, additional spring perch welds, and also ground out some questionable factory welds on the lower link brackets to be rewelded. Had my bud Rick I work with (who's a better welder than I) weld it up for me. Yes, I checked to be sure the axle tubes were straight before welding. I will be taking the car to the strip and running it on sticky drag tires and plan on some auto X action with A-6's so hopefully the extra welding will help things stay together and straight.

001-3.jpg


002-2.jpg


007.jpg
 
As you could see in the pics above the axle tubes were pitted. Since I'm a PT kinda guy I used Ospho, sanded, shot with DP 74 epoxy primer, smoothed pitted metal with filler, and then shot a coat of K 38 high build sandable primer on it. Some more smoothing and it'll be ready for final paint! Will it make it go faster corner better or stop quicker? No, but sometimes mission creep takes over.

001-4.jpg


002-4.jpg


003-3.jpg
 
I hate doing things twice but sometimes you have no choice. Something caused the paint to lift in the corners, nooks/crannies of the Malibu rear I had in primer. I suspect it was caused by laying a coat too thick/wet.

In any case I stripped it down of all paint in affected areas and prepped/primed/smoothed/primed/sanded till I had it looking the way I wanted to spray it gloss black. I don't usually do my own cars gloss underneath but all the new Hotchkis suspension components are powder coated gloss black so I figured I'd make the rear match.

I used PPG K38 high build primer and PPG single stage acrylic enamel.


NOT A TA said:
The rear was listed on Maliburacing.com for $350.00 and seller offered to deliver within 100 miles for additional money. I contacted the seller and he offered to meet me half way (we're a couple hundred miles apart) for $50.00. I told a bud about the rear who knows I've been scouring the earth to figure out an inexpensive way to get a rear that will hold up. He offered to pay for the rear and the extra $50.00 in exchangefor me doing a brake upgrade/repair and aftermarket AC install on a car. So no out of pocket expense for me.

Man, you are some kind of master negotiator !!! Do you have a "Masters in Negotiating"? :p

Love the pics and commentary!!!

 
Back
Top