Building Up A Blown Olds Motor for an "A/GS Gasser"

Growing up in the 50's Dad had an acetylene torch and an AC "buzzbox" welder in the garage, but my uncle down the road had a good quality ac/dc stick welder whenever I wanted to use that. Grew up doing amazing things with the torch and buzzbox....

Worked my way through college as an apprentice in the Univ. engineering shop, learning to machine, weld and fabricate various farm machinery parts for the ag professors and their projects.

As the field engineer for the sugar cane plantation here on Maui starting in the 60's I had after hours access to their shop, a very well equipped place!

In 1990 I started my own engineering business catering to all the agri-bizz's in the islands, so lost my access to the plantation shop, so started setting up my own shop, used equipment, as new as I could find, Miller 251 mig with a spool gun (for aluminum) and a syncrowave 180 tig unit, both heavy duty well built units. I probably do more work for my buddies in my shop than I do for myself, but it sure is handy to have that available, only took me 40 years to get there.....
Willy
 
Got the motor off the stand and "on the hook", so I could work on the "back end"....

Plugged up the holes in the rear of the block (oil gallery plugs, soft plugs, Olds has two of each in back), and started sorting through my "stash" of flywheels. Thought I would have one I could use, but was not happy with any of the ones I had stacked in the back shed....
So squeezed my bank account a little more (poor thing needs resuscitation!) and bought an aluminum McLeod flywheel....
A thing of beauty, 16 pounds, should be happy behind that blown motor....
Got that mounted, bolted on the clutch setup I had on hand, and fitted the clutch arm and bearing in the blow bell. When I fitted it up to the block, the clutch arm doesn't work right. Pivot ball is too short for one thing. The rod from the Z-bar to the clutch arm hits the starter. Gonna have to do some customizing to get this to work! Will try to post some photos....

Think we need a meeting of the "OD Racing Team", with BBQ and beers to sort this all out....
Aloha,
Willy

70buick%20flag.jpg

(The flag on the right is the Hawaii State Flag, yup, looks British, the King of Hawaii was hobnobbing with the Queen of England when the flag was designed....)
 
A oxy-acetylene torch is in my 2012 project list.
I also learned to weld with a very cheap stick welder, it was a pita to get started and almost impossible to make a nice looking weld. Almost made me abandon welding.. well it did for a few years.
I still have the welder, it seen almost no use and it will remain this way for very long. I call it the power wasting unit.

I did buy my first MIG welder this summer, the lincoln mig-pak 140, what a great investment. Now i can make strong weld that looks very good and ican be proud of my work :)
I wish in the futur i can work on engeneering metal, that always took my attention.

The lakewood bellhousing/blowbell clutch fork/arm fitting :p On mine i also found that some bolt where interfering with the oil filter(when using a long filter) but am on a chevy engine. All the rest was fine for me.
 
"I also learned to weld with a very cheap stick welder, it was a pita to get started and almost impossible to make a nice looking weld. Almost made me abandon welding.. well it did for a few years."

that is an almost universal experience, most of us start with a cheap arc welder and have TERRIBLE results and crappy welds, if the average guy started with a decent quality MIG or TIG welder IM 100% sure welding would in general both benefit from more WELDORS and far more decent welders being sold

I started with a sears 230 amp arc welder, and a friend with a LINCOLN 230 amp arc welder, both make decent welds on the thicker stuff like 1/4" brackets but are more or less useless for sheet metal in unskilled hands

when you select a welder many guys go with a welder based far more on price that capability, believe me I,m broke most of the time so I'm very well aware of cost issues, but its hardly good economic sense to spend lets say $670 on a welder that will do 80% of the welding jobs in your shop, like this
http://www.welders-direct.com/mm5/merch ... ory_Code=M


is spending lets say $800 would get you a welder that might do 95% of the jobs in your shop,like this one
http://www.welders-direct.com/mm5/merch ... ory_Code=M

in general a 180 amp-210amp MIG is about the best value per dollar, a decent TIG that will do darn near anything including aluminum, will cost a good deal more

http://www.welders-direct.com/mm5/merch ... gory_Code=
 
Talked to Lakewood today, found out that there are different length throwout bearings, so need to try to get a good measurement and order the correct longer length one. The one I have now is stock and too short, the arm can not go through a correct arc to engage the clutch. A longer bearing will solve that problem.
Ya learn sumthin good every day!


My old Lincoln 125 mig was my first wire feed welder, had it a long time, I think they call it the 140 these days, but it is essentially the same welder. I keep it ready to go with .023 wire and use it on sheetmetal jobs and light work.
Aloha,
Willy
 
I got an adjustable pivot ball, but i gotta take a look at my throwout bearings that will probably get my clutch fork fitment better.
I got the weighted diaphram clutch from centerforce w/hays flywheel really like them so far.

About the welder, here at canadiantire they have the Core-pak 125, the mig-pak 140 and mig-pak 180 the last two are unique to canada they really looks alike. The core-pak 125 need extra hardware for mig welding(that the way they come in canada).
When i first got to the store to buy my welder i was looking for the core-pak 125 on sale rebate for 500$, i got there and i was too late, missed the rebate... the mig-pak 140 (wich was MIG ready from out of the box) was now on rebate at the same price(500$ instead of 685$) so i grabbed it with a smile :).
http://www.canadiantire.ca/AST/browse/6 ... ?locale=en
So far it do everything i need very well, i did use it only for thick stuff flux core so far but i did buy a C-25 shielding gas bottle this afternoon and am going to setup for MIG very soon(floor pan repair job soon). That will be my first time welding with shielding gas and i gotta practice with some scrap sheetmetal first advice are welcome.

I got offered a 210-230 amp mig(i think because it was hudge) miller today for 500$(used) from the local machine shop. Too bad i already got mine and i have no 220-230v input right now.
 
if that miller MIG works (ask for a demo weld on some sheet steel, before purchase obviously) at $500 its a huge bargain if its in good shape.

I paid $2100 for mine
http://www.welders-direct.com/mm5/merch ... Code=m-mig

as to mig welding it takes practice but as my old welding instructor in college used to say
"you could teach monkeys to mig weld, so you morons have at least some chance at succeeding"
most guys screw up welding too slow and too cold, or not using enough shield gas flow,its usually better to run a tiny bit hot, with a bit more gas pressure and adjust weld speed., and many guys use wire sizes that are a bit larger in diam than ideal, wire size is as important as speed, and cleaning the surface before starting the weld.

http://www.weldingtipsandtricks.com/

http://www.millerwelds.com/resources/te ... /MIG_tips/
 
Making a Sound MIG Weld

diagram4.gif


weldpics456.jpg


The ability to make a good MIG weld is extremely important to the success of an auto repair technician. In fact, almost every welding repair made on a unibody car, light truck or van can be made with the Metal Inert Gas (MIG) welding process. For this reason, there are well-accepted standards and practices for producing sound MIG welds.

Note: This article is written for the person with a basic familiarity with welding who wants to practice and improve their welding technique. The process of arc welding poses several potential hazards that must be guarded. Therefore, all information relating to the safe operation of welding equipment and welding processes must be fully understood before attempting to begin work. Always read and follow the safety information in the operator's manual or contact the manufacturing company when in doubt.

What Needs Welding?

The front driver's side corner of a vehicle receives more damage than any other area. Parts damaged in this area include the upper rail, frame rail, radiator core support, and fender aprons. Other parts often damaged include the rear body panels, trunk floor, and lower rear rails. To make these repairs, the technician must thoroughly master all-position welding. It is important to practice so that you feel confident with making sound welds in all positions.

One way to become confident in your welding quality is to use a simple welding machine, such as the Millermatic® 185 from Miller Electric Mfg. Co. It comes complete with a package to get you started, including a 6 ft. power cord with plug, 10 ft. MIG gun and cable assembly, and 10 ft. work cable with heavy duty clamp. The package also includes a gas solenoid valve, flow gauge and 5 ft. gas hose, and factory installed running gear/cylinder rack.

Before making a repair weld, make test welds on material of the same type, thickness, and joint configuration. Visually inspect and destructively test the practice weld to ensure that it is sound before welding on the vehicle. Fine tuning the welding parameters and your technique on test welds improves the quality of the repair.

Welding In the Flat Position

For a flat joint, such as a butt joint, hold the gun at a 90 degree angle to the workpiece, directing the filler metal straight into the joint. A small, back and forth motion with the gun can help fill a large gap or when making multiple passes.

For a fillet weld on a T-joint, keep the gun at a 45 degree angle, or equal distance from each piece. When making multiple weld passes, the work angles change slightly. This helps avoid uneven weld beads and undercuts.

For a fillet weld on a lap joint, angle the gun between 60 and 70 degrees. The thicker the metal being welded, the greater the angle.

Plug welds should be made with the weld in the flat position if at all possible. Using a spiral-type technique, weld in a slow motion around the edges of the hole, making a complete circle before working toward the center (starting the spiral too soon can create pinholes). When welding around the edge, angle the gun slightly, somewhat like you would for a lap joint. Keep the gun perpendicular when filling the rest of the hole.

Horizontal

Because of the effects of gravity, the gun work angle must be dropped slightly by 0 to 15 degrees when welding horizontally. Without changing the work angle, the filler metal may sag or rollover on the bottom side of the weld joint. The travel angle, whether using a push or a drag technique, generally remains the same as for a weld joint in the flat position.

On thick metal when making multi-pass welds, or to bridge a slight gap where fit-up is poor, weave beads may be used to fill a weld joint. A back-and-forth weave, with or without a slight arch, is used in the horizontal position. A slight hesitation at the top toe of the weld helps prevent undercut and ensure proper tie-in of the weld to the base metal.

Voltage and amperage settings for welding in the horizontal position are usually the same, or very slightly less, than settings for welding in the flat position. However, note that if the wire diameter is too large, the resulting heat and size of the weld puddle may be too great to allow the weld puddle to freeze quickly, and the weld may rollover.

Vertical Positions

Vertical welding, both up and down, can be difficult. This makes pre-weld set-up very important for making high quality welds. Since you are fighting gravity, consider reducing the voltage and amperage 10 to 15 percent from the settings for the same weld in the flat position.

Know when to weld vertical down and when to weld vertical up. For vertical down welding, the welder begins at the top of a joint and welds down. This technique helps when welding thin metals because the arc penetrates less due to the faster travel speed. Because vertical down welding helps avoid excessive melt-through, welders sometimes place very thin materials in the vertical position even if they can weld them in the flat position.

When welding vertical down, angle the gun slightly back into the weld puddle at a 5 to 15 degree angle. For thin metal where burn-through is a concern, angle the gun slightly up and pull it downward (i.e., direct the wire away from the weld puddle). Either way, keep the electrode wire on the leading edge of the weld puddle. A very slight weave may help flatten the weld crown.

The vertical up technique - beginning at the bottom of a joint and welding up - can provide better penetration on thicker materials (typically 1/4 in. or more). The travel angle of the gun is a 5 to 15 degree drop from the perpendicular position. A slight weaving motion can help control the size, shape and cooling effects of the weld puddle.

Making a plug weld in the vertical position is somewhat similar to making a vertical up fillet weld. For a vertical plug weld, the filler metal is deposited upward along one side of the hole. Then, another bead is deposited from the bottom to the top on the other side of the hole. Alternate sides until the hole is filled. For thin metal, use a similar technique, but weld in the vertical down position to prevent burn-through.

Overhead Position

Drag, push or perpendicular gun techniques can be used for welding overhead. But, because of gravity, travel speeds must be fast enough so that the weld metal does not fall out of the joint. Also for this reason, weave beads should not be too wide. Using smaller diameter electrodes (e.g., .023 in.) and lowering the voltage and amperage help keep the weld puddle small and more controllable, too.

Work angles and travel angles for the overhead position can be thought of as the same angles for the flat position, only upside down. However, be sure to keep the gun nozzle clean, as spatter can build up much faster when overhead welding. Also, because the shielding gas flows upward, you may have to increase the gas flow rate to ensure proper coverage.

Travel Speed and Stickout

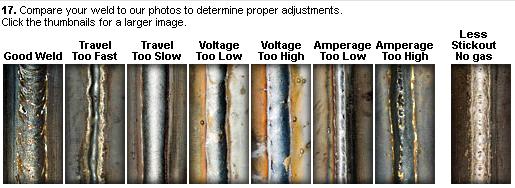
Travel speed and electrode extension (or stickout) also influence the shape and quality of a weld bead to a significant degree. Travel speed is the rate at which you move the gun along the joint. Many experienced MIG welders can determine the correct travel speed by judging the weld puddle size - in relation to the joint thickness - and keeping the arc on the leading edge of the puddle.

Stickout is the length of unmelted electrode extending from the tip of the contact tube. Changing the stickout - which occurs with variations in the distance of the contact tube to the workpiece - causes the voltage and amperage to vary, as well as changes the shape of the weld bead.

Generally, maintain a stickout of 1/4 to 1/2 in. Note that when starting a weld, a short stickout helps ensure a good, hot start; a longer stickout - once you've established the arc - can help bridge a gap when encountering poor fit-up. [Note: Long stickouts promote poor starts.] For critical welds, maintain a constant stickout.

More Practice

To make a sound weld, you must learn to combine the mechanical techniques noted in this article into one fluid welding motion. Practice so that welding on all joints in all positions becomes second nature.

For more information on Miller Electric and its MIG welding products, call 1-800-4-A-Miller (1-800-426-4553) or visit the website at www.MillerWelds.com.

Miller's 142-page Gas Metal Arc Welding handbook provides a comprehensive, yet easy to read, explanation of the GMAW, or MIG, process. It contains detailed instructions on how to set up MIG equipment, set MIG variables, select the correct shielding gas, welding techniques, safety, and troubleshooting. Cost is $25. Call Miller at (920) 735-4356 and ask for publication #151 682, Gas Metal Arc Welding.
 
Been busy with family, but did get some work done...
Moved the motor to the "hook" and started working on the clutch end of things....

55gasser%20onthehook1s%20Sep%202011.JPG


Decided to go with a McLeod aluminum flywheel, 12 lbs! And a Centerforce DFX ceramic clutch setup...

55gasser%20clutch%2002s%20Sep%202011.JPG


55gasser%20clutch%2003s%20Sep%202011.JPG


And of course, a Lakewood blo-bell to keep things safe and secure....

55gasser%20clutch%2004s%20Sep%202011.JPG


Am working on the clutch arm setup, needs a longer stud/pivot ball to be adjusted forward or run a longer throw-out bearing....

And need to trim off that blo-bell ear for the z-bar link to the clutch arm. The starter is block mount, so no problem there....

Might have to wait until November, I'll be traveling in New England the whole month of October....
Aloha,
Willy
LINK TO NEW MOTOR BUILD PAGE FIVE
 
"Yeah, sounds like this one will be ready in the next few days :p."

Just trying to get it off "the hook" and back in the car before flying out to Hartford, CT on Monday. We are doing a tour of the NE, getting up as far as Maine, and down as far as S. Carolina before heading back home on Nov. 3. A whole month of seeing new country (new to me, my wife is a New Yorker originally....)

When I get back have to finish up the wiring on the front end (lights, ignition, etc) then I can do a startup, looking at mid November for trial run!

Makes it difficult to go off on a trip when getting this close to a startup of a new motor!!!
 
Managed to get some more work done before heading off to the mainland.....

55gasser%20clutch%2014As%20Sep%202011.JPG


Extended the clutch arm pivot ball, clutch arm and throw-out bearing movement looks good, now need to modify the bell crank a little and shorten that rod to match the clutch arm....

LINK TO MORE PIX HERE...

Aloha,
Willy
 

Looking good!!! Do you have a season opener at the drag strip that you are trying to get ready for???
 
Our new season usually starts in Feb. weather permitting, and our last run of the season is usually in Nov. weather permitting. There's a race day on Oct. 15th, but I will miss that one. Could have made it too if I stayed home. Nov. 18-19, our season finale, is my goal for a "shake-down" run, test and tune, see what she will do, then try to be serious about it in '12....

Link to our club's web page (Maui Raceway Park):
http://www.mrp.org/
 
We're still traveling on the east coast, visiting the Outer Banks now, interesting place.

But was thinking about my problem fitting my tranny to my bell and pilot bearing before I left, and got to thinking I ought to index that blo bell and make sure it is aligned right. Did some searches here and elsewhere but did not find anything on the best way to check that out.

Anybody got a good reference online I can go look at for a good check of the alignment of the bell/tranny with the flywheel and crankshaft?

Aloha,
Willy
 
Many Thanks for the leads.....

While reading through them and some others here, I read where you recommend an overall gear ratio of around 10.0:1 to 10.8:1....
You're probably specifically thinking about your 'vettes, but it's good info....
viewtopic.php?f=71&t=741
I agree and find that the rear tire rolling diameter affects that some....
Just figured mine, at 3.30 low gear and 3.50 rear that's 11.55:1, but with taller drag tires it will probably be great!
For comparison purposes,divide the gear ratio by the tire diameter and then multiply the answer times ten, you get a number that is only for comparison purposes, but gives us gearheads something we can think about........
and with 28" tall tires on my setup that number calcs to 4.40
With Grumphy's suggested 10.0 ratio and 24" tires it comes out to 4.20, and with 10.8 ratio and 24" tires it is 4.50.
If I stick a set of taller drag tires on back, like 31", with my gear ratio that comes down to 3.70, slowing me down but giving me more top end.
It probably would let me hook up better with less tire spin off the line.
If I wanted to get back to the 4 to 4.5 then I increase the numerical ratio of my rear end, 3.77 would give me a 4.0 overall.
Don't know until I try it though....
 
Finally got back home and pulled the trans and clutch off, set up the dial indicator on the blo bell tranny hole and got max readings of +0.003" and -0.007", total 0.010", half of that is 0.005", according to what I read that's the max allowable, so looks like I am good to go! Will also set up on the trans mounting surface and see what that reads out, literature says up to 0.015" is allowable. More than that and I should shim to reduce it. Thanks for the leads, Grumpy!
Aloha,
Willy

UPDATE.....
The face of the bell only had .004" runout, so I am good to go....
Some pix....
55gasser%20blo%20bell%202s%20Nov%202011.JPG

The clutch and tranny are now mounted....
55gasser%20blo%20bell%205s%20Nov%202011.JPG

Tomorrow I'll put it back in the car and start hooking up stuff....

LINK to more photos

Aloha,
Willy
 
Back
Top