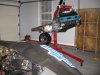
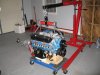
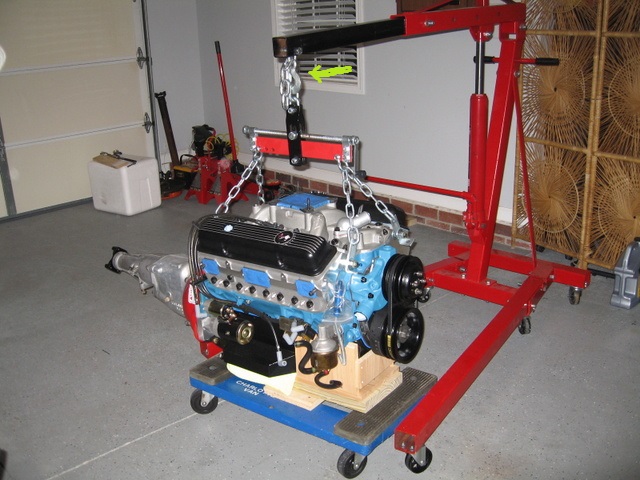
Head and Cam Swap, 82 CFI

Drawmain said:
While its out of the car I'll be detailing the engine compartment and taming the nest of wires, looming, re-routing and replacing as needed so when the engine goes back in it will be a really clean install.

If you have a plan already, then I don't want to complicate things. If you need some
ideas for looming, then I have some pics and links that might help.

 
One thing I've learned over the years, always listen to the ideas of others, especially ones that have been there and done that. I'd like to see your pics and links when you have time to post them, and thanks for offering!
 
Drawmain said:
One thing I've learned over the years, always listen to the ideas of others, especially ones that have been there and done that. I'd like to see your pics and links when you have time to post them, and thanks for offering!

Sorry ..... I forgot about my post and then your response slipped by me.

Actually I have a thread going with the wiring of my TBucket with all the pics. My goal was to wire the TBucket with enough improvements to get me thru this summer and then I wanted to do a complete rewire starting from scratch. I'm not planning on starting with a universal harness like a Painless or American Wire, I have bought 1700 feet of wire in all colors and sizes.

I spent hours looking thru WireCare.com at their braided sleeving, they have huge selection. I bought all my wire rolls at DelCity.net. When you need components for high amperage, such as 100 -200 amps, then don't forget the Audio Industry.

Electrical Wiring for a TBucket
viewtopic.php?f=70&t=10038


Supplies
http://www.wirecare.com/
http://www.wirecare.com/braided-sleeving.asp
http://www.delcity.net/
http://www.powerwerx.com/
http://www.parts-express.com/
http://www.haywireinc.com/
http://www.ceautoelectricsupply.com/index.html
http://www.diyautotune.com/catalog/755- ... p-380.html
http://solutions.3m.com/wps/portal/3M/e ... 4430&rt=r3
http://www.weatherpack.com/
http://www.cableorganizer.com/index_4-2 ... %3DRecView

Learning Center
http://www.wirecare.com/catalogs-and-videos.asp
http://www.cableorganizer.com/learning-center/?page=10

Wiring Harness Kits
http://www.painlessperformance.com/webc ... tomizableh
http://www.hotrodwires.com/12Circuit.html

Switches
http://www.wiringproducts.com/4-positio ... itch-panel
http://www.wiringproducts.com/5-switch- ... panel.html
http://www.dormanproducts.com/itemdetai ... Name=85936

Fuse Panels
http://www.watsons-streetworks.com/inde ... duct_id=60
http://www.cooperindustries.com/content ... _15300.pdf
http://www.waytekwire.com/item/46343/
http://www.enoscustom.com/blackbox.html
http://www.haywireinc.com/index.cfm/pag ... prd192.htm
http://www.phillipsind.com/product/633.html
http://www.phillipsind.com/product/634.html

 
That's a great list! And I know about the audio stuff, they are great for relays and other high amperage stuff (I love my car stereos...) I have a lot of reading ahead of me, thanks again!
 

Enjoy!!!

Let us know what you learn, a different perspective always brings to light
something I hadn't considered.

The closed braided sleeve is nicer looking than the split sleeve, but is much
harder to work with. With the split you can add wires to the sleeve at any
time, not so with the closed sleeve.

When you get to looking at the braided sleeve on the WireCare.com, don't
miss all the different tabs. I did for awhile !!!

http://www.wirecare.com/products.asp?prodline=hw


Attachments

  • WireCareBraidedSleeve.jpg
    WireCareBraidedSleeve.jpg
    26.9 KB · Views: 65
I noticed you don,t have a swivel hook,or engine leveler/tilter, trust me it makes the job far easier, to have both
once you do youll wonder why you ever attempted the job without those accessories, without the swivel hook the engine constantly wants to swing back to one location, it fights you constantly, the tilter makes clearing and indexing the engine angle so much easier

swivelhook2t.jpg

buy the 1.5-2 ton rated hook for your engine hoist and grease the swivel center pin on the hook
http://www.mfrexpress.com/alloy-swivel- ... p-699.html
adding a swivel like this between the leveler and crane GREATLY AIDS THE ENGINES REMOVAL, DON,T GET STUPID or CHEAP, GET THE 3000lb-3500lb rated one not the 1200lb size (REMEMBER YOULL BE UNDER THAT ENGINE SOMETIMES)
6164.jpg

bbcs2.jpg

the picture above can be used as a teaching aid, this guys got the engine tilter he needs but its mounted with the tilter too far above the carburetor, limiting the distance the engine can be lifted above the fenders there should be about 2"-3" between the carburetor BASE MOUNT ON THE INTAKE, tilter at most,with the carb removed and the intake opening duct taped closed and lower edge of the engine, intake carburetor mounting pad and having the distributor still installed is still a small risk, that, is best avoided as it could be damaged, its best removed for safety, but the picture also does not have the swivel,hook, and hes using it with the crank handle at the wrong end as it will hit the wind shield in some applications while cranking in that location, rather than having the crank face the crane like it should
 
Thanks for the tip!

Something I noticed after the pull. I looked in each exhaust port and the valves were white. My engine was running very lean. What can I do to remedy this? New O2 sensor? I was running approx 13 lbs of pressure, and for the week before I started getting the engine ready to pull I bumped it up to 14 psi. Could this be an issue with the ECM? It would give me the occasional code 43 (EST) and had some ping issues earlier in the year. I don't want to get this all back together just to have issues with the fuel mixture.
 
grumpyvette said:
I noticed you don,t have a swivel hook,or engine leveler/tilter, trust me it makes the job far easier, to have both
once you do youll wonder why you ever attempted the job without those accessories, without the swivel hook the engine constantly wants to swing back to one location, it fights you constantly, the tilter makes clearing and indexing the engine angle so much easier

swivelhook2t.jpg

I didn't have the swivel hook but did have the leveler. The leveler is a must if your pulling the engine and transmission together. The swivel would have made things a little easier but I was afraid adding the swivel would have decreased my lift clearance. Going in from the side on a C3 is the easy way to do it.


New build chained up ready for install. No carb and no distributor.
 

Attachments

  • IMG_0591.JPG
    IMG_0591.JPG
    112.7 KB · Views: 45
  • IMG_0592.JPG
    IMG_0592.JPG
    138.8 KB · Views: 45
  • IMG_0692.JPG
    IMG_0692.JPG
    134.4 KB · Views: 45
I didn't pull the transmission with the engine. I had everything ready for when my friend arrived with his cherry picker. We went in from the passenger side and it took about 20 minutes to get the motor out as I had already prepped for his arrival. A few things noticed after the pull: the lean burn in all exhaust ports, all the motor mounts were finger tight, the main engine ground strap was not tight. All will be corrected when the engine is re-installed after we finish the rebuild. I'm still wondering what is causing the lean burn.
 
bytor said:
grumpyvette said:
I noticed you don,t have a swivel hook,or engine leveler/tilter, trust me it makes the job far easier, to have both
once you do youll wonder why you ever attempted the job without those accessories, without the swivel hook the engine constantly wants to swing back to one location, it fights you constantly, the tilter makes clearing and indexing the engine angle so much easier

swivelhook2t.jpg

I didn't have the swivel hook but did have the leveler. The leveler is a must if your pulling the engine and transmission together. The swivel would have made things a little easier but I was afraid adding the swivel would have decreased my lift clearance. Going in from the side on a C3 is the easy way to do it.


New build chained up ready for install. No carb and no distributor.
0692.jpg

redhook.jpg

http://www.mfrexpress.com/alloy-swivel- ... p-699.html
I think youll find a properly installed swivel hook increases the cranes lift distance as the hook loop can be supported by the bolt thru the crane beam or a screw link and hooked directly into the engine leveler,either option is likely too be shorter than the current few chain links, IN ANY CASE ITS AN OPTION ALMOST ALL MY FRIENDS, AND I , NOW SWEAR BY AS A MANDATORY ACCESSORY :mrgreen: if you get a spare $20 or so, and have the time to order one, I think youll find its money well spent.

Drawmain said:
I didn't pull the transmission with the engine. I had everything ready for when my friend arrived with his cherry picker. We went in from the passenger side and it took about 20 minutes to get the motor out as I had already prepped for his arrival. A few things noticed after the pull: the lean burn in all exhaust ports, all the motor mounts were finger tight, the main engine ground strap was not tight. All will be corrected when the engine is re-installed after we finish the rebuild. I'm still wondering what is causing the lean burn.

well from a pragmatic view,"burning lean" , indicates far more AIR than fuel,in the mix entering the combustion chamber from the intake manifold, and since your dealing with two throttle bodies on a cross ram intake and youve already increased the fuel delivery pressure slightly which at least in theory should have made the mix ratio richer, the rather obvious places to look are vacuum leaks in intake or throttle body gaskets or leaking vacuum hoses, mal-functioning sensors, restrictive fuel filters or loose electrical connections but a restrictive exhaust , or WORN CAM,can also cause the engine too run lean, as the engine won,t "DRAW" thru the intake as well if the cam won,t open the valves as far or the gases from previous cylinder burns can,t exit efficiently.
keep in mind the oxygen sensors and emissions sensors are all set up to try to keep the engine running at a fuel/air ratio near 14.7:1 which is already fairly lean.

Stoich.gif

RELATED INFO
viewtopic.php?f=50&t=138&p=168&hilit=emmisions#p168

http://www.thecubestudio.com/CrossfireT ... sIndex.htm

viewtopic.php?f=32&t=10096&p=39656&hilit=manual+meter+shop#p39656

viewtopic.php?f=32&t=10096&p=39710&hilit=1984+crossfire#p39710

viewtopic.php?f=32&t=640&p=25768&hilit=1984+crossfire#p25768
 
The white deposits on the exhaust valves are common place today with unleaded E10 Ethanol gasoline used.
And motor oils today leave Ash Deposits.
All stock carburated &EFI GM engines built 1982-1996 run 7-8% leaner than GM Test engineers intended.
Original tuned to 100% unleaded & Leaded gasoline( up to 1974).

You will need a way to ECM Tune your Crossfire at will as we discussed before on DC C3.
 
87vette81big said:
The white deposits on the exhaust valves are common place today with unleaded E10 Ethanol gasoline used.
And motor oils today leave Ash Deposits.
All stock carburated &EFI GM engines built 1982-1996 run 7-8% leaner than GM Test engineers intended.
Original tuned to 100% unleaded & Leaded gasoline( up to 1974).

You will need a way to ECM Tune your Crossfire at will as we discussed before on DC C3.

Yep, sure looks that way. I'm looking into the EBL system. That is the next move after the rebuild.
 
it will look 1000% better once you have a machine shop carefully inspect it after its cleaned and don,t forget too number stamp the main caps as to location and direction they face , before dis-assembly, or you,remove all the rotating assembly components, freeze plugs and oil passage plugs and get a machine shop to rod out the passages and pressure or heat clean the block and you paint it.

http://www.summitracing.com/search/part ... toview=SKU
some engine protection bags while your working on it,
http://www.summitracing.com/parts/sum-g1009-5/overview/
SUM-G1009_SN_xl.jpg

144850_400x400.jpg

http://www.northerntool.com/shop/tools/ ... _200442439
youll need a decent low cost engine stand
22675.jpg

http://www.harborfreight.com/36-piece-1 ... 60671.html


read these threads
viewtopic.php?f=51&t=125

viewtopic.php?f=51&t=2919

viewtopic.php?f=51&t=7697&p=26187&hilit=number+stamp#p26187

viewtopic.php?f=50&t=1738&p=4333&hilit=+number+stamp#p4333

viewtopic.php?f=51&t=1479

viewtopic.php?f=54&t=5946&p=18310&hilit=freeze+plugs+brass#p18310
 
I hope all turns out okay. I do know I have a cracked horn where the trans mounts up. We'll know more as we get everything apart.
 
Its not too bad.
Just tired.
Was burning some engine oil pictures show me.
 
It is definitely time for the rebuild. I don't think it had too many more miles in it as it was. The motor never smoked at all, so maybe I got to it in time. I was concerned of what I'd find in there because of the detonation issue I was having earlier in the year.
 
Back
Top