Head and Cam Swap, 82 CFI

Drawmain said:
It is definitely time for the rebuild. I don't think it had too many more miles in it as it was. The motor never smoked at all, so maybe I got to it in time. I was concerned of what I'd find in there because of the detonation issue I was having earlier in the year.
Yes I recall our nightly conversations from DCC3.
You were not Drag Racing Hard or Flat Out Top End Runs For 20 seconds to 1minute.
She survived .
Do it right.
It will be worth it.
 
More pics of the tear down:

LIfters. One wasn't spinning, three others were severely worn.


Cam. Three wiped lobes.


Crank looked good. All bearings were in good shape, small amounts of wear.

I caught it in time. The block will have to be bored, but .030 should be plenty. This is gonna be a fun engine when it's back in the car and running.
 
Bytor I noticed in your picture that you re used the stock valve covers. Did they fit as-is or did you have to modify them in any way?
 
yes everything looks about as you might expect in an engine that is that old , its rather rare for the older engines with flat tappet cams to have survived in pristine condition since the oil formulations have changed to better fit roller cams and catalytic converters.
keep in mind even in the old days when the proper oils were common getting over about 140K on a cam and lifter's without them showing significant were was rare, now that the oil formals changed back in the 1990s thats very unlikely

Id suggest starting by doing a very careful parts cleaning, then spray the machined surfaces with WD40, then measuring the crank journals, Id suggest taking the block to a trusted local machine shop for careful cleaning and inspection after the oil passage plugs are removed and if it passes sonic testing the bore walls and the mains are strait, new cam bearings and brass freeze plugs.

viewtopic.php?f=59&t=1390&p=3073&hilit=precision#p3073

dcp2.jpg


viewtopic.php?f=51&t=125

viewtopic.php?f=53&t=247&p=8348&hilit=bearings#p8348

viewtopic.php?f=53&t=5478&p=16429&hilit=plastigauge#p16429

viewtopic.php?f=53&t=2726&p=7077&hilit=plastigauge#p7077

viewtopic.php?f=53&t=9527

theres a great deal of related info in this thread on engine building

about 7-8 posts earlier in the thread I posted info on engine stand and block prep, number stamps etc..

viewtopic.php?f=69&t=3814
 
My 1994 K1500 Suburban has the 350 TBI Engine Grumpy.
Used from 1987-1995.
They all have Flat Tappet Cams.
I use No Zinc Additive.
Casterole GTX Conventional in past.
Now Casterole SYNTEX 10W30 Full Synthetic.
No Flat lobe wiping issues.
Wifes 1999 Honda CRV has Dual Overhead Flat Tappet Cam Followers.
Use Casterole SYNTEX In her car too.
 
as the newer engines were built during the later 1980s- and 1990s that still had flat tappet cams ,the manufacturers became aware of the gradual shift in oil formulas, mostly done to allow the catalytic converters to survive, and the resulting shift in durability it was causing, to flat tappet lifter valve trains and they made changes to the metallurgy of the cams ,and lifters to try to offset the wear issues , some components and applications were much more successful at the attempted improvements than others.
and the frequency of oil changes and filter changes and the way you drive also has an effect, simply waiting until oil temps reach about 200f or more before stressing an engine tends to reduce wear.
 
Perhaps Yes Grumpy.
When I changed out the Suburban crankshaft last year in tbe vehichle laying on my back, crank thrust bearing failure as you recall,
I noticed looking straight up at the camshaft Lobes & lifter faces all, polished like a mirror .
From lapping in. Casterole GTX & SYNTEX Allows that from my experience.
GM Always cheaped out on the SBC.
BIG BLOCK CHEVY, PONTIAC V8, OLDS V8 , & CADILLAC 472-500 GOT THE BEST PARTS.
 
I think one of the previous owners was a tad lax on his oil changes. I am religious about changing oil and my engines usually last because of it.
 
Drawmain said:
Bytor I noticed in your picture that you re used the stock valve covers. Did they fit as-is or did you have to modify them in any way?

Yes, I reused my stock valve covers with me Dart heads and they fit fine. I would recommend you measure your rocker arm & nut to valve cover clearance with playdough to make sure you have no issues. You may need to run a thicker valve cover gasket if additional clearance is needed.
 
I did get the thicker valve cover gaskets. I've got the Dart SHP heads and Harland Sharp 1.6 rockers. I was wondering if the baffles would clear. I'll mock them up when I get back home.
 
Drawmain said:
I did get the thicker valve cover gaskets. I've got the Dart SHP heads and Harland Sharp 1.6 rockers. I was wondering if the baffles would clear. I'll mock them up when I get back home.

I was worried about the baffles too but they cleared my 1.5 Comp Cams roller rockers just fine.
 
I did a test fit of the valve covers and the baffles clear the rockers.

Now, I'm looking at DSS forged pistons (http://www.summitracing.com/parts/dms-e350-030), anyone have any experience with them? I think the engine will have to be bored, so pistons and rings will be in order. I'm also looking at Mahle rings (http://www.summitracing.com/parts/pcr-4 ... /overview/) for the oversize pistons. I'm reading that to set ring gap on the top ring multiply the bore size x .004. That gives me .016 on the top ring. The second ring I'm reading to multiply .005 times bore, for .020. Will that be enough gap, or do I need to go larger? Intended use is cruising with some highway time, no racing, but I may occasionally do some WOT runs.

If I end up not having to increase the bore I'll stick with my stock pistons, as they are forged, but the ring gap question remains.
 
Got the engine back from the machine shop. They even primered it for me. Ended up going .030 over on the bores, .010/.010 on the crank. I'm very pleased with their work.

Some progress pics:

In primer:


Driver's side painted:


Passenger side:


We're on the way!
 

Cool, I guess there are no smiles on your face right now! :D

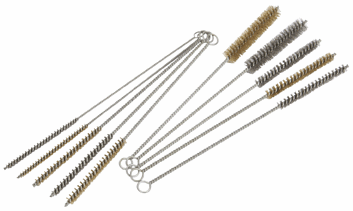
Don't forget to scrub the oil passages in the block, no matter how good it looks
on the outside, they probably didn't do thru passages with hot soapy water and
stiff bristle brushes. Cleanliness is next to godliness !!!

http://www.summitracing.com/parts/mor-61820


I hooked the battery operated drill to a rifle bore brush and spun it while
moving in and out.

viewtopic.php?f=51&t=125&p=42954&hilit=engine+brush#p42954
viewtopic.php?f=51&t=7697&p=26187&hilit=engine+brush#p26187
viewtopic.php?f=69&t=3814&p=11484&hilit=engine+brush#p11484


Attachments

  • EngineBrushes.jpg
    EngineBrushes.jpg
    4.6 KB · Views: 52
Thanks for the kind words :) We went through and chased every bolt hole, brushed all the oil passages and cleaned and blew out everything. Thanks for the advice. I kinda like the blue more than I thought I would. I wanted to go with the stock GM Corporate Blue. I wanted to keep it as original looking as I could. That being said, I'm not painting the heads :). The blue came out looking pretty good!

I've stripped the valve covers and they will be getting sand blasted then prepped for refinishing. I'm going with semi gloss black with polished fins, then clear coating for the final finish. I'll have pics when we are done with them. I'm going to paint the stock air cleaner to match as well. We're cutting back the snorkel. I have the door removed from the hood so that the engine pulls cool air from in front of the radiator at all times. I'm enjoying the build, but school is back in so my time on the car has gotten limited. Small steps, but always progress.
 
Back
Top