TH400 Amateur Build

TXChevy

Working at The Speed of Slow
As part of my overall engine/car build on my 57 Belair, I had started to post some info on my th400 rebuild. I work so slowly, especially this time of the year that I wasn't sure if posting a separate thread on the th400 rebuild would provide value, especially with the huge amount of info already online. After thinking about it some more I thought what the heck, I'll post some of the progress I make. Be aware, even though I've rebuilt th350 and 4R70W transmissions before, I'm no expert, so take this as entertainment :). Just documenting my way through this transmission.

You can find the original engine thread here:
TXChevy 454 Build

Rick was kind enough to set up an engine simulation based on specific build criteria. At some point I'd like to do a chassis dyno, but conservative results were as follows, important to keep in mind for the transmission. I don't need a race-built unit, but I do want to keep the engine numbers in mind as a realistic idea of what to improve in the transmission.
Indicated Power = 487 @ 5000 rpm
Flywheel Power = 409 @ 4600 rpm
Flywheel Torque = 519 @ 3700 rpm

Baseline Info:
This th400 was a junkyard pull out of a 1984 k-series 2WD pickup, mileage unknown. Installed in the first build on this car in 1990 if I remember right. Its never been opened up before other than my installation of a basic B&M shift kit (plate) sometime after that, and a few fluid/filter changes. My guess from looking at the clutches is that the unit looks like fairly low miles. The bushings generally look decent but I'll still replace them. The highest wear I see is on the planetary drum from the reverse band. I'll replace that drum. I've not yet looked at the clutch steels, pump gears etc. so my opinion may change! As I progress I'll post more interesting things and also give a list of all upgrades.

Resources:
These are some of the main resources I'm using...
- ATSG Manual for TH400
- Youtube - T.W. McDaniel
- Youtube - Southpaw Automotive
- Youtube - Nick's Transmissions
There's a lot more out there, as you look at these, other info opens up.

There are some moderate upgrades I will also do, nothing crazy.

I made a holding fixture for this project from steel I had, thick wall, it's overdesigned but that's fine. It's worked great, so much easier to work on the unit.
20230905_173834_HDR.jpg
20231103_123751.jpg
1000001563.heic.jpg

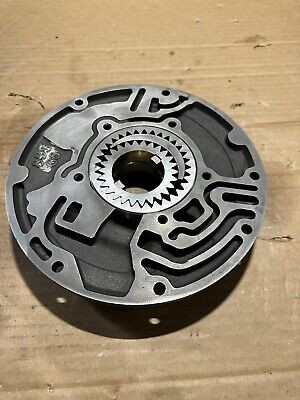
First step was to disassemble, the good part is that the transmission breaks down into units - pump, forward clucth etc. I can focus on each, clean/inspect/new parts, then assemble to check end clearances as I go.
1000001126.heic.jpg
1000001125.heic.jpg

Case was thoroughly powerwashed, then I used a flat sandpaper block to simply ensure the lower faces of valve body/transmission were true and level. Didn;t go crazy, just a clean-up. The valve body will get the same treatment. After this was all done, the case was again powerwashed, more brake cleaner sprayed into passages, air gun to blow everything out thoroughly, then a wipe down inside with transmission fluid, bagged up.

1000001562.heic.jpg
 
I'm taking dozens of pictures and bagging/tagging all parts, typical rebuild process for pretty much anything.

I'm also tagging all parts with the ATSG diagram numbers, I need all the help I can get.
1000001601.heic.jpg
1000001602.heic.jpg

The rebuild kit I'm using is a Raybestos Stage 1 Level 2 kit with Raybestos "red" waffle clutches. Just me maybe, but I like the waffle type vs Alto thin clutches. It's a pretty complete kit. This will be supplemented with any upgrade parts as I go. It lists for about $385 but for some reason I stumbled onto it on Amazon (same supplier - Transpartswarehouse.com) for $285. Maybe a glitch but I took advantage of the savings.

1000001048.heic.jpg

I also bought this reasonably priced bushing driver set. It's well made and the drivers are in 1mm increments so they should fit above and into bores without issue. I did use it on the tailshaft housing and it went super smooth. I have a shop press, so where feasible I like to press and not hammer bushings into place. If I need to replace case bushings my first attempt will be to use a threaded rod with washers/bolts to remove and install bushings vs wacking them into place.
1000001599.heic.jpg
1000001598.heic.jpg
1000001600.heic.jpg
 
Next up was the pump, its an 895 (later year) pump body casting with an 896 stator assembly.

I did measure end clearance before removal and it's out of spec at .029. Book spec is .007 to .025, my goal is to get to .01 at reassembly.
1000001105.heic.jpg


This pump needs considerable inspection to ensure proper operation. T.W. McDaniel and Southpaw Automotive have good videos on this.

The stator appears to be in good shape - you can see the factory lapping marks with only very mild marking from the gearset. Pump gear clearance spec is .0007 to .002 - these measure out at .001. Clearance is from top of gears to pump body.
1000001585.heic.jpg

The pump body will get a new bushing and a close inspection was needed for the gearset bore.
1000001586.heic.jpg

Gearset
1000001584.heic.jpg
1000001587.heic.jpg
1000001590.heic.jpg

I'll post further findings on this, if at all possible I want to use what I have. One big reason is that these gears are USA oem vs. possible Chineseum aftemarket gears. So far my nail doesn't catch on anything, and looking at the very good gearset clearance to pump body (.01), logically it doesn't appear that the gears have worn into the body.

One consideration is getting a pump body that has been refurbished (decked) with new gearset, but again, I'm not sure of the gearset material.

The pump regulator will get a Sonnax 852-400-LB1 pressure regulator valve kit upgrade.

 
More pump inspection and info....

I've used online pump data information, in addition to the ASTG manual to continue to decide what to do here, I'll explain ....

CKPerformance posted a good document about the pump, the pdf was too large to attach but hopefully you can link to it:
CKPerformance Oil Pump

Starting on page 19, there's info about pump gear inspection, I'm very interested in this as I'm on the fence as to replace anything except bushings/seal/pressure reg valve.

As I mentioned, the gear clearance to pump body is .001 well within spec of .0007 to .002. This tells me that the gearset has not ground into the pump body. Aside from very light wear marks, all looks ok. Both gears measure to .727 thickness, right on spec.

The "drop gear" test is good, the inner stays attached to the outer gear.
1000001653.heic.jpg

Next was to examine the outer and inner races of the pump body.
Very light wear at the top end of the inner crescent.
1000001655.heic.jpg

A little more wear on part of the outer race, as I understand you would expect more wear here. Still not too bad.
1000001656.heic.jpg

I then measured the gap between the outer gear and body wall. The .004 is within acceptable spec of .002 to .006.
1000001654.heic.jpg

Next I measured the inner gear against the crescent. Spec is .002 to .0075.
Clearance along the crescent was .006 and at the very end where the top wear was, clearance was .008 as shown.
1000001657.heic.jpg
To me this is not a requirement to change out the pump body. I will also be installing a Sonnax pressure regulator kit which also gradually increased line pressure as speed increases. I'm aware of penny wise and dollar foolish but I'm just not that sure of what I'll get with a refurbished pump body and new gears. Too many aftermarket and offshore parts. I'm inclined to use oem parts as long as possible, and I think that there is a substantial service life left in this pump unit.

Also, if you look at the tangs of the center gear above, you'll notice that it's machined into the gear with stress reliefs on either side. When I look at many new gears like the one below, that tang looks slotted into the gear ring itself, which I'm not sure is better than the oem version.
1701291989547.png
 
Incidentally, the tailshaft bushing that's usually supplied is 1.5" long, about .5" longer than the original bushing. Same diameter of course.
From what I read, this is ok.

The original bushing left a bit of gap inside the housing:
1000001593.heic.jpg

The new bushing extends into the housing as shown. Doesn't interfere with anything and it actually provides more surface area for the yoke. I did also check movement of the yoke in the new bushing, a good fit. Of course the main criteria is that the bushing is set just at the bottom of the chamfer on the rear surface of the yoke.
1000001597.heic.jpg
1000001595.heic.jpg
1000001600.heic.jpg
 
More grunt work to disassemble, inspect and clean.

I used my homemade compressor to press in the spring retainer on the direct drum
1000001661.heic.jpg
1000001670.heic.jpg

Just more stuff here, I'll detail more as I assemble. This is the direct clutch sprag that will be replaced with a 34 element sprag combined with a 4L80e direct drum assembly upgrade. Everything is tagged with its name and ID number per the ATSG diagrams.

1000001667.heic.jpg
1000001662.heic.jpg
1000001672.heic.jpg

Interesting on the direct clutches here, a blend of smooth and waffled. They do have wear but no chunks missing. I do see some hot spots on some of the steels. New steels are included in my rebuild kit - I'll measure thickness of each as well in case I need to mix or match to get spec clutch clearances.
1000001664.heic.jpg
 
Last edited:
CKPerformance posted a good document about the pump, the pdf was too large to attach but hopefully you can link to it:
CKPerformance Oil Pump

Starting on page 19, there's info about pump gear inspection, I'm very interested in this as I'm on the fence as to replace anything except bushings/seal/pressure reg valve.
Wow, that's and excellent find, that document goes into great detail. I assume that's better than the ATSG manual???

Will you be doing the modification starting on page 12???

BTW, those are some great pictures!!! .... Don't be scared to post bigger pics.
.
 
It includes and supplements info from ATSG. I'm looking further into doing the restriction, just want to ensure it's applicable to my moderate rebuild and power level. Looks easy enough, especially with the pump apart.
 
thank you for posting the pictures, linked info etc.
I like the fact you welded up and fabricated your own trans hold tool! :like:
and obviously have a hydraulic press
BTW for the members who don't have the fabrication tools
index.php
 
Last edited:
It's been a bit of a flurry of posts, but true to my by-line, it's going to slow up for a week or so, holidays and a brief trip next week.

I did want to list what changes I'm considering making - subject to change!
I'll update it as I proceed....

EDITED 2-3-2024
- converter charge restrictor *maybe* NO
- aluminum 2-3 accumulator piston (replace plastic version) YES
- Sonnax pump regulator kit with spring YES
- Sonnax case saver YES
- Sonnax bearing kit (used at 3 locations in transmission) YES
- thicker intermediate snap ring SPIRAL LOCK SNAP RING
- add round pan magnet (didn't have one!) YES
- 4R70W low roller clutch YES
- dual feed mod for direct drum YES, includes cup plug at reverse feed, delete #2 stator seal
- Borg Warner 34 element with spiral lock NO, using 4L80e direct drum/assembly
- 4L80e direct drum assembly, piston, return springs, 34 element sprag, spiral retainer (all good used OEM)
- Sonnax forward clutch heavy duty steel hub
- scarf cut sealing ring kit (vs oem steel rings)
- new 4L80e center support feed/retaining bolt (cut to th400 bolt length)
- Sonnax heavy duty spring retainer for forward piston
- Six (vs three) heavy duty return springs for intermediate piston
- Sonnax anti-walk/rollerized output case bushing
- new bushings
- new kickdown wire case connector
- aluminum (flat) forward clutch piston


The transmission has the RV (mild) version B&M shift kit installed for the last 20 years. It still has the 6 check balls and applicable drilled separator plate. The dual feed modification seems to take the place of a shift kit, so the consideration is to (1) remove the modified plate and install oem plate (2) leave the shift kit as is but think about 3 check balls and modified holes in the plate (3) remove it all and install a Transgo shift kit. I need to understand what impact and how all the changes can work together. Right now I'm not sure. The Transgo kit changes some of the valve body springs as well, but I don't want to wind up with a transmission that kicks your head back at low speed shifts - or doesn't generally work well.

As with any of my posts, I welcome correction and advice.
 
Last edited:
well do your research and DON'T mix/match several options as that's a sure path to potential issues
personally Id go the remove it all and install a Transgo shift kit. route.
but I'd sure ask a few (several) transmission modification and upgrade familiar shops their opinion,
if it was my car before going any route

Totally agree with you. As I looked into the converter feed restrictor, it became clear that one size doesn't fit all. You need to work with the line pressure that each transmission produces. I have no way as a benchtop builder to know this, so it would be a guess. I don't want to do trial and error as I don't want to pull the transmission.

At this point I think I will remove the B&M kit and use the Transgo 400-1&2 shift kit as it includes several of the modifications I wanted to make, in addition to revising the valve body spring rates. It includes the aluminum 2-3 accumulator, thicker snap ring, and the dual feed change. It also has all plates, gaskets, etc. needed and can be tailored to individual shift preferences. I think this suits my particular skillset and application.
Transgo 400-1&2
There's also a Transgo 400-PRO kit available, I'm looking at the details for both of these kits. I also read the instructions to get a good idea of what is done and what the expected results may be. I think that the 400-PRO may be more applicable to manual shifting, I want to put it in auto and forget-about-it. EDIT - looks like the 400-PRO does allow for auto shifting.

Unfortunately, there's not a lot of good shops around here. I'm not going to any of the usual franchises, and the small shops I see here look like wrecks, hand lettered plywood stuck on a tree. I'd rather do my own research and find that conservative middle ground of proven improvements.
 
Last edited:
The Transgo kit changes some of the valve body springs as well,
I wanted to make, in addition to revising the valve body spring rates.
I'm only guessing, but the VB springs will raise the shift rpm relative to the
other gears. The governor raises the sift rpm of all gears.

TransGo has a product support phone number, so maybe give them a call.


1701359112518.png

The PRO version says "Awesome capacity with adjustable shift timing and feel", does that mean adjustable from the outside or do you have to go inside to change something. That would be nice, but I bet you will have to go inside to make the changes. Something to ask about if you call them.

The PRO version is said to have "Gear Command". The link below helps explain what that means.

.
 
Last edited:
As a side note, most builders prefer to do the dual feed modification internally, meaning the second sealing ring is omitted, the middle seal is omitted on the piston, and a cup plug installed in the case feed to reverse. This may be a more effective approach vs shift kit separator plate.
Just a mention, I'll spend time to fully understand it all.
 
"what could possibly go wrong" :facepalm: :swearing: :worried::bhow::crying:

thanks! I needed that!
I laughed my self half SILLY...
decades of
dealing with engine swaps,
reality, dealing with other people,
parts vendors and machine shops,ETC.
and doing car repairs tends to do that to you!
 
Last edited:
I wanted to link a couple of videos from Nick's Transmission on Youtube. I think they are well done.


Little bit of pump work in between waiting for a new harmonic balancer seal...

New bushings on the stator part. I measured depth of original bushings, then just used a bit of marked paper as an easy visual guide. The depth marked is from the lower part of the bevel to the bushing.
1000001953.heic.jpg1000001948.heic.jpg

Stator was slid over the input shaft and it fit/turned very nicely. Checking that the new bushings weren't binding on the shaft journals.
1000001954.heic(1).jpg

I removed the pressure regulator valve assembly and to my surprise I found three horseshoe spacer clips. Manual shows just one. This is an original unit, I have no idea where the three came from. A Sonnax 400-LB1 pressure regulator valve/spring will be installed to replace the oem assembly.
1000001947.heic.jpg
1000001945.heic.jpg

I won't install the sealing rings on the pump until I check end clearance before final (last) assembly.
1000001955.heic(1).jpg

Next will clean/paint the converter side of the pump body, then install new bushing, seal, and Sonnax PR assembly.
 
Back
Top