You are using an out of date browser. It may not display this or other websites correctly.
You should upgrade or use an alternative browser.
You should upgrade or use an alternative browser.
Planning a new 383 build that is now going to be a 400
- Thread starter busterrm
- Start date

busterrm said:Hey guys, I am thinking of this dress up kit. It has flames on the valve covers, was thinking of taking some thin tape and taping off the flames and shooting them the color of the block "Red Fire", what do you guys think?
why not! its your engine and if done correctly it will look nice with a few custom personal touches
thats fairly easy, you can either use a good wax coating over the whole outer valve cover then use some sand paper to clean the wax off the areas to be painted followed buy a careful solvent cleaning of only those areas followed by a Q-tip repeatedly soaked with pool acid carefully applied to the areas to be painted will cause a surface of micro rough and porous surface that paint can grasp and lock onto , OR you can carefully use duct tape to mask off all the areas that don,t get paint and use an abrasive detail gun to get the surface prepped to a rough surface or you can do BOTHIndycars said:
Well of course it will look good, but how will it look in a couple of months,
take some time to make sure it sticks?
How will you make the paint stick to chrome?
a set of precision razor knifes help cut tape accurately
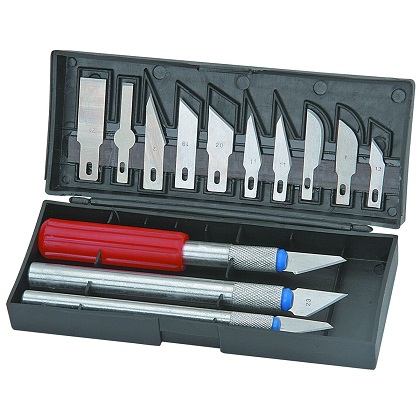
http://www.harborfreight.com/13-piece-p ... 32099.html
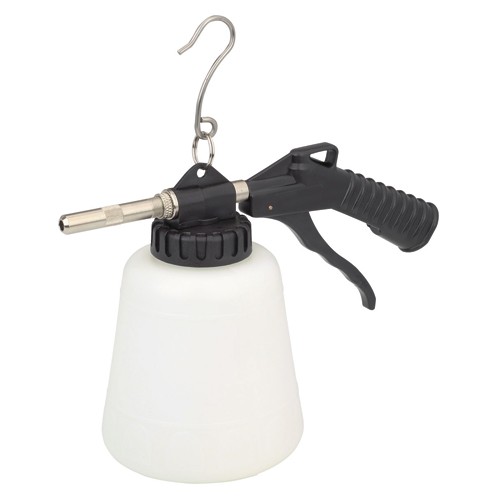
http://www.harborfreight.com/1-liter-ab ... 92857.html
http://www.harborfreight.com/44-lbs-bla ... 99945.html
BTW if you start with a set of high quality CAST valve covers and use a POWDER COAT process you have more options
viewtopic.php?f=44&t=1519&p=26293&hilit=powder+coating#p26293
busterrm
solid fixture here in the forum
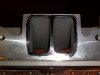
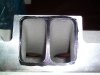
Okay doing some gasket matching, the ports aren't very well matched to the heads, along the bottom edge as you'll see in the pictures the gasket over hangs into the port. I plan on trimming that out and going to blend the port to match the scribed marks seen. I am not going to take any off the area where the gasket over hangs but am going to blend it with the areas where the head is inside the gasket. This is my first matching where I am going to remove head material, I am doing it right?
I forgot about the gasket matching, so the drivers side head will come apart enough to be able to remove the aluminum particles before reassembly.
I forgot about the gasket matching, so the drivers side head will come apart enough to be able to remove the aluminum particles before reassembly.
Attachments
8
87vette81big
Guest
Yes your gasket matching correct Busterm.
I allways blended down about 1 inch from the top intake or exhaust port surface.
Very nice RHS Heads. I see no core shift.
Be a simple job to gasket match.
I allways blended down about 1 inch from the top intake or exhaust port surface.
Very nice RHS Heads. I see no core shift.
Be a simple job to gasket match.
yes it looks good so far! and yes blending the port wall down about an inch into the port generally smooth the transition ,helping reduce turbulence and increasing air flow while reducing any tendency for an abrupt change in direction to allow fuel droplets suspended in that air flow to separate out.
related
viewtopic.php?f=55&t=5378&p=32456&hilit=port+matching#p32456
viewtopic.php?f=55&t=2773
viewtopic.php?f=52&t=462&p=567&hilit=porting+help#p567
viewtopic.php?f=52&t=8460
viewtopic.php?f=52&t=333
viewtopic.php?f=52&t=2630
related
viewtopic.php?f=55&t=5378&p=32456&hilit=port+matching#p32456
viewtopic.php?f=55&t=2773
viewtopic.php?f=52&t=462&p=567&hilit=porting+help#p567
viewtopic.php?f=52&t=8460
viewtopic.php?f=52&t=333
viewtopic.php?f=52&t=2630
What is the part number for the gasket you are using? Maybe there is a
better choice for the gasket, look for something in the chart below with
a smaller horizontal dimension. It might mean trimming more from the
top or bottom of the gasket, but less metal removal.
How does it look when you compare the gasket to the intake manifold?
Attachments

busterrm
solid fixture here in the forum
It compares to the Felpro 1206, its a Edelbrock part # 7201, It fits better than the felpro 1206. I haven't looked at the intake yet, it was gasket matched when I first bought it. But as I said when I was in OKC I have not decided whether I will use the Wieand Air Strike I have or Edelbrock Air Gap. I am considering having the machine shop mill the notch that a Air Gap has in the Air Strike.Indycars said:
What is the part number for the gasket you are using? Maybe there is a
better choice for the gasket, look for something in the chart below with
a smaller horizontal dimension. It might mean trimming more from the
top or bottom of the gasket, but less metal removal.
How does it look when you compare the gasket to the intake manifold?
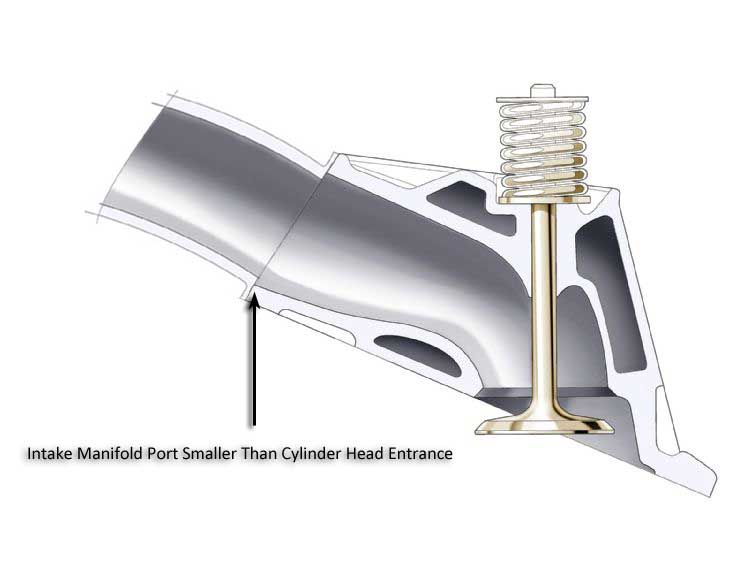
if you don,t want the intake to perfectly match the cylinder head port entrance then having the intake manifold port a very small amount smaller than the cylinder head entrance rather than larger is the preferred way to go, but matching both is preferred and usually fairly easy to obtain
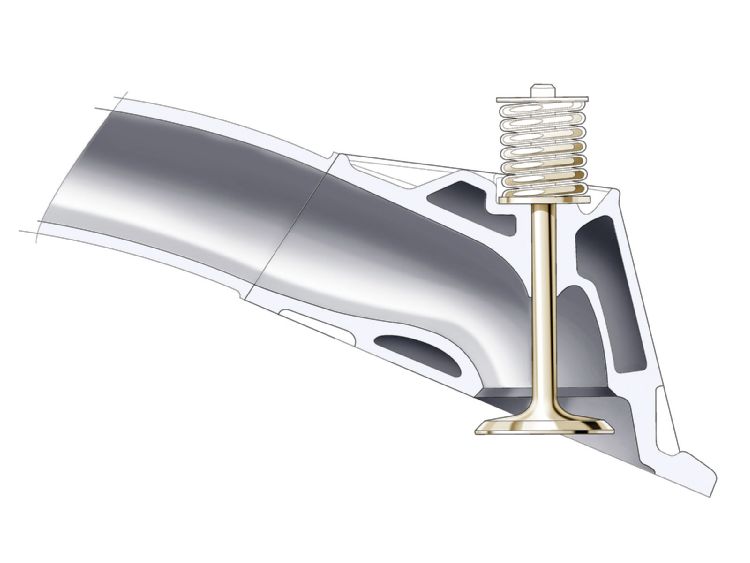
IDEAL
ACCEPTABLE BUT LESS THAN IDEAL
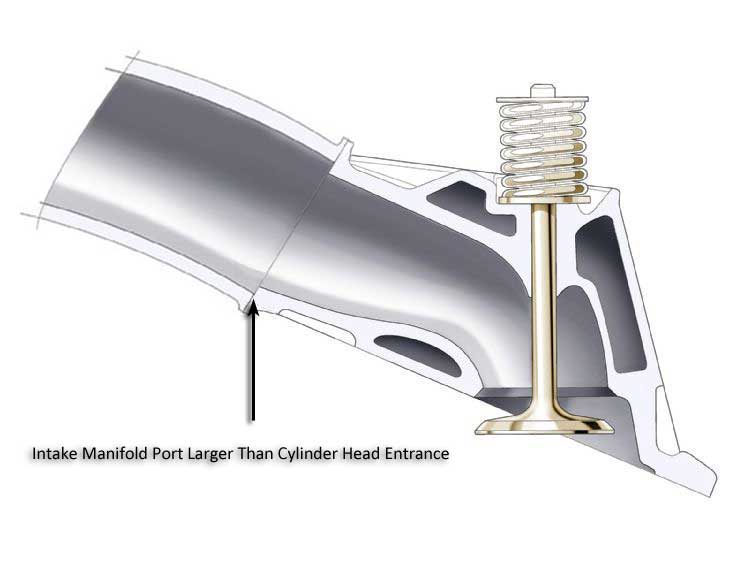
LEAST FAVORABLE CONFIG
IDEAL
ACCEPTABLE BUT LESS THAN IDEAL
LEAST FAVORABLE CONFIG
busterrm
solid fixture here in the forum
Hey Rick, this the manifold I was talking about on the phone, if you look closely there are notches seen from the carb mount where the divider plate slides down into the plenum.
Whats your opinion on this Grumpy?
Whats your opinion on this Grumpy?
Attachments
I own that exact intake ,Ive had it in the shop and been using it off and on to test with for at least 16 years,and on some engines it produced very good results, I picked mine up in a parts swap.
and I use it frequently as a test and tune intake.
and yes try it with and without the divider plate it can make a noticeable difference.
Its never been my favorite single plane as I prefer the edelbrock 2925, or 2892 and holley 300-110 on most small blocks running a single plane, but don,t assume it can,t make good power because while it seems a bit inconsistent in the results Ive seen its had its share of impressive results, and its main strong point is decent hood clearance yet still making good power
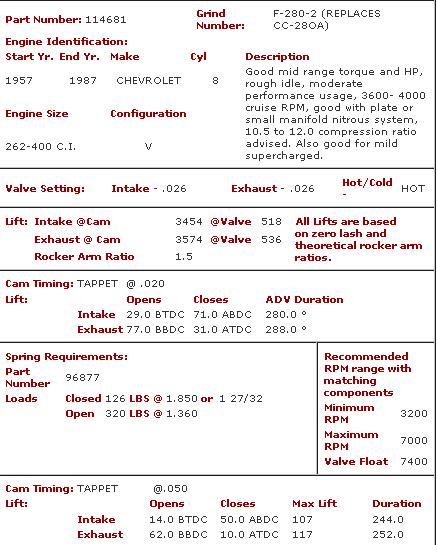
btw it seem to like the crane 114681 cam in a 383 with 11:1 compression and long tube headers, with a manual trans and 4.11:1 gears in something like a 68-72 nova, because Ive built several similar engines and it always worked fairly well on those
and I use it frequently as a test and tune intake.
and yes try it with and without the divider plate it can make a noticeable difference.
Its never been my favorite single plane as I prefer the edelbrock 2925, or 2892 and holley 300-110 on most small blocks running a single plane, but don,t assume it can,t make good power because while it seems a bit inconsistent in the results Ive seen its had its share of impressive results, and its main strong point is decent hood clearance yet still making good power
btw it seem to like the crane 114681 cam in a 383 with 11:1 compression and long tube headers, with a manual trans and 4.11:1 gears in something like a 68-72 nova, because Ive built several similar engines and it always worked fairly well on those
adding the divider tends to boost lower rpm response and torque slightly
busterrm
solid fixture here in the forum
I think I have decided to go with the Wieand Air Strike I already have, I want it to be as close to the Eddy Air Gap, so I am going to take it to the machine shop and have the notch machined in the plenum like the Air Gap. I have done a lot of research online and it is almost exactly the same as the air gap with the notch cut in the plenum. So that saved me some money, notching this one will cost 35 - 40 bux minus the 180 I was going to spend on the X-Celerator and divider plate. So, I am 140 ahead, I will add some to that and get a real good ignition system.
busterrm
solid fixture here in the forum
Okay, bought some more parts for my build. I ordered a complete pro billet small diameter MSD distributor, MSD Blaster 2 coil, MSD 6AL streetfire box, and 8.5mm Taylor wires. At Jegs I bought the head gaskets. .020, I went back and checked deck height again, did it 4 times this time and I got a more accurate reading, my deck is .023 so I went a little thicker that I was planning with the head gaskets. I bought a complete fastener kit, Head bolts are ARP and made for alum heads w/washers, oil pump stud kit, and bought the matching lash caps for my heads. So I have a few parts left for the complete build, carb, timing cover, valve covers, and air cleaner. Of Course later down the road when I do push rod checking I will have to order pushrods. What I have bought this week set me back quite a bit so I am gonna be saving again for the final round of parts.
busterrm said:Okay, .... What I have bought this week set me back quite a bit so I am gonna be saving again for the final round of parts.
thats almost always the reason most projects take months or years to complete, most of us are forced to deal with VERY limited FUNDS we can allocate to the hobby!
busterrm said:At Jegs I bought the head gaskets. .020, I went back and checked deck height again, did it 4 times this time and I got a more accurate reading, my deck is .023 so I went a little thicker that I was planning with the head gaskets.
If I read this correctly, then your quench distance is .043"??? Did you check
different cylinders or the same one 4 times ???
Should be completely safe at that distance, what were you hoping to get???
busterrm
solid fixture here in the forum
No, I ran the corners, 1,2, 7, and 8 did them all four times. I just figured since those four are all the same 2.4, 3, and 5 should be the same. With the block being a newborn and I had it checked when they honed the cylinders, checked the deck for true. I was hoping for .042, i guess .001 of that is close enough.Indycars said:busterrm said:At Jegs I bought the head gaskets. .020, I went back and checked deck height again, did it 4 times this time and I got a more accurate reading, my deck is .023 so I went a little thicker that I was planning with the head gaskets.
If I read this correctly, then you quench distance is .043"??? Did you check
different cylinders or the same one 4 times ???
Should be completely safe at that distance, what were you hoping to get???