My 1st. Street 383 Build

I think I found pparaska's complete post in another forum. The question around using the max or average measurements has me a bit confused.

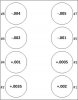
Here's an example of a measurement from that post. My basic question is what do you do with these number? Average, max or just measure from the middle of the piston? I may be over thinking this but I want to make sure I measure this correctly.

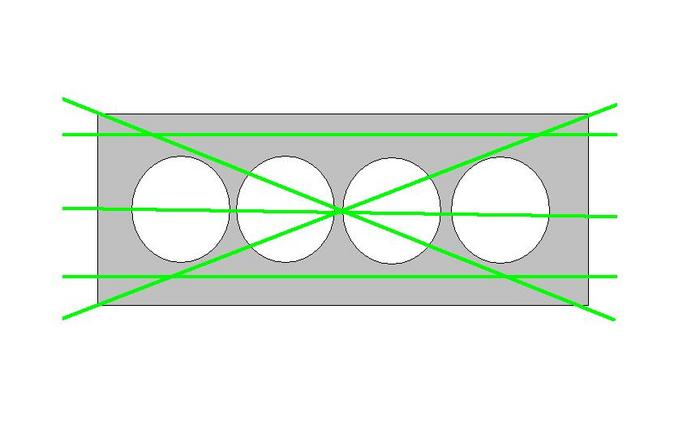
Typical readings: (this is cylinder #2, highest recorded heights on even bank)
Outside of block: Min: -0.002" Max: +0.023" (- is below deck, + is above)
Valley side: Min: -0.004" Max: +0.022"
Toward front: Min: +0.002" Max: +0.019"
Toward rear: Min: +0.002" Max: +0.019"
 
I read his post in the link you posted, did you read Grumpy's response below that???

I think his logic is too take in to account every possible movement that the piston could take, then use the number that provides the Closest Clearance as the deck clearance and then that to the quench distance.

I've never read anywhere the numbers that he is quoting (.020" - .030") for the quench distance. If you are really trying to get the minimum clearance to near zero when running, then yes, I would be very concerned about all these measurements. But if you are going to use the normally quoted distance of .038" to .042", then this in my opinion is over kill. That is NOT to say that "I" wouldn't take these measurements for reference and just from curiosity sake.
 
Indycars said:


I've never read anywhere the numbers that he is quoting (.020" - .030") for the quench distance. If you are really trying to get the minimum clearance to near zero when running, then yes, I would be very concerned about all these measurements. But if you are going to use the normally quoted distance of .038" to .042", then this in my opinion is over kill. That is NOT to say that "I" wouldn't take these measurements for reference and just from curiosity sake.


WHERE ARE YOU READING "he is quoting (.020" - .030") for the quench distance. "If I posted the info, the normally quoted distance of .038" to .042" is generally correct so if your reading something different, thats probably PLUS the head gasket,or a typo, you want to bring it to the desired distance of .038" to .042" anything under .035 is very likely to eventually result in piston to head contact at peak rpms in most engines
 
Maybe using the word "Quoting" is too strong. Below is what I was using for my comments.

I've read about people going with high 20s to low 30s for piston-to-head clearance, and think this would be possible in this instance, considering the light parts, steel rods and lower rpm. Am I correct?
If I use the conservative maximum height of +0.022" (above the deck), and shoot for a piston-to-head clearance as low as 0.030", that'd mean I'd need a 0.052" gasket.
 
Here's where I am now after checking all the pistons at TDC and measuring in the center of the piston. I have moved a few of the rod/piston combos around to balance out the banks. Looks like I have a slight deck slope from front to back. (+)measurements are above the deck. Any reasons for concern with this?


I use the highest measurement for my quench and compression calculations correct? In this case, +.0035. Using the compression calc. a .043 thick gasket puts me in the safe zone.
 

Attachments

  • piston deck clearance.jpg
    piston deck clearance.jpg
    23.2 KB · Views: 93
  • Drawing2.jpg
    Drawing2.jpg
    37.7 KB · Views: 93
A difference of .0075" variation on one side seems high to me, but I don't know what to expect from an OEM block. Let's see what Grumpy has to say.

About your calculations for CR. I should have put something in "Notes" column to clarify. When the piston stick out of the cylinder then the number for "Deck Height" should be negative. I had to look at the "Intermediate Calc -3" sheet to verify for myself. This is what the numbers should look like.


Attachments

  • DCR_bytor01.jpg
    DCR_bytor01.jpg
    28.3 KB · Views: 92
  • DCR_bytor02.jpg
    DCR_bytor02.jpg
    16.1 KB · Views: 92
Indycars said:
About your calculations for CR. I should have put something in "Notes" column to clarify. When the piston stick out of the cylinder then the number for "Deck Height" should be negative. I had to look at the "Intermediate Calc -3" sheet to verify for myself. This is what the numbers should look like.

I wondered about that, thanks for the clarification.
 
piston%20deck%20clearancespr.jpg


measurements that come up like this are very common on an engine with an older stock small or big block thats never been correctly RE-machined for deck height and being parallel and square with the crank center line. I honestly understand that G.M. production tolerances are no were near what a decent machine shop can give you and that blocks tend to warp and take a set after years of heat cycles.
check.jpg

It might be a surprise to many guys but a $10, METAL CARPENTERS SQUARE can be used , to verify a block thats is significantly warped on the deck surface
square.jpg

the truth is that a low performance daily driver style engine is rather tolerant of that dimensional spread and considering the stock head castings are no better the differences tend to average out in most cases, this does in no way mean this is correct or something you should ignore if you want to maximize power and durability, but it does show that everything doesn,t need to be perfect for the engines to function.
Obviously if you want things to operate near peak efficiency levels a few machine shop procedures like line honing the block, decking the block, and milling the head surfaces and CC,ing the combustion chambers, and porting the bowl area in the intake and exhaust runners under the valves, port matching the intake to the runners,in the intake, to the heads, and a good three angle valve job, verifying valve train clearances, etc. certainly would help here!, and I can assure you from experience that your going to spend a considerable percentage of the cost of a much better machined and stronger aftermarket block getting most G.M. blocks close to the correct dimensions yet youll have a far weaker block when your done.

LINKS MAY HELP

viewtopic.php?f=51&t=5460&p=16311&hilit=measuring+deck#p16311

viewtopic.php?f=50&t=321&p=3007&hilit=+finding+machine#p3007

viewtopic.php?f=51&t=4460&p=11720&hilit=finding+machine#p11720

viewtopic.php?f=67&t=3555&p=9438&hilit=finding+machine#p9438

viewtopic.php?f=53&t=509&p=11324&hilit=finding+machine#p11324

viewtopic.php?f=51&t=2692

viewtopic.php?f=51&t=5945

viewtopic.php?f=51&t=1014

viewtopic.php?f=51&t=3219

viewtopic.php?f=51&t=6162

viewtopic.php?f=51&t=3363

viewtopic.php?f=51&t=2855

viewtopic.php?f=44&t=38

viewtopic.php?f=50&t=428
 
Well, I did some checking and found something else that would cause these measurements. Not having the main caps torqued, duh.... I had them torqued at ~20ft/lb for some reason, not sure what I was thinking. Anyhow, torqued the caps and rechecked the measurements. Moved a few pistons around and now things look more consistent. My corners are still off some though. The #2 cylinder is the highest one at .004 above the deck. I swapped the #2 rods and pistons with some of the other corners that are lower with no change.
 

Attachments

  • piston deck clearance 2.jpg
    piston deck clearance 2.jpg
    22.8 KB · Views: 74
I wonder if it's the block or the piston/rod assembly that's in error? What measurements would you get if you used one piston/rod and moved it to the four corners???

 
Indycars said:
I wonder if it's the block or the piston/rod assembly that's in error? What measurements would you get if you used one piston/rod and moved it to the four corners???

I thought the same but swapping the #7 and #2 piston/rod assembles didn't change the readings significantly. I must be seeing a decking or line bore issue on #2. I'd feel better if #2 was closer to +.002 but for a street engine, I’m not sure it's that big of a deal. I'm going to recheck a few things before I give up though.
 

Since you don't know how much the rod/piston assembly might be out, then you have to consider that the block deck could be warped. Which will make it more difficult for the head gasket to seal properly.

Using one rod/piston assembly and moving it from thru all the cylinders and measuring would give you an idea about how straight the deck is. Having the block decked would be $150-$200 most likely.

When I had my stock OEM SBC 4-Bolt block bored .060" the cylinder wall became to thin, so I stopped there and went with the Dart SHP block. Yes I did throw away $300, but less than what I would have thrown away if the cylinder wall cracked after getting the engine together. Believe me I didn't want to change directions. I also had 30 hours and another $100 in abrasives grinding the outside of the block smooth.

Good think Grumpy put the bug in my ear, when he asked if I knew how thick the walls were after boring the block. He suggested a Sonic Test and it's then that I found out how thin they were.

Just food for thought!

Cylinder #4 gets the thinnest at .064" wall thickness or roughly 1/16".


Attachments

  • SonicTest01_800x600.jpg
    SonicTest01_800x600.jpg
    94.3 KB · Views: 108
Ive long ago lost count of the guys that dumped weeks of work and hundreds ,sometimes THOUSANDS of dollars into converting stock engine blocks to 4 bolt main caps or splayed main caps or had the blocks decked and line honed or bored cylinders, and honed ,or sleeved and then were forced to throw all that expensive machine work in a dumpster when the block cracked under use.
the stock SBC blocks are designed for about 350-400hp and under 6000rpm,the stock BBC block can easily handle 600 plus hp.
All the blocks benefit from use of ARP main studs rather than bolts and most benefit from splayed main caps, but theres a point where its better to just pay a bit more for the aftermarket blocks, that are designed to handle far more stress, and at some point even the BBC engines are FAR better off with the more rigid aftermarket casting with the thicker more stable block and thicker cylinders and main webs,and while we all know guys who have built successful engine combos making a good deal more power. the fact is the stock blocks basic casting is significantly weaker than a DART AFTERMARKET block thats both a good deal thicker and has a stiffer and stronger alloy in the casting.


RELATED INFO...yes I know your tempted to ignore the links, if you do youll miss a good deal of useful info

viewtopic.php?f=51&t=2229

viewtopic.php?f=51&t=976

viewtopic.php?f=51&t=1014

viewtopic.php?f=51&t=5460

viewtopic.php?f=51&t=6162

viewtopic.php?f=57&t=2991&p=7851#p7851
 
Beginning to start checking out my heads in detail. Before I start disassembling anything, is there any potential to damage the valve seals when removing the valves? The reason I ask is the upper edge of the valve lock grove looks like it could snag the valve seal.
 

Attachments

  • IMG_0225-001.JPG
    IMG_0225-001.JPG
    9.7 KB · Views: 91


valve seals do tend to get damaged when the sharp edge of the valve lock groove is pulled thru, the extent of the damage may be minimal but its frequently going to happen, valve seals are easily replaced and not very expensive so most guys replace them

this thread an sub links should help
viewtopic.php?f=52&t=5306&hilit=valve+seals
 
bytor said:
Beginning to start checking out my heads in detail. Before I start disassembling anything, is there any potential to damage the valve seals when removing the valves? The reason I ask is the upper edge of the valve lock grove looks like it could snag the valve seal.
Funny I asked that very same question about reusing the original seals, but they are only about $25. So just buy some new ones, then you will know for sure they are good.

Please read this, I made a few mistakes when installed the new seals. Might save you a few bucks and considerable frustration.

It starts at the bottom of this page and continues on the next page. Most of it on the second page.

viewtopic.php?f=69&t=3814&hilit=valve+seals&start=420

 
Indycars said:
Funny I asked that very same question about reusing the original seals, but they are only about $25. So just buy some new ones, then you will know for sure they are good.

Please read this, I made a few mistakes when installed the new seals. Might save you a few bucks and considerable frustration.

It starts at the bottom of this page and continues on the next page. Most of it on the second page.

viewtopic.php?f=69&t=3814&hilit=valve+seals&start=420

Thanks for the info guys. I did the heat shrink tubing trick that Grumpy mentioned and it worked like a charm but I intend to replace them anyway. I'm confirming with Dart but they seem to be the exact same seals you had on your heads originally Indycars. The measurements match and they have the EOK on the lip.

Dart confirmed the seals on the SHP 200 heads the same as US seal VS-529 and Comp Cams 529-16 Viton seals

On my deck height measurements, I confirmed I have roughly a .006 slope from the front to the back on both banks. I used one rod/piston combo and measured each cylinder. I purchased the block already machined and had it checked out by a machine shop who I trust. I shared the measurements with him and he said I would be fine for a street build. He had checked the deck with a straight edge and said it would seal fine. I checked it myself as well.

CNC BLOCKS said:
I noticed this block is .040 wouldn't this be a 385 build and not a 383 build.
Yes, your correct. This would be a 385 build.
 

Looks like you are getting answers to some good questions and making decisions based on that. Everyone has accept compromises, but at least it's based on good info.
 
Back
Top