Planning a new 383 build that is now going to be a 400

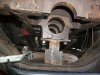
I am going with a Front Motor plate setup too Bob. But instead of rubber cushion I will have it bolted solid to the frame of my car.
Vibrations not an issue with me.
My car is solid motor mounted already prior.
I did research online and mainly Yellow Bullet Drag Racing Forum with Front and mid engine plate layouts.
Motor plates have lots of Beaming strength and resist torsional twist loads.
But they lack lateral strength.
Lateral means upon hard braking or front wheels off the ground drag race launches.
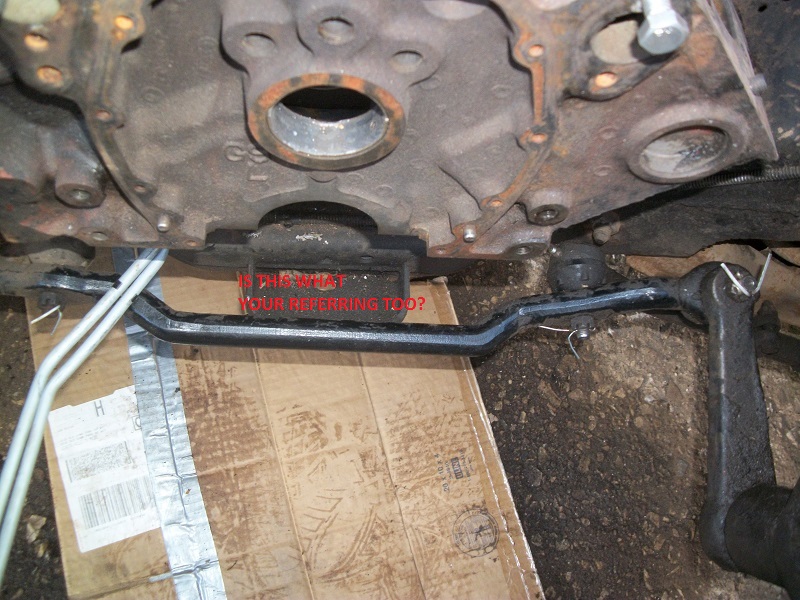
What they recommend is a Long lateral bar like a panhard bar welded to the frame rail on one side to the engine block or Trans bellhousing.
Heim Aurora joints on both ends.
Adjust a light preload on the bar.
Otherwise cracks may occur.
Is it true ?
I read it right from Moroso Competition Engineering instructions.
 
I have one but mine doesn't have the angled carb location like the one in your picture. It's old and needs a few helicoils, what would it be worth?
 
Still waiting on USPS and Speedway, looks like I will have to fab them myself. I got the frame mounts off and I will need to do some more custom work on the front mount, it come close to the arm off the steering box. I will just move it some to clear, you will see it in the picture, "steering clearance." In the picture the wheel is turned hard right and it clears but when straight it is real close.
OEM frame mounts1.jpg

OEM frame mounts2.jpg

OEM frame mounts3.jpg

temp mount in frame.jpg
 

Attachments

  • OEM frame mounts1.jpg
    OEM frame mounts1.jpg
    267 KB · Views: 8
  • OEM frame mounts2.jpg
    OEM frame mounts2.jpg
    256 KB · Views: 7
  • OEM frame mounts3.jpg
    OEM frame mounts3.jpg
    237.8 KB · Views: 6
  • temp mount in frame.jpg
    temp mount in frame.jpg
    246.1 KB · Views: 7
  • engine front.jpg
    engine front.jpg
    270.3 KB · Views: 11
  • steering clearance.jpg
    steering clearance.jpg
    276.4 KB · Views: 10
In the picture, " engine front " does that bucket in the middle of the frame serve any purpose Grumpy?
 
enginefrontx.jpg


I might be wrong but I think thats used as a mounting base, on the k-frame for the power steering rack on some cars and if not in use its just extra steel
 
Last edited:
So it won't hurt anything if I remove it? I have already figured with aluminum heads and intake, aluminum brackets(among other things I plan on deleting) I have cut weight by 150 lbs so far. I am estimating by thickness that it will take off another 10 lbs approx. I am going to totally remove the back seat and front bench seat(replaced with light buckets). Guessing I would say the weight will be down around 3000, maybe 2950. Going to remove the a/c evaporator off the firewall probably another 20 lbs. Weight reduction I am thinking around 270-280 lbs total, give or take. I will be looking for other ways to cut weight!
 
Removing weight is better that adding horsepower in my opinion. It's alot more reliable.

My T is about as light as it can get. In fact I probably need to add weight ...... in a roll bar. hehehehe !!!
 
yeah, that's how I feel, There are lots of things I can do with weight in my situation, as not really a lot in yours since it's about like engine connected to a roller skate!:D:D:D:D
 
In stock form my wt/hp is about 6.6/1, I think I can do well if I can get it down to 5.5 or 5.6, I think 5.75- 5.875 is more realistic.
 
2850 is about 5.875, 2790 is about 5.75. So those are realistic goals for it. So somewhere between 2790 and 2850 is what I will concentrate on in weight reduction.
 
I did some on my mounts today, I figured out the drivers side, got it tacked on the cross member, and probably close to finished. I had to do a lot more fabrication on passenger side, will probably have it on the cross member tomorrow. Then pull the mockup block and finish all the welding. I will post some pics then.
 
I got more done today, I got the passenger side mount on the cross member, after peat and repeat. I did not take the fuel pump housing into account when I fabbed the pedestal and use material too thick stacked next to each other and so I had to cut it off the frame. Of course I welded the entire length on the cross member so out comes the grinder. I fixed it and got it back together, while letting it cool I went to Lowe's and got some all thread bolts to use. Driver's side I cut down to 2" long and passenger 2 1/4" long. If any of you guys are using front mounts I found a way to get nice cushions(rubber bushings), here's a story for you. I had a conversation with Indycars yesterday to find out what he used, said he went Orielly Auto Parts and counter guy dug out a book. I have one close by and have a old friend that is Asst Manager. So my buddy Tim and I go up the, Chris(old friend) digs out a book and we start looking for a bushing for my use. About 30 mins later, we are at wits end, everything has to be ordered, we ask about shock rubbers, Chris points to isle 5 at the back on left. Tim and I are looking through everything they got to no avail, my eyes wonder down to the bottom row and there are expandable freeze plugs hanging there. One is taped together, so we open it, low and behold its the perfect diameter and thickness, I just had to run a drill bit through it to use my bolt. C0st 8 bux and a chunk of Tim, Chris, and my ego, hahahahahahahaha!!!!o_Oo_Oo_O
Here a few pics.
drivers side motor mount.jpg

front view motor mount.jpg

pass side motor mount.jpg
 
Tomorrow, I will pull the mock up block and finish the frame mounts. I am going to box them in on the sides and back to strengthen them some. Then I am going to get out the power purple and dowse the entire area and clean it all up and paint the cross member black. I am going to remove the bucket in the middle of the cross member Grumpy, I see no purpose for it so off it comes. I am going to paint the front mount black crinkle. Sorry if the pictures are fuzzy, my good camera is on the fritz so I had to use my 9.2 megapixel camera.
 
Got up early and worked on my mounts all day. Got the block out and boxed in the frame mounts and clean it all up. Here are a few pics. First is the passenger side, then driver side, and then front view. I did a mock up with the fuel pump in place and I am good to go on clearance. Next is a major clean up of the cross member and probably front suspension and going to paint everything.

frame mounts 1.jpg

frame mounts 2.jpg

frame mounts 3.jpg
 
its nice to see progress, and nice to see you have access to a welder
 
Did you take into account the power steering pump? I'm sure you did, but I don't think you mentioned the pump.
 
Yeah, it sits a lot higher than the fuel pump, I mocked it up on the Dart block and I have a lot of clearance.
 
Once I get all this done on the motor mount, with the mock up back in the car, I am going to mock up the water pump, fuel pump, power steering pump and fan, so I can do the final mounting of the shroud. Get it finalized and then move on to the AC evaporator.
 
Okay after doing some thinking I decided on going ahead with the midmounts and took some measurements and have a raw layout of the mount that will bolt to the back of the tranny. This is by no means the final, I have to get the mockup block back in the car and mock up the mid mount. But, this is the tentative layout in the picture. I see no reason in using the top bolts on the tranny flange on the back of the engine. If any of you see something, say something. the mount will be 1/4 thick and the flat plate at the bottom will be 3/8 thick. I have figured out a way to get a good weld all the way around the angle iron on the frame. I am not sure yet, but the headers may play into the equation. So I may have to mock up the heads and exhaust.

midmount.jpg
 
Back
Top