TBucket 200-4R Transmission Project


A little background first. There are two types of Oil Seal Rings, one is Solid
and the other is Scarf Cut. Solid is obvious, but the Scarf Cut needs a picture
like the one below to explain.

ScarfCutSealRings_3905.jpg

Trying to stretch these solid teflon seal rings is no easy task. They feel very
hard to the touch. First I tried steaming hot water for 10 minutes and I thought
that was helping. But now I'm not so sure. I also tried just considerable constant
pressure, after maybe 20-30 seconds they would begin to stretch enough that
you could slide them over the shaft and install them in their ring land. When I
say considerable pressure I mean more than you can do with your fingers, you
will need something the right diameter to help you push on the seal. So it's got
to be big enough to slide over the shaft, but small enough that it contacts the
seal ring.

SealRingsOnTurbineShaft01_3902.jpg

SealRingsOnTurbineShaft02_3901.jpg


SealRingsOnForwardClutchHousing_3896.jpg


Now the seal rings are much too big and need to be re-sized to make them smaller. I'm not real happy with my process, there must be a better way. But it did work so I'm happy it's done.

SealRingReSizing_3891.jpg

BTW, all 5 seal rings are the same size. Although they have different ID
numbers, they are interchangeable.

 
Last edited:

Finally got to putting Por15 Tie-Coat Primer on the case yesterday. For primer
I used the Harbor Freight HVLP spray gun #47016.

Paint_TieCoatPrimer.jpg
PaintPrep01_4098.jpg
PaintInsideBellHousing_4099.jpg


I used a lid from the candy jar that is made of cork. I completely covered it with
masking tape so I could put it back later. But before I could do that, the wife looked
at the candy jar and asked me where the lid was....."Um, I don't know." I said. :D

Paint_4103.jpg

Today I will put on the Por15 Engine Enamel.

Paint_EngineEnamelPor15.jpg

 
Last edited:
grumpyvette said:
great post, really good info and really impressive photography as usual... DAMN IMPRESSIVE!

X2

I wanna rebuild mine again!!!!!!!!!!
 
That and you are going to LOOOOVE driving that 200-4R.

Every time I take my chevy out... it shifts nicely.

Get on the highway... the OD kicks in and then the lock up to settle in a 70 MPH cruise at 2200 RPM... in a 40-year-old street strip... it's an awesome feeling that makes me grin every time.
 
Should have let me known Rick,
I have the Factory GM Kent Moore Turbine Input Shaft 1-Piece installation tool and 2nd tool for rezing the installed Teflon Seals.
Bought mine for my 700R4 rebuild few years back.
Same size as your 200R4 trans input.
Have complete 700R4 Kent Moore service tool set.
The factory service tools make it a snap to install the 1-Piece teflon turbine shaft seals.
 
DorianL said:
Get on the highway... the OD kicks in and then the lock up to settle in a 70 MPH cruise at 2200 RPM... in a 40-year-old street strip... it's an awesome feeling that makes me grin every time.

I'm having dreams of 70+ mph wind in my hair!!! :p

Thanks Grumpy and Dorian for the great comments!!!

 
87vette81big said:
Should have let me known Rick, .....

Well......if you could move closer so I could see your tools occasionally,
then I wouldn't make this mistake again! :D

 
Indycars said:
87vette81big said:
Should have let me known Rick, .....

Well......if you could move closer so I could see your tools occasionally,
then I wouldn't make this mistake again! :D

Those 1piece teflon seals are real important.
Must fit square on the turbine shaft grooves.
No excess hangout.
Any doubt let me know. WILL UPS TOOLS TO YOU.
JUST SEND BACK WHEN YOUR DONE.
 
Indycars said:

I certainly appreciate your offer and trust, but I think I will be Ok.


Ok Rick.
I tried installing those 1Piece teflon seals as you did in the past on 700R4&4L60E trannies.
Thinking all be well.
I nicked the ID of each teflon seal.
Had clutch pack failures within 500 miles.
#1 MISTAKE MADE. IMPROPER TOOL USED FOR INSTALLATION OF 1PIECE TEFLON SEALS.

$300 Kent moore tool.
 
Last edited:
Guys I pulled off the perfect crime!!! The cork I borrowed
from the candy jar to replace the rear seal while I was painting was
returned to the candy jar with the WIFE unaware of the slightest thing!!! :cool: :D :lol:

The rubber corks works really well, in that you can just peal or scrap
the paint off like it never happened in just a few minutes.

CandyJarCork_4116.jpg

 
Last edited:
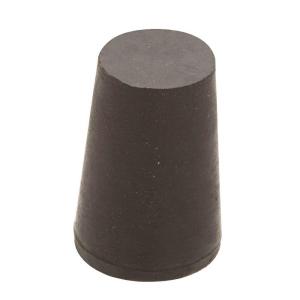
you are aware that HOME DEPOT sells rubber corks?
in a fairly wide selection of sizes?


http://www.homedepot.com/webapp/catalog ... Search+All
rubbercork.jpg


AS AN EXAMPLE

I bought 16 of these

http://www.homedepot.com/p/15-16-in-x-1 ... ZLQ8sqtYzY
screweye.jpg


Zoom
15/16 in. x 11/16 in. Black Rubber Stopper
Model # 16058
Internet # 202209570
Store SKU # 755424
Write a review
Write the first review

$1.20 /EA-Each

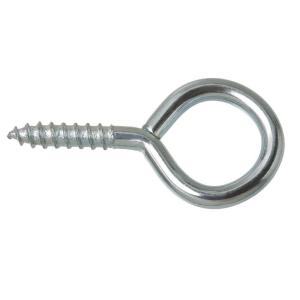
a pack of theses screw eyes, so I could screw one into the top center of each rubber cork, and string the 16 corks
http://www.homedepot.com/p/4-Zinc-Plate ... ZLNE8qtYzY

so I had lifter bore protecting plugs, that I connected on a 36" bead chain, so they don,t get misplaced or lost, in my tool box, for use when painting engine blocks


I found its a good Idea not to piss off the wife, they tend to be able to make your life miserable when they want to, so I try hard to avoid that, as an example I used to pre -prep timing gear/chains sets to make sure the metals really soaked in lube,prior to assembly ,in the kitchen by heating them in an oil/moly assembly lube mix, then letting them cool, before installing them, but it leaves an odor in the kitchen so I now do it in the shop on a hot plate I purchased very cheaply ($5) at a yard sale in a pot I bought at a different yard sale for $1
 
The POR 15 Paint is pretty toxic stuff Rick.
Women have a hightened sense of smell and taste.
She will find out....busted.....
:?

Grumpy is right.
Best not to piss of my wife here on my own part.
Even in my sleep I can hear hear whine and nag at me.
 
I can just see the name of the Thread, "The sneaky ways I used something from my wife's kitchen and didn't get caught!"
 
well are you making any further progress toward assembling the T-BUCKET and getting it in drive-able condition?
 

Now that I have the case painted, I've been cleaning up all the bolts on the
bench grinder/wire wheel and and few small pieces that go inside the pan.
If I'm lucky I might get started with the final assembly this weekend, but
knowing that I've never been there before it still might be a slow process.
The wife's 60th birthday is tomorrow so that might get in the way just alittle
bit. Just so you know, she married a younger man ! :)

It's not just a matter of bolting everything back together once the trans is
done. For example, the old shifter is not going to work most likely and the
throttle linkage will have to change. Most likely I will go to a cable setup there,
but again it's not just a bolt in operation for the TBucket.

Grumpy ..... I wish I could give a everyone a good guess when I'm going to
drive the TBucket, but I thought I would have been done over a year ago when
I first started this project to put the car back on the road ....sigh !!!

 
Back
Top