TBucket 200-4R Transmission Project

I don,t remember discussing the installation of a remote mounted trans fluid cooler on your t-bucket,
now it might not be mandatory, but its always a good idea on a car that has a high stall converter as they generate a good deal more fluid heat than a stock transmission. AS always before you go jumping into any mods on your car, But I would suggest at least installing both a fluid TEMP and trans pressure gauge so you can see what the trans fluid temps really are before spending the time and effort and cash required, but I think you might find it worth the effort


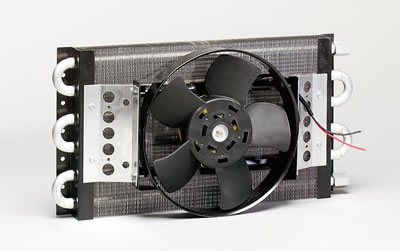
heres the cooler I installed on my corvette, It was the most efficient one I found that would fit at the time I looked, but it has AN#6 lines, it works just fine but if I had the chance ID select a slightly smaller and thicker cooler with larger line size , when I measured the corvette for the trans cooler I carefully measured the available space I intended to use and selected the largest most efficient trans fluid cooler that would fit in that space but forgot about the room that was required to route the trans fluid lines and fittings , making installing it in its intended location a true P.I.T.A. so I wound up mounting the trans fluid cooler where my spare tire goes normally, in the rear of the car, (NEW GUY STUPID MISTAKE), I,m pointing out this personal screw -up so you might avoid that little flaw in your plans should you choose to install a trans cooler

http://www.summitracing.com/parts/PRM-12318/
transcoolera2.jpg


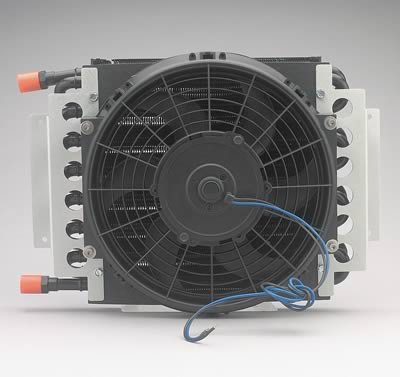
BUT having learned a good deal, since that time, if I had to do it over I would go with a slightly smaller size (length and height) cooler with larger DIAMETER AN#8 lines if I was doing it today

http://www.summitracing.com/parts/der-15800/overview/
transcoolera1.jpg


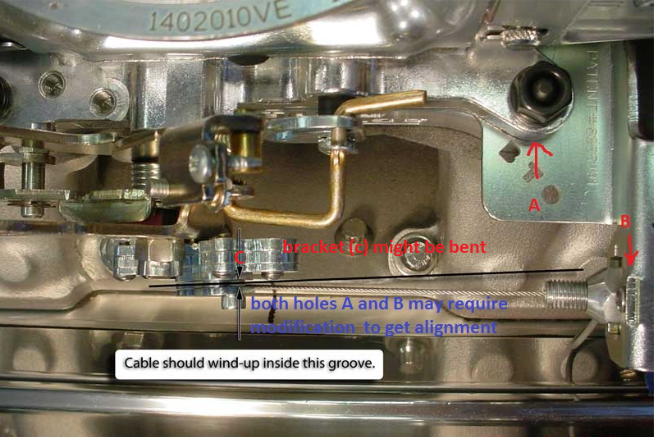
BE AWARE OF UNDER THE CAR CLEARANCE ISSUES


READ THIS LINK
http://garage.grumpysperformance.co...n-cooler-info-and-derale-trans-cool-pans.662/
 
Last edited by a moderator:
Grumpy I think You have an ingeneous Auto trans cooler location on your C4 Vette.
The Factory Fiberglass Airbox is tight on Room.
Relocating to Rear spare tire carrier area has plenty of mounting room.
Same line routing distance as front of vehicle.
Lots of undercarriage airflow once moving.
Why not ?
Going to do the same here.

Brian
 

I have this VDO gauge, just received it last week.

VDO-310107_ml.jpg

Plan on ordering this pressure tester before starting the engine the first time.


    • Large 3-1/2 inch gauges feature a chrome bezel and rugged protective outer boot
      High pressure gauge reads 0-400 psi and 0-2800 kPa
      Low pressure gauge reads 0-100 psi and 0-700 kPa
      Both gauges include rear hook to allow gauge to be hung conveniently out of the way
      Gauges and hose assembly incorporate quick couplers for easy disconnect
http://www.amazon.com/OTC-5610-Transmis ... Q9UOXJGVTT

OTC-5610-Pressure-Tester.jpg

 
Last edited:

These fittings will freely screw all the way in since they are straight pipe
thread. According to the ATSG manual the threads are 1/4-18 NPSF and
should torque to 26-30 ft*lbs. I checked my other 200-4R case and it's
the same way.

Should I use a a Teflon sealer on those threads ???

FP01_CoolerFittings_4585.jpg
FP01_CoolerFittings_4586.jpg


Last edited:
I would use a Teflon paste sealer Rick on The 200R4 cooler fittings.

I did the same on my 700R4 cooler fittings to case.
Just a small amount of Tefon paste sealer required.
Think I used Loctite brand Teflon paste. 3 years ago now.
 

Before I buy a trans cooler, I wanted to see how big a problem I might have
with temps. I have a temperature and pressure gauge I will monitor during
the first drive.

I also wanted more filtering capacity during those first few miles, I may want
to go with an external filter in the future if the cooler doesn't take up the
available room under the right side of the car. In the pan will be several
magnets also.

http://www.summitracing.com/parts/wix-58964

FP01_InlineWixTransFilter_4628.jpg
FP01_FilterCoolerLines_4629.jpg
FP01_FilterCoolerLings_4630.jpg


Last edited:

I finally decided on the TV system / Geometry Corrector for my Demon carb
and 200-4R transmission. I bought the system from Bowtie Overdrive, opting
for the nicer braided steel cable for additional $30. While I was ordering I also
got the cruise control bracket for another $10. With $16 S&H the total came
to $185.95.

http://www.bowtieoverdrives.com/catalog ... ITEMID=216

I decided on this system for the bracket that goes under the carb, instead of
a bracket that hangs of one rear carb stud. Thought it would be more stable.
I also liked the adjustability of this system to determine the shift points and
firmness, something that no one else had.

FP01_BTO_Kit_4692.jpg

They have a kit for lots of different carbs and Fuel Injection systems.

http://www.bowtieoverdrives.com/catalog ... AT&CATID=W

 
Last edited:
thanks for taking the time and effort to post part numbers, links and pictures!
I,m sure the part numbers, and info in this post will be very useful for several guys doing similar projects!
and glad to see your still making some progress!
 
Rick things might pretty warm quick without a trans cooler of some sort.
Does the T-bucket radiator have Auto trans cooler provusion & fittings?

MOROSO makes a real nice Double pass Finned aluminum trans cooler with integrated paper filter element. Compact.
Also they make a Single pass compacy trans cooler. Mounts on frame rail.
Have used the. MOROSO Double pass cooler on a friends 1970 C6 auto Mach 1 Mustang. 351C.
Street driven 2400 stall. No issues. About $160.
 

Yes the radiator does have a trans cooler, but I don't want to run lines up
there. I do have a tubing loop with a Wix magnetic filter for now in the
cooler line and a gauge to tell me if I have a problem during startup.

Once I determine the degree of my cooling problem, then I can decide
how big to install.


Started the install of the Bowtie Overdrive(BTO) kit. Dropped the pan to
install the new spring.

BTO makes it extremely clear that you must install their spring for
there kit to work properly, but also you will burn up the friction plates
in the transmission if you don't install their spring.

So even thou I installed a new spring, I removed it and installed the
BTO spring.

For your reference I'm posting this photo again. Hey it's backward from
my other photos today, but you get what you pay for !!! :p


TV_ValveLineup.jpg

FP02_RemoveComponents_4717.jpg
FP02_RemoveComponents_4716.jpg
I had to document the differences in the two springs, now I forgot to get
the overall diameter but this is better than nothing.

FP02_ThrottleValveSpringComparison_4713.jpg

 
Last edited:
Did you try and have a feel in the difference between the 2 springs?
like, wich one seem harder?
look like the BTO spring will be softer and have longer compressed/decompressed travel.
 

No I forgot to put my strain gauge finger glove on and test, next time I will!

 
Last edited:

Took a day of vacation to work on the the TBucket. As usual I took some time
to break the sharp edges on the carb plate that BTO provides to hold the TV
cable. I wondered just how big the holes for the throttle bores would be, no
problem there. But alignment will mean pushing it to one side.

FP03_CarbPlateAdapterFit_4721.jpg

While checking bore alignment I noticed a problem, but it was easy to fix
with a hand file.

FP03_PlateToFloatBowlConflict_4727.jpg
FP03_PlateToFloatBowlConflict_4729.jpg

Went under the car and hooked up the TV cable to the transmission.

FP03_TV-CableTransEnd_4762.jpg

Then after installing the carb bracket and hooking up the TV valve from
the transmission, I found my second problem. When open the throttle,
the cable drag and grinds across the edge of the bracket attached to the
throttle shaft. Sure makes it feel rough as I open the carb and increases
resistance that will be felt at the pedal. This will have to be fixed.
Planning on sending pics to BTO tomorrow and see what they say.

To make sure I had the adapter to the throttle shaft installed correctly, I
removed it and checked it again, then re-installed it. No change

FP03_TV_CableMisAlignmentCloseup_4748.jpg
FP03_TV_CableMisAlignment_4748.jpg


Last edited:
as always its great to have the photos posted showing what your dealing with, because the description alone, without the accompanying photo would be far more difficult to under stand, it looks like youll need to slot the bracket bolt holes or bend the bracket to allow you to shift it over to correct cable too groove alignment
xcvbn.png
 

I can't slot the hole for the carburetor stud, since the plate goes completely
underneath the carb (A). All the adjustment would have to be at the adapter
for the cable (B). BTO provides a small plate that you screw to the carb plate
with 6-32 screws for the braided steel cable option, which is different that
the OEM cable shape.

I would have to drill and tap new 6-32 screw holes and also enlarge the OEM
hole to provide room for the SS cable nut to rotate for adjustment.

FP04_BracketMod_4692.jpg
FP04_BracketMod_4763.jpg
FP04_BracketMod_4764.jpg


Last edited:
grumpyvette said:
as always its great to have the photos posted showing what your dealing with, because the description alone, without the accompanying photo would be far more difficult to under stand, it looks like youll need to slot the bracket bolt holes or bend the bracket to allow you to shift it over to correct cable too groove alignment
xcvbn.png
I agree with Grumpy, the plate can be modified but you would have to slot all 4 holes for it to move. I don't think that will cause and sealing problems. The fine tune the alignment on the bracket hole.
 
Back
Top