TBucket 200-4R Transmission Project


Installed the CKP Billet Servo that applies the Intermediate Band, the piston
has a bigger area for fluid pressure to impinge on. This gives it a significantly
larger clamping force. It clamps down on the Direct Drum when applied and
stops it rotation.

BilletServo_3035.jpg
Overview_4246.jpg


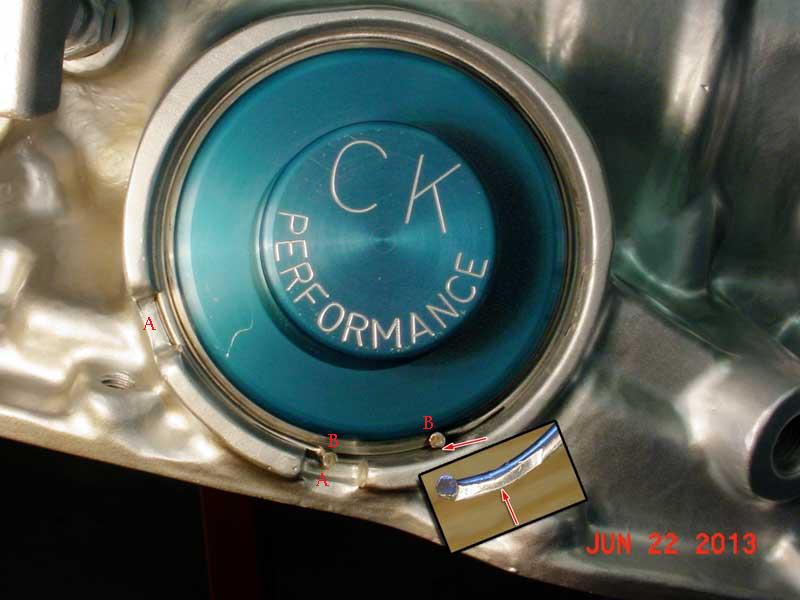
Don't do what I did and try and straighten out the snap ring ends, the ends
are bent for a reason. Like they say, don't ask me how I know. I will show you
why they are bent. There is no reliefs for the both ends to extend out of the
snap ring groove, therefore the ends are bent towards the center. Otherwise
the end will hold the snap ring out of it's groove.

I know it look like there are two exit points for the snap ring, but they
are too far apart. So I only re-bent one end.

SnapRing_4297.jpg

 
Last edited:
That's a pretty Blue anodized Billet Servo Rick.
Used a Billet Servo on my 700 R4 Too.

:D
 
I FREELY ADMIT I DON,T KNOW MUCH ABOUT REBUILDING A 200R4 TRANS BUT WHEN I SEE TWO SNAP RING ENDS (B) AND TWO NOTCHES (A) IM RATHER SUSPICIOUS THAT THE TWO IN SOME WAY ARE DESIGNED TO BE RELATED
 
I FREELY ADMIT I DON,T KNOW MUCH ABOUT REBUILDING A 200R4 TRANS BUT WHEN I SEE TWO SNAP RING ENDS (B) AND TWO NOTCHES (A) IM RATHER SUSPICIOUS THAT THE TWO IN SOME WAY ARE DESIGNED TO BE RELATED
http://web.archive.org/web/20070128173316/http://members.aol.com/powerrslid/thm2004r.html

SnapRing_4297Z.jpg
 
Last edited by a moderator:
grumpyvette said:
BUT WHEN I SEE TWO SNAP RING ENDS (B) AND TWO NOTCHES (A) IM RATHER SUSPICIOUS THAT THE TWO IN SOME WAY ARE DESIGNED TO BE RELATED

I though so to, but they are too far apart for both ends and there are no
other similar snap rings in the transmission to get confused with. Some
transmissions have snap rings without the end pieces, they are just straight
and harder to get out.


There are probably a dozen different air checks to perform during assembly,
here is the one for the intermediate band. First you need to improvise alittle
to find something that will reach into the worm casting and provide a half
way decent seal. I wrapped the tip with electrical tape.

IntermediateBandAirTest01_4301.jpg
IntermediateBandAirTest02_4300.jpg


I had a hard time feeling the movement. I didn't mention in my previous
post during the servo installation, but at first I'm not sure I had the pin
installed such that it was making contact with the band properly. When I
flipped the trans over such that the pan was pointing down and the band
would move under it's own weight into a better position before installing
the servo and associated pin, it seemed to work better.

Also closer tolerances might make this harder to feel. When watching the
DVD all they asked you to do was look for movement, that would have never
worked in my situation with so little movement.

IntermediateBandAirTest03_4238.jpg

 
Last edited:

Next to go in the trans was the Fourth Clutch Piston. Easy to install, it
just pushes in, but don't forget to lube it.

FourthClutchPiston_4307.jpg

Notice that there are seals inside and outside, that the piston slides between.

FourthGearPistonSeals_4248.jpg

Next to go in is the spring retainer and snap ring. The snap ring can be
installed with screwdriver. Just press down and work your way around
until the snap ring is installed. Next lay the thrust bearing in place, this
is one of the thrust washers I converted to a bearing.

FourthClutchSpringRetainer_4308.jpg

Install the Overdrive Internal Gear and another thrust bearing.

OverDriveInternalGear_4311.jpg

Also for your reference is the ATSG diagram

OverDriveComponents.jpg


Last edited:

Gentlemen, if you will notice there are 7 bolts in that pump and they
are torqued to 225 in/lbs !!!

I am finished with the center section of the transmission. I will follow
up with the details for setting the front section end play, including all
it's trials and tribulations in the next few days.
snoopy-happy-dance.jpg


FrontSectionEndPlay.006_4351.jpg
 
Last edited:

Next to be installed is the last sub-assembly.

FrontSectionSubAssembly01.jpg

This is what it looks like with the sub-assembly above installed into the
case. Make sure that the planet gear carrier is fully engaged into the
overdrive internal gear (ID 529).

FrontSectionSubAssemblyInstalled_4315.jpg

Next, start by installing a steel plate and then a friction plate (ID 508).

ClutchPlate01_4316.jpg

After all the steels and friction plates are installed, put in the backing
plate (ID 507) and snap ring. Remember I had the 4th clutch piston
trimmed so I could install a third friction plate. Normally there were
only two friction plates.

ClutchPlates02_4318.jpg

To make sure everything is working, next do your air test to confirm.

AirTest4thClutchPack_4321.jpg

If your satisfied with the air test, then install the oil deflector plate
ID 542. You will also notice that I have made some guide pins for
installing the pump. The pins were made from a couple of 3" bolts
that I cut the heads off.

OilDeflectorPlate_4328.jpg

Next comes the setup of the end play for the front section. This is
the last of three end play settings for this transmission.

 
Last edited:
your doing a VERY IMPRESSIVE job with this thread and photography is TOP QUALITY also, congrats on a fine job :mrgreen:
 

To set the front section end play, install a Selective Washer on the back side of
the pump. Use some transmission assembly lube or Vaseline to hold it in place.
Start with something in the middle or one that you already have. I already had
the Yellow washer (#5) so that’s what I used for my first check. The washer shown
below is not the #5, but the final washer #7.

SelectiveWasherInstalled_Purple_4341.jpg

Install the pump without seal into the case and setup dial indicator as shown.

DialIndicatorSetup_4332.jpg

Previously I had to measure the clearance shown below. To get the final end play
you have to subtract this number from the number shown on the dial indicator.

SnapRingToCarrierClearance.037_4312.jpg

Once the dial indicator is zeroed, then flip the trans over so the turbine shaft is
pointed down. Pull down on the turbine shaft to remove any clearances, then take
a reading on the dial indicator. I used a large screw driver to pry on the vise grips
attached to the shaft.

DialIndicatorSetup_4332.jpg

For example, I have .037” at the snap ring. If I measure .045” on the dial indicator
then, the end play would be:

.045” - .037” = .008” of end play. (CKP calls for .003” to .006” front section end play)

Ok, so now this is where my problem started. I didn’t realize at first, the
turbine shaft was binding in the forward clutch bushing. I thought I had zero
clearance, so I went to buy the thinnest selective washer(#1, Scarlet) at
Oklahoma Transmission Supply (OTS), cost was $10.

Next day I install the Scarlet Washer and take several measurements to see
if I can get a consistent number. It’s at this time I start suspecting that
something was wrong.

I remove parts until I can see the bushing in the forward clutch bushing.

ForwardClutchBushing_4311.jpg

I use the turbine shaft by from my other trans and fit it into the forward clutch
installed in the case. With a small ball peen hammer, I find out, I can tap it in
until it hits the bottom of the bore. You can tell when it gets there, it sounds
and feels different. So I used the old turbine shaft and work it in/out until
it frees up some. It’s not perfect, but it doesn’t carry a load, it’s only providing
a path for lubrication to flow internally.

ForwardClutchToTurbineShaftFitment_3213.jpg

Back to square one, I put the Yellow washer back in and take another measurement.
This time I get .015” (.052 - .037 = .015”), I’m shooting for .003” to .006”. Each
selective washer is approximately .005” thicker, so I go back to OTS and ask for
#6(Light Blue) and #7(Purple). What I actually get is #6 and #3(Brown). With the #6,
I go ahead and check my clearance and get .011” end play. The #3 washer is of no
use to me since it’s considerably thinner.

SelectiveWashers_4340.jpg

I’m on my third trip to OTS now. There is some confusion about the colors and
different manufactures, this time I ask for all the washers I don’t have, about 6
more and I will have all of them. But then I discovered that the prices range from
$1.27 to $10 each, so I just get the larger ones I don’t have ….. 7, 8 & 9.

I install the purple #7 washer and get a clearance of .006” ….. PERFECT !!!

Install the “D” shaped seal on the pump, you should be able to see the stripe all
the way around or it's twisted. Add seven bolts and torque to 18 ft/lbs.

PumpSealInstalled_4343.jpg

NOTE: The selective washers vary in thickness by up to .004” on any one washer.

 
Last edited:
Your 2/3rds of the way done Rick.
Looking very good.
Nice work.
 
I love driving my 200-4R... you have yet to get to the best bit :mrgreen:

Of course torque converter selection is everything...
 

I sent the email below to Chris at CKP. His answer was very specific with
the Motorcraft Mercon 5. Can anyone enlighten me as to why he would
recommend this ATF.

Dorian, what do you use? Have you changed fluids (Brand or Type) at any point?

Chris,

I'm getting close to finishing assembly of my 200-4R transmission. It
will be used entirely for street crusing in my TBucket, weight 1800 lbs.
Do you recommend Synthetic fluids? Can you suggest a couple of
brands you like?

Motorcraft Mercon 5

 
You had better of use what Chris @CKP Recommends Rick.
Merecon V -5.
I use Royal Purple Max ATF in my vette 700R4.
No issues.
 
87vette81big said:
You had better of use what Chris @CKP Recommends Rick.
Merecon V -5.

I plan to, but was curious what the difference was so I could understand
why he has made that choice. Most likely it's from testing.

 
Its likely from his own experience.
Every professional trans builder wanted me to use Dextron VI -6.
Or Regular Dinasour Dextron 3.
Lots of superstition on transmission fluids.
I chose Royal Purple Max ATF by experience used in past.
My 700R4 has Red Alto Eagle Friction plates throughout & Kolene salt bath treated steel plates.
2-4 Band is extra wide style Red Alto Eagle Friction lined too.
My racer bud Eddie with his 8-second Mustang &C4 auto trans has Red Alto Eagle Frictions , Kolene steels& bands too. He uses Royal Purple Max ATF also.
Never blew his C4 auto trans yet. He has 1400 Hp at rear wheels with 32psi Vortech YSi blower boost..
So I ignored all the 700R4 experts in the world back in August 2010.
None build for 1400 HP.

Wish I had that much HP.
AMAZING THINGS HAPPEN RICK..........YOU WILL WIN. ...
 
Can you easily obtain Mericon 5 V like Chris wants you to use Rick ?
They are constant changing ATF Formulations.
Hybrid blends for more than one application.
Its confusing.
 
Back
Top