You are using an out of date browser. It may not display this or other websites correctly.
You should upgrade or use an alternative browser.
You should upgrade or use an alternative browser.
The Force Awakens...
- Thread starter DorianL
- Start date

Loves302Chevy
"One test is worth a thousand expert opinions."
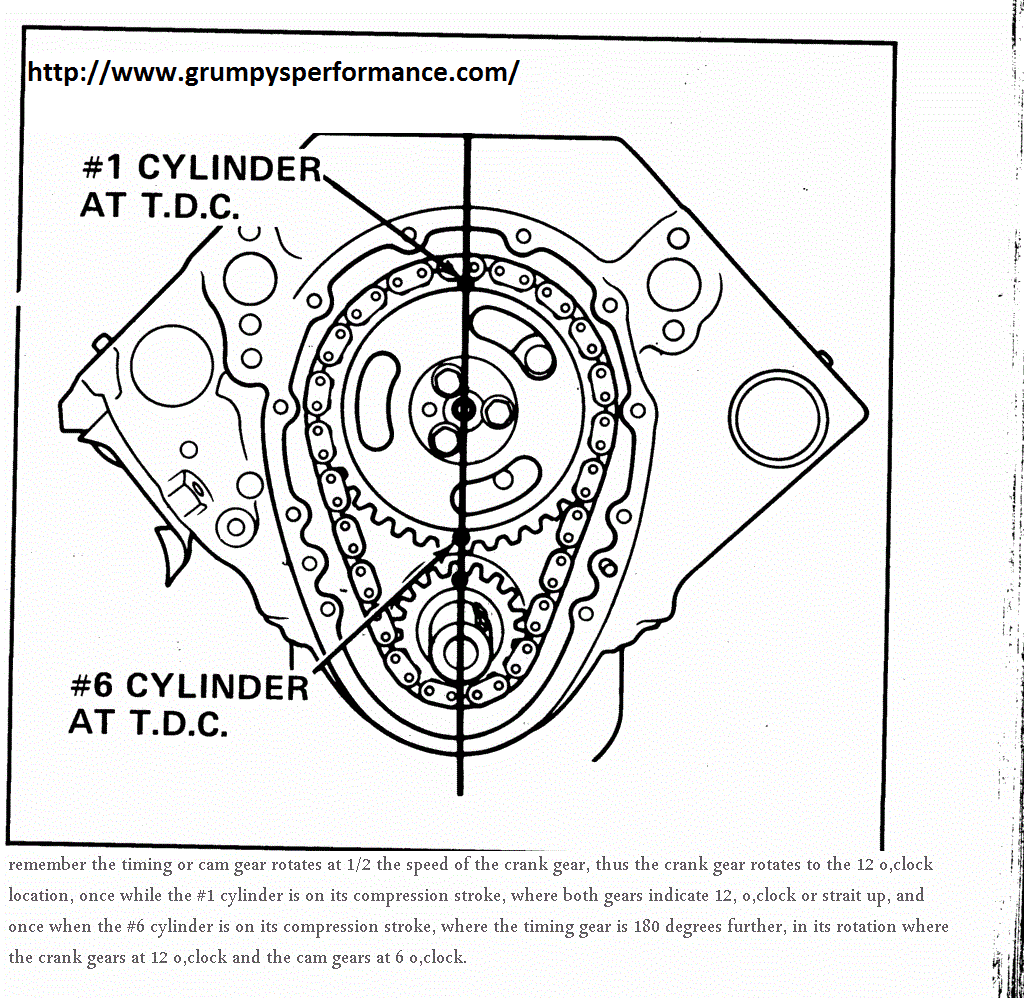
Before you put the timing cover on, rotate the crank 1 full turn so that #1 is ready to fire.
That's right - dot-to-dot is #6 firing. Many people don't realize this and then can't understand
how they managed to install the distributor 180 degrees off. I have done it more than a few times.
yes a good point thats over looked frequently
http://garage.grumpysperformance.co...stalling-the-intake-manifold-distributor.464/
http://garage.grumpysperformance.co...ibutors-wont-seat-on-intake.12538/#post-63610
http://garage.grumpysperformance.co...stalling-the-intake-manifold-distributor.464/
http://garage.grumpysperformance.co...ibutors-wont-seat-on-intake.12538/#post-63610
That's right - dot-to-dot is #6 firing.
Damn !!! Learn something every day!!!! Thx !!!!
http://garage.grumpysperformance.co...rect-custom-length-pushrods.14241/#post-72355
youll want too verify the correct valve train geometry and push rod length, just to be sure its correct , never assume anything
but once you know for certain,
thread on adjusting valves
http://garage.grumpysperformance.com/index.php?threads/correctly-adjusting-valves.196/
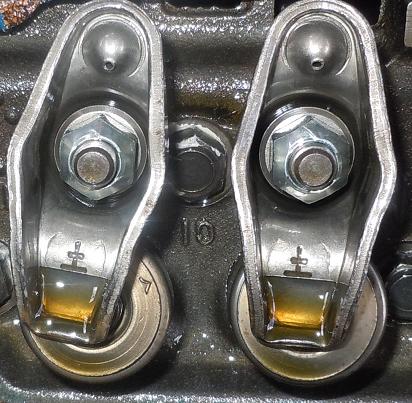
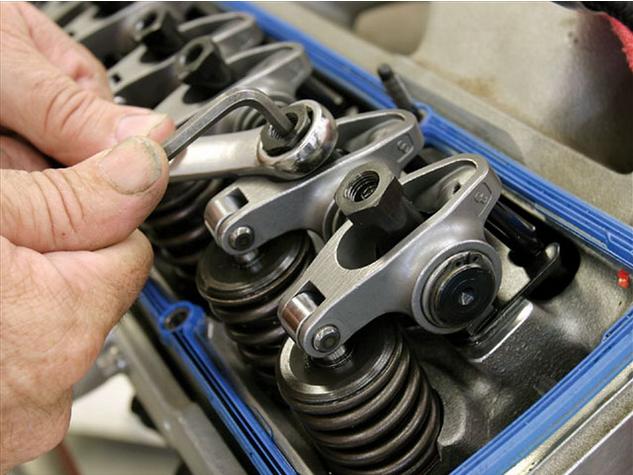
I strongly suggest the adjustment to the rocker arms pre- load on the lifters be made with the engine running at idle , where you back off the rocker adjustment nut slowly just to the point the rocker clicks, then slowly turn it in just to the point the clicking stops, then add a 1/4 turn pre-load, obviously this can get messy so a tall valve cover with the top cut out helps reduce oil loss and smoke and if you don,t have that a piece of card board about the length of the cylinder head and about 8"-12" tall placed above the lower valve cover lip , below the rockers can help
and before you even try adjusting valve lash at idle , (while the engines running) you really should consider finding a tall valve cover that fits your cylinder heads and modifying it by cutting out a large section of the top surface as adjusting valves while the engines at idle can get messy
btw
the quick and dirty version,, to getting a hydraulic flat tappet chevy SBC or BBC engine, with a new cam installed and adjusted
install all the rockers on the 16 individual rocker studs, so they just touch the push rods and valve stems with minimal slack,and are just loose enough that none bind,
now,rotate engine about 45 degrees and and repeat,the process by tightening any individual rocker ,
that got looser, so they are just loose enough that none bind
rotate engine about 45 degrees and and repeat,tightening only the rockers that got looser ,
so they are just loose enough that none bind
while you, ignore the others, that will be tighter as the engines rotated,
do this enough times that the engines been through 720 degrees (start anywhere )and take the slack out of any loose rockers, repeat for 720 degrees,(twice around) then go back and give each rocker nut one turn OUT(LOOSER) and start the engine,(yeah it will be messy and noisy) and then go back and turn each rocker IN (TIGHTER) until it just quits clicking as that individual rocker cycles as the engine idles, then add pre-load,by turning the rocker in tighter plus 1/4 -1/3rd of a turn past that point
OR
Valve Adjustment: ENGINE OFF!
with #1 cylinder Intake Valve at full valve lift .... Adjust #6 Intake Valve
with #8 cylinder Intake Valve at full valve lift .... Adjust #5 Intake Valve
with #4 cylinder Intake Valve at full valve lift .... Adjust #7 Intake Valve
with #3 cylinder Intake Valve at full valve lift .... Adjust #2 Intake Valve
with #6 cylinder Intake Valve at full valve lift .... Adjust #1 Intake Valve
with #5 cylinder Intake Valve at full valve lift .... Adjust #8 Intake Valve
with #7 cylinder Intake Valve at full valve lift .... Adjust #4 Intake Valve
with #2 cylinder Intake Valve at full valve lift .... Adjust #3 Intake Valve
Exhaust Valve Adjustment: ENGINE OFF!
If you have noticed, this is the same procedure as the intake valves listed above, just that you are now adjusting the exhaust valves the same way.
with #1 cylinder Exhaust Valve at full valve lift .... Adjust #6 Exhaust Valve
with #8 cylinder Exhaust Valve at full valve lift .... Adjust #5 Exhaust Valve
with #4 cylinder Exhaust Valve at full valve lift .... Adjust #7 Exhaust Valve
with #3 cylinder Exhaust Valve at full valve lift .... Adjust #2 Exhaust Valve
with #6 cylinder Exhaust Valve at full valve lift .... Adjust #1 Exhaust Valve
with #5 cylinder Exhaust Valve at full valve lift .... Adjust #8 Exhaust Valve
with #7 cylinder Exhaust Valve at full valve lift .... Adjust #4 Exhaust Valve
with #2 cylinder Exhaust Valve at full valve lift .... Adjust #3 Exhaust Valve
Last edited:


Obviously the two cams (old vs new) may not be identical lobe designs, and yes theres at least some potential for all the cam lobes too be worn once the metallic trash from even one lobe enters the oil flow, and circulates thats one great reason to install the magnets I've suggested, you might be amazed at the volume of metallic trash these magnets can prevent from circulating through the engines oil passages that the oil filter failed to catch.
remember the oil filter is located after the oil pump, so the gears in the oil pump are not protected from ingesting that metallic trash
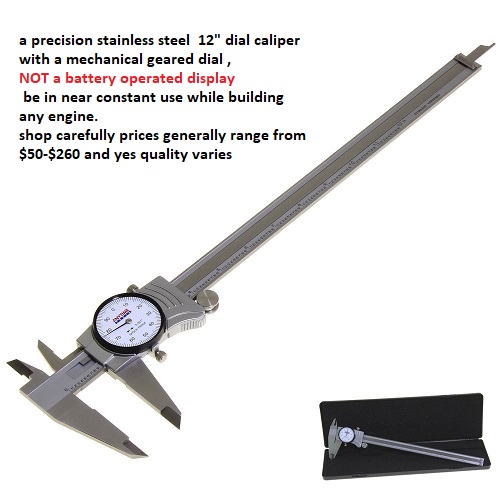
you should be easily able to use a caliper and measure each cam lobe's base circle vs lobe lift to see the wear.
http://garage.grumpysperformance.com/index.php?threads/acceptable-lobe-variation.13654/page-2
http://garage.grumpysperformance.com/index.php?threads/metallic-debris-in-filter.12364/#post-61283
IVE typically used these magnets in an engine, one in the rear oil drain on each cylinder head, one near each lifter gallery drain and 4 in the oil pan sump
proper magnets trap metallic debris
SmCo Samarium Cobalt Disc Magnets
http://www.magnet4less.com/
many magnets lose their magnetic pull if heated to 200F
these below won,t
proper magnets trap metallic debris
SmCo Samarium Cobalt Disc Magnets
http://www.magnet4less.com/
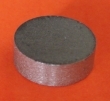
http://www.magnet4less.com/product_...ucts_id=254&osCsid=ckl4nevgdrmireotnegg7jcf36
http://www.magnet4sale.com/smco-magnets-dia-1x3-8-samarium-cobalt-magnets-608-f-temperature/
http://garage.grumpysperformance.com/index.php?threads/fuel-pump-push-rods.11093/#post-31713

remember the oil filter is located after the oil pump, so the gears in the oil pump are not protected from ingesting that metallic trash
you should be easily able to use a caliper and measure each cam lobe's base circle vs lobe lift to see the wear.
http://garage.grumpysperformance.com/index.php?threads/acceptable-lobe-variation.13654/page-2
http://garage.grumpysperformance.com/index.php?threads/metallic-debris-in-filter.12364/#post-61283
IVE typically used these magnets in an engine, one in the rear oil drain on each cylinder head, one near each lifter gallery drain and 4 in the oil pan sump
proper magnets trap metallic debris
SmCo Samarium Cobalt Disc Magnets
http://www.magnet4less.com/
many magnets lose their magnetic pull if heated to 200F
these below won,t
proper magnets trap metallic debris
SmCo Samarium Cobalt Disc Magnets
http://www.magnet4less.com/
http://www.magnet4less.com/product_...ucts_id=254&osCsid=ckl4nevgdrmireotnegg7jcf36
http://www.magnet4sale.com/smco-magnets-dia-1x3-8-samarium-cobalt-magnets-608-f-temperature/
http://garage.grumpysperformance.com/index.php?threads/fuel-pump-push-rods.11093/#post-31713
Last edited:

The cam break in went well as far as I could tell. It fired up immediately and I kept between 2000 and 2500 rpm. The neighbors did not yell at me for the 20-minute procedure.
I did find a zinc additive to dump in the oil.
The puffs of smoke are from leaking oil at the fuel pump getting on the exhaust. I’m not sure how I managed that. Did I not torque it down properly? To be investigated.
I also have a small drip at the oil pan plug. I guess a copper washer does not work there. Strange.
So. Now for an oil change and a new filter.
It stayed rock steady at operating temp; the electric fan never came on. I drilled those holes in the thermostat flange. No momentary overheating. I am very happy I did that. Last time i was seeing short spikes of 240 !!!!
Next step is also setting the valve lash hot. That way I’ll be able to verify if the push rods are spinning.
Man it’s always scary !
I had to shut down briefly because of a hose clamp I didn’t properly tighten.
Scary !!!