Unforgiven Project

This is how I tested by pump. I do suggest you have a friend if you follow my setup. It gets hard
to hang onto that flat bar when the pressure goes up.

http://garage.grumpysperformance.co...gine-project-dart-shp.3814/page-22#post-20563

Follow the link for lots more info and photos.

index.php

.
 
Last edited:
Thank you guys. I will make a plate today to test the pump.. It never crossed my mind to actually test the new pump.

I managed to plastic gauge the rods last night and was not happy.... I got a reading of .0015

I looked in my charts to see what I mic'ed the crank at and what the bore readings were and found that I did not check them.. I only checked the mains..
so I am going to take the rods back out and check with bore gauge, and compare with the crank.
I have a strong feeling that the plastic gauge is of old stock when I bought it, and it has gotten brittle. I did notice that it snapped cleanly when I broke a piece off from the package... My reading's from the mains using a bore gauge and micrometers showed .0025 , and the plasic gauge showed .002

Keeping this in mind.. I am hoping that when I check the rods with gauges... I will see the same results.
I had a hell of time trying to install those spiral locks into the piston at first because I have never used them before, so I must got preoccupied
with that learning curve and forgot to gauge the rod bores before I installed them. It sucks.... But I will feel better if I just pull them and double check
the sizes. Worst case.. I can order another set of .001 over rod bearings and replace the cap bearing to achieve .002

With using a Blower on the motor, I think it would be wise to not let the rods pass inspection with only .0015 clearance... I could be over thinking this..
but I do not want to take a chance and hurt the motor from my own stupidity. I feel THIS is the part of the build that is the most critical.
 
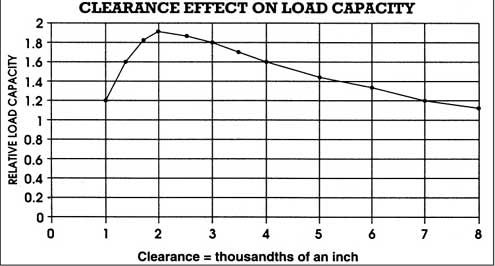
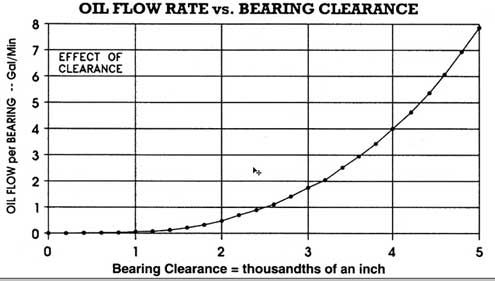
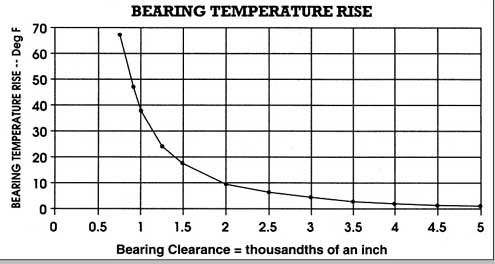
Tell Unforgiven to set the Main and Rod Clearances oil running clearances no tighter than .0020" - .0022" with his Engine combo from me. I would use .0022" - .0025" with 750-1000 High Boost Small Block Chevy and 20w50 Vavoline VR1 Racing oil. Crankshaft almost likely to deflect some. Not a Sonny Bryrant or Crower Billet 4340 or 300M Race Top Fuel quality crank he has. Call the manufacturer of his connecting rods and get the recommended running side check crank pair of connecting rods. I am thinking .016" - .022". 1963 Pontiac SD421 Rod pair side crank journals clearances set at .032" factory. Allows for thermal expansion and lots of oil to piston rings and camshaft lobes. Crower told me on Titanium Connecting Rods to let the Oil flow. Going to use .032" rod pair side check clearances.
 
yes obviously re-check clearances, and if necessary go with different bearing set,
having that extra thousand oil flow clearance, you really want that .0025-- .0027


clearanceload.jpg


clearanceflow.jpg


clearancetemp.jpg
 
Uggg! Just dropped $3000 at Summit Racing today!

Stay tuned.... It will arrive here on Friday!!!
Pictures will be coming tooo!
 
Well..... Ummmm.... I do remember Brian offering me a place to stay! :D So I got that going for me!
 
Actually, It took alot of negotiation for her to release it to me... I have to install a concrete approach in front of our garage for starters..It's a 24' wide x 35' long pad.
 
Don't feel bad was on the phone with machine shops today. Around $400 to be spent next week to have my block zero decked and screw in oil galley plugs installed
 
You must be building a roller block. I was going to install restricters in the valley but I changed my mind cause I went with flat tappet lifters. They need all the oil they can get.
$400 is not a bad price. I got a deal on my machine work on a virgin block, It had to be line bored and honed, cylinders bored and plate honed, decked, steel mains doweled, a cnc machined steel billet
rear main cap, 2 piece rear seal adapter plate and sonic cleaned twice with a shot blast done at the start. Friend did all that for $1000
 
Ok .. I thought I would give another Update.

I did not get to make that oil pump tester. Being that the pump is new.. and it states it is a 60 psi pressure ,,I think it will be just fine. The original question was really about what the package said about that extra blue spring being used for H/P corvette pumps. I did not know that some of these cars used High Pressure.
Anyway ... the new BBC pump fit well and the new oil drive shaft measurements where around .060 play. I measured the pick up to pan and came up with 3/8"
I measured two different ways... I used a square and scale to measure the location of the pick up to the block,then I measured the depth of the pan.....The second method used was , I laid a piece of plastic on the pick up screen
and set a piece of silly putty on it. I then wiped some oil on the pan floor and set it in place on the block, and bolted it down with 4 bolts . Both ways showed a heavy 3/8"..

IMG_0454.JPG
Sorry I did not get more pics of the procedure.
The Canton oil pan however did give me a little trouble... I had to trim out some off the top of the bulkhead above the trap door, to allow the nut clip that the windage tray bolts to,to be relocated forward about 1/8".
No Big deal.. Also had to open up a couple corner bolt hole abit bause they where binding on the stud threads.

If you recall.. I was worried about the plastigage showing my rod bearings to only have .0015 clearance. I spent about 3 hours removing each one and mic'ing the crank, and using a dial bore gauge, I checked the
rod bearings ... I was correct in my thinking the plasigage had hardened and became brittle... I was getting a gauge reading of .0022-.0025 with and average of .0024 on most.IMG_0449.JPG IMG_0450.JPG


This rechecking made me feel alot better.

With the lower half passing inspection, I installed the oil pan and moved on to degree the cam in. It was within 1/2 degree of the card.

IMG_0456.JPG


Next I made DAMN sure I had all the oil plugs in and installed the new block coolant drain valves ..
After all was good I installed a set of Cometic MLS gaskets .040 then set the heads over the studs and into place. Both heads torqued to 80 ftlb

Now if you recall back in the begining of this thread during the tear down.... I had made mention of how there seemed to be a ledge Between the heads and the intake.
Well ... I found it...
IMG_0470.JPG

That motor musta felt like it was sucking a chocolate shake through a coffee straw!!!
Well. I did my best to take care of the issue.

IMG_0472.JPG
 
After the intake was mounted I installed the blower and a few little items.
I am waiting for my rockers to arrive. But I did get a nice size box delivered from Summit !!!

IMG_0480.JPG

OH....HELL YEA!!

I did end up getting the Sniper 1250 and all the goodies to play nice with it!

I have been taking a crash coarse on how to work with EFI and E85...I need to fine my old laptop to help me tune I guess..

I am running a steel 10an line from the tank through the whole fuel system until I need to reduce it at the TBI.
I still need to purchase a 100 micron and a 10 micron filter for the system..I have been looking at a 6 micron fiberlass filter, but I'm not sure. It may result in a pressure drop.

Anyway ... I been busy... hopefully I will be able to fire this thing up in two to three more weeks!

Thought I would leave you guys with what I have accomplished so far...

IMG_0479.JPG

I will be replacing those older pulley studs on the water pump with the new ones that are the same as the new one you see on it. I felt that the old ones where too long of a stud.
And they look like S#*T !!

Also ... I had to send back the Moroso timing pointer cause I ordered the wrong one. :thinking:

The new one came in.. but I have to fabricate a spacer so it will sit further out from the
aluminum timing cover. As of now... it won't fit.
 
Those tires would be 18.4 x 16.1 TITAN 's
They are agricultural tires normally found on Combine farm equipment.
They are around 44" tall ... and weigh 225lbs including the wheel.. Each.
It takes lots of torque to spin those puppies!
The suspension has to be modified to be able to withstand the abuse also.
I have custom designed and built the entire under carriage of this truck.
It uses 1410 U-Joints.
2 1/2 ton military axles
Transfer case is a special reverse front rotation matched with the axles also.
This is because the ring gear in the front axle is located on the opposite side in the center chunk
from any other axle. If you where to use a regular Transfer case ... the front axle would spin in reverse while the rear axle spins forward.
I have added shackles to each end of the front leafsprings for a softer ride. In order to do this, I had to fabricate a parallel 4 link control bar suspension.
The steering has been removed and replaced with a FULL hydraulic control system.
You can steer this beast with your little finger!:D
 
Back
Top