You are using an out of date browser. It may not display this or other websites correctly.
You should upgrade or use an alternative browser.
You should upgrade or use an alternative browser.
Unforgiven Project
- Thread starter Unforgiven
- Start date
Unforgiven
solid fixture here in the forum
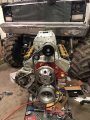
I also realized how far the blower belt is away from the end of the crank. It seems there is going to be tremendous leverage against the lower pulley.
I am thinking it might be wise to invest in a crank snout support.
But first I have to get this alignment issue solved.
I am thinking it might be wise to invest in a crank snout support.
But first I have to get this alignment issue solved.
Unforgiven
solid fixture here in the forum
or maybe spacers under the blower belt drive pulley to move it further out into ligament ?
If you are talking about the upper pulley... I am not sure if I can space out the idler pulley that is spring loaded that is right next to the drive pulley.
That certainly would be the easiest route if it could be done. It is is option that I will give another look at tonight.
I knew this build was going tooo smooth.

Unforgiven
solid fixture here in the forum
This is the time to put your capabilities to good use, make a new crankshaft pulley with
the correct dimensions !!!
Not a bad idea Rick..
I really need to find out why the blower wont line up as it did before.... That is really messing with me..
Strictly Attitude
solid fixture here in the forum
can you split is some machine some and use spacers for other I need to to do this for my reluctor wheel but mine is minor 1/8"
Unforgiven
solid fixture here in the forum
can you split is some machine some and use spacers for other I need to to do this for my reluctor wheel but mine is minor 1/8"
John ... That is most likely what has to be done...
JohnHancock
Well-Known Member
My blower pillows are offset on the mounting surface. Can you flip the upper pulley over?
Unforgiven
solid fixture here in the forum
Mike ...That is an awesome idea you made for your timing cover.! I wish I would have bought one of those two piece covers.. Especially now that I ruined my new pan gasket!
I have already machined a spacer for my adjustable pointer and was happy with those results.
Good advise on sealing the front crank snout too!
I lube the snout and seal .... anti sieze will be applied when I fix the predicament I'm in now.
Just ordered two new aluminum pulleys from Summit. ( It was cheaper and less time consuming Rick).
Got some spacers to have on hand if I need them too.
Yes... I reluctantly RE-ordered that damn oil pan gasket too.
And just to make matters worse... I ordered (1) 5 point harness (for now).
Yep... I'm in the doghouse again with the wife!
Unforgiven
solid fixture here in the forum
My blower pillows are offset on the mounting surface. Can you flip the upper pulley over?
That's a GOOD question!
I will also look into that tonight.
Unforgiven
solid fixture here in the forum
Well damn.... I was just posting on a different thread and did not realize it! OOOPS!
T-Test
solid fixture here in the forum
I would say the harmonic balancer is the difference in what is happening. Some where it is different than the other by the snout being longer or the total length of The balancer or the inside depth is not machined in as far as the old balancer. Recheck all dimensions and see what you've got.
The crank didn't grow in length and the blower didn't shrink. But you did space out the timing gears, I think, which should not affect the crank and balancer.
The crank didn't grow in length and the blower didn't shrink. But you did space out the timing gears, I think, which should not affect the crank and balancer.
Loves302Chevy
"One test is worth a thousand expert opinions."
Good suggestion Rick, especially since he has "(where I have access to all those CNC machines)" at work.This is the time to put your capabilities to good use, make a new crankshaft pulley with
the correct dimensions !!!

The timing set on my 334 was about .050" out of alignment, so I machined the lower gear to make it right.
From your pictures, everything looks right. The timing gears are fully on and the chain is aligned.
The balancer is seated up against the gear as it should be. You can't machine a full 1/2" from the hub without putting the back of the balancer into the timing cover. You compared the new balancer to the old one - same length. Where the hell is that additional 1/2" coming from???
Post a pic of the 2 balancers side-by-side, please.
Unforgiven
solid fixture here in the forum
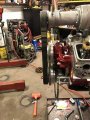
T... you are correct. Last night we found what the difference was.. (we think)
The old balancer was 8" in diameter with NO weight inside .. Also the snout was shorter on the back side.
We believe this allowed the balancer to be located further back and not interfear with the hub seal, which protrudes out from the cover by about .250
The new balancer is only 6.6" in diameter and it has a weight bolted inside of it. This weight prevented the balancer from allowing it to slide over that seal hub flange.
I ended up machining .250 off the back of the blower pulley and took .200 off the balancer snout for a total of .450
I will still need to shim the water pump pulley out .250 to line up. I am hoping that there is enough pilot to make it happen.
I'm at work now ...but I will post pics of the stuff later today.
Unforgiven
solid fixture here in the forum
Pics are coming this afternoon Mike..
We had 4 guys looking at this last night.. we think it was that insert in the balancer, and the way it was made.
Puzzling part is.... Both balancers measure the same for over all length.
We had 4 guys looking at this last night.. we think it was that insert in the balancer, and the way it was made.
Puzzling part is.... Both balancers measure the same for over all length.
Loves302Chevy
"One test is worth a thousand expert opinions."
Um, was there enough "meat" on the back of your blower pulley to machine .250" off without it failing?
I assume so since you already did it.
I assume so since you already did it.
Unforgiven
solid fixture here in the forum
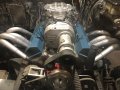
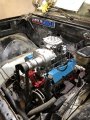
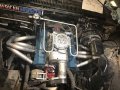
Yet another update. I did end up machining the blower pulley .250 off the mount face, and I shaved the hub of the balancer .235
This allowed everything to line up very well. I did not like the old steel v-belt pulleys so I ordered new aluminum pulleys to replace them.
Glad I did cause they look nice!
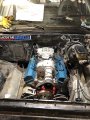
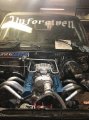
I found a set of fabricated aluminum rocker covers from the guy I bought the new block from. He said that I could have them for $20
They where painted blue, but I thought I would just soda blast them and polish them to a bright aluminum. But after I mounted them....
I kinda liked the color scheme. So my wife bought me a sign to install on the firewall.
Had to buy new headers.. 1 3/4" / 1 7/8" tubes with a 3 1/2" collector. She should breath alot better than the old 1 5/8" tube headers that
were on the old motor! Besides.... Ricks blueprint called for them! I had to explain to the wife the reason for new headers... So I told her that Rick
designed the motor and it called for them.
I had to do alot of thinking when I designed the fuel lines.. I bought a coil of 10AN aluminum tubing to supply fuel from the cell to
the 6 micron fuel filter in the engine bay. I have a 100 micron filter between the fuel cell and the A1000 fuel pump.
I used 8AN aluminum tube for the return line.
I had to rewire the whole truck because I removed all the factory wiring. It took me awhile to solder and shrink wrap the new wiring. I have
used as many relays as I could so I could keep all the power outside the cab. I wired it so that all my switches where on the negitive side.
Tonight... I will connect all the wiring to the battery to complete the electrical system.
I have a punch list taped to my door so I can keep track of all the little items that need to be addressed, And it is getting smaller!!
I hope to fire up the motor tomorrow night if all goes well.
I have a few pics to share below.

This allowed everything to line up very well. I did not like the old steel v-belt pulleys so I ordered new aluminum pulleys to replace them.
Glad I did cause they look nice!
I found a set of fabricated aluminum rocker covers from the guy I bought the new block from. He said that I could have them for $20
They where painted blue, but I thought I would just soda blast them and polish them to a bright aluminum. But after I mounted them....
I kinda liked the color scheme. So my wife bought me a sign to install on the firewall.
Had to buy new headers.. 1 3/4" / 1 7/8" tubes with a 3 1/2" collector. She should breath alot better than the old 1 5/8" tube headers that
were on the old motor! Besides.... Ricks blueprint called for them! I had to explain to the wife the reason for new headers... So I told her that Rick
designed the motor and it called for them.
I had to do alot of thinking when I designed the fuel lines.. I bought a coil of 10AN aluminum tubing to supply fuel from the cell to
the 6 micron fuel filter in the engine bay. I have a 100 micron filter between the fuel cell and the A1000 fuel pump.
I used 8AN aluminum tube for the return line.
I had to rewire the whole truck because I removed all the factory wiring. It took me awhile to solder and shrink wrap the new wiring. I have
used as many relays as I could so I could keep all the power outside the cab. I wired it so that all my switches where on the negitive side.
Tonight... I will connect all the wiring to the battery to complete the electrical system.
I have a punch list taped to my door so I can keep track of all the little items that need to be addressed, And it is getting smaller!!
I hope to fire up the motor tomorrow night if all goes well.
I have a few pics to share below.
Attachments
Last edited by a moderator: