grumpyvette said:"Several of the head bolts did NOT torque smoothly. Can I loosen the head bolts and re-torque them again or will that mess up the copper spray sealer?????"
you can, loosen the head bolts one at a time and then re-torque to the 55lb and 70 lb values, that should cause no major issues if done within 6-10 hours. and ID point out that bending a copper head gasket slightly is hardly a unique experience, I would not be overly concerned, thats one of the reasons they work well, they are rather pliable, in fact you can re-use copper head gaskets after cleaning and careful inspection 2-3 times with new copper coat added.
So you are saying don't loosen them all the way, just back them off a little to hopefully to 55 ft/lbs and then re-torque to 70 ft/lbs.....right ?????
You are using an out of date browser. It may not display this or other websites correctly.
You should upgrade or use an alternative browser.
You should upgrade or use an alternative browser.
TBucket Engine Project (Dart SHP)
- Thread starter Indycars
- Start date
Sorry for any confusion, Ill try to be clearer here,
Id back each bolt off individually about 3/4 turn , stop, then re-torque that individual bolt in two steps to the torque value its meant to have before proceeding to the next bolt, don,t do more than a single bolt at a time and you should be just fine
just as related info for future builds, or anyone later reading thru the thread.
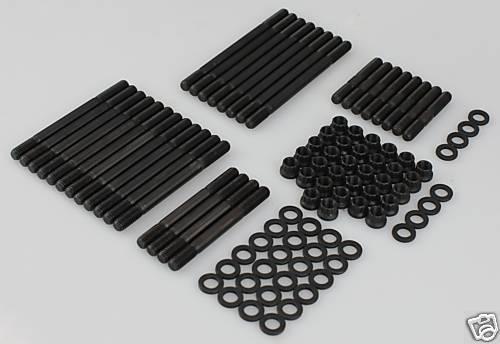
this is were head studs prove superior, with studs the lower end coarse threads completely engages the block threads before any stretch load is applied and with the washer on the head surface the nut used to clamp the head to the block is far more precise and your not trying to spin threads in the block while increasing the stretch or clamp loads. with studs the fine thread, upper end is lubed and the fine thread nut applies the clamp load stretching the stud.
remember to use the hardened steel washers under the head bolts on aluminum heads and the internal bevel side of the hardened washer faces away from the head toward the bolt heads.
if you don,t use the correct hard steel washers with some lube between the bolt heads and the aluminum heads, the clamp loads will vary a great deal
READ THRU THIS LINK
viewtopic.php?f=50&t=1222
Id back each bolt off individually about 3/4 turn , stop, then re-torque that individual bolt in two steps to the torque value its meant to have before proceeding to the next bolt, don,t do more than a single bolt at a time and you should be just fine
just as related info for future builds, or anyone later reading thru the thread.
this is were head studs prove superior, with studs the lower end coarse threads completely engages the block threads before any stretch load is applied and with the washer on the head surface the nut used to clamp the head to the block is far more precise and your not trying to spin threads in the block while increasing the stretch or clamp loads. with studs the fine thread, upper end is lubed and the fine thread nut applies the clamp load stretching the stud.
remember to use the hardened steel washers under the head bolts on aluminum heads and the internal bevel side of the hardened washer faces away from the head toward the bolt heads.
if you don,t use the correct hard steel washers with some lube between the bolt heads and the aluminum heads, the clamp loads will vary a great deal
READ THRU THIS LINK
viewtopic.php?f=50&t=1222
Thank you, Thank you, Thank you....... for hanging in there with me on this one. I'm thinking it was getting late for an East Coast kind of guy like you and age as nothing to do with this right!
But for now, I'm going to take a shower and go to bed. I will report my experiences on the RE-TORQUE tomorrow.
Thanks again!!!! I guess this is why you get paid the BIG BUCKs for running this forum! :lol:
But for now, I'm going to take a shower and go to bed. I will report my experiences on the RE-TORQUE tomorrow.
Thanks again!!!! I guess this is why you get paid the BIG BUCKs for running this forum! :lol:
I loosened each bolt one at a time and then retorqued it. The bolts were completely loose at 1/4 to 3/8
of turn. I set the torque wrench for 70 ft/lbs and tightened the bolt roughly half way and then adjusted
my stance and torqued until I got the click at 70 ft/lbs. After going thru the spiral pattern, then I went
back and checked them again going from one end to the other. Three or four bolts tightened a couple
of degrees more.
All bolts torqued smoothly this time!
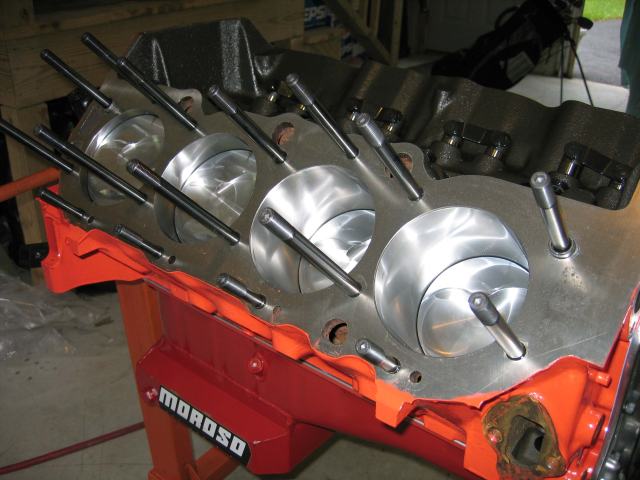
BTW, at last second before I put the head on, I stop one last time to think if there was anything I
needed to do first. Ding, Ding, Ding ........ the lifters have to been installed before the head goes on.
With a lifter that is .300" taller than OEM, they can NOT be installed after the head in installed. There
is not enough room between the head and lift bore.
mathd
solid fixture here in the forum
Loll, nice one there.Indycars said:Thanks again!!!! I guess this is why you get paid the BIG BUCKs for running this forum! :lol:
Thats suck about those lifter, so if you have a lifter failure or want to change the camshaft you have to remove the heads? aww.
I hadn't thought about it, but it's required when using roller lifters with the tie-bar in the Dart block. If you wanted to change camshafts, I suppose there would be a way to hold the lifters up while you slide the old cam out and the new one in.mathd said:Thats suck about those lifter, so if you have a lifter failure or want to change the camshaft you have to remove the heads? aww.

that .035 will be Just fine !
the object of drilling the tiny hole for those that don,t know, is two fold, first it helps prevent trapped air in the oil passage from slowing oil priming the oil pump pressurized oil from reaching the lifters quickly ,if the cars engine sits unused for a long time as trapped air in the oil passages is bled off far more rapidly, secondly it provides a constant flow of extra lube flowing to the chain cam drive even at low rpms, this helps increase durability.
viewtopic.php?f=27&t=1170&p=2396&hilit=drill+size#p2396
viewtopic.php?f=54&t=2187
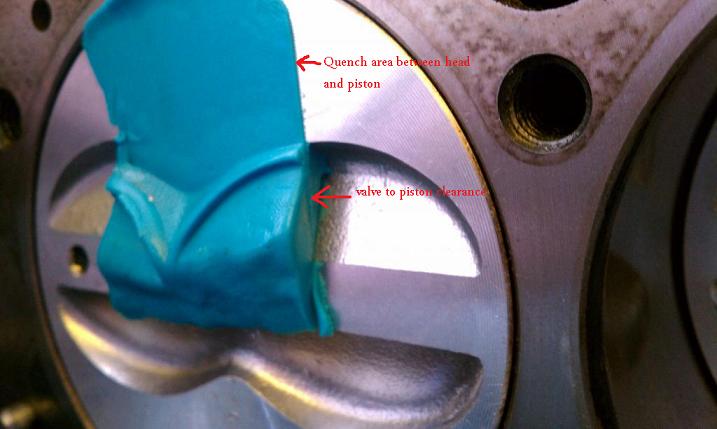
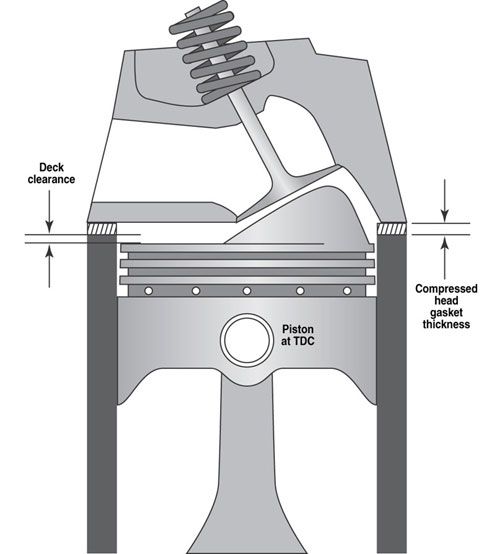
Be sure that you check and re check/ verify the QUENCH and PISTON TO VALVE CLEARANCE during the pre-assembly process.
viewtopic.php?f=52&t=399
viewtopic.php?f=52&t=1376
viewtopic.php?f=52&t=90
the object of drilling the tiny hole for those that don,t know, is two fold, first it helps prevent trapped air in the oil passage from slowing oil priming the oil pump pressurized oil from reaching the lifters quickly ,if the cars engine sits unused for a long time as trapped air in the oil passages is bled off far more rapidly, secondly it provides a constant flow of extra lube flowing to the chain cam drive even at low rpms, this helps increase durability.
viewtopic.php?f=27&t=1170&p=2396&hilit=drill+size#p2396
viewtopic.php?f=54&t=2187
Be sure that you check and re check/ verify the QUENCH and PISTON TO VALVE CLEARANCE during the pre-assembly process.
viewtopic.php?f=52&t=399
viewtopic.php?f=52&t=1376
viewtopic.php?f=52&t=90
My shipment with the two piece valve covers came in from Summit. Below is what I got.

From pictures I saw on Proform and Summit's website I wasn't sure if the bottom half was
polished. I did call Proform to make sure and yes both pieces are polished. As you can see
below the surface is not perfect, but what can you expect from Twain.

Below you can see the the internal construction. The allen bolts that hold it together were
black anodized.... maybe, one had some rust inside the hex. They used 3mm allen heads bolts,
that's the wrench size.


I guess you can't expect perfection for a lousy $200. I suppose I got what I realistically
could have expected. Wish I could have found such pictures like above so I could have
made a more informed decision. I'm holding final opinion until I can use them in a real
setting.
Last edited:
busterrm
solid fixture here in the forum
Those are the valvecovers we put on david's 385. I like them myself, once bolted on they are great, just make sure you get a good seal on bottom half. I like them because they leave good access to the rockers, easy access, no mess with valve work with the engine running. The top half I just stuck the gasket to the top cover like I do in regular valve covers.
I bought them for two reasons, one you just mentioned. The other reason is they are unique looking, not something you see all the time.busterrm said:Those are the valvecovers we put on david's 385. I like them myself, once bolted on they are great, just make sure you get a good seal on bottom half. I like them because they leave good access to the rockers, easy access, no mess with valve work with the engine running. The top half I just stuck the gasket to the top cover like I do in regular valve covers.
I got side tracked abit with my 29 year anniversary and a water leak into the trunk on the Park Avenue.
This time I put just the head on the block, no gasket and torqued all the bolts 20, 40, 60 ft/lbs. I had
three that didn't torque smoothly, so I loosened them and re-torqued them.
The next day I prepared the head gasket with scotch brite. I cleaned every surface first with mineral spirits
twice, then 91% alcohol twice and then with lacquer thinner three times while changing cloths several
times. Two coats of Permatex copper spray and install the gasket and head.
This time the torque went smoother, I only had to torque the bolts one time.
I just couldn't resist trying on the new valve covers to see how they looked. Sometimes it seems we
never grow up!


Last edited:
mathd said:Wow, just stop right now you cant do that...
Well....it's looks like you better get busy my friend!!! :cry:
It cannot look better that mine, its illegal to do it soo nicelly :lol:
Maybe in Canada!
thats certainly a bit out of the ordinary, I can,t wait to see it installed and running!
busterrm
solid fixture here in the forum
Hey Grumpy, I live about 140 miles away from Rick, and I plan on going up there soon. I am getting the itch to see this beast he is building.
Rick, its okay to still have the lil kid inside, I believe all hotrodders have a lil kid inside trying to get out. I have noticed after all your hours of work, there is a bit of excitement in your posts. But, that is okay! I remember when I started reading your T Bucket post some time back, you'll never know how many times I wanted to be there just watching. Today's society doesn't shed many terms of endearment, or people with your kind of passion. So enjoy it friend! I have on countless occasions, had this visual of you just putting around town in your T Bucket with a this big
____ eating grin across your face.
BTW
got any pictures or questions, advice, or ideas,or any thoughts about the use of additions too the cooling system and oil or transmission fluid coolers going into that T-bucket? a good trans cooler would be a great help,and I don,t remember much about the cooling system being mentioned (aluminum radiator, fan shroud?)
related threads, that you should look through again as a quick reference
viewtopic.php?f=52&t=90
viewtopic.php?f=52&t=399
viewtopic.php?f=52&t=1376
viewtopic.php?f=57&t=176
viewtopic.php?f=57&t=4701
viewtopic.php?f=57&t=4230&p=13699#p13699
viewtopic.php?f=57&t=2756
any thoughts on the fuel supply system design
viewtopic.php?f=55&t=635
viewtopic.php?f=55&t=211
viewtopic.php?f=55&t=6105&p=18854&hilit=fuel+filters#p18854
viewtopic.php?f=55&t=1790
viewtopic.php?f=55&t=1639
viewtopic.php?f=55&t=1790
viewtopic.php?f=55&t=5229
viewtopic.php?f=55&t=109
DRIVE TRAIN AND MOTOR MOUNTS?, TORQUE STRAPS, disc brakes, traction bars ETC
viewtopic.php?f=71&t=1282&p=13095&hilit=dana+differential#p13095
viewtopic.php?f=33&t=80&p=102&hilit=drive+shaft#p102
viewtopic.php?f=33&t=5621&p=22465&hilit=u+joints#p22465
viewtopic.php?f=81&t=2617&p=6756&hilit=torque+strap+mounts#p6756