TBucket Engine Project (Dart SHP)


The motor is mounted from the front face, not sure but thought the mount is from a Corvette
maybe. Should be little movement. I have already bought urethane biscuits for the mounts
when I go back together.


MotorMount_0019.jpg

I'm caught between doing everything and going into the this coming winter without driving
the car again. So my plans will be tempered by when I actually get the motor and
trans into the car. Adding cooler and a return style fuel system will require that car be together.
I do hope to put a trans cooler in before driving, but not a engine oil cooler. Probably go with
the Holley electric fuel pump I have now with the internal pressure regulator, then upgrade
over the winter.

The radiator is a 4 pass and 3" core thickness Walker radiator, so I hope this will be enough
with the HV water pump.


Radiator_0018.jpg

The brakes have always been plenty to stop this 1800 lb car, but am always willing to
re-evaluate with the new engine.

My latest concern is bringing the new engine and new transmission to life at the same time.
I will be researching what the trans needs on initial startup. Hopefully it won't require too much,
most of my focus will be the new engine. I plan to have a couple of extra eyes and ears on first startup.
 
Last edited:

I need to clean the CompCams rocker arm for final assembly. CompCams says
Wash rockers and polylocks thoroughly with denatured alcohol (lacquer thinner). Do not use water or evaporative cleaners. Then bow dry. Soak rocker in engine oil or spray with CompCams Valve Train Assembly Spray (Part #106).

Should I remove the snap ring to clean and make sure that all dirt is removed before soaking in oil???


RockArmSnapRing_2477.jpg
.
 
Last edited:
I would not remove the snap ring , on the roller rocker,as theres a good chance youll loose bearing or some small part, Id simply swish each rocker for a few minutes in a bucket of fuel or mineral spirits, to flush out any grit , blow it dry with high pressure air with a spray nozzle
nozzle.gif

and repeat the process again, then throw them all in a bucket of marvel mystery oil to soak for a few minutes prior to being installed
mmo.jpg

retain7.jpg

MMO is a very effective penetrating oil/lubricant that will protect bearings in the roller rockers for the short time it generally takes for oil flow thru the push-rods to start reaching the rockers if the lifters are properly adjusted
SBCOilingnew.png

keep in mind both the roller lifters and new rockers are frequently shipped with light protective grease film preventing rust in shipping, thats removed with the fuel and high pressure oil bath, the MMO is a good lube and perpetrator that protects from rust plus lubes and reduces friction
 
Last edited by a moderator:
Indycars said:

The motor is mounted from the front face, not sure but thought the mount is from a Corvette
maybe. Should be little movement. I have already bought urethane biscuits for the mounts
when I go back together.


I'm caught between doing everything and going into the this coming winter without driving
the car again. So my plans will be tempered by when I actually get the motor and
trans into the car. Adding cooler and a return style fuel system will require that car be together.
I do hope to put a trans cooler in before driving, but not a engine oil cooler. Probably go with
the Holley electric fuel pump I have now with the internal pressure regulator, then upgrade
over the winter.

The radiator is a 4 pass and 3" core thickness Walker radiator, so I hope this will be enough
with the HV water pump.


The brakes have always been plenty to stop this 1800 lb car, but am always willing to
re-evaluate with the new engine.

My latest concern is bringing the new engine and new transmission to life at the same time.
I will be researching what the trans needs on initial startup. Hopefully it won't require too much,
most of my focus will be the new engine. I plan to have a couple of extra eyes and ears on first startup.
Okay, do you guys remember when you were a kid, mom and/or dad took you to the
pet store to get a puppy? You walk up to the glass and all the little puppies run up put their front paws on the
glass, shake their hanging out tongue at you and start yippin at you? "Pick me, pick me!" Okay, I am raising my hand, "Pick me, Pick me!"
 
busterrm said:
Okay, do you guys remember when you were a kid, mom and/or dad took you to the
pet store to get a puppy? You walk up to the glass and all the little puppies run up put their front paws on the
glass, shake their hanging out tongue at you and start yippin at you? "Pick me, pick me!" Okay, I am raising my hand, "Pick me, Pick me!"
Pick me, Pick me .......... :lol: :lol: :lol:
 
grumpyvette said:
I would not remove the snap ring , on the roller rocker,as theres a good chance youll loose bearing or some small part, Id simply swish each rocker for a few minutes in a bucket of fuel or mineral spirits, to flush out any grit , blow it dry with high pressure air with a spray nozzle
nozzle.gif

and repeat the process again, then throw them all in a bucket of marvel mystery oil to soak for a few minutes prior to being installed
mmo.jpg


MMO is a very effective penetrating oil/lubricant that will protect bearings in the roller rockers for the short time it generally takes for oil flow thru the push-rods to start reaching the rockers if the lifters are properly adjusted
SBCOilingnew.png

keep in mind both the roller lifters and new rockers are frequently shipped with light protective grease film preventing rust in shipping, thats removed with the fuel and high pressure oil bath, the MMO is a good lube and perpetrator that protects from rust plus lubes and reduces friction
I agree, just wash them and blow dry, I soaked mine high zinc engine oil before.
 
Last edited by a moderator:
I just wanted to put a bug in your ear for witnesses to your spectacle! Hahahahaha! Gosh, sounds like I am talking about Indy 500!!


I was thinking since your going with a new engine, have you had the radiator out and flushed real good? But I do think the radiator you have will work just fine, considering the engine is also going to be out in open to air, it will have that to help cool it also. Is your water pump high flow?
 
busterrm said:
I just wanted to put a bug in your ear for witnesses to your spectacle! Hahahahaha! Gosh, sounds like I am talking about Indy 500!!

I was thinking since your going with a new engine, have you had the radiator out and flushed real good? But I do think the radiator you have will work just fine, considering the engine is also going to be out in open to air, it will have that to help cool it also. Is your water pump high flow?
I haven't taken it to the radiator shop yet, but it's on my list. I don't want to get it all together and running to find out I have a leak.
 

I thought I had the pushrods clean, I had run them thru the parts washer (PW). Which
included holding the pushrod up to the nozzle and forcing all the flow thru the inside of
the pushrod. I did hold it up to the light and examine, looked pretty good to me. But how
can you be sure when trying to look thru 7.45" inside of a pushrod. My wife was out
running around, so I called her and asked for some pipe cleaners. Sure enough she found
some and just to satisfy my curiosity I immediately I pushed a pipe cleaner thru the inside
of a what I thought was a clean pushrod.

This is what it looked like.

PushRod&PipeCleaner_2478.jpg

So I used the pipe cleaner and the PW. After scrubbing the inside and then flushing with
the PW, I could see dirty cloud come out of the pushrod.....so much for that clean
pushrod that I though I had.

I wish I had taken a before picture, but this shows how shinny it looked internally after
cleaning with the pipe cleaner.

Thank god for wives that like to shop....even for pipe cleaners. :lol: :p :lol:

PushRodInternalClean_2488.jpg

I wiped down 8 pushrods after going thru the PW twice, but there was still something
on the outside. Probably nothing to worry about. Just some something Trick Flow sprayed
on the outside to keep them from corroding while on the shelf for months.

DirtyTowel_2499.jpg

Soap Opera to continue, tune in tomorrow and find out ...... will the pushrod and lifter get together
or will it be the pushrod and the rocker arm. It's pretty embarrassing from my view, they
both look pretty intimate. Maybe it's going to be a 3-way.....

TO BE CONTINUED.......

 
Last edited:
RELATED THREADS AND LINKED INFO

viewtopic.php?f=50&t=6255&p=21695&hilit=cleaning+parts#p21695

viewtopic.php?f=50&t=6847&p=22254&hilit=parts+washer#p22254

viewtopic.php?f=50&t=6255&p=19681&hilit=parts+washer#p19681

viewtopic.php?f=27&t=2886&p=12701&hilit=parts+washer#p12701

pwp1.jpg


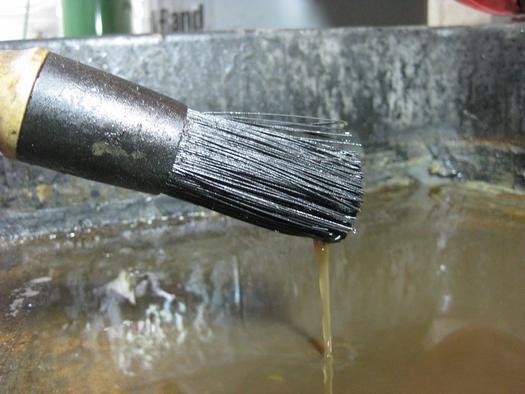
There are an awful lot of greasy parts in the world. Cheap parts washers barely filter the cleaning chemicals and recirculate a solution of sludge. The nice parts cleaners have a filtering system, but cost hundreds of dollars. This is a simple design for a filtering system that will make up most of the gap between your cheap parts washer and the professional units without stressing your wallet.

The $50–$100 parts washers on the market consist of a tank, a pump, a hose and a brush. Only a small piece of gauze serves as a filter, and it is almost totally ineffective. In the parts washer of the $1,000 price range, the used cleaning solution drains into a barrel on which the parts washer sits. Cleaning solution is drawn through a filter element before recirculating back through the parts-washer brush. The filtration makes all the difference. So this design swaps the crappy gauze filter for an automotive oil filter and a remote oil-filter mount, mimicing the high-end mode of operation for around $75.
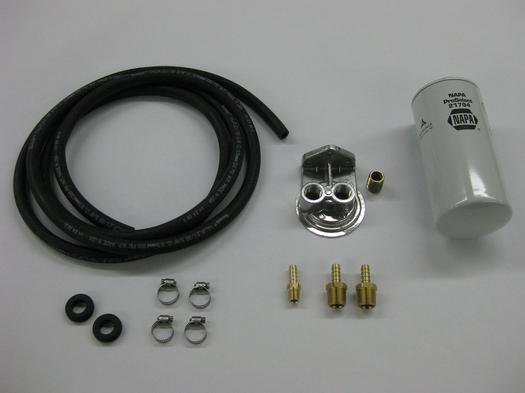
pwp2.jpg

Ingredients:

(If you would prefer to purchase the parts for this conversion all at once, I've put together parts washer filter kits available in the TE eBay store.)

A cheap parts washer. Presumably you already have this. I used mine, a well used Northern Tool 20-gallon model.
Perma Cool model 1213 remote oil filter mount. Jegs p/n 771-1213 $15.99
Chevy 2 Quart Oil Filter. Napa Oil filter 21794 or equivalent. $9.16
Around 10 feet of 3/8" Air, Water, and Oil hose. McMaster p/n 5138K64. $0.84/ft
Pipe to 3/8"-hose adapter suitable for the outlet of the existing parts washer. Most of these, including mine, are 1/4" NPT, which is McMaster p/n 5346K18. $9.19/10
1/2" NPT to 3/8" hose adapter. McMaster p/n 5346K21. $11.07/5
Hose Clamps for 11/16" OD hose. McMaster p/n 5388K16. $5.28/box
Rubber Grommets for 11/16" OD hose. McMaster p/n 9600K55. $5.89/25
4x 5/16" NC bolts 1" long, 4x 5/16" washers, and 4x 5/16" NC nuts
pwp3.jpg

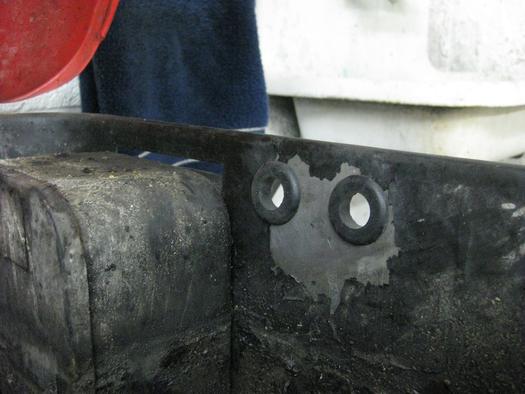
Parts Washer Filter Holes: Vin Marshall

First, we'll need two holes in the side of the parts-washer tank through which the hose can pass. Drill these above the normal fluid level of the tank so that a perfect seal is slightly less important. The outer diameter of your grommets will determine the size of these holes. If you use the ones I specify above, the hole size should be 1". You can drill this with a holesaw.

pwp4.jpg

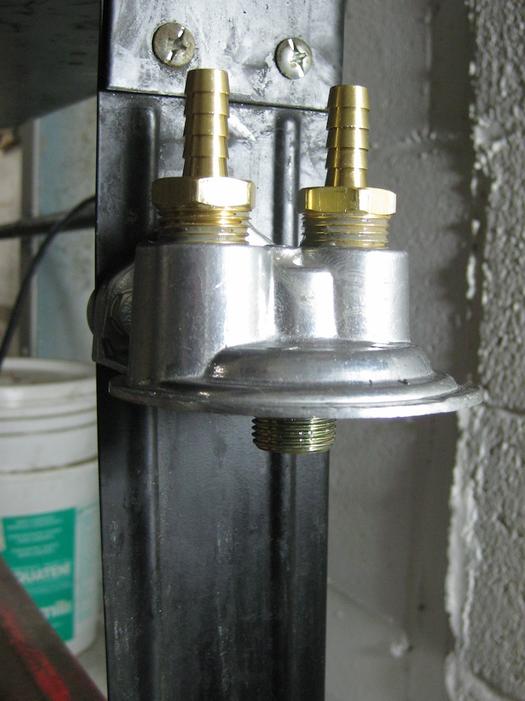
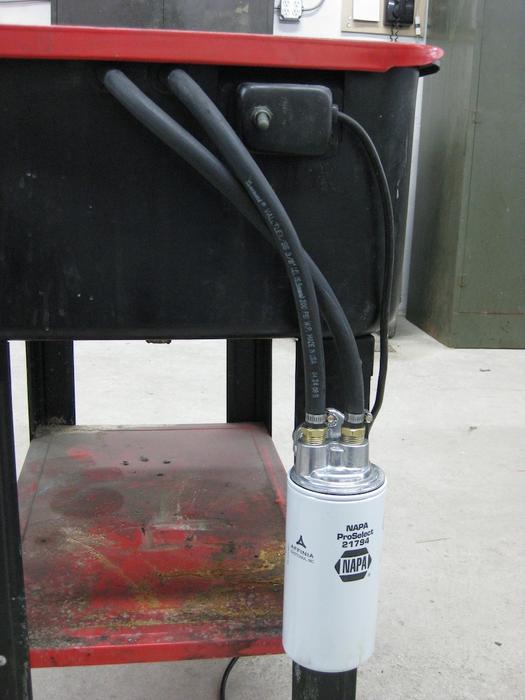
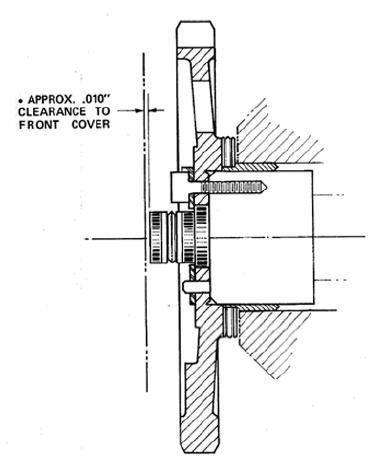
Next, we will mount the filter housing. Place this housing somewhere out of the way. I chose to mount it on the back leg of the parts washer. I chose the perma-cool remote oil filter mount used here because it will fit a two-quart oil filter used on diesel trucks. The inlet and outlet ports are 1/2" NPT. Thread into those two ports 1/2" NPT to 3/8" hose-barb adapter fittings. Use teflon tape or pipe dope on all of the threaded fittings in this project. The filter mount comes with the threaded filter mount separate from the housing. Install this threaded nipple into the filter housing as per the included instructions.

pwp5.jpg

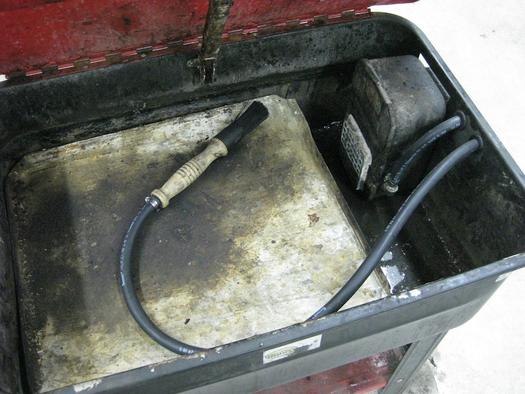
The outlet from the pump on my parts washer is 1/4" NPT. I suspect most of these cheap parts washers are made using the same pump. Check the outlet of your pump to be sure and determine exactly what fitting you need here. From that fitting, adapt to the 3/8" hose with a barbed fitting. For my setup, that meant a 1/4" NPT to 3/8" hose barb. Install that NPT to hose adapter into the outlet of the filter pump using teflon tape or pipe dope. Run a length of thye 3/8" hose from this adapter through one of the holes in the side of the tank and onto another barb to NPT adapter already threaded into the "IN" port on the top of the filter mount.
pwp6.jpg


From the hose barb on the "OUT" port of the filter mount, run a hose back into the parts washer tank through the other grommet. Leaving enough hose to move the parts washer brush around, run that hose to the original brush. Use hose clamps on all of the hose connections.


5. Changing Filters

Depending on how filthy your parts are, you'll periodically need to change filters. If the filter head is mounted below the level of the parts washer tank as mine is, you'll need to clamp off the "IN" hose to stop the siphoning of liquid as you remove the filter. I use vise-grip pliers for this. You could also install a valve - if you find that you are changing filters very frequently - or just mount the filter higher than the tank.

Your parts washer is now ready to use. For around $75 in parts, your parts washer is filtering the cleaning solution like a pro.

pwp7.jpg


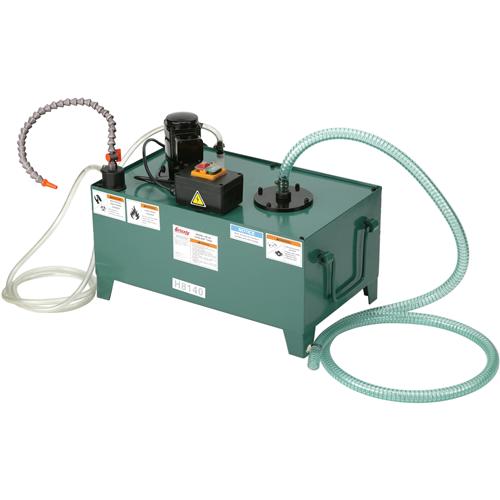
http://www.grizzly.com/products/7-Gallo ... stem/H8140
 
Indycars said:
I must of ordered the wrong cam bolt locking plate. The bolt circle diameter is incorrect.

Is the locking plate necessary if I'm using Red Loctite 262 on the three cam bolts???

This is the locking plate I bought:
http://www.summitracing.com/parts/CRN-99168-1/

ITS not required if your using loctite on the bolt threads, but IM curious, what part of the lock plate is not lining up?
most guys use the retainer plate to hold a nylon cam button in place more than the bolts
cambutclear.jpg

0106em_bbshootout_14_z.jpg


viewtopic.php?f=50&t=4306&p=11353&hilit=safety+wire#p11353

viewtopic.php?f=52&t=3809&hilit=nylon+button
 

Picture is worth a 1000 words.

When you look at the description on Summit, under notes it says "Will not fit engines with factory roller cams."


CamBoltLockingPlate_2507.jpg
 
Last edited:
yeah! definitely the wrong part for the application
Im sure summit or jegs etc has the correct part and since were not talking much money ID just stick that part on the shelf and get them to send the correct part if you still want it, but a bit of thread locker will get the job done!
and you can always drill and safety wire the bolts if its a serious concern


RELATED THREADS

viewtopic.php?f=50&t=4306&p=11353&hilit=safety+wire#p11353

viewtopic.php?f=27&t=970&p=2373&hilit=every+press+drill#p2373

viewtopic.php?f=27&t=2198

viewtopic.php?f=27&t=4714&p=12809&hilit=drill+press#p12809
 
Indycars said:
Picture is worth a 1000 words.

When you look at the description on Summit, under notes it says "Will not fit engines with factory roller cams."
What brand of cam, it looks like the bolt circle is smaller than the one in grumpy's picture? Look at the edge of your bolt head and look at the ones in grumpy's picture, yours are inside the ID hole and his aren't! Thats weird, I have used those from summit for a couple years and never had that problem. I don't use factory roller cams, but thats just odd!
 
busterrm said:
What brand of cam, it looks like the bolt circle is smaller than the one in grumpy's picture? Look at the edge of your bolt head and look at the ones in grumpy's picture, yours are inside the ID hole and his aren't! That's weird, I have used those from summit for a couple years and never had that problem. I don't use factory roller cams, but thats just odd!
The camshaft is a Crower Hyd Roller 00471 with a step nose.

DSC00486_Resized.jpg

Found this on the Comp Cams website: http://www.compcams.com/pages/412/gener ... -info.aspx


GENERAL MOTORS TECHNICAL INFORMATION
Small Block V8
There are several varieties of small block engines currently in use in the aftermarket. Although they
mostly use the same block, the cylinder heads are very different and require totally different camshafts.
The valve arrangement in the heads is different, and therefore the lobe placement on the camshafts
must coincide with the head you are using. The 54 is the first cam to completely stray from the original
design. It is .300" larger in diameter.


CamNoseID.jpg

The nose of the standard early model cam 12 is very different from the later model hydraulic roller 08.
The nose of the hydraulic roller 08 is necked down to accommodate the cam retention plate. The 07
is an LT1/LT4 shaft which has a longer dowel pin and a center hole for the distributor. Be sure to check
the diameter and depth of the hole in the front, as well as the length of the dowel pin.


I went ahead and installed the cam gear with Red Loctite #262. I forgot these threaded holes are not blind
and tried to spray brake cleaner to clean the threads, so just a heads up.
 
Last edited:

Yesterday I realized that I had not checked the balancer and timing pointer for accuracy, but I already
had installed the heads. So I made this piston stop from a broken spark plug. No need to drill it, just
tap it for a 3/8 - 16 course thread after removing the center electrode. I estimated that I needed about
2" from the tip of the bolt to the gasket surface. I used an allen bolt I had and ground it down until it
would just slip inside the plug hole. This is not nearly as solid this way compared to the piston stop with
the heads off. This has some flex, because it's being contacted by the piston at nearly a 90 degree angle.

PistonStop01_2501.jpg


All the possible adjustment in the pointer was used to get zero on the balancer.

TimingPointerCalibration01_2489.jpg
TimingPointerCalibration02_2495.jpg

I installed all the pushrod guide plates and torqued the rocker studs to 45 ft/lbs and red Loctite, per
the phone conversation I just had with a Brodix technician. I had already cleaned and soaked the rocker
arms over night, so they were ready to go.

RockerArmsSoaking_2517.jpg
ValveTrain01_2524.jpg

I like to take pictures of the final assembly so I can go back and verify that something was done. In this
case I took (4 pics, 2 per side) pictures of the rocker arm pivots so I have this confirmation if I need it later.

RockerArmPivotInstall_2521.jpg
.
 
Last edited:
Back
Top