You are using an out of date browser. It may not display this or other websites correctly.
You should upgrade or use an alternative browser.
You should upgrade or use an alternative browser.
TBucket Engine Project (Dart SHP)
- Thread starter Indycars
- Start date
I figured out where to get the interior done again, I'm going to use "Barely Street Legal".
I know it sounds like a porn website ......hehehe!!! They are going to do something similar
to the one below for about $1800. The colors will be totally different then what you see,
they will be as noted in white text. Should take less than a week to complete.

I know it sounds like a porn website ......hehehe!!! They are going to do something similar
to the one below for about $1800. The colors will be totally different then what you see,
they will be as noted in white text. Should take less than a week to complete.

I like the idea of getting the t-buckets interior, redone
(Ive never been exceptionally good at interior re-upholster work, but I certainly appreciate a well done interior upholstery job)
but, on headers,Id probably do what many guys would consider rather silly as its bound to cost more and take more work, Id sure invest that nearly $700, your looking at spending on headers, on a good WELDER if I didn,t already own several,and fabricate my own headers,
made too be an exact fit, even if the welder and materials eventually,will
and probably would cost 3-4 times as much as just buying headers ,
simply so I had exactly what I wanted and, when I was done,
I'd own a new welder.
but then thats the TOOL JUNKY , in me, SPEAKING,
and the fact that I hate "making DO" rather than getting "EXACTLY WHAT I WANT"
but keep in mind that frame of mind has also kept me from building my corvette engine swap,
while I keep adding tools to my shop, so its a known flaw in my planing
yeah its amazing how everything costs ten times what you think it will and takes five times longer to do even at that inflated price
http://garage.grumpysperformance.com/index.php?threads/building-custom-headers.961/
http://www.stainlessheaders.com/
http://hotrodenginetech.com/icengineworks-header-modeling-kits/
Last edited:
I'm planning on replacing the firewall with some polished SS and the front
motor mount with Bob's mount. This all requires pulling the engine out of
the car. I've drained the coolant including both sides of the block, disconnected
the wiring, pulled the distributor, carburetor, hoses and radiator. I'm getting
pretty close to pulling the engine now, hopefully it will be out this weekend.
I called about the cost of a dyno test and it's $400 for 1/2 a day and I supply the
fuel. The downside is it will be March or April before he can get to me, this is the
busy time of year for him. So I'm on the fence about whether to have the test done
at this time.


Below I'm preparing to pull the distributor.

.
motor mount with Bob's mount. This all requires pulling the engine out of
the car. I've drained the coolant including both sides of the block, disconnected
the wiring, pulled the distributor, carburetor, hoses and radiator. I'm getting
pretty close to pulling the engine now, hopefully it will be out this weekend.
I called about the cost of a dyno test and it's $400 for 1/2 a day and I supply the
fuel. The downside is it will be March or April before he can get to me, this is the
busy time of year for him. So I'm on the fence about whether to have the test done
at this time.
Below I'm preparing to pull the distributor.
.
you take some darn impressive photos Rick!
and if you get the car dyno tested remember rear wheel hp with an auto trans typically reads rear wheel hp,
at about 18%-20% below crank hp, due to converter slip,and drive line losses.
Id also point out that as previously, discussed your easily able to boost peak crank hp numbers 60hp-80hp, at a slight reduction in street-ability, with minimal changes, (cam & intake)
Ive built a few dozen roughly similar 383-406 SBC engines and the trends rather obvious,with the component selection vs drive-ability, and I tried to help you build a much more street and durable combo with peak hp taking a back seat to reliability and peak hp, If you read early posts I made it a point to try to explain that peak power is of far less value than having a completely durable and easy to drive combo, that does not mean it can,t be scary fast , just that judicious part selection trades a bit of peak power for ease of daily use.
Last edited:
I would NOT be in a big rush to change the expensive and well matched to your application, cam& valve train, components, your current combo, once sorted and tuned, even as it is currently, should easily get you into the low 11 to high 10 second range
but swapping to a decent single plane intake would reduce off idle torque, allowing less wheel spin and provide a bit more peak power potential, and due to the ease of component swapping might be a viable option Id look at, provided you really feel a few extra peak hp are warranted,If you go that route obviously an intake swap is not difficult for someone with your proven skills
I would NOT port match the heads, as Ill bet you'll be happy with the result, for racing, without doing that, but I would clean up and blend the plenum and runner entrances, and keep in mind for daily use you might want to re-install the dual plane later,
YOUR THOUGHTS?
personally Id buy and test this just out of curiosity if it was my t-bucket,ESPECIALLY if you decide to swap to a longer duration cam, as the potential increased air flow will help the longer duration cam reach more of its upper rpm power potential.
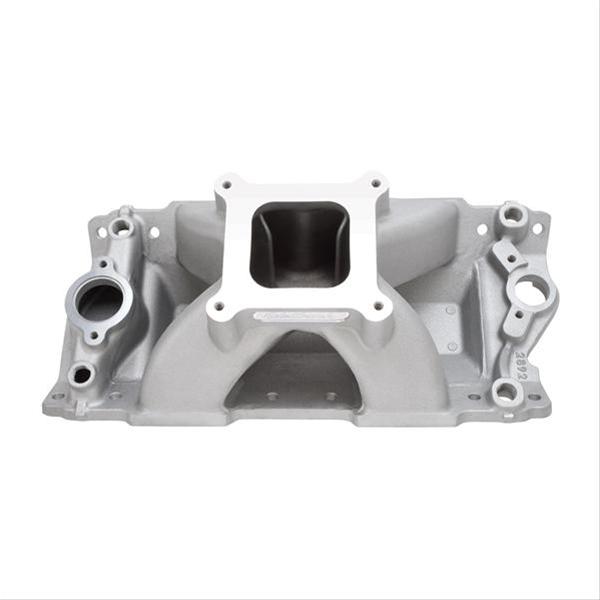
I've seen that single plane intake be worth a couple tenths on a few cars ,once matched to the correct cam, but remember your not building or driving a race car.
the cam and intake you currently have is very well matched to performance street driving, and once the tires and suspension are correctly set up for max traction, you should get the car to run very low 11 to high 10 second 1/4 mile et, with its current config. , and while its easily possible to increase power with a intake like the one linked below,and longer duration cam.
http://www.summitracing.com/parts/edl-2892
yes a cam like these linked below ,would gain you a few extra hp,
but you've barely begun to sort out the current combo, over caming the engine would be a major mistake,
and you need slicks and thinking about traction and suspension options, you've barely begun to sort out the current combo potential.
As I'm sure you realize , but the newer guys reading this thread may not, It generally helps to step back mentally and ask yourself, any time you contemplate major changes , what am I trying to accomplish here?
what are the realistic potential results?
can I do the work myself or will I need to have help?
what else will need to be changed to make this work efficiently?
remember you can calculate ,the potential results of most changes with current dyno soft ware, to get at least some idea, of the potential likely results ,and for what your contemplating ,you,ll want the LSA to fall in the 105-110 range and I would not exceed 246 @ .050 lift or about .650 lift at the valves with 1.6:1 ratio rockers due to wanting to maintain long term durability,and wanting to drive it with pump octane fuel, but not over cam the engine ,as that would likely result in trading too much street, drive-ability for too little gain in upper rpm power as your compression, converter stall speed and rear gear ratio, will stay the same, and this is a street driven car, "not a trailer it to the track," dedicated race car.
minimum hydraulic roller upgrade
http://www.cranecams.com/product/cart.php?m=product_detail&p=24187
decent solid roller choices
http://www.cranecams.com/product/cart.php?m=product_detail&p=24543
or
http://www.crower.com/chevy-262-400-power-beast-roller-cam-277r.html
but swapping to a decent single plane intake would reduce off idle torque, allowing less wheel spin and provide a bit more peak power potential, and due to the ease of component swapping might be a viable option Id look at, provided you really feel a few extra peak hp are warranted,If you go that route obviously an intake swap is not difficult for someone with your proven skills
I would NOT port match the heads, as Ill bet you'll be happy with the result, for racing, without doing that, but I would clean up and blend the plenum and runner entrances, and keep in mind for daily use you might want to re-install the dual plane later,
YOUR THOUGHTS?
personally Id buy and test this just out of curiosity if it was my t-bucket,ESPECIALLY if you decide to swap to a longer duration cam, as the potential increased air flow will help the longer duration cam reach more of its upper rpm power potential.
I've seen that single plane intake be worth a couple tenths on a few cars ,once matched to the correct cam, but remember your not building or driving a race car.
the cam and intake you currently have is very well matched to performance street driving, and once the tires and suspension are correctly set up for max traction, you should get the car to run very low 11 to high 10 second 1/4 mile et, with its current config. , and while its easily possible to increase power with a intake like the one linked below,and longer duration cam.
http://www.summitracing.com/parts/edl-2892
yes a cam like these linked below ,would gain you a few extra hp,
but you've barely begun to sort out the current combo, over caming the engine would be a major mistake,
and you need slicks and thinking about traction and suspension options, you've barely begun to sort out the current combo potential.
As I'm sure you realize , but the newer guys reading this thread may not, It generally helps to step back mentally and ask yourself, any time you contemplate major changes , what am I trying to accomplish here?
what are the realistic potential results?
can I do the work myself or will I need to have help?
what else will need to be changed to make this work efficiently?
remember you can calculate ,the potential results of most changes with current dyno soft ware, to get at least some idea, of the potential likely results ,and for what your contemplating ,you,ll want the LSA to fall in the 105-110 range and I would not exceed 246 @ .050 lift or about .650 lift at the valves with 1.6:1 ratio rockers due to wanting to maintain long term durability,and wanting to drive it with pump octane fuel, but not over cam the engine ,as that would likely result in trading too much street, drive-ability for too little gain in upper rpm power as your compression, converter stall speed and rear gear ratio, will stay the same, and this is a street driven car, "not a trailer it to the track," dedicated race car.
minimum hydraulic roller upgrade
http://www.cranecams.com/product/cart.php?m=product_detail&p=24187
decent solid roller choices
http://www.cranecams.com/product/cart.php?m=product_detail&p=24543
or
http://www.crower.com/chevy-262-400-power-beast-roller-cam-277r.html
Last edited:
Oh, I'm not seriously considering upgrading the engine. Just thinking out loud
for the future or several years from now.
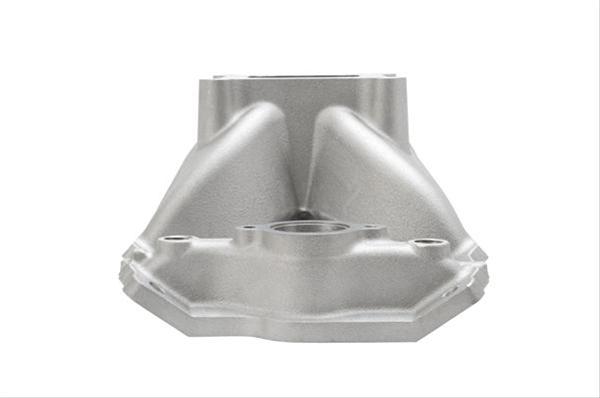
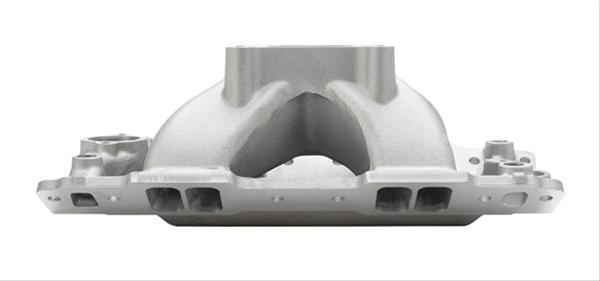
I thought you like the Keith Dorton single plane, but I see it has a 500 rpm higher
range of 4500 - 8500 RPM, than the Victor at 4000 - 8000 RPM
http://www.summitracing.com/parts/hly-300-110
Just how low can one go with the DCR and still be acceptable, mine would be 7.29
with the new Crane and it's IVC of 82° ABDC and that's already 5° advanced ???
Would the spring have to change, the CC987 CompCams springs are rated at 121 lbs/1.8"
and 343 lbs/1.2"? Would that be close enough to 125 lbs @1.2" and 376 lbs @1.240

The springs look pretty close until you see the spring rate of CC987/ 370 lbs/in, where
the Crane cam is calling for 448 lbs/in. That looks significantly different when using
these numbers.
for the future or several years from now.
I thought you like the Keith Dorton single plane, but I see it has a 500 rpm higher
range of 4500 - 8500 RPM, than the Victor at 4000 - 8000 RPM
http://www.summitracing.com/parts/hly-300-110
Just how low can one go with the DCR and still be acceptable, mine would be 7.29
with the new Crane and it's IVC of 82° ABDC and that's already 5° advanced ???
Would the spring have to change, the CC987 CompCams springs are rated at 121 lbs/1.8"
and 343 lbs/1.2"? Would that be close enough to 125 lbs @1.2" and 376 lbs @1.240
The springs look pretty close until you see the spring rate of CC987/ 370 lbs/in, where
the Crane cam is calling for 448 lbs/in. That looks significantly different when using
these numbers.
KEEP IN MIND YOUR CURRENT COMBOS CLOSE TO IDEAL FOR THE CURRENT APPLICATION,
a longer duration cam potentially adds breathing potential, in the higher rpm range, at the cost of reduced low and mid range torque, every change you make will cause some compromise somewhere, you might gain in one area and loose due to the change in others, theres never a "FREE LUNCH"
that cost in lower rpm torque is even higher if you don,t bother to boost the static compression when using the longer cam timing.
but you still benefit from the increased breathing and longer scavenging the longer duration cam timing provides,
even if you don,t boost the static compression.
yes the cam will require stiffer valve spring load rates to operate effectively at the higher rpm range as the valve train inertial loads increase noticeably,
but you still could use the cam with the current valve springs, it would just reach valve float a bit earlier in the power band than the correct valve spring rates would allow, thus some what limiting the value of a longer duration cam, so if you go that route matching the springs makes sense.
keep in mind theres never a "FREE LUNCH", stiffer valve springs can result in potentially more valve train wear, and if you want to maximize the upper rpm power, solid lifter roller lifters are lighter weight and a bit more suited to higher rpm power bands but again at the cost of lower rpm driveability issues.
like I said, Id strongly suggest you try focusing on the tires and suspension and perhaps an intake manifold upgrade
Last edited:
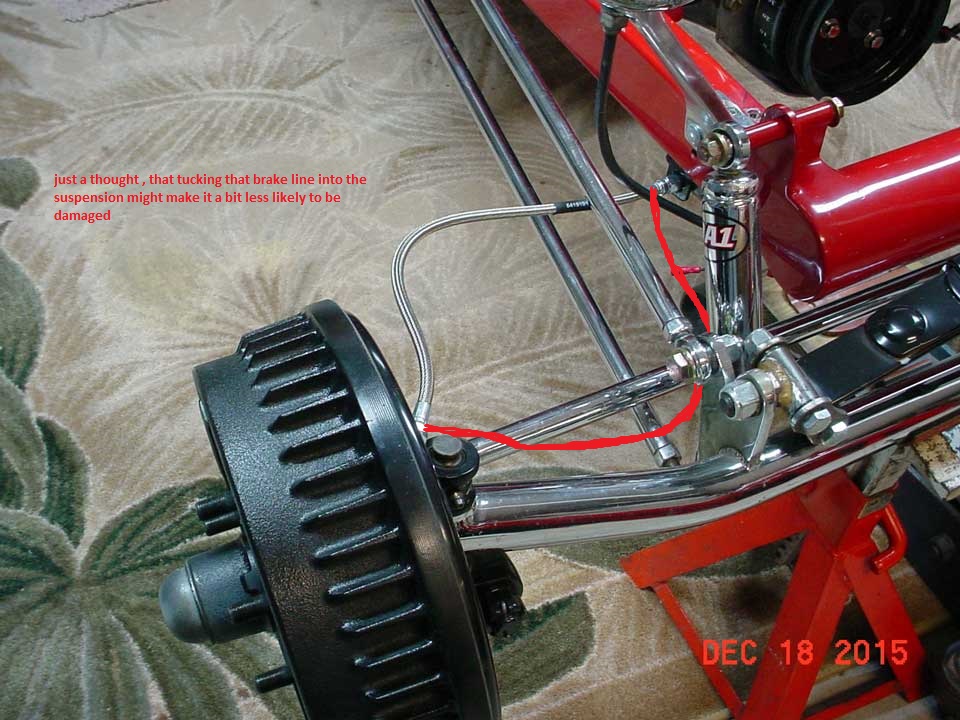
One of my smaller winter projects was replacing my front brake lines. Especially
the fitting at the wheel cylinders are known to leak at the copper washer. The
copper washer just does not fit and slips off center when tightening and creating
a leak.
My plan was going to a banjo fitting and bolt. But to do that would require the
wheel cylinders to point to the front and not backwards. So I used my noggin and
decided to swap sides and thus reversing the angle .
PARTS NEEDED ARE:


http://www.jegs.com/i/Earl's/361/977503/10002/-1
http://www.jegs.com/i/Earl's/361/997643/10002/-1
http://www.summitracing.com/parts/ear-64191919erl
I took the wheel cylinders out and swap sides. Now you can see where the banjo
fitting point backwards at 90° to the wheel cylinder, exactly what I needed.

Now the completed hose and fittings and how they look are below:

Below is what I had before the upgrade.


the fitting at the wheel cylinders are known to leak at the copper washer. The
copper washer just does not fit and slips off center when tightening and creating
a leak.
My plan was going to a banjo fitting and bolt. But to do that would require the
wheel cylinders to point to the front and not backwards. So I used my noggin and
decided to swap sides and thus reversing the angle .
PARTS NEEDED ARE:
http://www.jegs.com/i/Earl's/361/977503/10002/-1
http://www.jegs.com/i/Earl's/361/997643/10002/-1
http://www.summitracing.com/parts/ear-64191919erl
I took the wheel cylinders out and swap sides. Now you can see where the banjo
fitting point backwards at 90° to the wheel cylinder, exactly what I needed.
Now the completed hose and fittings and how they look are below:
Below is what I had before the upgrade.
A great many guys don,t realize that its the total time, spent in both planing, parts selection, and effort spent on getting all the sub systems working correctly on a project and the attention to the smaller details that can and frequently does upgrade a good car build to an exceptional car build.
little changes and that attention to the smaller details can and does take up a good deal of time and at times soaks up a good deal of your pay check, yet the difference in how the car runs and drives from the accumulated small improvements can make a huge difference.
theres an old saying,
"watch out for the small or fine details,
at each step in a car restoration,and on each sub system,
and take the time and effort to do everything to the best of your ability,
and you'll be amazed at the total results !"
busterrm
solid fixture here in the forum
Oops, your talking about the brake line, I thought it was the brake lining. After rereading I agree, might be neccessary to pull it in some, to avoid debris coming possibly off the tires and resulting in damage .Is that brake lining, looks like it might be the edge of drum?
It has to be able to flex and tying it down and holding it in a particular position
would be so restrictive that you could hardly turn the wheels. Besides, 1000's
of TBuckets have run the very same setup for years. Mines was basically the same
way for 20 years with the older lines and not once have I had a problem.
would be so restrictive that you could hardly turn the wheels. Besides, 1000's
of TBuckets have run the very same setup for years. Mines was basically the same
way for 20 years with the older lines and not once have I had a problem.
busterrm
solid fixture here in the forum
Oops, your talking about the brake line, I thought it was the brake lining. After rereading I agree, might be neccessary to pull it in some, to avoid debris coming possibly off the tires and resulting in damage .Is that brake lining, looks like it might be the edge of drum?