You are using an out of date browser. It may not display this or other websites correctly.
You should upgrade or use an alternative browser.
You should upgrade or use an alternative browser.
TBucket Engine Project (Dart SHP)
- Thread starter Indycars
- Start date
Strictly Attitude
solid fixture here in the forum
I would wet sand them then use there billet polish it removes a small amount of material its a polish
NOT A TA said:Nice job buffing the valve cover tops. I know how long that takes hand sanding.
Thanks for the complement!!!
I've been wanting to do this since the day I got them. I was a little disappointed
with the flatness of the surface since day one.
My brother was over yesterday so we pulled the pan to see how things were
going on downstairs in the motor. I don't have a working speedometer, so I
can only guess, but the mileage should be about 400 to 500 miles since new.


The oil is Royal Purple HPS. I believe I can smell gas in the oil, which would
make sense with the engine running most of the time below 12.5 A/F ratio.
Sometimes as low as 10.5 A/F ratio.


Found this sitting in the pan acting like it was meant to be there. Looks
like a piece of the pan gasket.

Before I put the oil pan back on I cleaned all the magnets and the inside. So
next time I can tell what's accumulated since this inspection.

going on downstairs in the motor. I don't have a working speedometer, so I
can only guess, but the mileage should be about 400 to 500 miles since new.
The oil is Royal Purple HPS. I believe I can smell gas in the oil, which would
make sense with the engine running most of the time below 12.5 A/F ratio.
Sometimes as low as 10.5 A/F ratio.
Found this sitting in the pan acting like it was meant to be there. Looks
like a piece of the pan gasket.
Before I put the oil pan back on I cleaned all the magnets and the inside. So
next time I can tell what's accumulated since this inspection.
Last edited:
you obviously built it correctly, followed the advice and have what effectively is a brand new engine showing almost zero wear, because you did things correctly your engine shows less wear than most do after 15-30 minutes of cam break-in time
Id put it back together carefully as it is and have zero concerns its darn near perfect

BTW a single loose piece of gasket material that size should not be an issue, but always try hard to not have loose gasket material, or use excessive silicone sealants inside an engine as it is a very frequent problem,as it is frequently either stopped by the oil pump pick-up pre-filter, passed into the oil filter after getting sucked into the oil pump, and shredded, passing through the gears, then pumped through the blocks internal oil passages , which eventually either get clogged or crap/debris gets caught in the lifter oil ports.
http://garage.grumpysperformance.com/index.php?threads/not-getting-oil-to-rockers.4537/#post-33843
http://garage.grumpysperformance.co...s-and-improved-oil-flow-mods.3834/#post-15192
http://garage.grumpysperformance.co...after-a-lifter-or-lobe-fails.7824/#post-26947
http://garage.grumpysperformance.co...ear-articles-you-need-to-read.282/#post-18269
http://garage.grumpysperformance.com/index.php?threads/inspecting-filter.4611/#post-12332
http://garage.grumpysperformance.co...s-and-improved-oil-flow-mods.3834/#post-10199
Id put it back together carefully as it is and have zero concerns its darn near perfect
BTW a single loose piece of gasket material that size should not be an issue, but always try hard to not have loose gasket material, or use excessive silicone sealants inside an engine as it is a very frequent problem,as it is frequently either stopped by the oil pump pick-up pre-filter, passed into the oil filter after getting sucked into the oil pump, and shredded, passing through the gears, then pumped through the blocks internal oil passages , which eventually either get clogged or crap/debris gets caught in the lifter oil ports.
http://garage.grumpysperformance.com/index.php?threads/not-getting-oil-to-rockers.4537/#post-33843
http://garage.grumpysperformance.co...s-and-improved-oil-flow-mods.3834/#post-15192
http://garage.grumpysperformance.co...after-a-lifter-or-lobe-fails.7824/#post-26947
http://garage.grumpysperformance.co...ear-articles-you-need-to-read.282/#post-18269
http://garage.grumpysperformance.com/index.php?threads/inspecting-filter.4611/#post-12332
http://garage.grumpysperformance.co...s-and-improved-oil-flow-mods.3834/#post-10199
Last edited by a moderator:
What ..... darn near???????? hehehehegrumpyvette said:Id put it back together carefully as it is and have zero concerns its darn near perfect

While I had the chance, I went ahead and checked the torque on all the main
and rod bolts. Everyone of them clicked before they started to turn.
I know ..... static friction is higher that dynamic friction. Guess I should have
set the torque wrench for an additional 5 ft/lbs over final torque.
What else should I have done while I had the chance, would you have checked
all the bearing???
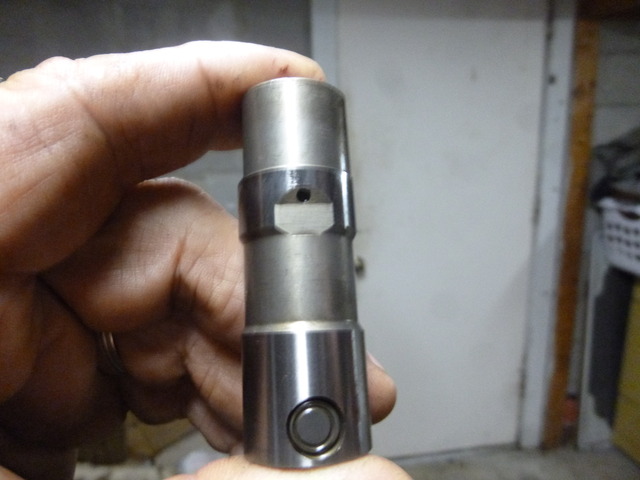
Why does the main bearing have a higher shine to it?
The rod bearing has a shinny ring at the very edge of the bearing, maybe an
1/8 inch wide, but hard to see in the photos. Don't remember the bearing number,
but it's Clevite with an "H" suffix, so it should have plenty of clearance in the
crank radius.
busterrm
solid fixture here in the forum
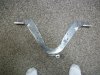
I haven't bolted it to my block yet, but I am sure it will fit. I set all the dimensions from your drawing and then just added the bottom area. I didn't drill and tap for the alternator, I thought that would be best done when you have it, I didn't know what the center to center measurement was to bolt it to the biscuits so I left it blank. I could drill and tap for the alternator if I knew what the dimension from center of the mount holes and how far off the center of the bottom mount hole. I could drill and tap it then.
busterrm said:I haven't bolted it to my block yet, but I am sure it will fit. I set all the dimensions from your drawing and then just added the bottom area. I didn't drill and tap for the alternator, I thought that would be best done when you have it, I didn't know what the center to center measurement was to bolt it to the biscuits so I left it blank. I could drill and tap for the alternator if I knew what the dimension from center of the mount holes and how far off the center of the bottom mount hole. I could drill and tap it then.
Bob sent me a PM asking if I read his post and had a few questions. I did read
his post but didn't have time to respond right then. So then I forgot about it, but
now I would like to take the time to thank him publicly.
Thanks again Bob for once again for coming to the rescue !!!
I didn't have to ask, he just offered to help!
During our conversation he had a suggestion that was outside my box, that
might just be the cats meow! Thanks again !!!!!!!!!!!!!
busterrm
solid fixture here in the forum
Oops I hit the wrong button and quoted again! Gees, I am old and goofy!Indycars said:busterrm said:I haven't bolted it to my block yet, but I am sure it will fit. I set all the dimensions from your drawing and then just added the bottom area. I didn't drill and tap for the alternator, I thought that would be best done when you have it, I didn't know what the center to center measurement was to bolt it to the biscuits so I left it blank. I could drill and tap for the alternator if I knew what the dimension from center of the mount holes and how far off the center of the bottom mount hole. I could drill and tap it then.
Bob sent me a PM asking if I read his post and had a few questions. I did read
his post but didn't have time to respond right then. So then I forgot about it, but
now I would like to take the time to thank him publicly.
Thanks again Bob for once again for coming to the rescue !!!
I didn't have to ask, he just offered to help!
During our conversation he had a suggestion that was outside my box, that
might just be the cats meow! Thanks again !!!!!!!!!!!!!
busterrm
solid fixture here in the forum
My front mount is going to be quite different than yours, I am going to have to make the frame mounts go up and over the steering box. My center line off the mounting holes in the block is going to be 1.5 off the top and 3.125 off the bottom hole. Its going to be a lot flatter looking than yours.
busterrm
solid fixture here in the forum
I made the mount for my Nova, now that the motor is out, I took some raw measurements and will mount the pedestals for the biscuits with the mock up block and tranny in the car. The two are more alike than I thought they would be, while I was laying out my mount on the plate I felt like I was making yours again. Here is a shot of the two side by side. Yours is actually 11 inches tall and mine is 10 inches, the centers are different, and heighth off the holes is different. But, they do look similar.
Attachments
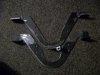
Its really impressive to see guys who can THINK, actually accurately, MEASURE and FABRICATE AND WELD, as so few guys have those skills and so many guys think that they can do mods to their cars, or anything worth doing to the cars, ONLY if the parts come pre_packaged with instructions over some speed shop counter
busterrm
solid fixture here in the forum
The real difference is your mount has the biscuits out front, mine on the other hand will be opposite, with the biscuits behind the mount, mine will mount on the cross-member. That's going to be the chore, but I can handle it. I will have to custom make those also and weld them to the frame. I will have to order the biscuit kit from Speedway beforehand.
well ? any more progress gentlemen?