My Cam Research for the Experts Eye

No hijack at all - as with many builds, a HUGE amount of work. I didn't comment, but I did make a few notes of good ideas and things to remember.
LOL the first 57 build was from 1985-1990. This "mild refresh" :rofl: started in May 2020! and is still ongoing. I'm really lucky that my wife sees past the "I'll just do a couple of things to get it running"......
 
Finally, mounts are painted. I'll let them sit for a day then get them on the car.
5172023202515.jpg

To do that I'll need to use the hoist to suspend the back of the engine. No hood removal needed, I'll just run a chain to the back of each head and the boom can get in low enough to simply keep the engine up about a half inch. I just need to take the weight off the back to swap out the mounts.
 
Well it took about a week but I'm really happy with the new engine supports. Everything bolted right into place - I want to get slightly longer bolts but these will do fine for now. Easy enough to replace one at a a time, no need to use the engine hoist later. I used it today just to get the weight off the back to swap stuff out.
20230621_114015_HDR_resized.jpg

Here's the before version
20221111_115306_HDR_resized.jpg

Here's the new version
20230621_130057_HDR_resized.jpg

Has that very solid feel when lowered into place, even with the rubber bushings. Just rough numbers - if I conservatively assume about 600lbs weight at the back, the old mounts carried about 300lbs at each bellhousing bolt (1 bracket connection point each side).
The new mounts are double the thickness and carry about 100lbs at each bellhousing bolt (3 bracket connection points each side).
Even though one Gr8 bolt can easily carry 300lbs the failsafe and mount rigidity has been dramatically increased. This setup isn't going anywhere and the extra wood support isn't needed.

The driver side mount accommodates the oil sender/switch arrangement. It all clears the headers no problem and I'll tweak the clocking slightly to ensure bellhousing is cleared too.
20230621_130123_HDR_resized.jpg

As you can see there's an insulated clamp holding the oil sender tube in place. The clamp is attached via nutsert to a small bracket bolted to the engine mount. I decided not to weld a tab to the mount, if I ever change something it's easy to just bolt in a different bracket if needed. The sender/switch is very secure and moves with the engine so little chance of vibration issues. And it will be easy to get to.
20230621_130156_HDR_resized.jpg

The spacers you see between the bracket and the block represent the thickness of the transmission bellhousing.

All this took an extra week but I'm really glad I did it and I'm really happy with the results.

Pics later - I finished installing redundant ground cables from body to frame at the back. I'll also install grounding cables from engine to frame to body at the front. I just wanted to get the mounts done first. I made up my own 4ga cables to get a nice exact routing and nutserts were used to attach the cable clamps, very clean.
 
You might recall a few pages ago, my looking at starters and starter bolts.
Glad I did all that, today I installed the starter and felt confident about the attachment.
I used a heat blanket - we'll see if it makes any difference. The car had a heat soak problem for years and I'm hoping that the addition of the trunk mounted relay with direct cable to the starter, and a bit of heat shielding may do the trick.

I used the standard size high torque delco starter. Staggered bolt pattern which I like because it puts one bolt right by the "meat" of the block.
20230627_152346_HDR_resized.jpg
20230627_152302_HDR_resized.jpg

I had made a copper jumper for the solenoid, so the only connection at the starter is the hot-when-cranking cable.
10212022181524.jpg
I also used the correct front bracket for the starter for secure mounting.
20230627_152450_HDR_resized.jpg
 
Rick was kind enough to send me a pdf/jpg editing program, so I messed around with it on these pics :) THANK YOU RICK

I had mentioned redundant grounding - I finished that today. It's often overlooked but I think it's really important to ensure a full ground path throughout the car. My definition of "redundant grounding" is duplicate grounding points not only at the front and rear of the car, but also two separate ground cables (grounding routes) at each of those front and rear areas.

The primary point of grounding from the trunk mounted battery is at the rear package shelf. It's essentially a bolt going through the body, tightened to capture the sheet metal, and extending below for a point of attachment for two frame ground cables, one on each side of the car.

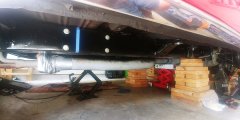
This an older picture, the cables are now tidied up, but this shows the initial primary grounding point.
20221203_165534_HDR_modified.jpg

This is looking up from under the car at that rear package shelf. I made up two frame ground cables, one for each side of the car. Another case of using nutserts for the clamp attachments. The gray conduit is for the starter cable, I never run cables loose or unprotected under the car.
20230628_130158_HDR_modified.jpg

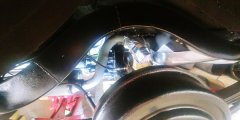
This is the driver side frame ground cable routing and attachment. Same case for the passenger side.
20230628_130328_HDR_modified.jpg

In the front I repeated the duplicate ground cables. This is from under the car, looking up where the transmission tunnel begins at the firewall. Engine is at the top of the picture. Those two body ground bolts not only attach the cables you see, but they also attach and connect ground to a grounding strip on the other side of the tunnel - this grounding strip provides ground for the interior circuits. Easy and convenient and will be hidden at the front of the center console.
20230628_125819_modified.jpg

Here's where the two engine ground cables attach.
20230628_125839_modified.jpg

Obviously there are other more minor ground paths, such as through the engine mounts or other stuff attached to the body and/or frame. But for me, this redundant grounding has worked well - I used it for the past 30+ years on this car with zero electrical gremlins showing up. I think it's especially important when the battery is way back in the trunk to provide a good clear ground path for the starter, the #1 high amperage draw on the system. That particular circuit, along with the alternator charge circuit are key circuits for me - if they work well, usually everything else is cake.
 
Ive usually run a couple extra grounds, also, one from the engine to the frame, and one from the transmission too the firewall,
and yeah, I know others that do the same (remember to disconnect & then reconnect when pulling engine/trans, replacing those parts)
61GXPO4at+L._AC_SL1001_.jpg
 
Have you ever verified the the ground resistances by measuring from some distant points back to the negative terminal on the battery?
 
I have many times , you might be surprised that the ohms reading tend to be a bit higher than you might expect
but if you measure a copper wire , or sheet of steel, of the same / similar distance its generally also higher than you might expect
like if you measure a steel tape measure tape thats 18 feet long , its no where near the 1-2 ohms,
most people seem to assume a strait electrical metal conductor would be
 
Exhaust work today.

The headers were coated many years ago, but they are looking pretty tired and have some dents on the bottom. The exhaust system is all welded so it goes back as a one-piece with enough loop to go over the rear axle. I'll need to add more exhaust at that point so that it all exits behind the rear wheels. I want something a bit different from the usual out the rear bumper look, which is what had always been on the car.

The exhaust system was painted with Eastwood cast iron gray hi-temp paint many years ago and it's held up pretty well. My plan is to clean up the headers and exhaust system and repaint with this KBS paint. It's rated fairly well and it's the same cast iron gray color, which I like. What I really like is that it's half the cost of the Eastwood stuff. A pint of the Eastwood is about $60, this quart was $65. I'll just brush it on. It dries well so it can be handled no problem, but final cure is with heat.
5182023192031.jpg

This is the drivers side header, just to show overall current condition. The denting at the front tubes is to clear steering, etc. I'll leave it alone. The dent close to the collector is from hitting something - I decided to pull that out just to open up the tube a bit.
20230629_082955_HDR_resized.jpg
20230629_083015_HDR_resized.jpg

The flanges on both sides are in pretty good shape, just a good wire-brush will clean them up. These are headers with the weld bead sealing at the ports, so I'm using Remflex 2036 header gaskets for 1.75 diameter port. They are slightly thicker and should work well.
20230629_083022_HDR_resized.jpg

I decided to use a slide hammer and heat to pull the dent on the header. My goal wasn't to make it perfect, just to open up the tube as it had a pretty good crunch.
20230629_094959_HDR_resized.jpg
20230629_100729_HDR_resized.jpg

As you can see, the dent is better, but not completely pulled. It became difficult to get the crease out of the tube and I didn't want to cut out the area and add a patch as I didn't see there would be any operating benefit. This was "good enough". I then welded up the hole and the area around the hole to ensure the strength of the area.
20230629_104346_HDR_resized.jpg

Thinking of occasional bumps in the road I added a small skid plate over the repaired area, which is the underside of the header pipe. The holes are to let water drain instead of sitting on the plate.
20230629_095018_HDR_resized.jpg
20230629_125357_HDR_resized.jpg

A little primer and it's done, ready for final cleanup and application of the cast iron gray heat paint. As you can see the welds are functional but nothing to brag about - this will all be at the very underside of the header and not seen.
20230629_125726_HDR_resized.jpg
 
Years ago I had added a skid plate to the bottom of the passenger side header. It was done on my back under the car and the welds held but were really crummy. So I cleaned it up, added another bead around the plate and called it a day. Again, the welds aren't perfect, but if you saw them before I started, these look great!
20230629_125835_HDR_resized.jpg
20230629_130519_HDR_resized.jpg

Next step is to break out the wire brush and give headers and exhaust system a clean-up, wipe down with acetone and apply the KBS heat paint. One benefit here is that there is zero rust on any of the exhaust components, so it's really just some minor repair and cleanup.

I may weld a couple of clips to the top part of the exhaust piping loops that go over the rear axle, as I've added nutserts to the body above for exhaust hangers. The exhaust will definitely need some support at that point.
 
Cleaned up the headers a bit more, the weld beads at the flanges look fine. I never really had any leak problems with them.
20230630_120520_HDR_resized.jpg

Here's what the system looks like, it's essentially a single unit. I'll get some help to install it - the front hangars are still in place but I'll need to add some rear hangars at the axle loops. Like the headers, it will all get cleaned up and ready for paint. As you can see, the rear axle loops are cut back to allow the system to be installed over the axle. Easy enough to add the rear sections later, although I will probably add a bit of flex pipe or something to take the exhaust lower towards the ground. Mufflers are Flowmasters - the 454 sounds great through them.
20230630_120443_HDR_resized.jpg

I also put rust converter on all welds and seams just to avoid any later issues.
20230630_131226_HDR_resized.jpg

Front hangar, pretty basic, but it worked well. The rubber strap is showing some degradation. I guess I'll just cut the welded tab and install a complete new hangar assembly in the same spot.
20230630_131328_HDR_resized.jpg
 
Seems you keep finding things to do, so you don't have to start up the new engine. I know it can be scary, but some day you will have to face the music!!! LOL! ;)
 
I know! You're right, all this stuff keeps showing up on my road to first start :facepalm:
Gotta keep putting in the infrastructure though!
 
Lots of small details have been done, not worth a lot of documentation, but a couple of mentions though...

I installed the parking brake system - I had long since had all the parts ready, either refinished or replaced, so it was pretty much a bolt-in. It's funny how the 1950's tech of cables, pulleys and levers still works quite well.

I needed to get the park brake stuff done because it installs up under the body, above the exhaust. More convenient to get it installed now before the exhaust is in.

Before painting the headers/exhaust, I did a fit-up check. This was important because I've installed new power cable conduits, fuel lines, and brake lines, different from previous routing. Rear axle area gets a bit crowded. I did a temporary install of one side header to ensure that the exhaust would be in the right position under the car - I'm re-doing all the exhaust hangars.
20230707_142108_HDR_resized.jpg

I stuck a piece of pvc from engine to axle so I could visually ensure sure the driveshaft would be centered between the mufflers.
20230707_142149_HDR_resized.jpg
20230707_142202_HDR_resized.jpg

Everything looked fine and more importantly, everything cleared!
20230708_095940_HDR_resized.jpg

The axle is compressed so plenty of room. Hopefully you can see that the pipe ends right after the curve (cardboard over the end). For the first start I'll simply add a piece of exhaust flex tube to route the exhaust down further to the ground. Later I'll run the ends just behind the rear tires.
20230708_095847_HDR_resized.jpg
 

Attachments

  • 20230708_095914_HDR_resized.jpg
    20230708_095914_HDR_resized.jpg
    178.1 KB · Views: 1
  • 20230708_095835_HDR_resized.jpg
    20230708_095835_HDR_resized.jpg
    215 KB · Views: 1
I then removed the header/exhaust and prepped for paint.

I've installed nutserts at specific locations on the body to support the exhaust - I had initially planned to weld hangar clips right to the exhaust pipes, but decided to keep it simple and just use hangars and saddle clamps. This will allow me to install the hangars exactly where I need them without any need to for welding or possibility of the clip being welded a little off.

Nutsert for hangar bolt vs the previous lag-screw-through-metal.
20230608_154204_HDR_resized.jpg

I'm using these hangars - they are very well made and a complete bargain at the price.
1688853095168.png

I really like this KBS paint. It seems to be identical to the Eastwood cast iron paint that I've used in the past - in fact I wonder if KBS supplies it to Eastwood.
But again, it's half the cost - this quart was about the cost of a pint from Eastwood.
5182023192031.jpg

This is brushed on. To me, the final appearance is great. You can see light brush marks on the smooth surfaces, but I'm fine with that. Application was very good, even on these hot days where specialty paint can be really tough to get right. The exhaust you see has 2 full wet brush coats, and it only took 1/2 pint, so plenty left for the headers. I may do our Silverado manifolds to use it up, as I'm not sure what the shelf life is. It is a heat final-cure paint, so for sure I'll be smelling it when we run the engine.
20230708_134009_HDR_resized.jpg

20230708_134038_HDR_resized.jpg


And a surprise benefit is that the color matches up nicely with the gray on the engine, and in engine compartment!
 
Headers are now done, they look a hundred times better. Still very happy with this paint.

20230710_100359_HDR_resized.jpg

20230710_100422_HDR_resized.jpg

Lots more details got done, the minor stuff seems to take forever. I'm trying not to stress over the remaining to-do list, cooling, fuel system check, electrical check, etc.

Electrical check will initially be for the circuits/gauges needed to crank and run the engine. I'll check the rest of the car after we get the engine running.
The fuel system check is pretty straightforward, put a couple gallons in, pressurize, and check for leaks.

I've got a buddy coming over to help with getting the headers and exhaust installed this week. Everything has been test fitted so it should just bolt in, it's just bulky, and the driver side header is a very tight fit, so the extra hands will be welcome. I'm waiting on the saddle clamps for the hangars, they should be here soon.

Next up, getting the cooling system installed.....
 
Headers and exhaust installed, it all went very smooth. No issues with interference anywhere. I'm a happy camper.

20230714_121909_HDR_resized.jpg

There's clearance between the brake hose and exhaust but I'll put a sleeve on it anyway.
20230714_121841_HDR_resized.jpg

20230714_121810_HDR_resized.jpg
614202312589.jpg

20230714_121744_HDR_resized.jpg

Lol Rick's sharp eyes will notice not all header bolts are installed. Just a few to snug them up until I get the dipstick fitting right, then a set of ARP bolts with the smaller 3/8 heads.
 
use anti seize paste on the header bolt threads , and this link may help

https://garage.grumpysperformance.com/index.php?threads/header-bolts.559/

 
Last edited:
Back
Top