You are using an out of date browser. It may not display this or other websites correctly.
You should upgrade or use an alternative browser.
You should upgrade or use an alternative browser.
My Cam Research for the Experts Eye
- Thread starter TXChevy
- Start date
All the exhaust is now installed, went very smooth with an extra set of hands. Same pics as before, just with all bolts now installed. Good milestone.
Next is to get the cooling system installed. Radiator is in great shape but I've got some refurb to do on the core support. One thing has to step ladder before the next.
Needs clean/repaint and those ss side panels need a run with the scotchbrite pad. Plus the holes for the hoses will be fixed to be true round. All in all not too bad.

The hardest part right now for me is the heat. Even with open door and fans the garage is like an oven so I'm going slow. 2-3 hours max for me.
Next is to get the cooling system installed. Radiator is in great shape but I've got some refurb to do on the core support. One thing has to step ladder before the next.
Needs clean/repaint and those ss side panels need a run with the scotchbrite pad. Plus the holes for the hoses will be fixed to be true round. All in all not too bad.
The hardest part right now for me is the heat. Even with open door and fans the garage is like an oven so I'm going slow. 2-3 hours max for me.
heats a familiar companion , in texas and florida where I spent and am spending most of my life, and yeah those big fans really help
https://www.tractorsupply.com/tsc/p...nic_feed-_-GoogleShopping-_-Product-_-1308816
Master 42 in. High Capacity Belt-Drive Fan, MAC-42-BDF
SKU: 130881699

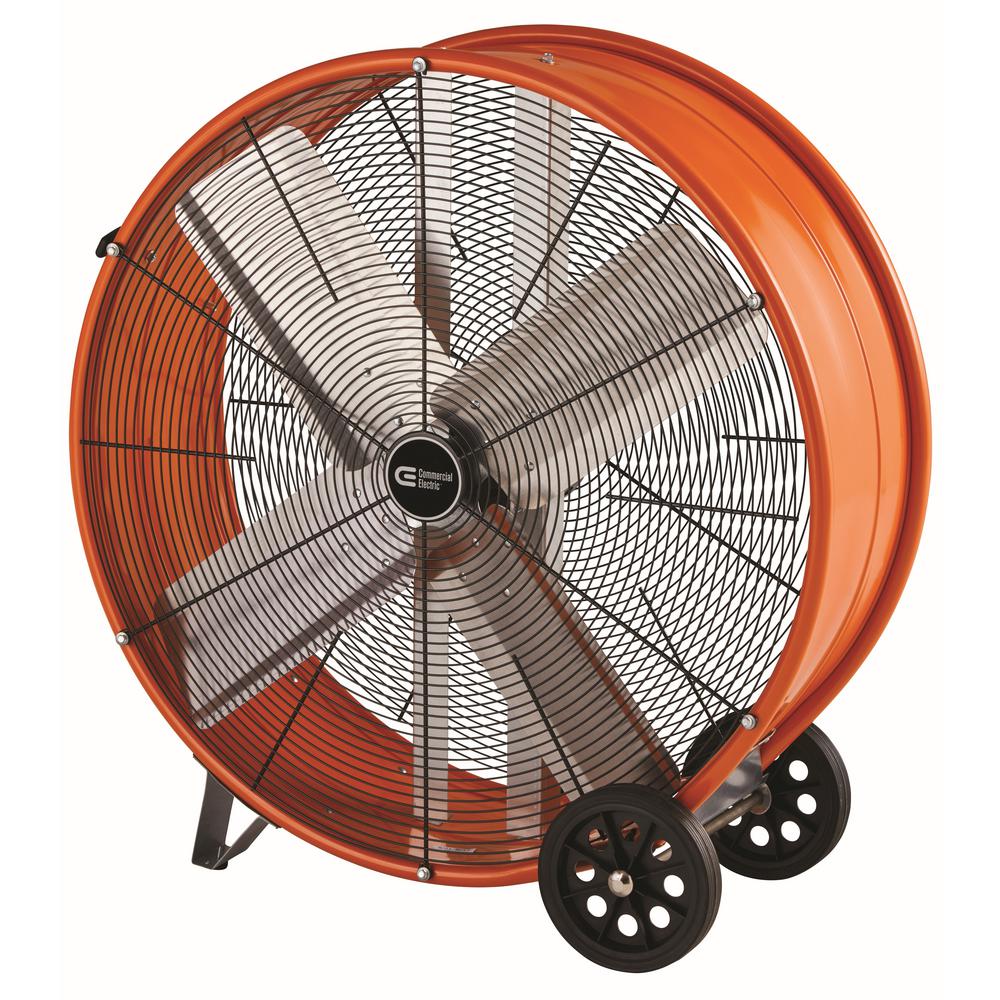
https://www.tractorsupply.com/tsc/p...nic_feed-_-GoogleShopping-_-Product-_-1308816
Master 42 in. High Capacity Belt-Drive Fan, MAC-42-BDF
SKU: 130881699
I took the core support apart for cleaning/repaint. I had rebuilt it years ago so it's pretty straightforward refurbish.
Here's the main pieces, the black ones will get repainted, the u-shape doesn't need re-painting. The general set up supports the radiator and a front bracket holding the transmission cooler.

These are the ss side panels. The cut-outs I did years ago aren't acceptable to me today. I'll clean them up and make the hose openings true round and even up the slots, plus of course clean up the surface.


As a general reference, here's what it all looked like before I took it all apart. Will look pretty much the same when I'm done except no more red/blue AN fittings.

Here's the main pieces, the black ones will get repainted, the u-shape doesn't need re-painting. The general set up supports the radiator and a front bracket holding the transmission cooler.
These are the ss side panels. The cut-outs I did years ago aren't acceptable to me today. I'll clean them up and make the hose openings true round and even up the slots, plus of course clean up the surface.
As a general reference, here's what it all looked like before I took it all apart. Will look pretty much the same when I'm done except no more red/blue AN fittings.
Somebody got to keep an eye on you to make sure you stay out of trouble!Lol Rick's sharp eyes will notice not all header bolts are installed.

Keep up the very nice work !
Thanks Rick
Ok - I've got a spark plug question.
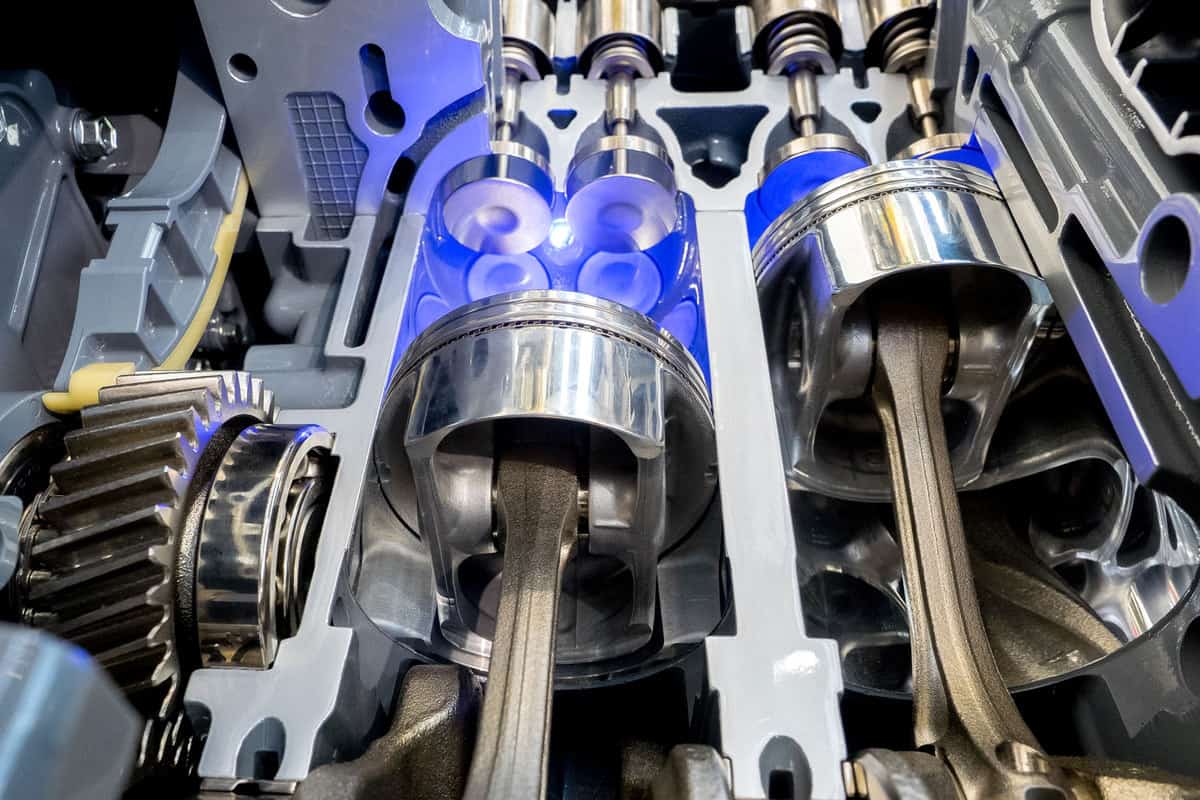
This is a 454 block with 3935401 68-76 open chamber large oval port truck 427 heads. Chambers have been cleaned and polished a bit but nothing radical, just a general cleanup.
I always used Delco R45XLS plugs in it without any real issues, but I recall in the last couple of years I drove it there was a slight detonation at times. Plugs generally looked slightly dark brown but no soot or black on them. These are the washer type plugs, not tapered seat.
Block wasn't decked, same (domed) pistons, same .020" deck height. One difference is that previous head gasket was .042" installed thickness, the new head gasket is .039" installed thickness.
Maybe overthinking it, but wondering if moving to a 44 (cooler) plug may be of benefit and also not sure if I should stick with the extended reach or go with a standard plug. My concern is that the "xls" plugs may be into the chamber a bit too much (hotspot) and if the .003" decrease in head gasket thickness may be an issue. I have not rotated the engine with an old xls spark plug installed. I don't recall offhand but there was good piston to valve clearance, and its been rotated dozens of times as it sits. I've kept the oil system primed and I rotate the engine as I do that.
Based on the build info now, any recommendations?
Ok - I've got a spark plug question.
This is a 454 block with 3935401 68-76 open chamber large oval port truck 427 heads. Chambers have been cleaned and polished a bit but nothing radical, just a general cleanup.
I always used Delco R45XLS plugs in it without any real issues, but I recall in the last couple of years I drove it there was a slight detonation at times. Plugs generally looked slightly dark brown but no soot or black on them. These are the washer type plugs, not tapered seat.
Block wasn't decked, same (domed) pistons, same .020" deck height. One difference is that previous head gasket was .042" installed thickness, the new head gasket is .039" installed thickness.
Maybe overthinking it, but wondering if moving to a 44 (cooler) plug may be of benefit and also not sure if I should stick with the extended reach or go with a standard plug. My concern is that the "xls" plugs may be into the chamber a bit too much (hotspot) and if the .003" decrease in head gasket thickness may be an issue. I have not rotated the engine with an old xls spark plug installed. I don't recall offhand but there was good piston to valve clearance, and its been rotated dozens of times as it sits. I've kept the oil system primed and I rotate the engine as I do that.
Based on the build info now, any recommendations?
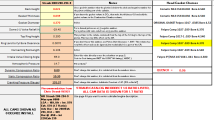
I plugged in the new gasket info into the calculator, results below. I'm OK with a very similar DCR. But I do have a much closer deck clearance of .040", where yours is about .060". The highest octane gas I can purchase locally is 91, what about you?
How did you install the cam? In my simulations I have IVC = 69°.
The closer the spark plug to the center of the chamber the better, less time to a complete burn vs being compressed by the piston until it self combusts or detonation.

How did you install the cam? In my simulations I have IVC = 69°.
The closer the spark plug to the center of the chamber the better, less time to a complete burn vs being compressed by the piston until it self combusts or detonation.
I plugged in the new gasket info into the calculator, results below. I'm OK with a very similar DCR. But I do have a much closer deck clearance of .040", where yours is about .060". The highest octane gas I can purchase locally is 91, what about you?
How did you install the cam? In my simulations I have IVC = 69°.
The closer the spark plug to the center of the chamber the better, less time to a complete burn vs being compressed by the piston until it self combusts or detonation.
View attachment 17957
Thanks Rick,
I looked back at my records and I ended up installing the cam 2 degrees retarded.
Here's the reason why - in the chart below, I found that this setting yielded the closest results to specs when I degreed the cam. I repeated the cam degree process several times to ensure I hadn't messed up.
Cam specs are to the left on the chart and degreeing results are on the right.

If I plug in current head gasket and cam install data into the spreadsheet:

This results in:

We have both 91 and 93 octane around here, 93 octane is actually a bit more common.
Something that I'll do tomorrow is install one of the old plugs and rotate the engine - I don't anticipate any problem with the xls plug but better to do this now.
I appreciate your help, especially with sharing these calculators. Makes for great referencing.
Attachments
Water injection in the EGR stream??
Discussion: I have read of letting in more EGR gasses to fill the chamber thus displace some of the fresh incoming air and fuel and force a wider opened throttle to lower vacuum and pumping loses. The trick is to balance the throttle VS the EGR gases to maintain speed. And a system to cut off...
garage.grumpysperformance.com
Knock sensors:
Building a 383, will be running a 1987 Camaro TPI intake with a newer PCM, what Knock sensor should I run?? Rich
garage.grumpysperformance.com
tumble and swirl, quench & squish
This is interesting :like: I have read (on forums...) that there can be too high squish velocity when engines are under high boost. NA engines not so sensitive i think? But if super much squish was of benefit, then would all engine makers already have it?
garage.grumpysperformance.com
octane boosters
Gasoline is produced in oil refineries. Material that is separated from crude oil via distillation, called virgin or straight-run gasoline, does not meet the required specifications for modern engines (in particular octane rating; see below), but will form part of the blend. The bulk of a...
garage.grumpysperformance.com
reading plugs
YOU REALLY NEED TO READ THRU ALL THESE THREADS AND SUB LINKS TO GET A GOOD BASIC UNDERSTANDING http://www.4secondsflat.com/Spark_plug_reading.html http://www.strappe.com/plugs.html http://garage.grumpysperformance.com/index.php?threads/383-with-ignition-knock-issues.14293/#post-72961...
garage.grumpysperformance.com
verifying your real advance curve
you need to start by verifying TDC on the timing tab and damper actually show TRUE TDC. IF that base line (TDC on CRANK AND TIMING TAB) is not correct, everything done after that is based on that TDC, will be wrong...
garage.grumpysperformance.com
detonation, and how to reduce its likely hood
Ok you just built your dream engine and find out it runs better than you even expected, but once it heats up, its got that tendency to start pinging when it heats up or when you try to save a few bucks and use less than high test gas! there are chances of pre-ignition and knocking, if...
garage.grumpysperformance.com
cooler denser air
Im always rather amazed at the guys that don,t stop and think about the total process of making power and the failure of so many guys to think thru how each step can be improved. it really doesn,t matter if you have a single carb, dual quads or efi, cooler denser air will result in a more...
garage.grumpysperformance.com
Last edited:
Thanks Grumpy, all are on my read list.
Just a few things that come to mind -
I won't be using the usual (hot air) open element air cleaner - 57's have an air intake above the headlights, feeds into the car. On my car the air feeds from right headlight also to a 4in round duct that originally attached to the heater core. No more heater core but I'll fabricate a closed air cleaner that uses outside cool air from that duct.
Last build I had tried a number of advance curves, used excel to plot the numbers in a graph. I'll do the same this time, makes it very objective to compare and figure out optimum curve.
Quench/squish is now set on the engine, but since it can be calculated, I can factor in other parameters like carb adjust, timing, etc as step by step vs. guessing at everything.
Right now the first step for me is starting this thing and to get the initial spark plug choice settled. I'm ok to get another set if needed after the car is actually driven.
As always, I read and think about/apply advice!
If you are thinking that a cooler plug will help with detonation, then this is not going to work. The plug never gets to a temperature that will ignite the fuel/air mixture.Maybe overthinking it, but wondering if moving to a 44 (cooler) plug may be of benefit
spark plug info
spark plug info..SO!...read thru the links theres a ton of good info, but its spread over all the links, if you can get that skill mastered your well ahead of most guys who fail to take the time and effort to learn that skill guys frequently ask me what plug gap to use, Provided your ignition...
garage.grumpysperformance.com
reading plugs
YOU REALLY NEED TO READ THRU ALL THESE THREADS AND SUB LINKS TO GET A GOOD BASIC UNDERSTANDING http://www.4secondsflat.com/Spark_plug_reading.html http://www.strappe.com/plugs.html http://garage.grumpysperformance.com/index.php?threads/383-with-ignition-knock-issues.14293/#post-72961...
garage.grumpysperformance.com
Basic Math On Fuel/air Ratios That Gets Ignored
1 cubic foot of air at standard temperature and pressure assuming average composition weighs approximately 0.0807 lbs. (at sea level) that simply means it takes 12.4 cubic feet of air to equal one pound, your best engine torque is generally found at a fuel/air ratio near 12.6:1 , thats 12.6...
garage.grumpysperformance.com
Engine piston – x-engineer.org
Tutorial on internal combustion engine (ICE) pistons: types, characteristics and technologies
 x-engineer.org
where a rapid increase in pressure above the piston forces it down the cylinder,
and you want to avoid detonation, that will rapidly damage a piston
keep in mind just rapidly compressing the fuel/air mix rapidly raised the mixtures temperature enough that it can cause it to self ignite
(detonation) one reason you use quench & squish in the combustion chamber design to get the ignition to start and burn uniformly, and ideally starting in the near center of the combustion chamber and racing out toward the outer edges rather than self ignition near the edges that will rapidly result in piston damage from excessive pressure and heat.
remember at 850 rpm (idle speed ) your compressing a new cylinder full of fuel/air , 7 times a second at 6000 rpm it is 50 times a second.
The following examples detail the typical temperatures of various combustion-related engine parts during normal operation:
- Intake valve: 475° F
- Exhaust valve: 1,200° F
- Spark plug: 1,100° F
- Piston face: 575° F
- Cylinder wall: 375° F
"The most commonly known flammable liquid is gasoline.
It has a flash point of about −50° F (−65° C). The ignition temperature is about 495° F (232(232° C) [sic], a comparatively low figure."
The temperature of the burning gases inside the combustion chamber is typically around 2,800° F. In a diesel engine, this temperature remains fairly steady. In a gasoline-powered engine, the temperature can climb to 4,500° F or more under certain circumstances. However, the vehicle's engine cooling system keeps the walls of the combustion chamber at a temperature of between 265° F and 475° F.
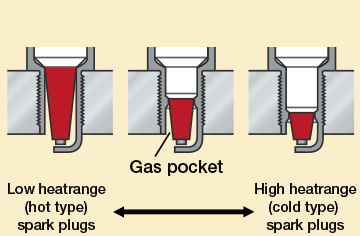
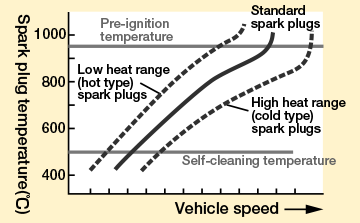
Heat Range | Basic Knowledge | SPARK PLUG | Automotive Service Parts and Accessories | DENSO Global Website
An explanation of the relationship between the degree of dispersion of the heat the spark plug is subjected to and vehicle speed.
detonation issues???
Hi guys, I NEED some advise here... I have a 350 sbc motor that has been bored out 40 over, 6" piston rods, dished out piston heads at 20cc, 3.750 stroke crankshaft, my deck clearance is -.006, Trick flow 175 cylinder head chamber size is 56cc, mild Elgin 923 cam, and an .042 head gasket... I...
garage.grumpysperformance.com

What is the temperature inside the combustion chamber of an engine?
Answer (1 of 9): As there appears to already be some engineering based answers, I will defer from a scientific answer, and give you my real world aviation experience. Flying my PA-31–325 Navajo, it being equipped with two turbo charged, air cooled six cylinder engines producing 325 horsepower eac...
calculate required octane for compression ratio
What else influences your car's octane requirements? IF YOU DON,T LIKE READING SUB-LINKS, AND LOOKING AT CHARTS , AND DOING A BIT OF MATH 'AND INDIVIDUAL CALCULATIONS, YOUR UN-LIKELY TO BENEFIT FROM MOST OF THE THREADS, ON THIS WEB SITE! LIKE IN MOST AREAS ITS KNOWLEDGE AND THE ABILITY TO THINK...
garage.grumpysperformance.com
How Hot Does A Combustion Chamber Get In A Vehicle? [The Answer Might Surprise You!]
Whether you're a weekend DIY mechanic, a diehard gearhead, or just a vehicle owner curious about how your car works, you may want to know more about how the engine burns fuel to create power. Many common questions center on what causes engine overheating. You may be wondering just how hot it...
 vehq.com
Heat Range | Basic Knowledge | SPARK PLUG | Automotive Service Parts and Accessories | DENSO Global Website
An explanation of the relationship between the degree of dispersion of the heat the spark plug is subjected to and vehicle speed.
Last edited:

\ keep in mind its pressurized oil flowing between the moving parts ,that is critical to engine durability, as that , oil flow, absorbs the heat and lubricates the parts and transports the heat , consider the fact that nearly 65% of the fuels energy is dissipated as heat generated not mechanical movement, or power to the rear wheels.
oil flow heat is transferred to the block where coolant flow absorbs and transfers the heat to the radiator to disperse to outside air flow
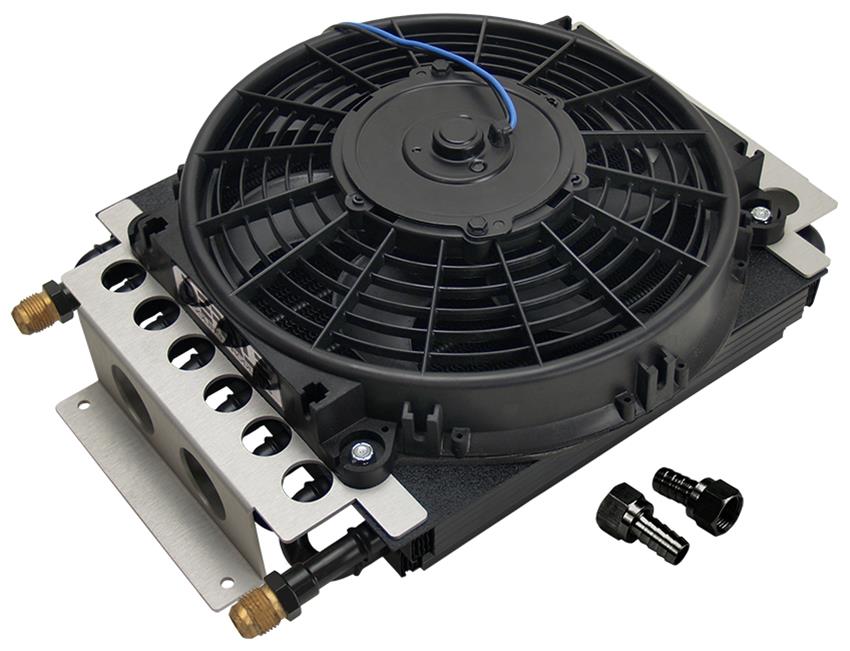
this is a reason adding a decent high quality oil cooler on a performance engine has huge benefits.
Choosing An Engine Oil Cooler Or Transmission Fluid Cooler
Hi there, So I'm looking for guidance regarding how to choose an engine oil cooler. I don't want to get one too small or I guess too large. I looked through the threads in part of the forum but did not find anything that popped out at me that I could use to help me. Any guidance or references...
garage.grumpysperformance.com
basic info on your v8 lube system
now think it thru, HERES SOME USEFUL INFO, that might help in this thread and the sub links http://garage.grumpysperformance.com/index.php?threads/crank-case-blow-bye-and-related-info.16790/ the first thing Id be doing here, if your not getting a strong oil flow at each rocker while your turn...
garage.grumpysperformance.com
oil system mods that help
heres a short list REMEMBER the object or goal in building and maintaining the lubrication system is too maintain a 100% dependable pressurized cooling flow of lubricant to the bearings, rockers ,valves etc. your most important tool, is your ability to think about how things are supposed to...
garage.grumpysperformance.com
Last edited:
Both of you are a terrific help, I appreciate it.
Looking at the info, I'm going to get the same delco r45xls plugs.
But you've also started me thinking about an oil cooler too! This engine can use all the cooling it can.
First I'll get the engine running, then easy enough to modify as needed for something like what you linked to:
 www.summitracing.com
I really like that one, anyway, that's a bit later after I research coolers, sandwich plates etc.
Looking at the info, I'm going to get the same delco r45xls plugs.
But you've also started me thinking about an oil cooler too! This engine can use all the cooling it can.
First I'll get the engine running, then easy enough to modify as needed for something like what you linked to:
Derale Cooling Products 15800 Derale Electra-Cool Remote Fluid Coolers | Summit Racing
Free Shipping - Derale Electra-Cool Remote Fluid Coolers with qualifying orders of $109. Shop Fluid Coolers at Summit Racing.
I really like that one, anyway, that's a bit later after I research coolers, sandwich plates etc.
before you spend cash that might be better spent else ware on an oil cooler it would be smart to verify your engines oil temps
(and trans fluid temps) an oil or trans fluid cooler is a great idea for most performance engines,
as is a 7-8 quart baffled oil pan,
but on some cars its not needed.(accurate gauges help here)
every choice you make is a compromise in some area
(and trans fluid temps) an oil or trans fluid cooler is a great idea for most performance engines,
as is a 7-8 quart baffled oil pan,
but on some cars its not needed.(accurate gauges help here)
every choice you make is a compromise in some area
Last edited:
I was taking another look at the numbers you posted and had a question.
- Why would the duration @ .050 change just because you installed the cam with a different advance/retard????
- Did you record the the Intake/Exhaust centerlines for +4 and -2 installations???
Just to be clear, when you say "Installed at 0 degrees", this should say "Dot-to-Dot". It's actually
(114° - 105.5°) / 2 = 4.25° Advanced
Probably when you say +4° Advanced, then it's actually +8 advanced, but I can't easily tell without the centerlines. It could be caluculated from the your valve timing numbers.
I'm trying to think back on this one - and I'm a bit confused too. Hopefully you can help walk me through....
On the duration @ .050, I recorded where the degree wheel landed at each of the different cam settings and compared to the spec data. I honestly didn't think about durations changing, but assumed that the numbers would adjust as the cam was shifted to the different install settings.
I'll go back to see if I recorded the centerline data, I may not have as I was focused on the open/close valve events.
Yes the "0" degree setting was indeed dot to dot (installed "straight up"). I'll change that on the chart for clarity. The +4 degree call out was based on the corresponding mark on the crank gear, so I called it as installed at +4 degrees. But I see what you say about the centerlines. I've heard before that many cams are ground at +4 degrees as the straight-up install setting? I'll look back on my notes but I don't think Straub/Clay Smith did this on this cam. I hope this isn't a can of worms but better to figure it out .
Crank gear below, as you can see it's marked at the keyway and where the corresponding tooth would be pointing up to the cam gear dot. In the pic below the cam would be installed at that dot to dot position.


Clarifications are appreciated, thanks.
Edit - here's what I got back from C. Straub when I sent him the same degree chart we're discussing. I asked for input on what I had come up with.
"Unless this block has had the lifter bores blueprinted, the best you can do is get the IVO as close to the printed IVO as you can. Being a little retarded is fine as the chain tends to stretch some."
The lobes we use for these are not symmetrical, so a quick centerline method can give a false reading. Small changes in the lifter angle in the bore, and even lifter bore angle itself can effect some of these readings as well.
So I took this as my final setting of -2 degrees was ok.
On the duration @ .050, I recorded where the degree wheel landed at each of the different cam settings and compared to the spec data. I honestly didn't think about durations changing, but assumed that the numbers would adjust as the cam was shifted to the different install settings.
I'll go back to see if I recorded the centerline data, I may not have as I was focused on the open/close valve events.
Yes the "0" degree setting was indeed dot to dot (installed "straight up"). I'll change that on the chart for clarity. The +4 degree call out was based on the corresponding mark on the crank gear, so I called it as installed at +4 degrees. But I see what you say about the centerlines. I've heard before that many cams are ground at +4 degrees as the straight-up install setting? I'll look back on my notes but I don't think Straub/Clay Smith did this on this cam. I hope this isn't a can of worms but better to figure it out .
Crank gear below, as you can see it's marked at the keyway and where the corresponding tooth would be pointing up to the cam gear dot. In the pic below the cam would be installed at that dot to dot position.
Clarifications are appreciated, thanks.
Edit - here's what I got back from C. Straub when I sent him the same degree chart we're discussing. I asked for input on what I had come up with.
"Unless this block has had the lifter bores blueprinted, the best you can do is get the IVO as close to the printed IVO as you can. Being a little retarded is fine as the chain tends to stretch some."
The lobes we use for these are not symmetrical, so a quick centerline method can give a false reading. Small changes in the lifter angle in the bore, and even lifter bore angle itself can effect some of these readings as well.
So I took this as my final setting of -2 degrees was ok.
Last edited:
Thunderbolt
Well-Known Member
"Being a little retarded is fine as the chain tends to stretch some"
Must be a typo? Should it not be advanced?
Must be a typo? Should it not be advanced?