Building Up A Blown Olds Motor for an "A/GS Gasser"

Hadn't thought about that, guess I could try it and see how it works.

Was traveling over the holidays, am back home again and working on the gasser. Feels good!

Pulled the blow bell front plate off the block, cleaned it up, and am welding on nuts where needed on the front of the plate to make it easier to put the blow bell on and off without having to reach up in there to hold the nuts in place each time I want to remove it!

Then it will be reassemble time with the new McLeod RXT ceramic twin disk clutch setup.

55gasser%20clutch%20disks%2007s%20Jan%202013.JPG


And I will be adding a little more room front and back in this blow bell window to allow more clutch arm adjustment/movement:

55gasser%20clutch%20disks%2011s%20Jan%202013.JPG


Posted some more pix on my project page (LINK)....

Aloha,
Willy
 
I'm going back to the aluminum flywheel. It's a 1/4" thinner than the steel one, that gives me an additional 1/4" adjustment room, plus when I switched from the aluminum to the thicker steel, I shortened the pivot ball mount 1/8", so there should be plenty of adjustment room now. The steel flywheel needs a trip to the machine shop for a resurfacing before it can be used again!

Welded all the nuts that needed it to the front side of the flat plate the blow bell mounts against, got tired having to reach up there every time to hold each nut in place to put a bolt in, so got that done yesterday. Cleaned it up, and painted it, waiting for the paint to dry, should be good to go today and start putting it all together , see how the clutch arm and bearing will fit with the new clutch setup. Also got a new clutch bearing while I had it apart. The old one seems ok, but it's going in the "spares" box.

55gasser%20clutch%20disks%2014s%20Jan%202013.JPG


Should have it on the road by Monday if nothing else pops up along the way.
 
I hope none of those welded NUTS prevent the BELL HOUSING from being bolted onto the block plate or some similar issue?
 
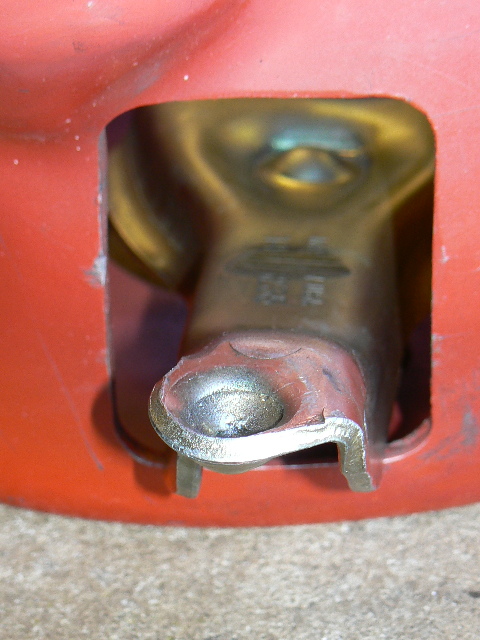
Heh,heh, that could happen couldn't it? Naww, I knew where the bolts had to go, and if you look closely at the pix above of the motor side of the plate, you'll see where three bolts were welded in reversed, compared to the nuts on the rest, as that is where the oil filter is on the Olds motors, and couldn't put a bolt through back to front there, it hits the filter, so put those three bolts through front to back and welded them in place. It all went on the block quite nicely, clears the oil filter. The six smaller open holes are where bolts fasten through the bell and the plate into the block itself. The two larger holes are for the dowel pins in the block.

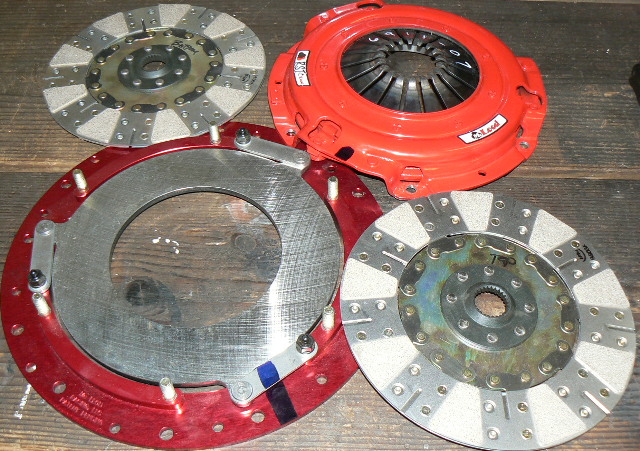
McLeod provided a plastic alignment tool with the twin disk clutch setup, and I carefully aligned everything on the flywheel, it's more complicated by the fact that the splines on both disks have to be aligned, then both centered on the pilot bearing, in order for the tranny input shaft to slide all the way in.

The alignment tool got the two disks aligned pretty well, but there was some flexibility in the whole thing, once I got the tip of the tool in the pilot bearing, I could wiggle it around a bit before I tightened down the bolts, clamping everything in place! I tried to center it as much as I could, but it was still basically just a guess! Clamped it down and put the bell in place with the clutch arm and bearing, and hooked up the linkage. Looking down the hole with a light it all looked lined up pretty well.

Laying on my back with that heavy Doug Nash tranny on my chest, I got it in and it was a tight fit. The splines on the input shaft needed some persuasion to go into the clutch disk splines, but it went in until it got to the pilot bearing, and wouldn't go any further, that last 1/4" or so gap between the front of the tranny and the bell surface told me where I was! Wiggled it, pushed it, rotated it, profuse profanity was used, it just would not go in that final little bit!

That told me the clutch disks were not accurately centered on the pilot bearing.

OK, take the bell off so I can realign it with that plastic tool and try again? Take all those bolts off again, some of which are quite difficult to get at with a wrench? Or wait until a buddy can come by and step on the clutch pedal for me, so that maybe I can wiggle it around enough to center it and "pop" it into the pilot bearing? I've been successful before doing it that way, so ok, let's wait, go have a beer (or six!!!).......

Pulled the tranny out and layed it aside.......

My buddy stopped by on his way home from work, I got that heavy tranny up on my chest again, and in the hole, he stepped on the clutch, which released the pressure on the two disks, I could feel them release, and tried to wiggle them around on the front of the tranny shaft, to find the pilot bearing hole, but after a lot of profanity and sweaty wrestling with that tranny, I was unsuccessful!

I think that when the throwout bearing is pressed against the clutch fingers, although the clutch disks are free to move around, the throwout bearing is pretty much immovable, pressed as hard as it is against the clutch fingers, preventing me from moving the disks enough to get alignment. Must have just got lucky when I did it that way before.

Pulled the tranny back out, looked in the hole with a light, could see that the disks were not aligned any more with each other, with the splines also out of phase. Tried to put them back close with the tool, with my buddy holding the clutch pedal down, but again, that throw out bearing was locked against the clutch fingers and wouldn't move, making it hard to try to get that tool in through both disks and aligning the splines. Just impossible. If it had a spare input shaft with the correct size and splines for this app, where I had something to grab ahold of and work with, I might have been able to get it aligned again, but that short little plastic tool just disappears in there when shoved in, no way to grab ahold of it and wrestle it around trying to align the splines, and the disks with the pilot bearing. Just no way!!!

Went and had a bunch of beer and grilled some fresh venison with my buddies, "Fender Friday at the Shop...."

Today the bell comes off and try again to align it all....

And gotta do it before 3 pm, when the Niner's game comes on....
With more beer, and we'll fire up the grill at half time....

"Not Feeling Much Aloha Today...."
(Well, that's not quite true, it's only when I think about that *%# clutch!!!)
Willy
 

With the bell housing on, can you not loosen the pressure plate bolts enough to allow the disks to slip and do your alignment then??? Maybe remove the fork and reach in thru that hole, if you have no other access.

 
Can't.
Very limited access with that blow well on there. One hole for the clutch arm, the tranny hole is limited, can't get in there to access the pressure plate bolts. Have to pull off the bell. Tried for quite awhile to move the disks around with a large screwdriver when the clutch depressed, could move them around, but no real way to get them lined up again, with splines sync'd, and stay in position while putting the trans back in. It looks like it has to be right on, then put the tranny in.

Don't have access to a real tranny jack, don't want to spend the money for one, up to now have always been successful just manhandling it in, so gonna try it again. Have used a floor jack with a piece of plywood bolted on for a tranny support, but the jack handle always gets in the way under the car.
 
After wrestling that Nash tranny twice yesterday, and getting trashed, I could hardly get outta bed this morning. Made the 5am pot extra strong! (hey, early "plantation daze" hours die hard, I love the early am.... Fresh Black Coffee and both the Honolulu and Maui Papers at 5-ish every day....) (They deliver at 4:30 am to a box out at the road, I walk out every morning with a hot cuppa in my hand, rain or stars....)

But went back and took apart and redid everything, spun those disks in there a coupla times on the tool and yeah, kinda pushed it up a bit, just ever so slightly, as I tightened up the bolts by hand to hold it in place, then went round and round the circle, half turn at a time, pulling the pressure plate in nice and tight.

Then mounted the bell in place, 22 bolts on that buggah, then found some old bolts, long ones, cut off the heads and screwed them into the bell as dowels for the tranny, then started wrestling the tranny back in. Not so bad with the bolts to carry the weight, but it still wouldn't go past the second disk, kept cranking the tailshaft yoke back and forth (got a busted one I stick in when the tranny's outta the car), tried a coupla different gears, my buddy helping me, 4th felt pretty good, able to click it back and forth pretty firmly, but it just wouldn't go! So I finally hooked up the clutch, and with my buddy (he's a whole lot bigger, younger, and stronger than me.....) pushing on the tranny and twisting the yoke, when I stepped on the clutch pedal it popped into place, grabbing the second disk and sliding into the pilot bearing!!!!

YEAH!!!!

Now to put the rest together and check it out on the street. i'll definitely put the GoPro in and record it for youtube....

Am inside with a cold one watching the Niner's game at the moment.
There's always tomorrow...
Willy

UPDATE:
Did a vid with my camera while working on the clutch setup:
VIDEO of clutch install....
 
Took it for a cruise yesterday.

Started the vid at Rice Park in Kula, went out through Keokea to the Sun Yet Sen Memorial Park, then back through Kula to my place in Pukalani.

Most of it is pretty boring, as there was traffic and usually a couple of cops. And the vid makes it look like I'm going a lot faster then I actually was. But did manage to open up the elec. cutouts and hit it a little a couple of times. Not too hard though, as I am supposed to be "breaking in" this clutch carefully! I cut the vid up into seven segments, probably the first is the best one. Although the third and fourth are out on a narrow winding two laner where I got it going pretty good a couple of times.

Also need to bleed the brakes, they are working great, but respond to a single pump so I know there is still some air in there somewhere....

But the clutch works fine, I like it. I did go ahead and put the ceramic disks in, just had to find out how they were. Gotta get some miles on it though, our first race of the season is coming up Feb. 8,9.........
Aloha,
Willy

http://youtu.be/L3P8LIgmFRI

http://youtu.be/2KezTj6yNOw

http://youtu.be/oXBjkxLDbN4

http://youtu.be/zx19x-JaKck

http://youtu.be/TkIUq5Az0Vk

http://youtu.be/AB3hlHBKSxQ

http://youtu.be/rRvj0c6t4pY
 

Thanks for the ride Willy!

Hopefully this clutch will last a little longer than the last one.

 
hehe i miss the hot asphalt, wish i was local we could take some ride all together.
Thanks for the vid, its great to watch while waiting for that snow to melt(4 more month)
Sometime i wish i had elect cutout, i can already see all the evil fun id had with this feature.(i think it will get on the next year's to do list)
I notice your blower (well i think or it is the trans or tire?) is doing loud whining on decel, is this normal?
That ceramic clutch looks like a pita to drive on the street.
Also its nice to see the car comming the other way that move away from the yellow line when they see "the best" comming :)
 
My understanding on the Doug Nash trannies is that there were two versions, a strip and a street. Easy to ID as the strip did not have a speedometer gear port, the street did. Mine is a street. I'm told the strip had square cut gears and a different shifting setup internally, blocks or something I don't understand yet. The street version has a slight bevel on the gears and synchro rings. much like the M22, and you hear that same gear whine as the M22. Between the blower belt whine, the tranny gear whine, the elec fuel pump, and the steel heim joints on the ladder bars occasionally clunking, it's a noisy car! Then when I open the cutouts, Ahhhhh, Heaven....
Willy
 
Drove the car down to Kihei (about a half hour away) to have lunch with a buddy. On the way home had a little bit of open stretch on 4 lanes, was just crusing in fifth a 2,000, and decided to roll it on "just to see...."
As the boost climbed and the rpm came up to near 4,000, it pulled harder and harder, much more like a freight train then a maserati! That's with 3.00 rear gears and 28" tall tires. No speedo but know it goes 65 at 2,500, so that calcs out as 104 at 4,000. But it did not feel like a ten second machine. I just have a feeling it's just not that strong, probably will be lucky to do 11's next month at the track.

One thing, I've been scared by all the talk of possible detonation on pump gas with boost, and have been probably pretty conservative on timing. I'd like to try more timing, but just do not want to damage this motor, period! It is noisy enough that I doubt I could ever hear any detonation if it were to occur. With the 38/34 pulleys I have on there now the boost peaks out at about 7 lbs, that's with 8:1 forged pistons, aluminum heads, and a fairly conservative roller hyd. cam. (.506/.516, 230/236 @ .050). Carbs are running fat right now.

Willy
 
7psi boost @ 8:1 compression make for an effective compression ratio of: 11.85:1
for 92 octane most assume under 12:1(11.5:1 for marine engine) is safe(without water/meth injection and watercooler)but always use premium and colder plugs if you did not already.
That is from the supercharger tech info pdf i posted earlier.
Personnaly i am aiming at 6-7 psi(now at 4-5 psi) with 8.7:1 compression with my 383 once my blower teflon strip are changed.
aim for a fat/rich WOT mixture(12:1 - 12.5:1 AF)

As for the timming issue, me and dorianL use the MSD knock alert(p/n: 8964), so with the loud exhaust it let you know if there is detonation.
So you can safely tune your ignition advance.
You cant get it from summit or jegs from my memory i buy mine from msd website(apparently they made the last batch in 2007 but apparently a company in california make one J & S Electronics).
 
Do You have local airport nearby ?
Most here in Illinois allow you to purchase 100 LL Avaition gasoline if you bring your own containers.
When I want 100 LL AV gas, I bring 3 or 4 Five gallon containers.
Look for the Small piston airplane mechanics on duty, they are always happy to stop working & sell me AV gas.
100LL AV gas is at least 50 times better quality fuel than today's 93 octane gasohol oxygenated pump gas.
Your car even smells good when its running & driving down the road. Almost identical to the smell of Real 110 to 116 motor octane race gas.
100 LL AV gas is how I afforded to drive my 1970 Pontiac Trans Am with a built up 12.0:1 static compression ratio & cast iron Pontiac Ram Air 4 heads for over 10,000 miles street & strip on that engine build over 2 years. Driving from March till the snow fell in late November- early December.
With 100 LL AV gas, I ran total ignition timing to 32 Degrees BTDC.
When I wanted to play real hard or race, filled the tank up 1/2 way with 110 motor octane race gas and set total timing to 36 degrees BTDC.
Real fast advance curve I used, all timing in by 1,100 RPM's with 21 degrees centrifugal advance at the Crankshaft.
Tilton Mini Starter to start the beast with 15 degrees initial or static timing BTDC.

You have to experiment.
Never stop till you hit the tune exact right for Blown Olds 425 Beast.
It should run in the 10's easy. Don't fret, your getting there.

Brian R.
 
Back
Top