Electrical Wiring for a TBucket

Indycars said:
mathd said:
What kind of steering wheel is that?, i mean from the sounds of it. it look very big :p.
Angle gauge look to be a good idea too, i see it as usefull and aesthetic improvement :!.

The steering wheel is made by Moto-Lita in Britian. It measures 13 inches
center line to center line.
https://www.moto-lita.co.uk/default.aspx

Below is a rough approximation of what I see, there maybe room for some
gauges around the big 4 inch gauges.


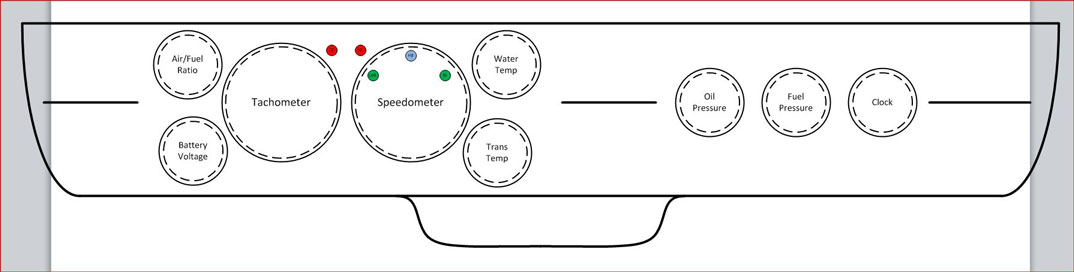
Could also move the 2 big gauge away from each other just enough to have 2 smaller gauge between the big ones :)
 

I tried to improve my accuracy by showing the hole size (dotted line) and the
OD of the gauge bezel to help visualize how close they look.

Hey I really like this new layout. I might have to tilt my head or sit a little
higher in the saddle to see all six gauges, but that's not a big deal.


Attachments

  • DashLayoutC.JPG
    DashLayoutC.JPG
    42.2 KB · Views: 12
Indycars said:

I tried to improve my accuracy by showing the hole size (dotted line) and the
OD of the gauge bezel to help visualize how close they look.

Hey I really like this new layout. I might have to tilt my head or sit a little
higher in the saddle to see all six gauges, but that's not a big deal.


I think i like this :) (probably because my camaro has almost the same gauge layout)
mFF3jyGStkvuJbGnKYIvU9A.jpg

Now, one question. Where is the fuel level gauge?
 
DashLayoutC.JPG

yeah! thats A huge improvement in the dash lay out design in my opinion

but I'd SWAP the OIL PRESSURE and FUEL/AIR RATIO GAUGE LOCATIONS
 
mathd said:
Now, one question. Where is the fuel level gauge?

You sure are reading closely and watching every detail!!! ....thanks!!!

I use what's called a Lookin Gauge, there are free and don't require any power!!! :lol:

 
grumpyvette said:
yeah! thats A huge improvement in the dash lay out design in my opinion

but I'd SWAP the OIL PRESSURE and FUEL/AIR RATIO GAUGE LOCATIONS

Yaw, that was my first pass trying to decide on gauge placement. You can't
read it, but the two red lights in the middle are oil pressure and alternator
charging lights. So I guess my reasoning was I have the light and what's the
chance of seeing a oil pressure reading on the way down. The A/F gauge
would alert you to dirt in the carb and causing a lean condition and detonation
possibly.

Have you ever caught a oil system failure as it was going south .... say at 20
psi and cruising.

I'm just throwing thoughts out there, your discussion helps me think it thru
and come up with the best possible answer.... thanks!!!

 
grumpyvette said:
DashLayoutC.JPG

yeah! thats A huge improvement in the dash lay out design in my opinion

but I'd SWAP the OIL PRESSURE and FUEL/AIR RATIO GAUGE LOCATIONS

This^^^ including Grumps swap. Other than that I like it if you'll be able to see the gauges through the wheel.
 
Have you ever caught a oil system failure as it was going south .... say at 20
psi and cruising.
I was in a friends 440, 4 speed ,road runner when "he ran over a heavy metal frame real estate, for sale sign"

Y_frame.jpg


that was at that time laying, unseen, in the street, and after a very obvious metallic bang and grind sound , the result of the bent sign leg ripping thru metal under the car, I looked down at his oil pressure gauge and saw it dropping rapidly, I looked out the rear window and saw a ton of smoke and told him to turn the engine OFF NOW!
luckily it was only the oil filter that was punctured and ripped.
 

OK, I can move it and have the wife focus on her three gauges and quit looking
around at the scenery. :)

 
Indycars said:
Have you ever caught a oil system failure as it was going south .... say at 20
psi and cruising.
Yes, i did a 10+ mile ride at 8psi oil pressure with a 350, i also did a small burnout(engine had no power) right at the begin of the trip and the engine started to run like shit and oil press dropped around 4-6 psi just after the burnout (yeah wise idea) did not try to let it idle after that. I guess i was lucky to make it to my destination it was mostly highway so no stop and go haha :).
Checked engine, oil filter adapter was loose, main and cam bearing was bad. Cam lobe and rod bearing looked good.

Thats when i moved the camaro to install the 383 before i had a place to work on my car :).
 

Hope you are wiser today and would return back to the point of origin as soon
as possible.

How did you find the oil filter adapter was loose, just damn lucky !!!! hehehe :D

 
Indycars said:

Hope you are wiser today and would return back to the point of origin as soon
as possible.

How did you find the oil filter adapter was loose, just damn lucky !!!! hehehe :D

I found out when i dissasembled the engine :).

When i bought the camaro. it was 180mile from here.. and i knew the engine was bad.. did the 180 mile trip with 12 psi oil pressure and the choke stuck closed, ignition timing too advanced it was pinging under accell.. (i knew almost nothing about engine at that time) thats before the 10 mile trip at 4-6psi for the engine swap.
No trailer, no tow rig and no tool no jumping cable + the battery cable was left loose. shut the engine off once and it was real hard to start haha so i kept it running for the rest of the ride.
That was "intense" if my english is correct.
I still managed to take a few ride on the city before the engine swap.
Good memories :). well now i always have a small tool box with an extinctor on all my vehicle.
 

Stopped by Lowes last night and picked up some semi cheap wood for the dash
prototype. I'm going to make one out of Pine first and see where I can improve
my process. Then with that knowledge, I can work on the Padauk wood.

First thing I had to do was tape the pages together very accurately. I print
a vertical line on one page and another line on the next page exactly 5 inches
apart.


Below are the tools I used, scribe, Starrett 6 inch Scale, 8x Eye Loupe, LED flash light and 3-7/8 inch hole saw.


Next I taped the template straight with the board. The vertical pieces of
5 pieces of tape are where each page was taped together.


Next I marked the hole centers with the scribe. It's not always easy to get the
scribe centered on the cross hairs, since you cannot be two places at once to
see how it looks in X and Y at the same time. The flash light also helped to
see exactly how I was doing. Once I was found the center, then just push the
scribe into the wood. Just like center punching metal for drilling.


Before I used the hole saw I drilled every center starting with an 1/8" drill and
then incrementing 1/32" until I got to 1/4" for the hole saw.


I got both large holes drilled, now I just have the seven 2-1/16" holes left to complete.


Attachments

  • FP02_DashHoleCenters_5946.jpg
    FP02_DashHoleCenters_5946.jpg
    30.7 KB · Views: 42
  • FP02_DashHoleCenters_5948.jpg
    FP02_DashHoleCenters_5948.jpg
    27.8 KB · Views: 42
  • FP02_DashTemplate5Inches_5950.jpg
    FP02_DashTemplate5Inches_5950.jpg
    26.2 KB · Views: 42
  • FP02_DashTemplateLayoutOnBoard_5942.jpg
    FP02_DashTemplateLayoutOnBoard_5942.jpg
    37.8 KB · Views: 42
  • FP02_DashWithFirst4InchHole_5952.jpg
    FP02_DashWithFirst4InchHole_5952.jpg
    49.6 KB · Views: 42
  • FP02_DashWoodCuttingTools_5944.jpg
    FP02_DashWoodCuttingTools_5944.jpg
    39 KB · Views: 42
I'm looking forward to the results, and is it not always amazing at how every project always seems like its going to go fairly smoothly until your fully involved!
 
lookin good so far rick! i really admire your measure twice, cut one (or drill) approach to things. i wouldve eyeballed it with a solo cup and probably just lived with the results or had to do it twice... young ignorance
 

Thanks Phil for the nice comment!!!

I'm trying to read the books you sent, but I'm having trouble. Only electrical
thoughts seem to be able to penetrate my head right now. If I can't get thru
them in another month, I will return them then.

 
Indycars said:

Thanks Phil for the nice comment!!!

I'm trying to read the books you sent, but I'm having trouble. Only electrical
thoughts seem to be able to penetrate my head right now. If I can't get thru
them in another month, I will return them then.


why dont you photocopy or scan them and hang on to it.... wether or not you read them it'd be nice to have a copy floating around for reference at some point or another.
 
I have pine cabinets in my kitchen. bit of tint and varnish. look pretty good, but this wood is pretty soft.
padauk wood look like hard wood. its going to be harder to work with.
I looked padauk wood on google, look very good, what your going to lay over it? some nitrocellulose lacquer applied with the spray gun? :)
 
Back
Top