TBucket Engine Project (Dart SHP)

busterrm said:
I would have had to watch you degree it, I don't understand it when someone is talking about it. I would if I were to watch it being done. I did notice your documentation and was wondering about the centerline column. Isn't the centerline After Bottom Dead Center? I noticed it says ATDC. I was thinking its just a typo.

Okay, I read your posts on degreeing, where did you degree it in? Advance? Retarded? My nova is set up 4 degrees advance.

No I'm pretty sure the centerline for the intake is 106 ATDC or I guess you could say it's 74 Before BDC. Think of it like this..... the majority of the intake stroke is when the piston in moving down ATDC, therefore the centerline would have to be after TDC.

It's installed Dot-to-Dot or 4 degrees advanced.

The LSA for this cam is 110 degree and the cam is installed with the centerline at 106 ....... 110 - 106 = 4 degrees advanced.


Indycars said:
busterrm said:
I would have had to watch you degree it, I don't understand it when someone is talking about it. I would if I were to watch it being done. I did notice your documentation and was wondering about the centerline column. Isn't the centerline After Bottom Dead Center? I noticed it says ATDC. I was thinking its just a typo.

Okay, I read your posts on degreeing, where did you degree it in? Advance? Retarded? My nova is set up 4 degrees advance.

No I'm pretty sure the centerline for the intake is 106 ATDC or I guess you could say it's 74 Before BDC. Think of it like this..... the majority of the intake stroke is when the piston in moving down ATDC, therefore the centerline would have to be after TDC.

It's installed Dot-to-Dot or 4 degrees advanced.

The LSA for this cam is 110 degree and the cam is installed with the centerline at 106 ....... 110 - 106 = 4 degrees advanced.


Theres no right or wrong here just preference, yet, I generally install that cam, strait up, not advanced 4 degrees, like most factory cams are set with a dot-to-dot install, now, Id suggest driving the car and getting a feel for the engine first, before making any changes, but if you find you want to move the whole effective power curve up a bit ,having it moved up about 200rpm,can be accomplished if you can re-index the cam in again strait up, youll find the current power curve starts and stops about 200rpm lower than if the cams installed strait up. that may be more responsive but you can add a few peak hp and reduce wheel spin very slightly thru installing the cam strait up.
 

What's the reasoning behind FelPro's statement about installing the one piece pan gasket. They say
"IMPORTANT: This molded rubber silicone gasket must be installed DRY without any chemical adhesive."

I want to make sure the gasket stays with the block if I pull the pan with the engine in the
car. Grumpy you said to use "contact cement ONLY", is this something like 3M "Black Weatherstrip
and Gasket Adhesive" # 08008 what you are referring to???

Wonder whats wrong with using RTV, FelPro wants you to use it in the corners only.


most of the weather strip adhesives are not designed to hold in a near constant bath of hot oil, the yellow type actually dissolves slowly over many months
related threads

viewtopic.php?f=44&t=805&p=1171&hilit=studs+heads+bolts+lube#p1171

viewtopic.php?f=54&t=2725&p=7076#p7076

viewtopic.php?f=54&t=4578

viewtopic.php?f=54&t=206

viewtopic.php?f=54&t=115

onepiece.jpg

youll want to use the BLACK RTV oil proof sealant, pictured below on the upper surface of the oil pan gasket
blackrtva.jpg


BTW BOTH chevy and KEVCO sell oil pan rail spreader plates to reduce oil pan rail bending and spread the clamp loads reducing leaks
reinforcement_rails_full.gif
 
The one on my nova was a snap, I did use silicone in the corners. on the pan side not the block side. Did yours come with the blue alignment dowels? Mine did and I used them when i put on the new pan a month or so ago. It was a pain to get the engine up enough to put it on, but it went well after it was high enough. I slid it on the block with the dowels supplied and put the silicon in the corners let it set up for about 10 - 15 minutes and put the pan on and put in all the 1/4 -20 bolts snugged them up pulled the dowels and intalled the 5/16 bolts on the corners and tightened then in a inside to outside order and it has not leaked one drop since then.
 
grumpyvette said:
Indycars said:
busterrm said:
I would have had to watch you degree it, I don't understand it when someone is talking about it. I would if I were to watch it being done. I did notice your documentation and was wondering about the centerline column. Isn't the centerline After Bottom Dead Center? I noticed it says ATDC. I was thinking its just a typo.

Okay, I read your posts on degreeing, where did you degree it in? Advance? Retarded? My nova is set up 4 degrees advance.

No I'm pretty sure the centerline for the intake is 106 ATDC or I guess you could say it's 74 Before BDC. Think of it like this..... the majority of the intake stroke is when the piston in moving down ATDC, therefore the centerline would have to be after TDC.

It's installed Dot-to-Dot or 4 degrees advanced.

The LSA for this cam is 110 degree and the cam is installed with the centerline at 106 ....... 110 - 106 = 4 degrees advanced.


Theres no right or wrong here just preference, yet, I generally install that cam, strait up, not advanced 4 degrees, like most factory cams are set with a dot-to-dot install, now, Id suggest driving the car and getting a feel for the engine first, before making any changes, but if you find you want to move the whole effective power curve up a bit ,having it moved up about 200rpm,can be accomplished if you can re-index the cam in again strait up, youll find the current power curve starts and stops about 200rpm lower than if the cams installed strait up. that may be more responsive but you can add a few peak hp and reduce wheel spin very slightly thru installing the cam strait up.

Here's why I asked about it Rick, I was under the impression that the intake centerline is when its closing to start the dynamic comp stroke?
I guess I am still confused about how to read a cam card, To me the centerline looks like its ABDC
The cam card for the cam in my nova looks like this:

Lunati60103.jpg
 
I am not saying your wrong, I am looking at this and labeling it where the card says they open and close. I guess I am still learning about cams.
Maybe this is why I am losing my hair, cuz I am always scratching my head.
 
busterrm said:
Here's why I asked about it Rick, I was under the impression that the intake centerline is when its closing to start the dynamic comp stroke?
I guess I am still confused about how to read a cam card, To me the centerline looks like its ABDC
The cam card for the cam in my nova looks like this:
Maybe your are confusing IC(Intake Closing) and ICA(Intake Centerline Angle). ICA by it's definition is the 1/2 way point on all camshafts that have a symmetrical lobe shape. Sometime the opening side, compared the closing side are NOT identical.


busterrm said:
I am not saying your wrong, I am looking at this and labeling it where the card says they open and close. I guess I am still learning about cams.
Maybe this is why I am losing my hair, cuz I am always scratching my head.
I appreciate questions and in no way did I think you were trying to tell me I was wrong.

I see where you were confused, I was scratching my head at first looking at that Lunati cam card. We were both looking at the card as if it was a clock and reading the diagram in a clockwise direction, but that's where we went wrong.

Consider this cam card. You have to start at the opening number and go counter clockwise, you cannot jump across the opening in the diagram to get to the closing. Which doesn't make sense, cause the time the valve was open would be just 92 degrees (360-268=92).


LunatiCamCard_60103.jpg
 
Last edited:
when your reading a cam spec card, you'll want too keep in mind theres 720 degrees in a cycle and the cam turns at 1/2 the speed of the crank so the piston reaches TDC twice in one complete rotation of the cam, plus cam cards generally start with the exhaust valve opening not the intake valve as most of us might assume,


READ THREAD
viewtopic.php?f=52&t=1477
Fig5LiftCurve_HydSolidRoller800.jpg

timingtab.gif

prorot.jpg

heifire.jpg
 
Indycars said:
busterrm said:
Here's why I asked about it Rick, I was under the impression that the intake centerline is when its closing to start the dynamic comp stroke?
I guess I am still confused about how to read a cam card, To me the centerline looks like its ABDC
The cam card for the cam in my nova looks like this:
Maybe your are confusing IC(Intake Closing) and ICA(Intake Centerline Angle). ICA by it's definition is the 1/2 way point on all camshafts that have a symmetrical lobe shape. Sometime the opening side, compared the closing side are NOT identical.


busterrm said:
I am not saying your wrong, I am looking at this and labeling it where the card says they open and close. I guess I am still learning about cams.
Maybe this is why I am losing my hair, cuz I am always scratching my head.
I appreciate questions and in no way did I think you were trying to tell me I was wrong.

I see where you were confused, I was scratching my head at first looking at that Lunati cam card. We were both looking at the card as if it was a clock and reading the diagram in a clockwise direction, but that's where we went wrong.

Consider this cam card. You have to start at the opening number and go counter clockwise, you cannot jump across the opening in the diagram to get to the closing. Which doesn't make sense, cause the time the valve was open would be just 92 degrees (360-268=92).


Okay, its beginning to make sense to me now. Question, the direction of the arrows you added is this the direction the engine is rotating while running? The degrees listed on the diagram are crank degrees right? Omg, I am scratching my head again!! LOL
 
busterrm said:
Okay, its beginning to make sense to me now. Question, the direction of the arrows you added is this the direction the engine is rotating while running? The degrees listed on the diagram are crank degrees right? Omg, I am scratching my head again!! LOL

Rotation would depend on where you are...in the driver seat or standing at the front of the car. If you are standing at the front bumper, then the rotation is Clockwise.

It would also depend on the what your perspective is, if it's the camshaft perspective then it one direction, but if its the lifter then it's the other direction. But don't get hung up on which way it's going, it's the concept that you want to understand.

I would suggest a book about valve trains. I have this one and it's pretty good.
http://www.amazon.com/Build-High-Perfor ... valvetrain
http://www.barnesandnoble.com/s/Build-H ... llproducts

ValveTrainsBook.jpg

Or this article on the forum is pretty good.
Camshafts - 8 Lessons
viewtopic.php?f=52&t=5154

I believe the only time a number is camshaft degrees is when you talking about the Lobe Separation Angle LSA, othewise it's always crankshaft degrees.


Fig3_TwoLobe.gif
 
Last edited:

The one piece pan gasket that I purchased was made to fit a dipstick on either side of the
block. I didn't want that extra gasket to stick out so I trimmed it off. From the piece that
I trimmed off, I cutout a piece to slide back in where the hole was. I wanted the gasket to
look like it was made for just the dipstick on the passenger side.

PanGasketTrimmed01_2560.jpg

Put the RTV sealer only on the block side.

PanGasket_wRTV_2565.jpg
PanGasketDipStickHolePatched_2567.jpg

Not sure what's causing the gasket to pull up like this, but I will be putting back on the old
orange pan until after the motor is installed in the car. BTW, I did use a torque wrench to
install the pan bolts.


PanGasketProblem_2569.jpg


Here is one thing you will want to be aware of when using a one piece pan gasket. It takes
longer bolts, since it considerably thicker. They do include bolts with the gasket, but I had
bought the ARP polished stainless steel bolts. I had to start the corner bolts at the front
and then some down the side before I could get the corner bolts in the rear to start threading.

 
Last edited:
file.php


I could very easily be wrong, as I only have that picture from that one angle to judge by, yet it appears the edge of the oil pans a bit bent,
possibly due to over tightening those pan bolts on a rather squishy gasket,

(one reason many guys prefer the oil pan re-enforcing plates and studs)

viewtopic.php?f=54&t=206

viewtopic.php?f=54&t=115

and thats EXTREMELY easy to do

0275.jpg
 
what torque you used on the 1/4 oil pan bolt?
the 5/16-18 should be @ 265 LB. IN and the 1/4-20 @ 80 LB. IN
thats about 22 foot pound for the 5/16 and 6-7 foot pound for the 1/4 never torque the 1/4 to over 10 ft/lbs.
 
grumpyvette said:
I could very easily be wrong, as I only have that picture from that one angle to judge by, yet it appears the edge of the oil pans a bit bent,
possibly due to over tightening those pan bolts on a rather squishy gasket,

(one reason many guys prefer the oil pan re-enforcing plates and studs)
viewtopic.php?f=54&t=206

viewtopic.php?f=54&t=115

and thats EXTREMELY easy to do
I agree it does looked to be over tightened. The gasket does have steel rings in the four corner of the gasket, you can see them in the picture with the RTV on the gasket. The other bolt hole look like they have plastic reinforcement.

The pan looks to be straight when it's on the bench.

PanCornerGasketProblem_2582.jpg

I put the clamp on the gasket and will leave it overnight, but I don't hold out much hope of it helping.

PanGasketCClamp_2584.jpg
 
Last edited:
mathd said:
what torque you used on the 1/4 oil pan bolt?
the 5/16-18 should be @ 265 LB. IN and the 1/4-20 @ 80 LB. IN
thats about 22 foot pound for the 5/16 and 6-7 foot pound for the 1/4 never torque the 1/4 to over 10 ft/lbs.

I had the ARP torque value and the FelPro torque values, I went with the Felpro value. There were lower and I felt they would know more about how the gasket should be torqued.

Felpro wanted 96 in/lbs for the 1/4" bolts and 216 in/lbs for the 5/16 bolts. I stopped short of the numbers by a little.
 
yeah the torque is fine.
i asked because it really looked like it was overtorqued.

Was looking at the picture with the intake on, i think this engine will be ready very soon. I can feel the excitement building up :)
 

I mentioned earlier that I made a mistake when plotting the lift curves for my camshaft the
Hyd Roller Crower 00471. The mistake was made in the exhaust lift curve. The shape was
correct but I plotted it 30 degrees to early. The plot below shows both the Correct and Incorrect
curves side-by-side. See the graphic below, it does a better job of explaining than words.

IncorrectExhaustLiftCurveComparison.jpg

This is the corrected lift curve with the additional information of "Exhaust Centerline" and
the "Lobe Separation Angle" or LSA are labeled.

LiftCurveCrowerHR00471_02.jpg

It also effected the plot where I compared the same "Lift Curve" with "Velocity Curve". It's
the very same lift curve that was on the other plot, so it needed to be corrected also.

Lift&VelocityCurveCrowerHR00471_02.jpg


NOTE: The incorrect information was on page 29. But if you read
page 29 after today, June 21, 2012, then I had already corrected it.
So what you read was right.


Last edited:
having used that crower cam in several similar , 383-406 sbc engine builds in the past, I can,t wait to see the look on your face once you get everything correctly adjusted and tuned and stomp the throttle from a 30mph rolling start!
I don,t remember what stall speed converter you said you have , but I was using a 3200 stall in my trans at the time I used it in my corvette , and had ERSON 1.6:1 roller rockers on my 11:1 cpr 383 and it certainly was fun to drive if you were only concerned with performance.
you car should be easily 800lbs-900lbs lighter in weight so it should be really fun.
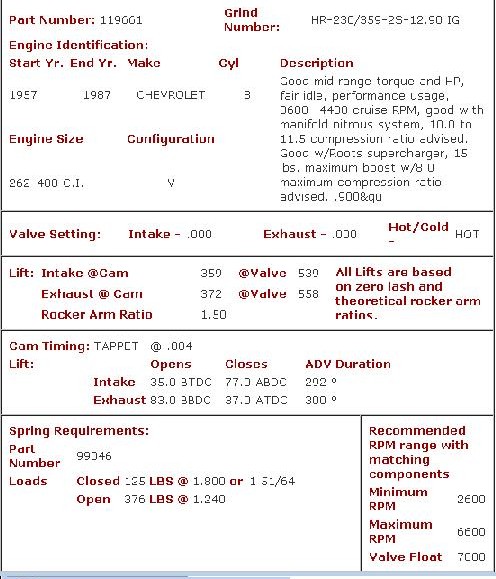
the only reason I swapped back to the crane 119661 was that the crane cams a bit easier to drive in traffic and cruise with, but the crower has a bit brisker performance.
yes a couple different parts could have been selected that would have easily boosted the power level significantly higher , but it would have resulted in a trade-off that reduced the street drive-ability,in exchange for peak power numbers that were seldom used on the street
RELATED THREAD

viewtopic.php?f=32&t=430

00471.jpg

119661.jpg


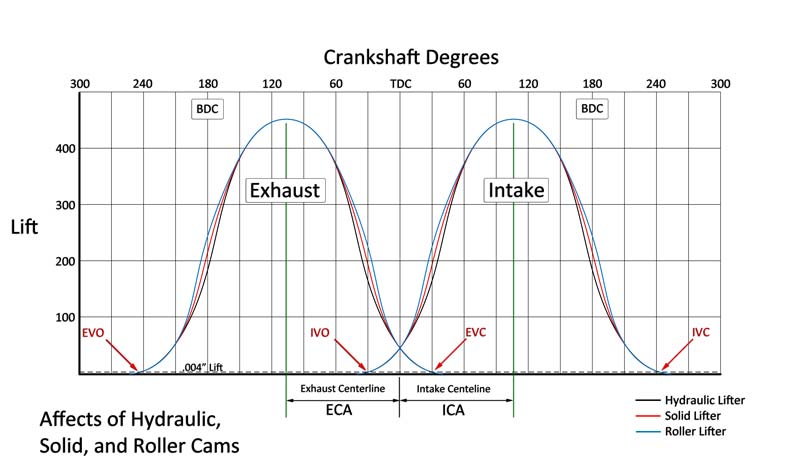
properly tuned, with proper valve train geometry and with the valves properly adjusted,
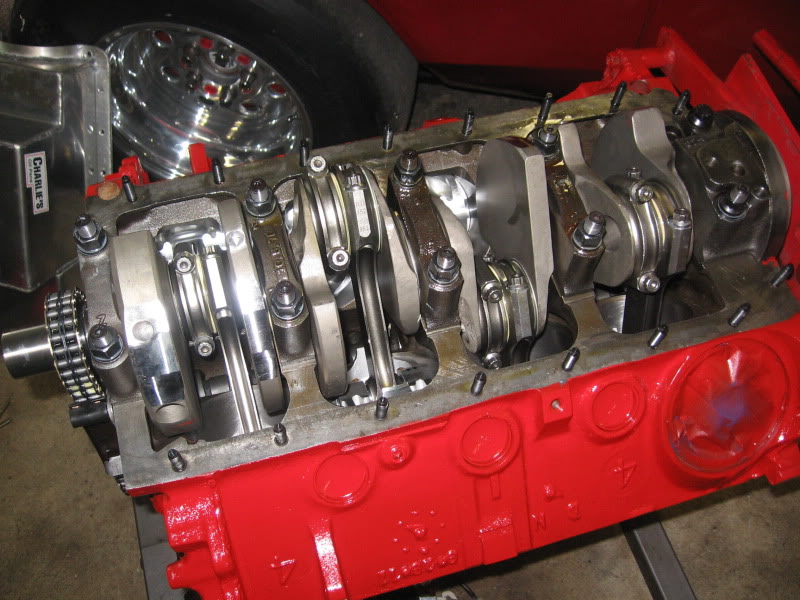
Ricks engine should rather easily spin about 6300 rpm once the rocker girdles installed,
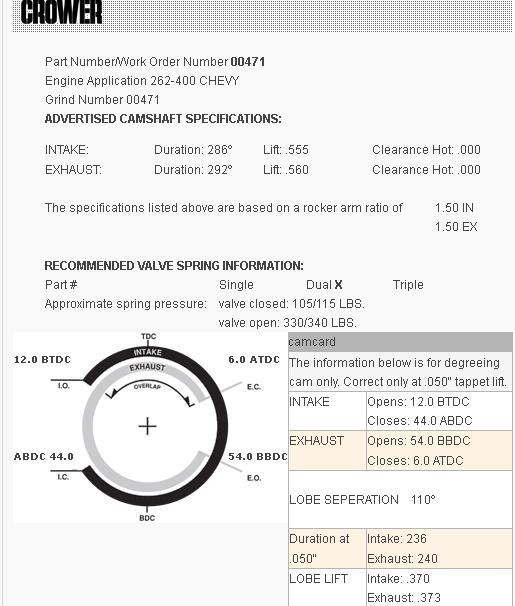
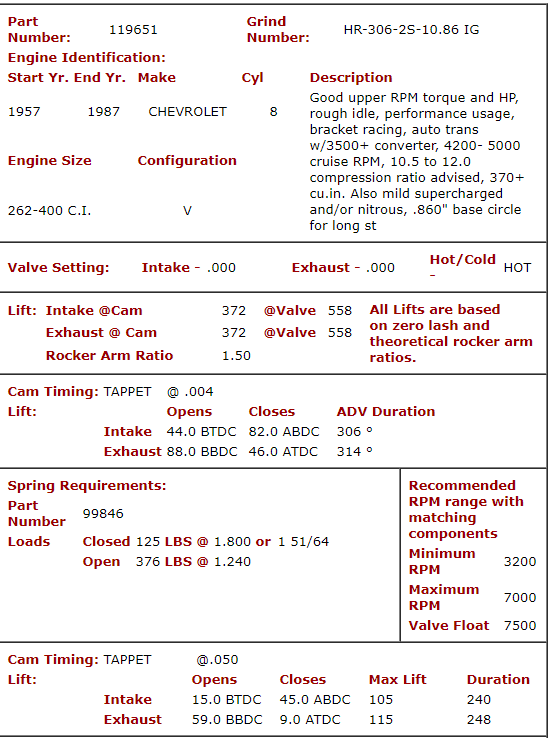
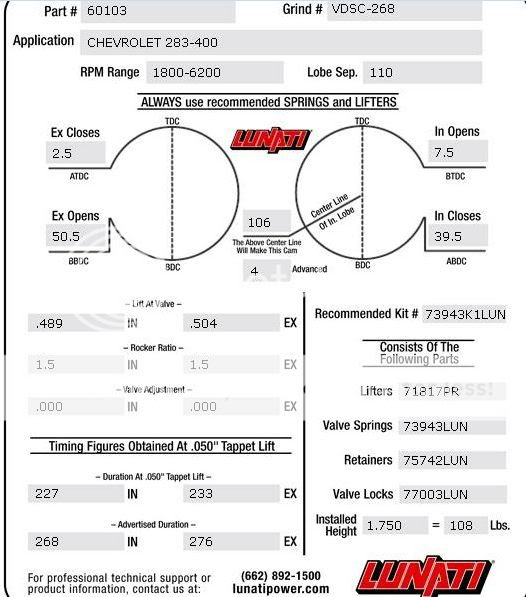
if the proper valve spring load pressure is still there, so he should be in the 490-530 flywheel hp range.(with the crower 00471 cam)
lets say 400 rear wheel hp and 2400 lbs with him in the T-bucket,car,thus with proper tires and suspension , decent street performance should easily result.
I've built several very similar 383-406 engines,
and even in a 3000 lb vega getting into the very low, to mid 11 second 1/4 mile times is rather easily done., provided the tires and suspension, drive train gearing and converter stall, are properly set up.
with Ricks much lighter T-bucket that should not be overly difficult.
keep firmly in mind this combo was not ever intended to be a racing engine, I could have selected several different components to boost potential power noticeably, but it would inevitably , resulted in a marginal or in some combo choices noticeable loss of street drive-ability and some potential loss in durability, which in my opinion is not generally a wise trade off in a street car engine. and you've built an engine that will require higher than pump gas octane fuel and you'll have a combo that won,t cruise at 2500 rpm at 70 mph so it won,t be good for long trips, but the trade -of will result in a quicker and faster 1/4 mile time at the track

http://www.wallaceracing.com/et-hp-mph.php


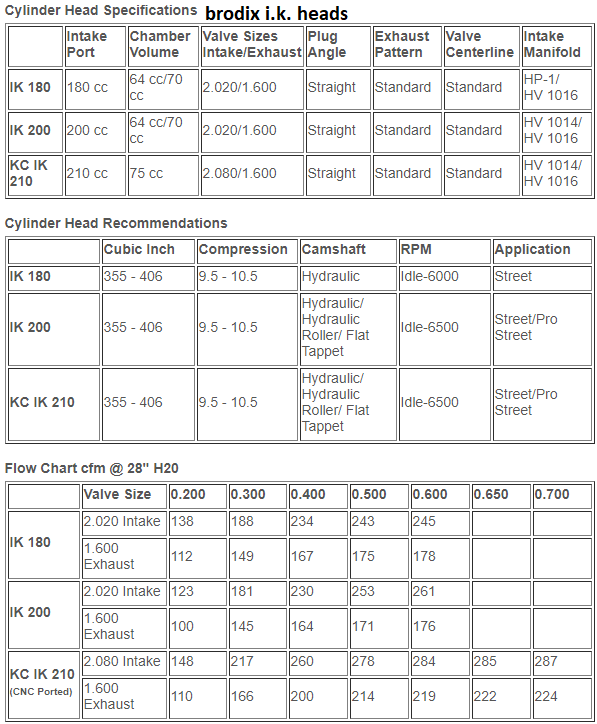
now if you wanted more power,boost the compression to about 11.5:1-12:1 swap to a 3500 stall speed, converter a 4.11:1 rear gear would be a better match, Id suggest you use 1.6:1 roller rockers and a rocker stud girdle ,swap to 210cc brodix Ik heads, 
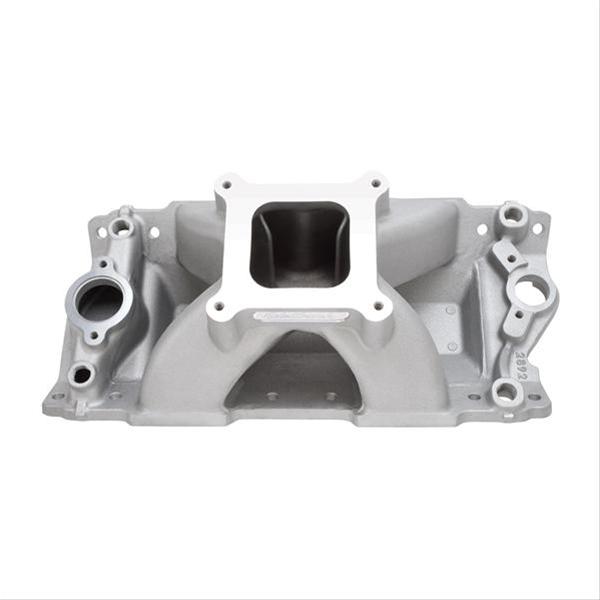
swap to a decent single plane intake, and be well aware the engine will mandate the use of race octane fuel.
http://www.summitracing.com/parts/edl-2892
edl-2892_oh_xl.jpg

edl-2892_it_xl.jpg

edl-2892_xl.jpg

yes a cam like these linked below
http://www.jegs.com/i/Brodix/158/10...MIp6Gm6vqF2gIVirrACh394QFuEAAYASAAEgJKK_D_BwE

and a cam like this, marginally longer duration crane hydraulic roller,and you would see a very obvious boost in peak power,
probably 75 hp plus, but the cost of the parts jumped up by more than $1200

crane119651.png

I've found BRODIX I.K. heads are very good quality, and decent value per dollar,
for a high performance street/strip style engine
https://craftperformanceengines.com...nder-Heads--brodix_cylinder_heads_sbc_ik.html
brodixik.png


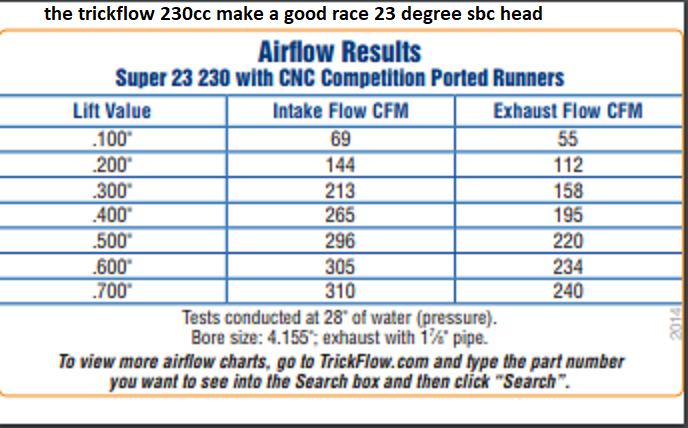
trickflow 230cc makes a good racing sbc head choice
trickflow230.png

https://www.trickflow.com/parts/tfs-3241t001-c03

profiler 210cc is a good compromise race and street strip head
https://www.profilerperformance.com/176-sbc-23-degree-heads.html

176-210cc.png


https://www.summitracing.com/parts/afr-1055/overview/make/chevrolet
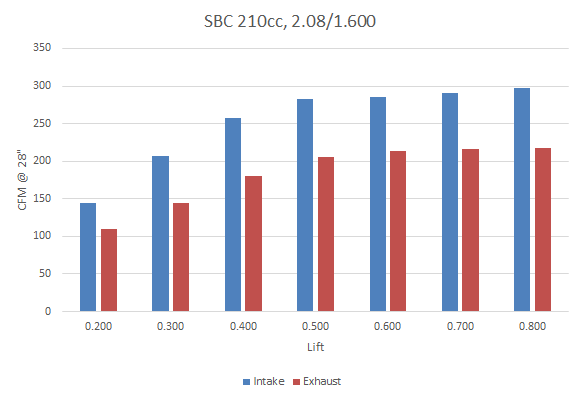
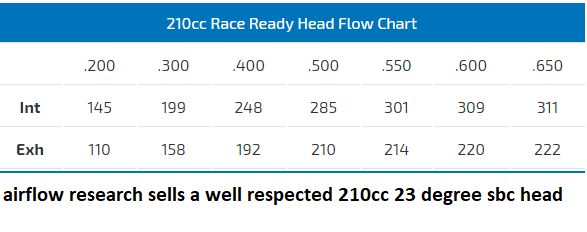
http://www.airflowresearch.com/210cc-sbc-race-cylinder-head/
afr210cc.png


related info
USE THE CALCULATORS to match port size to intended rpm levels... but keep in mind valve lift and port flow limitations[/color]
http://www.wallaceracing.com/runnertorquecalc.php
http://www.wallaceracing.com/ca-calc.php
http://www.wallaceracing.com/area-under-curve.php
http://www.wallaceracing.com/chokepoint.php
http://www.wallaceracing.com/header_length.php


https://www.profilerperformance.com/176-sbc-23-degree-heads.html

http://garage.grumpysperformance.co...olishing-combustion-chambers.2630/#post-48319

http://garage.grumpysperformance.co...r-flow-heads-the-best-choice.9415/#post-34274

http://garage.grumpysperformance.co...good-street-combo-your-after.5078/#post-14433

http://garage.grumpysperformance.com/index.php?threads/more-port-flow-related-info.322/#post-722
119651.png

119651.jpg

119651.jpg
 
Last edited by a moderator:
grumpyvette said:
having used that crower cam in several similar , 383-406 sbc engine builds in the past, I can,t wait to see the look on your face once you get everything correctly adjusted and tuned and stomp the throttle from a 30mph rolling start!
I don,t remember what stall speed converter you said you have , but I was using a 3200 stall in my trans at the time I used it in my corvette ,.......]

I can't wait either to see my face, and secondly, I'm looking forward to seeing and hearing my wife the first time she takes a ride!!! I will be doing this ----> :lol: :lol: :lol:

I have not bought a torque convertor yet. Probably buy something around the end of the 200-4R transmission build.

 
Back
Top